みなさん、こんばんは
【watnowテックカレンダーの25日目】
今日はwatnowのおかだが担当します
よろしくお願いします
はじめに
今回は私が卒業研究で触ったSpeech Recognition API(音声認識API)とESP-WROOM-32を用いてLEDを制御してみます.
動作環境及び開発環境
swift5.3.2
Xcode Version 12.4
MacOS Catalina
ios14.4
Speechフレームワークとは
ios10から追加されたフレームワークで音声認識して文字起こししたりとか色々できちゃうやつです!
ESP-WROOM-32とは
通称ESP-32と呼ばれるArduinoとWIFI通信を兼ねたモジュールみたいなのです!
流れ
Arduino側でLEDの制御とWIFI通信の設定を行い,xcode側で認識した音声に応じたURLにアクセスすることで設定したLEDが光ります!!
Arduino側コード
# include <WiFi.h>

const char* ssid     = "あなたのSSID";
const char* password = "あなたのパス";

WiFiServer server(80);

unsigned long time_data = 0;
unsigned long second = 0;


void setup()
{
    Serial.begin(115200);
    pinMode(4, OUTPUT);      //front
    pinMode(2, OUTPUT);     //back
    pinMode(15, OUTPUT);     //right
    pinMode(0, OUTPUT);    //left

    delay(10);

    // We start by connecting to a WiFi network

    Serial.println();
    Serial.println();
    Serial.print("Connecting to ");
    Serial.println(ssid);

    WiFi.begin(ssid, password);

    while (WiFi.status() != WL_CONNECTED) {
        delay(500);
        Serial.print(".");
    }

    Serial.println("");
    Serial.println("WiFi connected.");
    Serial.println("IP address: ");
    Serial.println(WiFi.localIP());

    server.begin();

}

void loop(){
 WiFiClient client = server.available();   // listen for incoming clients

  if (client) {                             // if you get a client,
    Serial.println("New Client.");           // print a message out the serial port
    String currentLine = "";                // make a String to hold incoming data from the client
    while (client.connected()) {            // loop while the client's connected
      if (client.available()) {             // if there's bytes to read from the client,
        char c = client.read();             // read a byte, then
        Serial.write(c);                    // print it out the serial monitor
        if (c == '\n') {                    // if the byte is a newline character

          // if the current line is blank, you got two newline characters in a row.
          // that's the end of the client HTTP request, so send a response:
          if (currentLine.length() == 0) {
            // HTTP headers always start with a response code (e.g. HTTP/1.1 200 OK)
            // and a content-type so the client knows what's coming, then a blank line:
            client.println("HTTP/1.1 200 OK");
            client.println("Content-type:text/html");
            client.println();

            // the content of the HTTP response follows the header:
            client.print("Click <a href=\"/ST\">here</a> to turn the LED on pin All off.<br>");  //stop
            client.print("Click <a href=\"/FF\">here</a> to turn the LED on pin 4 on.<br>");    //front
            client.print("Click <a href=\"/BB\">here</a> to turn the LED on pin 2 on.<br>");   //back
            client.print("Click <a href=\"/RI\">here</a> to turn the LED on pin 15 on.<br>");   //right
            client.print("Click <a href=\"/LE\">here</a> to turn the LED on pin 0 on.<br>");   //left


            // The HTTP response ends with another blank line:
            client.println();
            // break out of the while loop:
            break;
          } else {    // if you got a newline, then clear currentLine:
            currentLine = "";
          }
        } else if (c != '\r') {  // if you got anything else but a carriage return character,
          currentLine += c;      // add it to the end of the currentLine
        }

        if (currentLine.endsWith("GET /ST")) {
          stop();

        }

        if (currentLine.endsWith("GET /FF")) {
          Serial.printf("前");
          stop();

          digitalWrite(4, HIGH);

        }

        if (currentLine.endsWith("GET /BB")) {
          Serial.printf("後");
          stop();

          digitalWrite(2, HIGH);

        }

        if (currentLine.endsWith("GET /RI")) {
          Serial.printf("右");
          stop();

          digitalWrite(15, HIGH);

        }

        if (currentLine.endsWith("GET /LE")) {
          Serial.printf("左");
          stop();

          digitalWrite(0, HIGH);
        }

      }

    }
    // close the connection:
    client.stop();

    Serial.println("Client Disconnected.");
  }
}
void stop(){
    digitalWrite(4, LOW);
    digitalWrite(2, LOW);
    digitalWrite(15, LOW);
    digitalWrite(0, LOW);

}
arduino側の操作
SSIDとPASSWORDを自分のWIFIのものに書き換えてコンパイルしてください.
次にWEBブラウザでIPアドレスにアクセスして設定したボタンを押してLEDが思い通りに点滅するか確認してください.
Xcode側コード
import UIKit
import Speech

class ViewController: UIViewController {
    //認識する言語
    private let speechRecognizer = SFSpeechRecognizer(locale: Locale(identifier: "ja-JP"))!

    private var recognitionRequest: SFSpeechAudioBufferRecognitionRequest?
    private var recognitionTask: SFSpeechRecognitionTask?
    private var audioEngine = AVAudioEngine()

    @IBOutlet weak var textView: UITextView!

    @IBOutlet weak var fromtButton: UIButton!
    @IBOutlet weak var rightButton: UIButton!
    @IBOutlet weak var backButton: UIButton!
    @IBOutlet weak var leftButton: UIButton!
    @IBOutlet weak var stopButton: UIButton!

    override func viewDidLoad() {
        super.viewDidLoad()

        SFSpeechRecognizer.requestAuthorization { (status) in
            OperationQueue.main.addOperation {
                    switch status {
                    case .authorized:
                            do {
                                try self.startSpeech()
                            } catch{
                                print("startError: \(error)")
                            }
                            self.startTimer()
                    default:
                        print("error")
                }
            }
        }
    }

    func stopOnButton() {
        let url = URL(string: "http://192.168.10.XX/ST")!
         var request = URLRequest(url: url)
         request.httpMethod = "GET"
            let connection = NSURLConnection(request: request, delegate:nil, startImmediately: true)
    }

    func frontOnButton() {
        let url = URL(string: "http://192.168.10.XX/FF")!
         var request = URLRequest(url: url)
         request.httpMethod = "GET"
           let connection = NSURLConnection(request: request, delegate:nil, startImmediately: true)
    }
    func backOnButton() {
        let url = URL(string: "http://192.168.10.XX/BB")!
         var request = URLRequest(url: url)
         request.httpMethod = "GET"
            let connection = NSURLConnection(request: request, delegate:nil, startImmediately: true)
    }

    func rightOnButton() {
        let url = URL(string: "http://192.168.10.XX/RI")!
         var request = URLRequest(url: url)
         request.httpMethod = "GET"
            let connection = NSURLConnection(request: request, delegate:nil, startImmediately: true)
    }

    func leftOnButton() {
        let url = URL(string: "http://192.168.10.XX/LE")!
         var request = URLRequest(url: url)
         request.httpMethod = "GET"
            let connection = NSURLConnection(request: request, delegate:nil, startImmediately: true)
    }

    func startSpeech() throws {
        if let recognitionTask = recognitionTask {
            recognitionTask.cancel()
            self.recognitionTask = nil
        }

        let audioSession = AVAudioSession.sharedInstance()
        try audioSession.setCategory(.record, mode: .measurement, options: [])
        try audioSession.setActive(true, options: .notifyOthersOnDeactivation)

        let recognitionRequest = SFSpeechAudioBufferRecognitionRequest()
        self.recognitionRequest = recognitionRequest
        recognitionRequest.shouldReportPartialResults = true
        recognitionTask = speechRecognizer.recognitionTask(with: recognitionRequest) { [weak self] (result, error) in
            guard let `self` = self else { return }

            if let result = result {
                self.textView.text = result.bestTranscription.formattedString
                print(result.bestTranscription.formattedString)
                //特定の文字を発話した際に処理を行う
                if result.bestTranscription.formattedString.contains("前のライト") {
                    self.setBackgroundColor(color: .blue)
                    self.frontOnButton()

                } else if result.bestTranscription.formattedString.contains("後のライト") {
                    self.setBackgroundColor(color: .yellow)
                    self.backOnButton()

                }else if result.bestTranscription.formattedString.contains("右のライト") {
                    self.setBackgroundColor(color: .orange)
                    self.rightOnButton()

                }else if result.bestTranscription.formattedString.contains("左のライト") {
                    self.setBackgroundColor(color: .purple)
                    self.leftOnButton()


                }else if result.bestTranscription.formattedString.contains("停止") {
                    self.setBackgroundColor(color: .white)
                    self.stopOnButton()

                }
            }
        }
        let recordingFormat = audioEngine.inputNode.outputFormat(forBus: 0)
        audioEngine.inputNode.installTap(onBus: 0, bufferSize: 1024, format: recordingFormat) { (buffer: AVAudioPCMBuffer, when: AVAudioTime) in
            self.recognitionRequest?.append(buffer)
        }

        audioEngine.prepare()
        try? audioEngine.start()
    }

    func stopSpeech() {

        guard let task = self.recognitionTask else {
            fatalError("Error")
        }
        task.cancel()
        task.finish()

        self.audioEngine.inputNode.removeTap(onBus: 0)
        self.audioEngine.stop()
        self.recognitionRequest?.endAudio()
    }

    private func setBackgroundColor(color: UIColor) {
        DispatchQueue.main.async {
            self.view.backgroundColor = color
        }

        self.stopSpeech()
        do {
            try self.startSpeech()
        } catch {
            print("startError: \(error)")
        }
    }

    //1分でタイムアウトして音声認識されなくなるのでタイマーでループ
    private func startTimer(){
        Timer.scheduledTimer(withTimeInterval: 60, repeats: true) { _ in
            self.stopSpeech()
            do {
                try self.startSpeech()
            } catch{
                print("startError: \(error)")
            }
        }
    }

    @IBAction func stopAction(_ sender: Any) {
        self.stopOnButton()
    }

    @IBAction func frontAction(_ sender: Any) {
        self.frontOnButton()
    }

    @IBAction func backAction(_ sender: Any) {
        self.backOnButton()
    }
    @IBAction func rightAction(_ sender: Any) {
        self.rightOnButton()
    }
    @IBAction func leftAction(_ sender: Any) {
        self.leftOnButton()
    }
}
xcode側の操作
各Butttonに設定してあるURLを各ボタンのURLに変えてください.
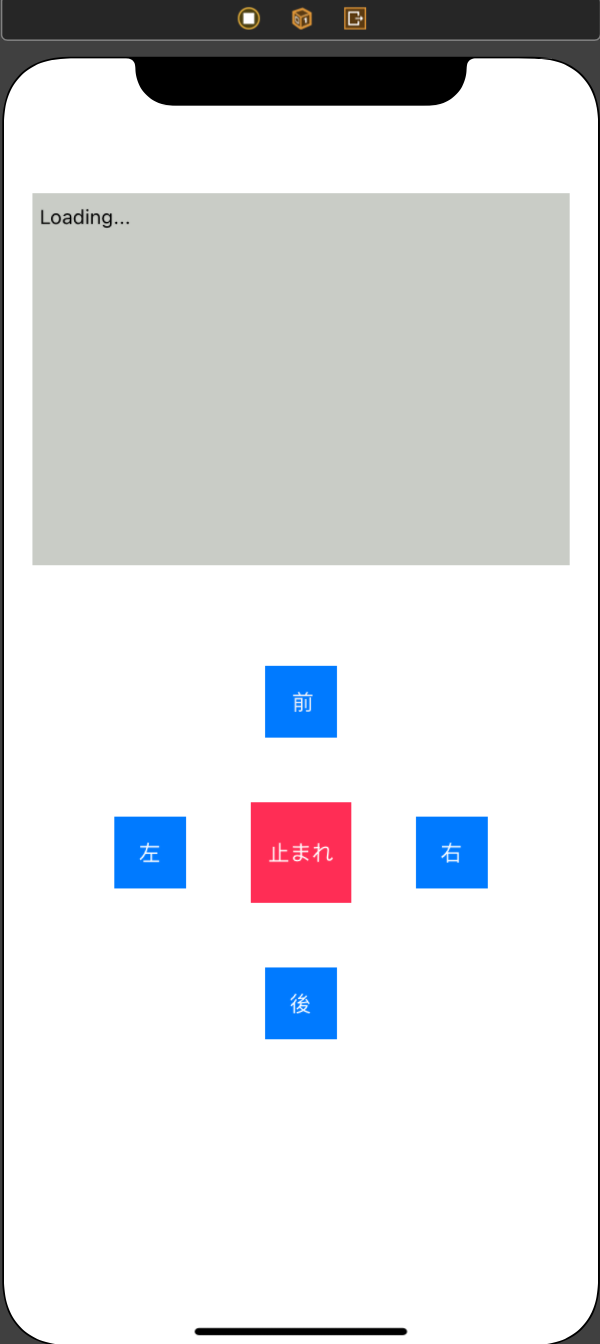
viewController
おわりに
どうでしたでしょうか.今回はiphoneで音声認識させてLEDを制御するということをやってみました.工夫次第で色々なことに応用できると思うのでぜひ色々やってみてください!!
watnowでは、チャレンジ精神旺盛な仲間を募集しています
興味を持たれた方はぜひ@watnowsにDMしてください
