実装の狙い
上記のようにユーザーの入力などUIイベントの発生から画面の更新までを単一方向のフローで処理するための、基本的な実装についての確認です。
また、選択UIというのは非宣言的UIフレームワークにおいては、UI側に状態を持たせる実装になることが多いため、宣言的UIフレームワークにおいての実装のためのインターフェイスを確認する目的もあります。
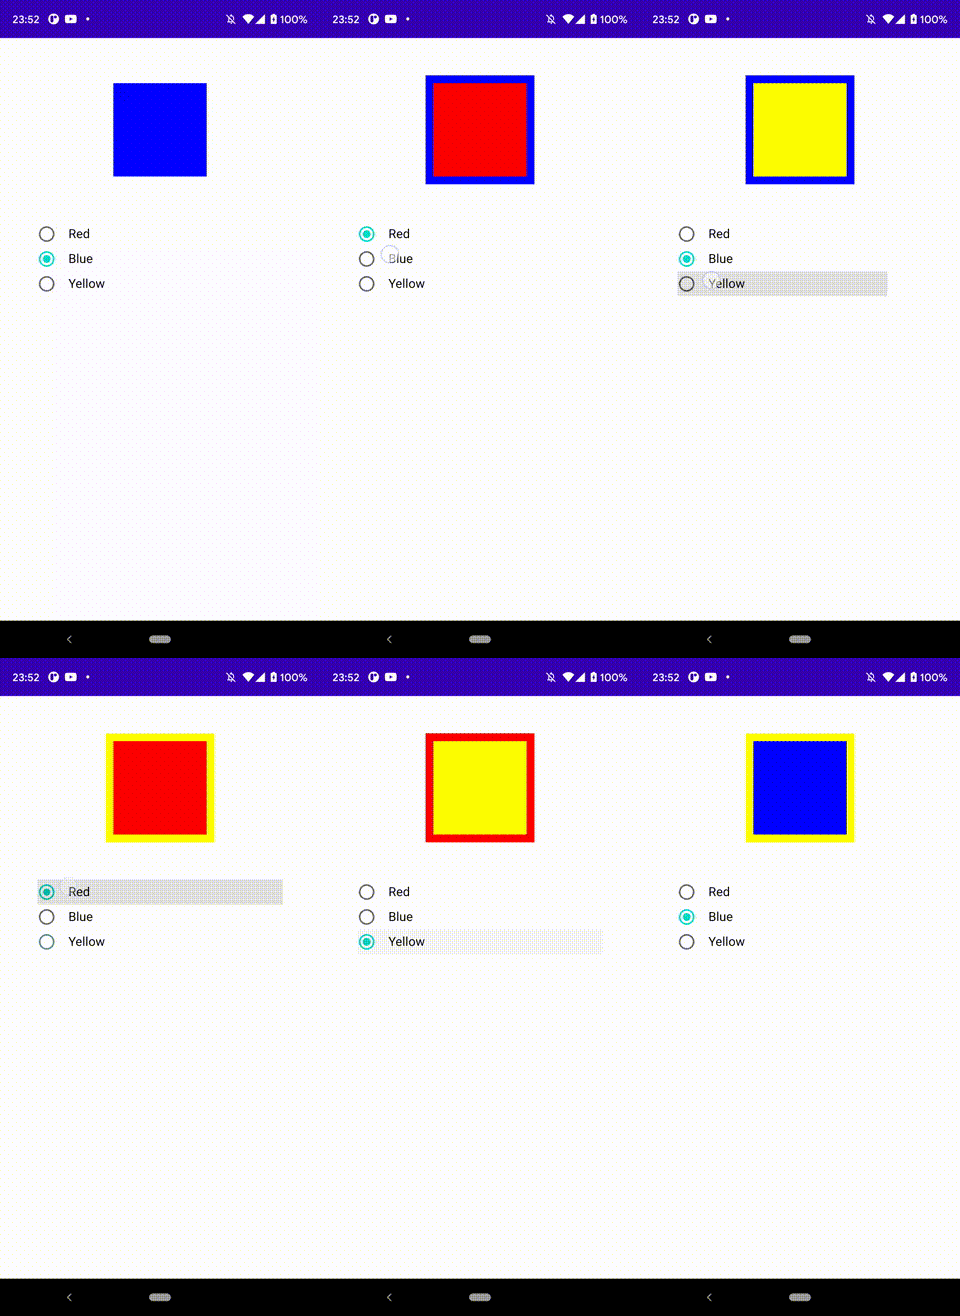
今回実装したものについて
- 色の選択肢を複数の中から選択UIによって一つ選択できるようにする
- 前面の小さな方の四角い枠のバックグラウンドは今、選択UIで選択されている色を表示する
- その四角い枠の背面にはみ出ている大きな方の四角い枠のバックグラウンドには現在選択されたものより一つ前の選択されたものを表示する
以下は各フレームワークで動かした様子をGifにしたものです
| Jetpack Compose | SwiftUI | Flutter |
|---|---|---|
 |
 |
 |
Jetpack Compose版選択UI(ラジオボタン)の実装
@Composable
fun RadioButtonSample(options: List<String>) {
    val options = mutableStateListOf("Red", "Blue", "Yellow")
    val (selected, onSelected) = remember { mutableStateOf("Blue") }
    val (preColor, preColorChange) = remember { mutableStateOf(Color.Transparent) }
    val (selectedColor, onColorChange) = remember { mutableStateOf(Color.Blue) }
    val onChangeSelected = { text: String ->
        onSelected(text)
        preColorChange(selectedColor)
        val color = when (text) {
            "Red" -> Color.Red
            "Blue" -> Color.Blue
            "Yellow" -> Color.Yellow
            else -> Color.Transparent
        }
        onColorChange(color)
    }

    Column(Modifier
        .fillMaxSize()
        .padding(horizontal = 48.dp)
    ) {

        Box(Modifier
            .padding(48.dp)
            .size(140.dp, 140.dp)
            .align(Alignment.CenterHorizontally)
            .background(preColor)
        ) {

            Box(Modifier
                .size(120.dp, 120.dp)
                .align(Alignment.Center)
                .background(selectedColor)
            )

        }

        options.fastForEach { text ->
            Row(Modifier
                .fillMaxWidth()
                .selectable(
                    selected = (text == selected),
                    onClick = { onChangeSelected(text) }
                )
                .padding(vertical = 4.dp)
            ) {
                RadioButton(
                    selected = (text == selected),
                    onClick = { onChangeSelected(text) }
                )
                Text(
                    text = text,
                    style = MaterialTheme.typography.body1.merge(),
                    modifier = Modifier.padding(start = 16.dp)
                )
            }
        }
    }
}
SwiftUI版選択UI(Picker)の実装
struct ContentView: View {
    let options = ["Red", "Blue", "Yellow"]
    @State var selectedIndex = 1
    @State var preColor = Color.clear
    @State var selectedColor = Color.blue

    func onChangeSelected(index: Int) {
        let colorName = options[index]
        preColor = selectedColor
        switch colorName {
        case "Red":
            selectedColor = Color.red
        case "Blue":
            selectedColor = Color.blue
        case "Yellow":
            selectedColor = Color.yellow
        default:
            selectedColor = Color.clear
        }
    }

    var body: some View {
        VStack() {
            Spacer()
                .frame(height: 48)

            ZStack {
                ZStack {
                }
                .frame(width: 120, height: 120)
                .background(selectedColor)
            }
            .padding(48)
            .frame(width: 140, height: 140)
            .background(preColor)

            Spacer()
                .frame(height: 48)

            Picker("Color", selection: $selectedIndex) {
                ForEach(0 ..< options.count) { index in
                    let text = options[index]
                    Text(text).tag(text)
                }
            }
            .pickerStyle(SegmentedPickerStyle())
            .padding(.horizontal, 24)
            .onChange(of: self.selectedIndex, perform: { value in
                onChangeSelected(index: value)
            })

            Spacer()

        }
    }
}
Flutter版選択UI(ラジオボタン)の実装
class _MyRadioButtonPageState extends State<MyHomePage> {
  var _options = ["Red", "Blue", "Yellow"];
  var _selected = 'Blue';
  var _preColor = Colors.transparent;
  var _selectedColor = Colors.blue;

  void _onChangeSelected(String text) => setState(() {
        _selected = text;
        _preColor = _selectedColor;
        switch (text) {
          case 'Red':
            _selectedColor = Colors.red;
            break;
          case 'Blue':
            _selectedColor = Colors.blue;
            break;
          case 'Yellow':
            _selectedColor = Colors.yellow;
            break;
          default:
            _selectedColor = Colors.transparent;
            break;
        }
      });

  @override
  Widget build(BuildContext context) {
    return Scaffold(
      appBar: AppBar(
        title: Text(widget.title),
      ),
      body: Center(
        child: Padding(
          padding: EdgeInsets.symmetric(horizontal: 48.0),
          child: Column(
            mainAxisAlignment: MainAxisAlignment.start,
            crossAxisAlignment: CrossAxisAlignment.center,
            children: <Widget>[
              Padding(
                  padding: EdgeInsets.all(48),
                  child: Stack(
                    alignment: Alignment.center,
                    children: [
                      Container(
                        color: _preColor,
                        width: 140,
                        height: 140,
                      ),
                      Container(
                        color: _selectedColor,
                        width: 120,
                        height: 120,
                      )
                    ],
                  )),
              Column(
                children: _options
                    .map(
                      (text) => InkWell(
                          onTap: () {
                            _onChangeSelected(text);
                          },
                          child: Row(
                            children: [
                              Radio(
                                value: text,
                                groupValue: _selected,
                                onChanged: _onChangeSelected,
                              ),
                              Text(text)
                            ],
                          )),
                    )
                    .toList(),
              )
            ],
          ),
        ),
      ),
    );
  }
}
実装を終えて
ご覧の通り選択状態の切り替わりのイベント→onChangeSelected →UIの更新という単一方向のフローでの実装はほぼ似た様な形で可能でした。めでたしめでたし。
あえて言うことがあるなら、SwiftUIの実装方法については多少疑問を覚える内容でした。Pickerの選択状態からUI更新する方法は二つあります。
-
onChangeを使わないでPickerのselectionという引数に@Stateで宣言した変数を渡すだけ -
onChangeを使う方法
ここでの違和感は前者についてで、Pickerのサンプルコードもだいたい前者を前提にしたものばかりでした。このパターンだと、変更イベントをキーに複数の状態を更新する処理ができず、単にselectedIndexを参照しているロジックとUIだけの更新になります。ほとんどの場合はこれで済むのかもしれませんが、今回試したかった単一方向のフローの状態更新処理の中で、以前の状態を保持しつつというほんの少し手のこんだ内容を行うには、ちょっと難しそうにみえました。
selectedIndexの変更を監視する方法もあるっぽいですが、基本的にはUIのイベントを主体にすべきでselectedIndexの変更を監視するのはちょっと違う気がしているので、後者のonChangeを使う方法が今回はベストなんだろうなと思います。そう言う点では、Pickerの実装に関してはPicker生成の引数などではなくonChangeの存在と実装方法について知っている必要がある点で直感性に欠ける部分があるので、今後もSwiftUIで実装する時は注意が必要だと思うに至りました。
まとめ
一旦は思った実装ができたのでひと安心です。ただ単に、より有効な実装方法を知らないだけなのだと思いますが、SwiftUIのAPIの設計には若干の疑問も残りました。もしどなたかこれより簡易で良い方法があるというならコメントいただけると嬉しいです。
別の視点としては、Flutterの子のUIを実装する方法がchildやchildrenの引数にWidgetを渡すと言う方法だったので、この中では一番独特な感触が強かったです。今後各プラットフォームのエンジニアがSwiftUIやFlutter、Jetpack Composeを触っていくケースがより増えていくと思うので、興味がある方は一度各宣言的UIのフレームワークを触っておくのは良い経験になるのではと思いました。
