➊ はじめに
Androidで、Handlerによる周期起動の方法を調べました。
➋ どんな感じ?
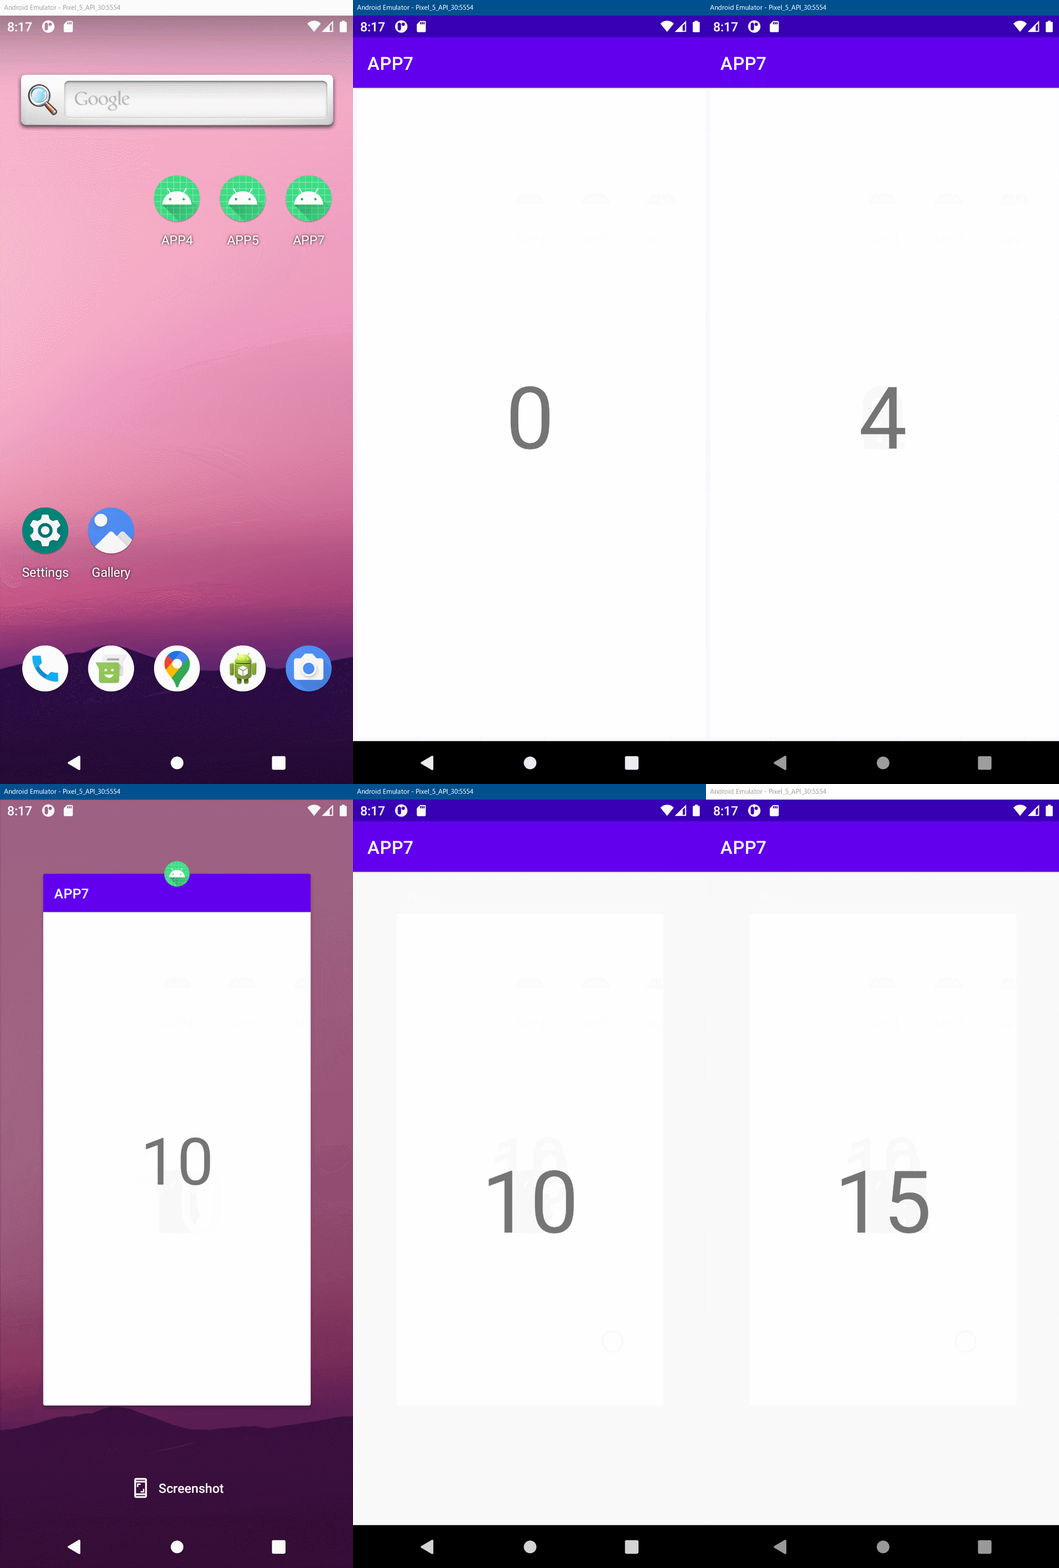
百聞は一見にしかずということで、こんな感じ~になります。
「TextView」のみのアプリです😁
➌ お勉強ポイント
- Handlerを使用した周期起動の方法
※周期起動の方法はいくつかありますが、ここではHandlerを使う方法で実装します。
➍ 周期起動の仕組み
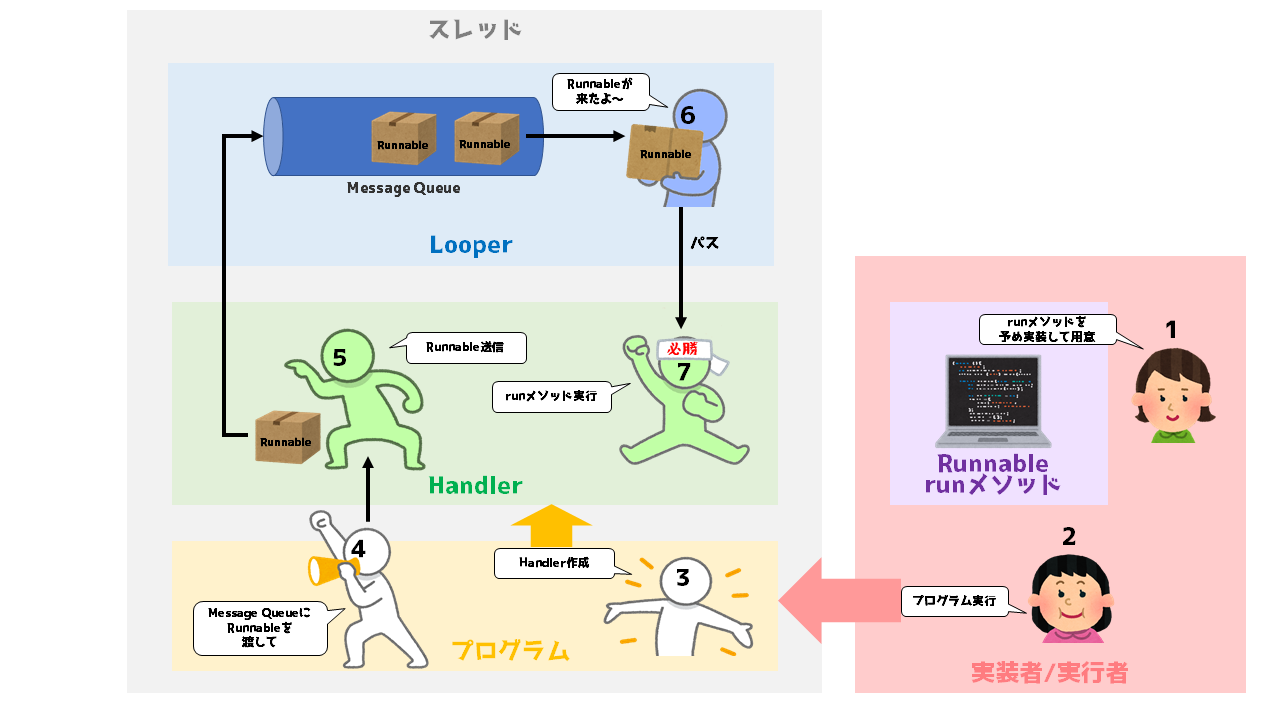
Handlerを使用して、周期起動を行うと言いましたが、詳しくは以下3つの機能を使用します。
- Looper:Looperは無限にループしながら自分が属したスレッドのMessage Queueに入ってきたMessageやRunnableオブジェクトを順に取り出してこれを処理するHandlerに伝える役割をします。UIスレッド(メインスレッド)は、最初からLooperを持っています。
- Handler:Looperに対してRunnableオブジェクトの送信および処理ができます。
- Runnable:「実行できるもの」という意味のインターフェイスで、メソッドは、戻り値void、引数なしのrunメソッドのみです。
この説明だけではとても分かりにくいと思いますので、以下、イメージをまとめました。

この様な仕組みなので、runメソッドに「HandlerでRunnable送信」というコードを記載しておくと、自動的に周期起動を行うようになります。
(1) ハンドラを作成
ハンドラを作成し、UIスレッド(メインスレッド)のLooperにバインドします。
private val handler : Handler = Handler(Looper.getMainLooper())
(2) ハンドラ:Runnable送信
Runnableをメッセージキューに追加します。
handler.post(this)
(3) ハンドラ:指定時間後Runnable送信
Runnableをメッセージキューに追加し、指定された時間が経過した後に実行します。
handler.postDelayed(this, 1000)
(4) ハンドラ:Runnable全削除
メッセージキューにある保留中Runnableをすべて削除します。
handler.removeCallbacks(this)
(5) Runnableのrunメソッド
LooperがRunnableを受け取ったときに実行するコードを記載します。
class MainActivity : AppCompatActivity(), Runnable {

    // Runnable設定
    override fun run() {
        Log.d("Runnable", "run")
        // 実行させたい処理を書く
        // ・・・

        // ここにRunnable送信処理を書くと周期起動になる
        handler.postDelayed(this, 1000)
    }
}
➎ 実装
仕組みが分かったところで、上記をまとめ、諸々実装していきます。
言語は、「Kotlin」で実装します。
(1) activity_main.xml
app/src/main/res/layout/activity_main.xml
<?xml version="1.0" encoding="utf-8"?>
<androidx.constraintlayout.widget.ConstraintLayout xmlns:android="http://schemas.android.com/apk/res/android"
    xmlns:app="http://schemas.android.com/apk/res-auto"
    xmlns:tools="http://schemas.android.com/tools"
    android:layout_width="match_parent"
    android:layout_height="match_parent"
    tools:context=".MainActivity">

    <TextView
        android:id="@+id/textView"
        android:layout_width="wrap_content"
        android:layout_height="wrap_content"
        android:text="0"
        android:textSize="96sp"
        app:layout_constraintBottom_toBottomOf="parent"
        app:layout_constraintEnd_toEndOf="parent"
        app:layout_constraintHorizontal_bias="0.5"
        app:layout_constraintStart_toStartOf="parent"
        app:layout_constraintTop_toTopOf="parent" />

</androidx.constraintlayout.widget.ConstraintLayout>
(2) MainActivity.kt
app/src/main/java/com/poodlemaster/app7/MainActivity.kt
package com.poodlemaster.app7

import androidx.appcompat.app.AppCompatActivity
import android.os.Bundle
import android.os.Handler
import android.os.Looper
import android.util.Log
import android.widget.TextView

class MainActivity : AppCompatActivity(), Runnable {

    private var count : Int = 0
    private val handler : Handler = Handler(Looper.getMainLooper())

    //--------------------------------------------------------------------------------------
    override fun onCreate(savedInstanceState: Bundle?) {
        super.onCreate(savedInstanceState)
        setContentView(R.layout.activity_main)
        Log.d("app7/status", "onCreate")
    }

    //--------------------------------------------------------------------------------------
    private fun countUp() : Int {

        // カウントアップ
        if(count < Integer.MAX_VALUE) {
            count++
        }
        Log.d("app7/countUp(count)", count.toString())

        val textView : TextView = findViewById(R.id.textView)
        textView.text = count.toString()

        return(count)
    }

    //--------------------------------------------------------------------------------------
    override fun run() {
        Log.d("r/Runnable", "run")

        // カウントアップ
        countUp()

        // Runnable送信
        handler.postDelayed(this, 1000)
    }

    //--------------------------------------------------------------------------------------
    override fun onResume() {
        super.onResume()
        Log.d("app7/status", "onResume")

        // Runnable送信
        handler.postDelayed(this , 1000)
    }

    //--------------------------------------------------------------------------------------
    override fun onPause() {
        super.onPause()
        Log.d("app7/status", "onPause")

        // Runnable解除
        handler.removeCallbacks(this)
    }
}
➏ 結果
以下動作時のログ(Logcat)です。見やすくするためにログを少々加工しています。
(1) アプリ起動
(2) 5秒間放置し
(3) マルチタスクボタン押下
(4) アプリ再開
※[View] -> [Tool Windows] -> [Logcat]で起動できます。
※ログ種別を「Debug」、検索対象を「app7/」に絞ると見やすくなります。
# アプリ起動
2021-09-09 23:24:08.220 3268-3268/com.poodlemaster.app7 D/app7/status: onCreate
2021-09-09 23:24:08.227 3268-3268/com.poodlemaster.app7 D/app7/status: onResume
2021-09-09 23:24:09.229 3268-3268/com.poodlemaster.app7 D/app7/countUp(count): 1
2021-09-09 23:24:10.235 3268-3268/com.poodlemaster.app7 D/app7/countUp(count): 2
2021-09-09 23:24:11.238 3268-3268/com.poodlemaster.app7 D/app7/countUp(count): 3
2021-09-09 23:24:12.241 3268-3268/com.poodlemaster.app7 D/app7/countUp(count): 4
2021-09-09 23:24:13.244 3268-3268/com.poodlemaster.app7 D/app7/countUp(count): 5

# マルチタスクボタン押下
2021-09-10 18:24:13.934 3268-3268/com.poodlemaster.app7 D/app7/status: onPause

# アプリ再開
2021-09-09 23:24:16.557 3268-3268/com.poodlemaster.app7 D/app7/status: onResume
2021-09-09 23:24:17.558 3268-3268/com.poodlemaster.app7 D/app7/countUp(count): 6
2021-09-09 23:24:18.560 3268-3268/com.poodlemaster.app7 D/app7/countUp(count): 7
2021-09-09 23:24:19.563 3268-3268/com.poodlemaster.app7 D/app7/countUp(count): 8
2021-09-09 23:24:20.566 3268-3268/com.poodlemaster.app7 D/app7/countUp(count): 9
2021-09-09 23:24:21.569 3268-3268/com.poodlemaster.app7 D/app7/countUp(count): 10
➐ 以上
今回は周期処理させるものが軽い処理(count++)のみでしたので、UIスレッド(メインスレッド)上のLooperへRunnableをQueueingしましたが、重い処理を実行する場合は、これをUIスレッド(メインスレッド)でやると反応が遅くなり、ユーザビリティが失われてしまいます。そのため、重い処理を実行する場合は、バッググラウンドで動作しているスレッドにリクエストを行うようにします。今後は、マルチスレッドも勉強していきたいと思っています。
「Android Studio」でkotlin言語を使って簡単なアプリを作れたら楽しいだろうなと思って少し使い始めました。まずは、機能の基礎勉強中です。同士の役に立てれば本望です😉
お疲れ様でした😊
