はじめに
webカメラでAIにより「モノの認識」が簡単にできたら楽しいと思いませんか?
公開されているモデルを利用することで簡単にそんなことができます。
では、早速やってみましょう!
具体的にどんなことをやるか
webカメラからPCに映像を取り込み、そこに映ったものは何か、AIに**リアルタイム認識させ、画面にTOP3までを表示します。今回は、学習済みモデル**を利用しますので、時間のかかるAI学習などはありませんので、サクッと遊べます。

※クラウド版の『【簡単】webカメラでAI自動認識! for Google Colab』は、こちらです
開発環境
webカメラからのイメージデータを取り込むためにOpenCVというライブラリと、イメージデータを識別するkerasというAIライブラリを使用します。必要なライブラリのパッケージをインストールしてください。
| 必要なモノ | 備考欄 |
|---|---|
| webカメラ付きのNote PCなど | PCとUSB接続によるwebカメラでもOK |
| 開発言語 | Python3.7 ※利用したバージョンは3.7.7 |
| 主な必要ライブラリ |
【 OpenCV 】 画像や動画を処理するためのライブラリ ※利用したバージョンは4.3.0 【 keras 】 Python言語のニューラルネットワークライブラリ ※利用したバージョンは2.3.1 |
DenseNet121
簡単って言うからやっているのに、
いきなりDenseNet121と言われて、ワケワカラン!
もうやめだ!
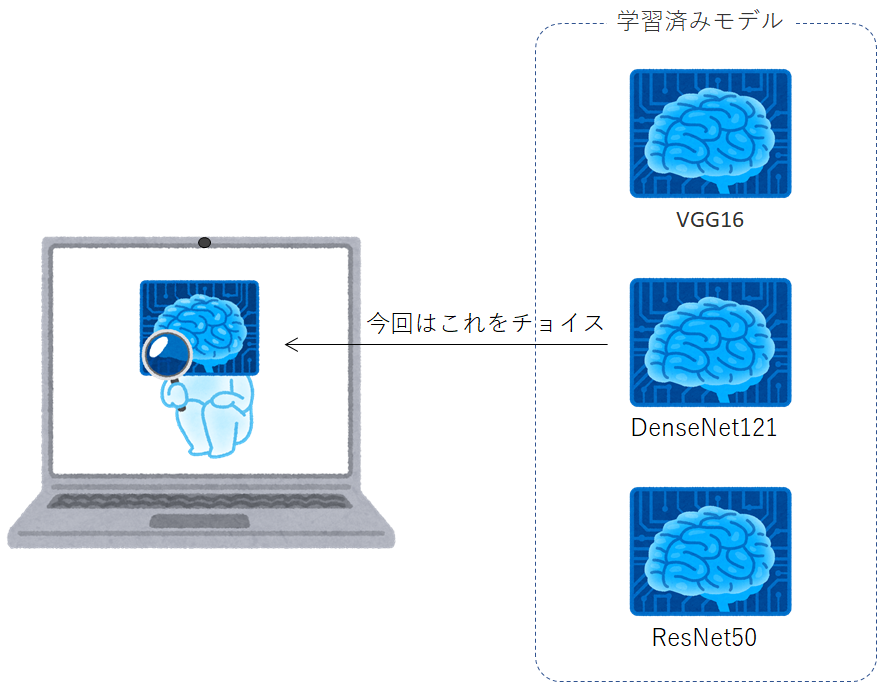
大丈夫です。落ち着いてください。これは学習済みモデルのことで、今回はDenseNet121という学習モデルを使用しますということです。細かいこと分からなくてもできます!
- なぜ
DenseNet121モデルに選定したのか?
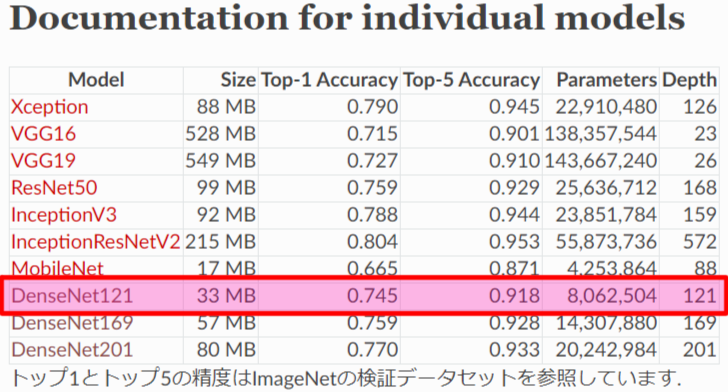
kerasライブラリからVGG16、ResNet50など様々な画像分類モデルが簡単に使えるようになっていますが、その中から今回使用する画像分類モデルは、モデルサイズが33MBと比較的小さく認識率も良いためDenseNet121を選びました。「Keras Documentation」によると、DenseNet121でモノを認識させた場合、TOP5までの認識正解率が約92%となるそうです。(TOP1だけだと約75%です)

引用元:Keras Documentation
https://keras.io/ja/applications/#documentation-for-individual-models
AIプログラム
使用するライブラリ(keras、opencv、等)のパッケージをインストールしたら、下記AIプログラムをコピペしてください。
# -------------------------------------------------------------------------------------
# カメラを画面に表示する。
# DenseNet121で画像判定
# [+]キーでCameraDevice変更
# [s]キーで画像を保存する
# [ESC] or [q]キーで終了
# -------------------------------------------------------------------------------------
from keras.applications.densenet import DenseNet121
from keras.applications.densenet import preprocess_input, decode_predictions
from keras.preprocessing import image
import numpy as np
import cv2
import datetime


# -------------------------------------------------------------------------------------
# capture_device
# -------------------------------------------------------------------------------------
def capture_device(capture, dev):

    while True:

        # cameraデバイスから画像をキャプチャ
        ret, frame = capture.read()
        if not ret:
            k = ord('+')
            return k

        # DenseNet121画像判定
        resize_frame = cv2.resize(frame, (300, 224))            # 640x480(4:3) -> 300x224(4:3)に画像リサイズ
        trim_x, trim_y = int((300-224)/2), 0                    # 判定用に224x224へトリミング
        trim_h, trim_w = 224, 224
        trim_frame = resize_frame[trim_y : (trim_y + trim_h), trim_x : (trim_x + trim_w)]
        x = image.img_to_array(trim_frame)
        x = np.expand_dims(x, axis=0)
        x = preprocess_input(x)
        preds = model.predict(x)                                # 画像AI判定

        # Usage
        disp_frame = frame
        txt1 = "model is DenseNet121"
        txt2 = "camera device No.(" + str(dev) + ")"
        txt3 = "[+] : Change Device"
        txt4 = "[s] : Image Capture"
        txt5 = "[ESC] or [q] : Exit"

        cv2.putText(disp_frame, txt1, (10,  30), cv2.FONT_HERSHEY_PLAIN, 1, (255, 255, 255), 1, cv2.LINE_AA)
        cv2.putText(disp_frame, txt2, (10,  60), cv2.FONT_HERSHEY_PLAIN, 1, (255, 255, 255), 1, cv2.LINE_AA)
        cv2.putText(disp_frame, txt3, (10,  90), cv2.FONT_HERSHEY_PLAIN, 1, (255, 255, 255), 1, cv2.LINE_AA)
        cv2.putText(disp_frame, txt4, (10, 120), cv2.FONT_HERSHEY_PLAIN, 1, (255, 255, 255), 1, cv2.LINE_AA)
        cv2.putText(disp_frame, txt5, (10, 150), cv2.FONT_HERSHEY_PLAIN, 1, (255, 255, 255), 1, cv2.LINE_AA)

        # 画像判定文字出力
        output1 = 'No.1:{0}:{1}%'.format(decode_predictions(preds, top=3)[0][0][1],
                                         int(decode_predictions(preds, top=3)[0][0][2] * 100))
        output2 = 'No.2:{0}:{1}%'.format(decode_predictions(preds, top=3)[0][1][1],
                                         int(decode_predictions(preds, top=3)[0][1][2] * 100))
        output3 = 'No.3:{0}:{1}%'.format(decode_predictions(preds, top=3)[0][2][1],
                                         int(decode_predictions(preds, top=3)[0][2][2] * 100))

        cv2.putText(disp_frame, output1, (10, 300), cv2.FONT_HERSHEY_PLAIN, 1, (255, 255, 255), 1, cv2.LINE_AA)
        cv2.putText(disp_frame, output2, (10, 330), cv2.FONT_HERSHEY_PLAIN, 1, (255, 255, 255), 1, cv2.LINE_AA)
        cv2.putText(disp_frame, output3, (10, 360), cv2.FONT_HERSHEY_PLAIN, 1, (255, 255, 255), 1, cv2.LINE_AA)

        # カメラ画面出力
        cv2.imshow('camera', disp_frame)

        # 1msec待ってキー取得
        k = cv2.waitKey(1) & 0xFF

        # [ESC] or [q]を押されるまで画面表示し続ける
        if (k == ord('q')) or (k == 27):
            return k

        # [+]でdevice変更
        if k == ord('+'):
            txt = "Change Device. Please wait... "
            XX = int(disp_frame.shape[1] / 4)
            YY = int(disp_frame.shape[0] / 2)
            cv2.putText(disp_frame, txt, (XX, YY), cv2.FONT_HERSHEY_PLAIN, 1, (255, 255, 255), 1, cv2.LINE_AA)
            cv2.imshow('camera', disp_frame)
            cv2.waitKey(1) & 0xFF
            return k

        # [s]で画面に表示された画像保存
        elif k == ord('s'):
            cv2.imwrite('camera_dsp{}.{}'.format(datetime.datetime.now().strftime('%Y%m%d_%H%M%S_%f'), "png"), disp_frame)
#           cv2.imwrite('camera_rsz{}.{}'.format(datetime.datetime.now().strftime('%Y%m%d_%H%M%S_%f'), "png"), resize_frame)
#           cv2.imwrite('camera_trm{}.{}'.format(datetime.datetime.now().strftime('%Y%m%d_%H%M%S_%f'), "png"), trim_frame)
#           cv2.imwrite('camera_raw{}.{}'.format(datetime.datetime.now().strftime('%Y%m%d_%H%M%S_%f'), "png"), frame)


# -------------------------------------------------------------------------------------
# camera
# -------------------------------------------------------------------------------------
def camera(dev):

    while True:

        capture = cv2.VideoCapture(dev)
        ret = capture_device(capture, dev)

        if (ret == ord('q')) or (ret == 27):
            # リソース解放
            capture.release()
            cv2.destroyAllWindows()
            break

        if ret == ord('+'):
            dev += 1

            if dev == 9:
                dev = 0


# -------------------------------------------------------------------------------------
# main
# -------------------------------------------------------------------------------------
# ●DenseNet121
# https://keras.io/ja/applications/#densenet
#
# DenseNet121を実行することで、
# (1)DenseNet121モデル、(2)クラス分類ファイルの2つが自動的にダウンロードされます。
# そのため初回起動時は約33MBあるDenseNet121モデルとクラス分類ファイルを
# ダウンロードする必要があるため起動時間は長くかかりますが、
# 2回目起動時以降はダウンロードを割愛するため起動が早くなります。
#
# ダウンロードファイルは以下ディレクトリに格納されます。
# 「C:/Users/xxxx/.keras/models/」
#
# (1)DenseNet121のモデル:DenseNet121_weights_tf_dim_ordering_tf_kernels.h5
# (2)クラス分類ファイル(全1000分類):imagenet_class_index.json

# 画像分類モデル
model = DenseNet121(weights='imagenet')

# カメラ起動
camera(dev=0)
AIプログラム実行
初回起動時
DenseNet121ライブラリ関数を実行することで、DenseNet121モデルとクラス分類ファイルの2つが自動的にダウンロードされます。そのため初回起動時は約33MBあるDenseNet121モデルとクラス分類ファイルをダウンロードする必要があるため起動時間は長くかかりますが、2回目起動時以降はダウンロードを割愛するため起動が早くなります。
ファイル格納場所
C:/Users/xxxx/.keras/models/
- DenseNet121モデル ( DenseNet121_weights_tf_dim_ordering_tf_kernels.h5 )
- クラス分類ファイル ( imagenet_class_index.json )
モデルのDLが終わると

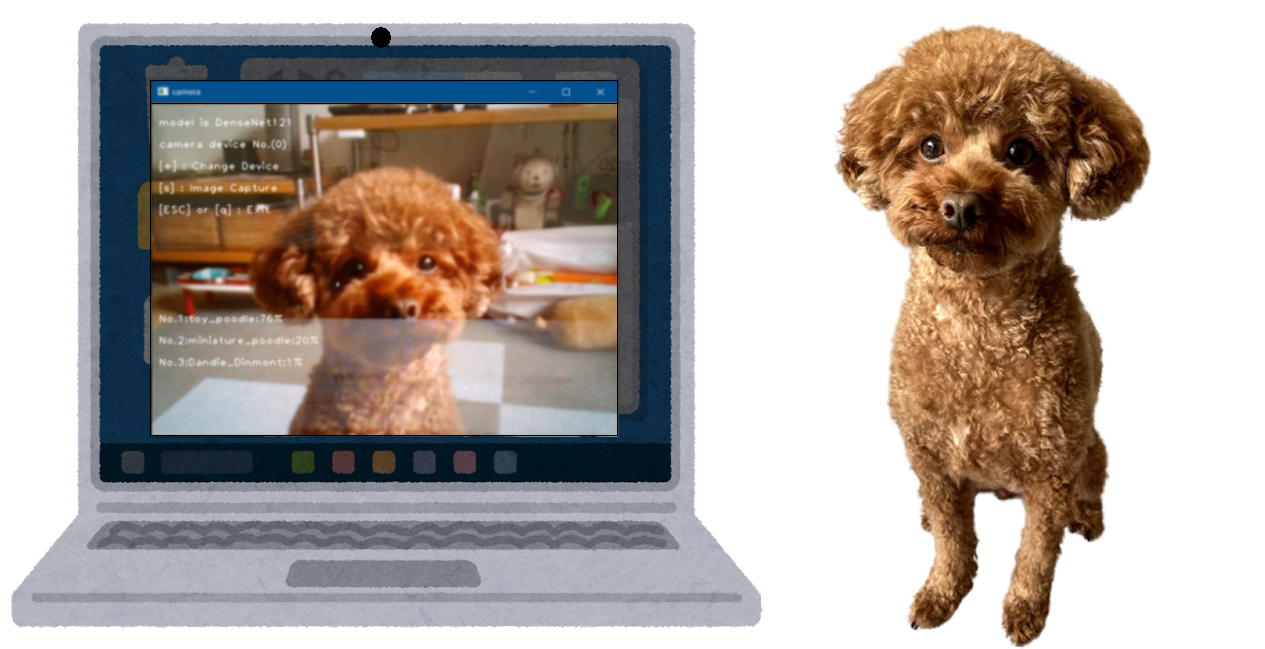
こんな感じにwindowが開きwebカメラの映像が出力され、AIが認識したTOP3の情報が画面に表示されれば成功です。ちなみにうちのワンコ(トイプードル)を映した結果は、下記の様にAIが76%の確率でトイプードルでしょうと言っているので、AIの認識は正しいものになります。
【結果の一例】AIの認識率TOP3
- toy_poodle : 76%
- miniature_poodle : 20%
- Dandie_Dinmont : 1%
※リアルタイムで認識率は変動します。
AIプログラム実行ログ
下記のダウンロードログは、初回のみ表示されます。
C:\Users\xxxx\anaconda3\envs\python37\python.exe C:/Users/xxxx/PycharmProjects/OpenCV/sample09.py
Using TensorFlow backend.
2020-08-12 10:38:59.579123: I tensorflow/core/platform/cpu_feature_guard.cc:142] Your CPU supports instructions that this TensorFlow binary was not compiled to use: AVX AVX2
Downloading data from https://github.com/keras-team/keras-applications/releases/download/densenet/densenet121_weights_tf_dim_ordering_tf_kernels.h5

    8192/33188688 [..............................] - ETA: 12:39
   16384/33188688 [..............................] - ETA: 8:26
   40960/33188688 [..............................] - ETA: 5:03
  106496/33188688 [..............................] - ETA: 2:59
  245760/33188688 [..............................] - ETA: 1:42

                           ~ 省略 ~

32743424/33188688 [============================>.] - ETA: 0s
32776192/33188688 [============================>.] - ETA: 0s
32956416/33188688 [============================>.] - ETA: 0s
33005568/33188688 [============================>.] - ETA: 0s
33193984/33188688 [==============================] - 32s 1us/step
Downloading data from https://storage.googleapis.com/download.tensorflow.org/data/imagenet_class_index.json

 8192/35363 [=====>........................] - ETA: 0s
40960/35363 [==================================] - 0s 0us/step
[ WARN:0] global C:\projects\opencv-python\opencv\modules\videoio\src\cap_msmf.cpp (436) `anonymous-namespace'::SourceReaderCB::~SourceReaderCB terminating async callback

Process finished with exit code 0
識別可能クラス
「imagenet_class_index.json」ファイルを参照すると、イメージデータが以下のNo.0~999の1000クラスに分類ができることが分かります。制限事項にもなりますが、ここに記載が無いものを認識させても、ここの中のどれかにクラス分類されてしまいます。ここに無いものを分類したい場合は、新たにモデルを作るか、転移学習、ファインチューニングなどを調べていただければと思います。
{
	"0": ["n01440764", "tench"],
	"1": ["n01443537", "goldfish"],
	"2": ["n01484850", "great_white_shark"],
	"3": ["n01491361", "tiger_shark"],
	"4": ["n01494475", "hammerhead"],
	"5": ["n01496331", "electric_ray"],
	"6": ["n01498041", "stingray"],
	"7": ["n01514668", "cock"],
	"8": ["n01514859", "hen"],
	"9": ["n01518878", "ostrich"],

          ~ 省略 ~

	"990": ["n12768682", "buckeye"],
	"991": ["n12985857", "coral_fungus"],
	"992": ["n12998815", "agaric"],
	"993": ["n13037406", "gyromitra"],
	"994": ["n13040303", "stinkhorn"],
	"995": ["n13044778", "earthstar"],
	"996": ["n13052670", "hen-of-the-woods"],
	"997": ["n13054560", "bolete"],
	"998": ["n13133613", "ear"],
	"999": ["n15075141", "toilet_tissue"]
}
以上
お疲れ様でした!
