挨拶
おはようございます。もしくはこんにちは。こんばんはの人もいると思います。
初めてQiitaで記事を書くPols128bと申します。
タイトルにもある通り、ESP32というマイコンボードをArduinoIDEでプログラムいじってBluetooth通信させました。
詳しく書くと、メカナムホイールという特殊な車輪を搭載した自作の電気自動車のコントローラー、レシーバーをプログラムしたESP32で動かしてラジコン作りましょうね〜っていうことをキャンパスフェスティバルの展示に向けてやりました。
この記事で書くこと
1. 3Dプリンターによるモデリング
2. ESP32に記入したプログラム
3. 実際の制作
4. 動作確認
5. 振り返り
6. 参考にしたサイト、および動画
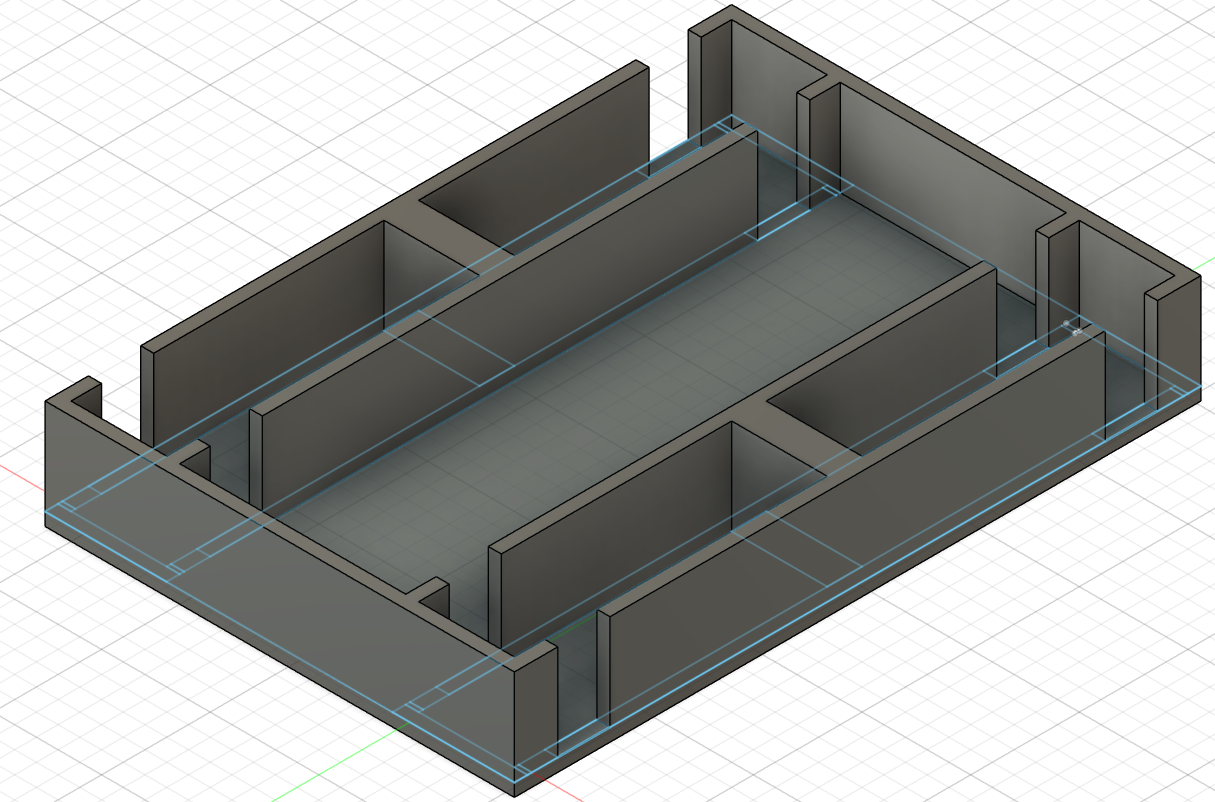
1. 3Dプリンターによるモデリング
利用させていただいたソフトウェア
Fuison360無料ライセンス
モデリングしたとか大層なこと言ってますけど、結局やったのは仕切りとちょっとタイヤをつけられるように横に穴空いた小っちゃい箱作っただけです。
2. ESP32に記入したプログラム
利用させていただいたソフトウェア
Arduino IDE
見てられないようなコードですがお許し下さい
プログラム
int LXpin;
int LYpin;
int RXpin;
int RYpin;
int TLX;
int TLY;
int TRX;
int TRY;
char data[32];

#include "BluetoothSerial.h"

//#define USE_NAME  // Comment this to use MAC address instead of a slaveName

// Check if Bluetooth is available
#if !defined(CONFIG_BT_ENABLED) || !defined(CONFIG_BLUEDROID_ENABLED)
#error Bluetooth is not enabled! Please run `make menuconfig` to and enable it
#endif

// Check Serial Port Profile
#if !defined(CONFIG_BT_SPP_ENABLED)
#error Serial Port Profile for Bluetooth is not available or not enabled. It is only available for the ESP32 chip.
#endif
BluetoothSerial SerialBT;

#ifdef USE_NAME
String slaveName = "ESP32-BT-Slave";  // Change this to reflect the real name of your slave BT device
#else
String MACadd = "ec:c9:ff:e2:cc:06";                        // This only for printing
uint8_t address[6] = {0xec, 0xc9, 0xff, 0xe2, 0xcc, 0x06};  // Change this to reflect real MAC address of your slave BT device
#endif

String myName = "ESP32-BT-Master";

void setup() {

  bool connected;
  Serial.begin(115200);

  SerialBT.begin(myName, true);
  //SerialBT.deleteAllBondedDevices(); // Uncomment this to delete paired devices; Must be called after begin
  Serial.printf("The device \"%s\" started in master mode, make sure slave BT device is on!\n", myName.c_str());

//#ifndef USE_NAME
  //SerialBT.setPin(pin);
  //Serial.println("Using PIN");
//#endif

// connect(address) is fast (up to 10 secs max), connect(slaveName) is slow (up to 30 secs max) as it needs
// to resolve slaveName to address first, but it allows to connect to different devices with the same name.
// Set CoreDebugLevel to Info to view devices Bluetooth address and device names
#ifdef USE_NAME
  connected = SerialBT.connect(slaveName);
  Serial.printf("Connecting to slave BT device named \"%s\"\n", slaveName.c_str());
#else
  connected = SerialBT.connect(address);
  Serial.print("Connecting to slave BT device with MAC ");
  Serial.println(MACadd);
#endif

  if (connected) {
    Serial.println("Connected Successfully!");
  } else {
    while (!SerialBT.connected(10000)) {
      Serial.println("Failed to connect. Make sure remote device is available and in range, then restart app.");
    }
  }
  // Disconnect() may take up to 10 secs max
  if (SerialBT.disconnect()) {
    Serial.println("Disconnected Successfully!");
  }
  // This would reconnect to the slaveName(will use address, if resolved) or address used with connect(slaveName/address).
  SerialBT.connect();
  if (connected) {
    Serial.println("Reconnected Successfully!");
  } else {
    while (!SerialBT.connected(10000)) {
      Serial.println("Failed to reconnect. Make sure remote device is available and in range, then restart app.");
    }
  }
  pinMode(36,ANALOG);
  pinMode(39,ANALOG);
  pinMode(34,ANALOG);
  pinMode(35,ANALOG);
}

void loop() {
  LXpin = analogRead(36) - 1730;
  LYpin = analogRead(39) - 1730;
  RXpin = analogRead(34) - 1750;
  RYpin = analogRead(35) - 1762;

if (LXpin >= -100 && LXpin <= 100){
    TLX = 0;
  } else if(LXpin >= 2048){
    TLX = 2048;
  } else if(LXpin <= -2048){
    TLX = -2048;
    }else{
    TLX = LXpin;
    }

     if (RXpin >= -100 && RXpin <= 100){
    TRX = 0;
  } else if(RXpin >= 2048){
    TRX = 2048;
  } else if(RXpin <= -2048){
    TRX = -2048;
    }else{
    TRX = RXpin;
    }
      if (LYpin >= -100 && LYpin <= 100){
    TLY = 0;
  } else if(LYpin >= 2048){
    TLY = 2048;
  } else if(LYpin <= -2048){
    TLY = -2048;
    }else{
    TLY = LYpin;
    }
      if (RYpin >= -100 && RYpin <= 100){
    TRY = 0;
  } else if(RYpin >= 2048){
    TRY = 2048;
  } else if(RYpin <= -2048){
    TRY = -2048;
    }else{
    TRY = RYpin;
    }

    sprintf(data, "%d:%d:%d:%d", TLX, TLY, TRX, TRY);

    Serial.println(data);
    SerialBT.println(data);

  if (SerialBT.available()) {
    Serial.write(SerialBT.read());
  }
  delay(100);
}
3. 実際の制作
さて、3Dプリンターで印刷して、マイコンにプログラム書き込んでも組み合わせて車両として成立させなければ意味がありません。実際に作ってみましょう。
しかし、画像がございません。申し訳ないです。
動作確認に一応全体像がございます。
ステップ1
3Dプリントしたボディとプログラミングしたマイコンがあっても合体させなければ意味がありません。てことで電子工作の時間じゃい。って思います。
ステップ2
買ってきたギヤードモーターとモータドライバーをワイヤーで繋げます
ステップ3
モータドライバーとマイコンをワイヤーで繋げます
ステップ4
グルーガンでギヤードモーターなど全てを3Dプリンターの造形物に貼り付けます。
ステップ5
メカナムホイールをグルーガンではっつけます。
完成!!
4. 動作確認
実際に動かしてみましょう!コントローラーと車体のマイコンスイッチ入れて...
スイッチオン!

ここから先またしても画像がなく、言葉だけですがイメージしながらお楽しみください
えちょっと待って、なんか甲高い音すんだけど...
えちょっと待って電池あっつ!すぐ取らないと。
待って待ってなんかICから煙が出てきた!!!!
やばいやばい電池があっつ!
ふ、ふぅ、危なかった。
そんなことが起こりました。
5. 振り返り
期日が短かったのもあり、プロトタイプも作らず一発勝負で作ったため、結果はぶっ壊れて大失敗でした。
具体的に述べると、モータドライバがESP32のPWM制御に対応していなかったことによるICチップの焼き切れが原因で回路がショートし、電池に無限大の電流が流れ、ホクホクになったと考えられます。焦っていたこともあり、急遽anyazonで購入したものを使っていました。次は対応しているものを調べて買います。
もっと勉強します。そして来年にはもっと質の良いものを質の良い記事とともにお送りしたいと考えております。
6. 参考にしたサイト、および動画
今回制作する上で参考にさせていただいたサイト、及び動画です。感謝申し上げます
ESP32同士をBruetoothでペアリング
ESP32でBluetooth相互無線通信(Arduino互換機)
