作ったもの
”iPhone擬似テルミン”
iPhoneに向かって手をかざすと、手の位置(正確には人差し指の位置)によって
鳴る音の高低/大小が変わる。
クリスマスということで、「きよしこの夜」っぽいものを演奏してみている。。。
難しい。。。
なんでこれ作ったの
家に楽器がなくて寂しい(実家にはピアノ/ギター/ドラム等沢山あった)
→iPhoneで音鳴らせば楽しいのでは❓
→この記事 見るとiPhoneを楽器化できてる、でもテルミンって何
→テルミンの演奏動画
→めっちゃ音きれい、触らず音鳴ってすごい、擬似テルミン作ってみたい
どうやって擬似テルミン作るのか
この記事 によれば、”テルミンは、縦のアンテナに手を近づけるほど高い音になり、水平のアンテナに手を近づけるほど小さい音になる” らしい。
iPhoneでテルミンっぽいものを作るなら、iPhoneの画面と手との距離で音を決定すればいいんじゃないか?ーー最初はそう思っていたが、難しそうなので断念した。
さてどうしようかと悩んでいたとき、WWDC20の中で、Vision Frameworkを使って手のポーズを検知する というのがあったのを思い出した。このフレームワークを使って、画面内の右手の人差し指のY座標を音の高低と対応させてみてはどうだろうか。両手をトラッキングするのは大変そうだから片手で音量も調整できるようにしてみようか? その場合、X座標を音の大小に対応させるとよいだろうか。
iPhoneから音を出すのは AudioKit が使えそうだ。
いざ実装
Vision FrameworkのHandPoseはiOS 14.0+なので、手元のiOS14のiPhoneで動くようにしていく。ほんとは画面がでかいiPadでやりたかったが、家にはiOS12のiPadしかなかったので断念した。
実装は大まかに分けて2ステップで終わりそうだ。
① アプリを起動したらインカメの映像がiPhoneの画面に表示されるようにして、インカメに映った右手の人差し指の座標を取れるようにする
② 右手の人差し指の座標を音の高低/大小に変換して、音を出す
①アプリを起動したらインカメの映像がiPhoneの画面に表示されるようにして、インカメに映った右手の人差し指の座標を取れるようにする
インカメで顔認識をするためのコードが この記事 に載っていた。手を認識できるようにするには、このコードの顔認識の部分を手認識に変更できれば良いわけだ。
手の認識については、Appleが デモアプリのコード を提供していたので、これを参考にする。このコードの人差し指をトラッキングする箇所だけ抜き出して、先述の顔認識の部分を手認識に書き換える。
以下のコードは、**「アプリを起動したらインカメの映像がiPhoneの画面に表示され、インカメに映った右手の人差し指の座標をprint文で書き出す」**ものである。Y座標は画面上部が0で画面下部が1になるようにしている。X座標は画面右が0で画面左が1である。
コードを切って貼ってしたので、不必要な部分が混ざっているかもしれない。。。
import UIKit
import Vision
import AVFoundation

class ViewController: UIViewController,
                      AVCaptureVideoDataOutputSampleBufferDelegate {
    private var handPoseRequest = VNDetectHumanHandPoseRequest()
    var indexTip  = CGPoint (x: 0,
                             y: 0)
    private var _captureSession = AVCaptureSession()
    private var _videoDevice = AVCaptureDevice.default(for: AVMediaType.video)
    private var _videoOutput = AVCaptureVideoDataOutput()
    private var _videoLayer : AVCaptureVideoPreviewLayer? = nil
    private var rectArray:[UIView] = []
    var image : UIImage!
    func setupVideo( camPos:AVCaptureDevice.Position,
                     orientaiton:AVCaptureVideoOrientation ){
        // カメラ関連の設定
        self._captureSession = AVCaptureSession()
        self._videoOutput = AVCaptureVideoDataOutput()
        self._videoDevice = AVCaptureDevice.default(.builtInWideAngleCamera,
                                                    for: .video,
                                                    position: camPos)
        // Inputを作ってSessionに追加
        do {
            let videoInput = try AVCaptureDeviceInput(device: self._videoDevice!) as AVCaptureDeviceInput
            self._captureSession.addInput(videoInput)
        } catch let error as NSError {
            print(error)
        }
        // Outputを作ってSessionに追加
        self._videoOutput.videoSettings = [kCVPixelBufferPixelFormatTypeKey as AnyHashable as! String : Int(kCVPixelFormatType_32BGRA)]
        self._videoOutput.setSampleBufferDelegate(self,
                                                  queue: DispatchQueue.main)
        self._videoOutput.alwaysDiscardsLateVideoFrames = true
        self._captureSession.addOutput(self._videoOutput)
        for connection in self._videoOutput.connections {
            connection.videoOrientation = orientaiton
        }
        // 出力レイヤを作る
        self._videoLayer = AVCaptureVideoPreviewLayer(session: self._captureSession)
        self._videoLayer?.frame = UIScreen.main.bounds
        self._videoLayer?.videoGravity = AVLayerVideoGravity.resizeAspectFill
        self._videoLayer?.connection?.videoOrientation = orientaiton
        self.view.layer.addSublayer(self._videoLayer!)
        // 録画開始
        self._captureSession.startRunning()
    }
    private func imageFromSampleBuffer(sampleBuffer: CMSampleBuffer) -> UIImage {
        let imageBuffer: CVImageBuffer = CMSampleBufferGetImageBuffer(sampleBuffer)!
        CVPixelBufferLockBaseAddress(imageBuffer,
                                     CVPixelBufferLockFlags(rawValue: 0))
        let colorSpace = CGColorSpaceCreateDeviceRGB()
        let bitmapInfo = (CGBitmapInfo.byteOrder32Little.rawValue | CGImageAlphaInfo.premultipliedFirst.rawValue)
        let context = CGContext(data: CVPixelBufferGetBaseAddressOfPlane(imageBuffer,
                                                                         0),
                                width: CVPixelBufferGetWidth(imageBuffer),
                                height: CVPixelBufferGetHeight(imageBuffer),
                                bitsPerComponent: 8,
                                bytesPerRow: CVPixelBufferGetBytesPerRow(imageBuffer),
                                space: colorSpace,
                                bitmapInfo: bitmapInfo)
        let imageRef = context!.makeImage()
        CVPixelBufferUnlockBaseAddress(imageBuffer,
                                       CVPixelBufferLockFlags(rawValue: 0))
        let resultImage: UIImage = UIImage(cgImage: imageRef!)
        return resultImage
    }
    func captureOutput(_ output: AVCaptureOutput,
                       didOutput sampleBuffer: CMSampleBuffer,
                       from connection: AVCaptureConnection) {
        let handler = VNImageRequestHandler(cmSampleBuffer: sampleBuffer,
                                            orientation: .up,
                                            options: [:])
        do {
            // Perform VNDetectHumanHandPoseRequest
            try handler.perform([handPoseRequest])
            // Continue only when a hand was detected in the frame.
            // Since we set the maximumHandCount property of the request to 1, there will be at most one observation.
            guard let observation = handPoseRequest.results?.first else {
                return
            }
            // Get points for index finger.
            let indexFingerPoints = try observation.recognizedPoints(.indexFinger)
            // Look for tip points.
            guard let indexTipPoint = indexFingerPoints[.indexTip] else {
                return
            }
            indexTip = CGPoint(x: indexTipPoint.location.x,
                               y: 1 - indexTipPoint.location.y)
            print(indexTip)
        } catch {

        }
    }
    override func viewDidLoad() {
        super.viewDidLoad()
        // This sample app detects one hand only.
        handPoseRequest.maximumHandCount = 1
        setupVideo(camPos: .front,
                   orientaiton: .portrait)
    }
}
②右手の人差し指の座標を音の高低/大小に変換して、音を出す
先述の通り、ここではAudioKitを使う。
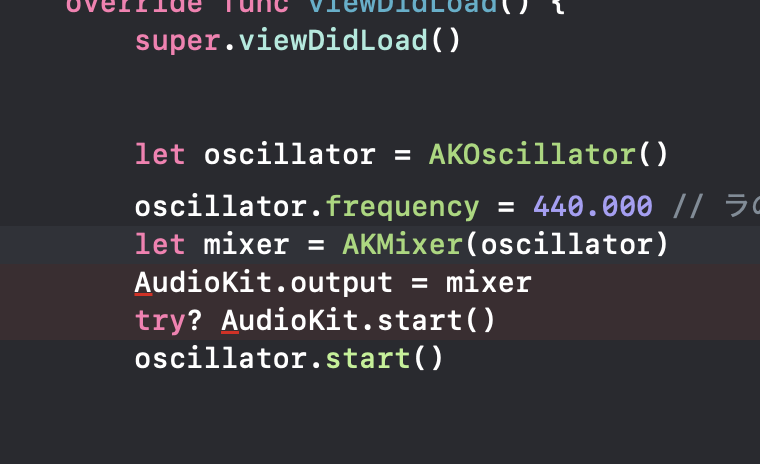
AudioKitを使うのは初めてだったので、使い方が一通り書かれている この記事 の通りに書いてみたけど怒られた。以下の赤線の箇所で、"Module 'AudioKit' has no member named 'output'" "Module 'AudioKit' has no member named 'start'"とのこと。
記事で使われてるライブラリのバージョンと、実際に導入したライブラリのバージョンが違ってるから発生してるんだろうな。。。

AudiKitの 公式ページ の「AudioKit V4.11」の「Example Code」と書かれている部分を参照すると、
AKManager.output = oscillator
という記述があったので、赤線エラー部分をそのように直してみた↓

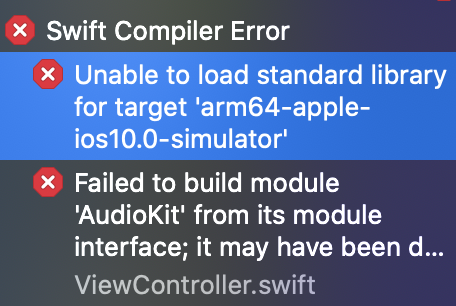
するとまだエラーが出る。
さらに以下のようなエラーも出ていた。

うーむ。
ここで改めて 公式ページを見たら**「初めてAudioKitを導入するユーザーはver.5を入れろ」**みたいなことが書いてあった。
さらに以下のように説明があったので、ver.5を入れ直すことにする。
To add AudioKit to your Xcode project, select File -> Swift Packages -> Add Package Depedancy. Enter https://github.com/AudioKit/AudioKit for the URL. Check the use branch option and enter v5-main or v5-develop.
長い長い読み込み時間が終わったら、migrationガイド を参考にコードを直して、ようやく**「右手の人差し指の座標を音の高低/大小に変換して、音を出す」**にたどり着いた。コードは以下に記しているが、「画面上部は音が高い、画面下部は音が低い、画面右は音が大きい、画面左は音が小さい」というのが実現できている。
ただし、そのままではまともに演奏できなかった。
テルミン奏者じゃないのでどの指の位置でどの音が出るのかわからないし覚えられなかった。
このため、この記事 を参考に音階ごとに黄色い線を引いてみた。
線を引く際に必要な音階の計算方法は この記事 を参考にした。
アプリ起動時に、起動音みたいに440hzがピーピピって鳴るけどそこは気にしない。
import UIKit
import Vision
import AVFoundation
import AudioKit

class ViewController: UIViewController,
                      AVCaptureVideoDataOutputSampleBufferDelegate {
    let oscillator = Oscillator()
    let engine = AudioEngine()
    private var handPoseRequest = VNDetectHumanHandPoseRequest()
    var indexTip  = CGPoint (x: 0,
                             y: 0)
    private var _captureSession = AVCaptureSession()
    private var _videoDevice = AVCaptureDevice.default(for: AVMediaType.video)
    private var _videoOutput = AVCaptureVideoDataOutput()
    private var _videoLayer : AVCaptureVideoPreviewLayer? = nil
    private var rectArray:[UIView] = []
    var image : UIImage!
    func setupVideo( camPos:AVCaptureDevice.Position,
                     orientaiton:AVCaptureVideoOrientation){
        // カメラ関連の設定
        self._captureSession = AVCaptureSession()
        self._videoOutput = AVCaptureVideoDataOutput()
        self._videoDevice = AVCaptureDevice.default(.builtInWideAngleCamera,
                                                    for: .video,
                                                    position: camPos)
        // Inputを作ってSessionに追加
        do {
            let videoInput = try AVCaptureDeviceInput(device: self._videoDevice!) as AVCaptureDeviceInput
            self._captureSession.addInput(videoInput)
        } catch let error as NSError {
            print(error)
        }
        // Outputを作ってSessionに追加
        self._videoOutput.videoSettings = [kCVPixelBufferPixelFormatTypeKey as AnyHashable as! String : Int(kCVPixelFormatType_32BGRA)]
        self._videoOutput.setSampleBufferDelegate(self,
                                                  queue: DispatchQueue.main)
        self._videoOutput.alwaysDiscardsLateVideoFrames = true
        self._captureSession.addOutput(self._videoOutput)
        for connection in self._videoOutput.connections {
            connection.videoOrientation = orientaiton
        }
        // 出力レイヤを作る
        self._videoLayer = AVCaptureVideoPreviewLayer(session: self._captureSession)
        self._videoLayer?.frame = UIScreen.main.bounds
        self._videoLayer?.videoGravity = AVLayerVideoGravity.resizeAspectFill
        self._videoLayer?.connection?.videoOrientation = orientaiton
        self.view.layer.addSublayer(self._videoLayer!)
        // 録画開始
        self._captureSession.startRunning()
    }
    private func imageFromSampleBuffer(sampleBuffer: CMSampleBuffer) -> UIImage {
        let imageBuffer: CVImageBuffer = CMSampleBufferGetImageBuffer(sampleBuffer)!
        CVPixelBufferLockBaseAddress(imageBuffer,
                                     CVPixelBufferLockFlags(rawValue: 0))
        let colorSpace = CGColorSpaceCreateDeviceRGB()
        let bitmapInfo = (CGBitmapInfo.byteOrder32Little.rawValue | CGImageAlphaInfo.premultipliedFirst.rawValue)
        let context = CGContext(data: CVPixelBufferGetBaseAddressOfPlane(imageBuffer, 0),
                                width: CVPixelBufferGetWidth(imageBuffer),
                                height: CVPixelBufferGetHeight(imageBuffer),
                                bitsPerComponent: 8,
                                bytesPerRow: CVPixelBufferGetBytesPerRow(imageBuffer),
                                space: colorSpace,
                                bitmapInfo: bitmapInfo)
        let imageRef = context!.makeImage()
        CVPixelBufferUnlockBaseAddress(imageBuffer,
                                       CVPixelBufferLockFlags(rawValue: 0))
        let resultImage: UIImage = UIImage(cgImage: imageRef!)
        return resultImage
    }
    func captureOutput(_ output: AVCaptureOutput,
                       didOutput sampleBuffer: CMSampleBuffer,
                       from connection: AVCaptureConnection) {
        let handler = VNImageRequestHandler(cmSampleBuffer: sampleBuffer,
                                            orientation: .up,
                                            options: [:])
        do {
            // Perform VNDetectHumanHandPoseRequest
            try handler.perform([handPoseRequest])
            // Continue only when a hand was detected in the frame.
            // Since we set the maximumHandCount property of the request to 1, there will be at most one observation.
            guard let observation = handPoseRequest.results?.first else {
                oscillator.stop()
                return
            }
            // Get points for index finger.
            let indexFingerPoints = try observation.recognizedPoints(.indexFinger)
            // Look for tip points.
            guard let indexTipPoint = indexFingerPoints[.indexTip] else {
                return
            }
            indexTip = CGPoint(x: 1 - indexTipPoint.location.x,
                               y: 1 - indexTipPoint.location.y)
            //人差し指の先の座標を下のラ〜普通のラまでの周波数に置き換える
            let frequency = 440.000 - 220 * indexTip.y
            oscillator.frequency = AUValue(frequency)
            oscillator.amplitude = AUValue(indexTip.x)
            if oscillator.isStopped {
                oscillator.start()
            }
        } catch {

        }
    }
    override func viewDidLoad() {
        super.viewDidLoad()
        let mixer = Mixer(oscillator)
        engine.output = mixer
        try? engine.start()
        oscillator.start()
        // This app detects one hand only.
        handPoseRequest.maximumHandCount = 1
        setupVideo(camPos: .front,
                   orientaiton: .portrait)
        drawLines(positionArray: frequencyToPosition(frequencyArray: notes()))
    }
    //各音階の場所に線を描く関数。
    func drawLines(positionArray: [CGFloat]){
        let linePath = UIBezierPath()
        for position in positionArray {
            linePath.move(to: CGPoint(x: 0,
                                      y: position))
            linePath.addLine(to: CGPoint(x: 400,
                                         y: position))
            let lineLayer = CAShapeLayer()
            lineLayer.path = linePath.cgPath
            lineLayer.strokeColor = UIColor.yellow.cgColor
            lineLayer.lineWidth = 4
            self.view.layer.addSublayer(lineLayer)
        }
    }
    //frequencyを画面上のy座標に置き換える関数。
    func frequencyToPosition(frequencyArray: [Float]) -> [CGFloat] {
        var yPosition : Float = 0.0
        var positionArray : [CGFloat] = []
        for frequency in frequencyArray {
            let x  = (frequency - 440.0) / -220.0
            yPosition = Float(UIScreen.main.bounds.height) * x
            positionArray.append(CGFloat(yPosition))
        }
        return positionArray
    }
    //低いラから普通のラまでの周波数のArrayを返す関数。
    func notes() -> [Float] {
        var f : Float = 0
        var frequencyArray : [Float] = []
        for d in -12 ... 0 {
            f = 440.0 * pow(2.0,
                            Float(d) / 12.0)
            frequencyArray.append(f)
        }
        return frequencyArray
    }
}
これで擬似テルミンの完成だ!
おわりに
作ったものの、まともに演奏できる気がしない。
できる人いたら見せて欲しい。。。
あとテルミン実際に演奏してみたい。
