MapKitに関する最新の情報が少ないように感じたので
よく使うような基本的な使い方についてまとめました!
今回の実装コードはGithubにあげているので自由にどうぞ!
Delegate部分はextentionで実装しているので多少異なります。
https://github.com/tomoki-inoue1221/mapkit-sample
網羅している内容
基本編
- MapKitを使用するための設定と注意点
- 現在地の表示
- 現在地への照準を合わせる
- 指定した場所にピンを立てる(タイトルやサブタイトルの設定)
- ピンがタップされた時の処理
- ロングタップでタップした場所にピンを立てる
応用編
- 住所から緯度・経度を取得する(ジオコーディング)
- 緯度・経度から住所を取得する(逆ジオコーディング)
- カスタムピンの表示
基本編の実装
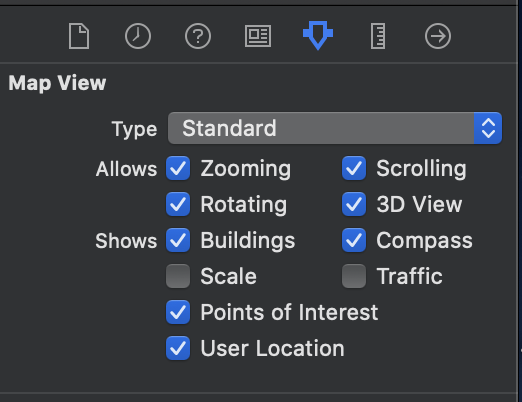
MapKit使用するための事前知識
現在地を表示する設定
現在地を表示するためには2点設定が必要です。
- Info.plistに許可設定用の内容を記述
- Privacy - Location When In Use Usage Description
- Privacy - Location Always Usage Description

- storyBoardでMapViewのUserLocationにチェックを入れる
現在地を表示する注意点
現在地を表示するためには実機での確認が必要です。
LocationManagerについて
Mapを使う上ではLocationManagerの存在は避けて通れないので、
こちらを一読しておくと良いです!
【CoreLocation】位置情報を取得する
よく使うDelegateメソッドの紹介
- CLLocationManagerDelegate編
/// delegateをセットする呼ばれる(位置情報の許可設定に使用)
func locationManager(_ manager: CLLocationManager, didChangeAuthorization status: CLAuthorizationStatus) {}

/// 自分の現在地が更新された時に呼ばれる(現在地更新した時に何か処理したい場合に使用)
/// locationsに現在地入ってる
func locationManager(_ manager: CLLocationManager, didUpdateLocations locations:[CLLocation]) {}
- MKMapViewDelegate編
/// ピンを追加した時に呼ばれる(ピンを加工したりする)
func mapView(_ mapView: MKMapView, viewFor annotation: MKAnnotation) -> MKAnnotationView? {}

/// ピンをタップした時に呼ばれる(ピンの詳細情報を出したりする)
func mapView(_ mapView: MKMapView, didSelect view: MKAnnotationView) {}
現在地の表示
位置情報の許可を求める
- コードの実装
import UIKit
// 2つimportする
import MapKit
import CoreLocation

// CLLocationManagerDelegateを継承する
class ViewController: UIViewController, CLLocationManagerDelegate {
  // storyboardから接続する
  @IBOutlet weak var mapView: MKMapView!
  // locationManagerを宣言する
  var locationManager: CLLocationManager!

  override func viewDidLoad() {
     super.viewDidLoad()
     // ロケーションマネージャーのセットアップ
     locationManager = CLLocationManager()
     locationManager.delegate = self
     locationManager!.requestWhenInUseAuthorization()
  }

 // 許可を求めるためのdelegateメソッド
 func locationManager(_ manager: CLLocationManager, didChangeAuthorization status: CLAuthorizationStatus) {
        switch status {
        // 許可されてない場合
        case .notDetermined:
       // 許可を求める
            manager.requestWhenInUseAuthorization()
        // 拒否されてる場合
        case .restricted, .denied:
            // 何もしない
            break
        // 許可されている場合
        case .authorizedAlways, .authorizedWhenInUse:
            // 現在地の取得を開始
            manager.startUpdatingLocation()
            break
        default:
            break
        }
    }
}
こちらで、Info.plist・storyboardの設定がうまくできていれば
許可を求めるダイアログが表示されます。
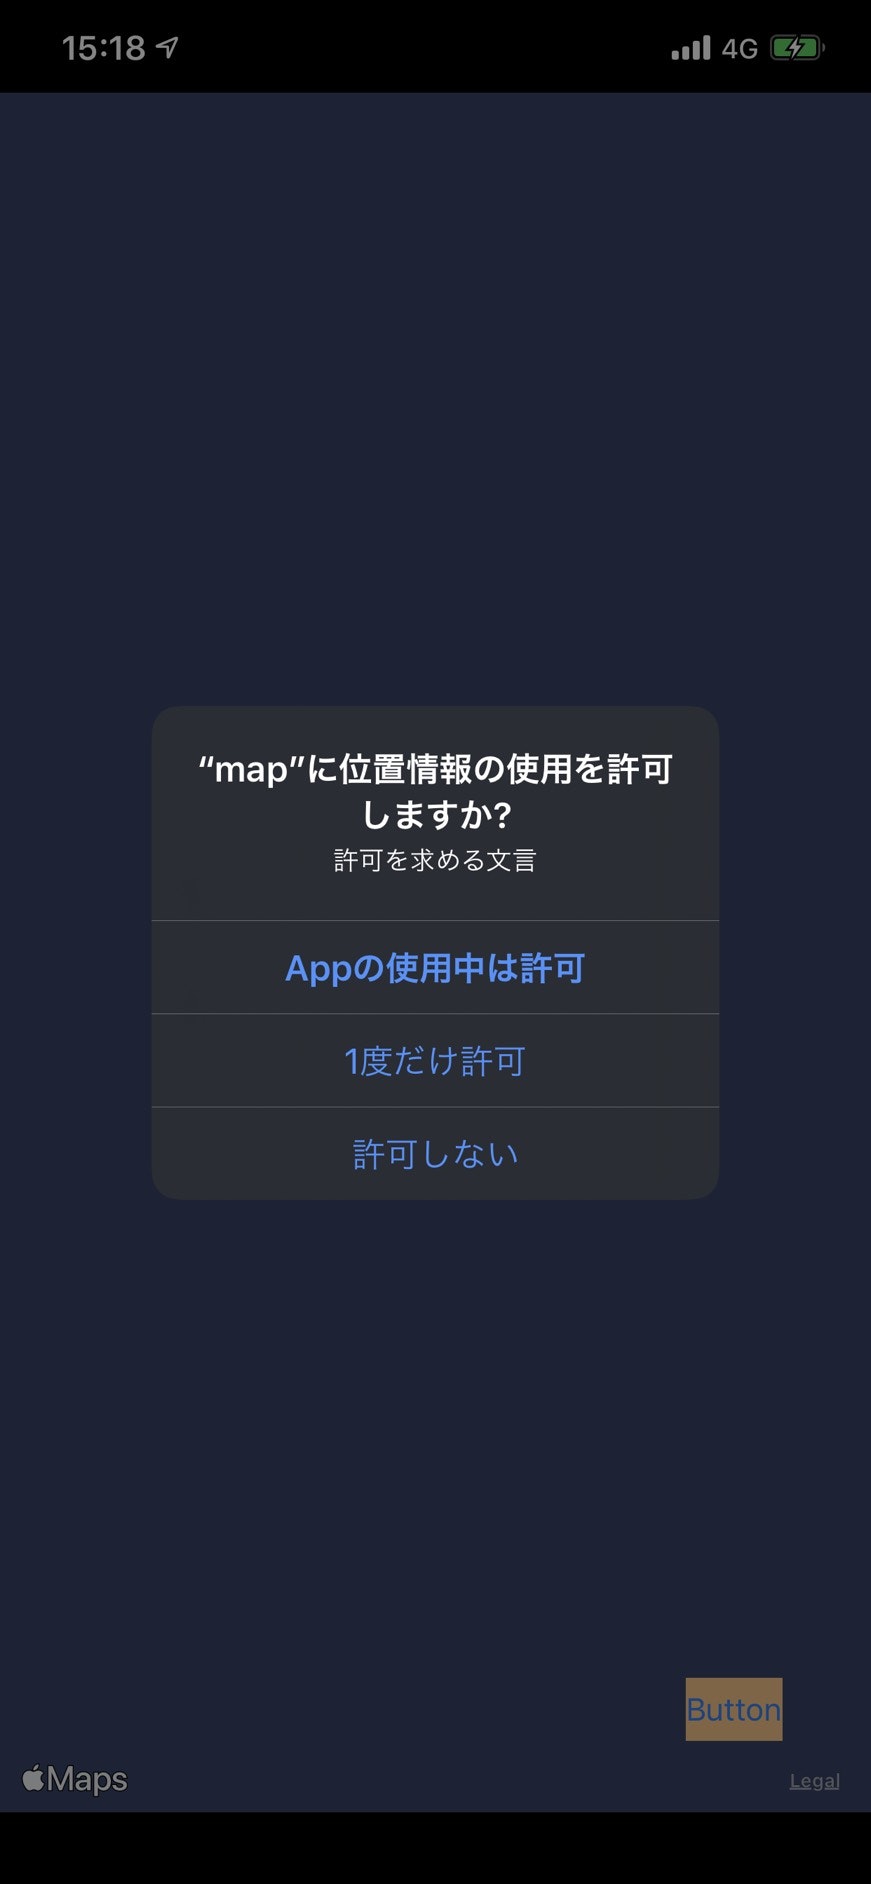
許可を完了するとマップに現在地が表示されます。
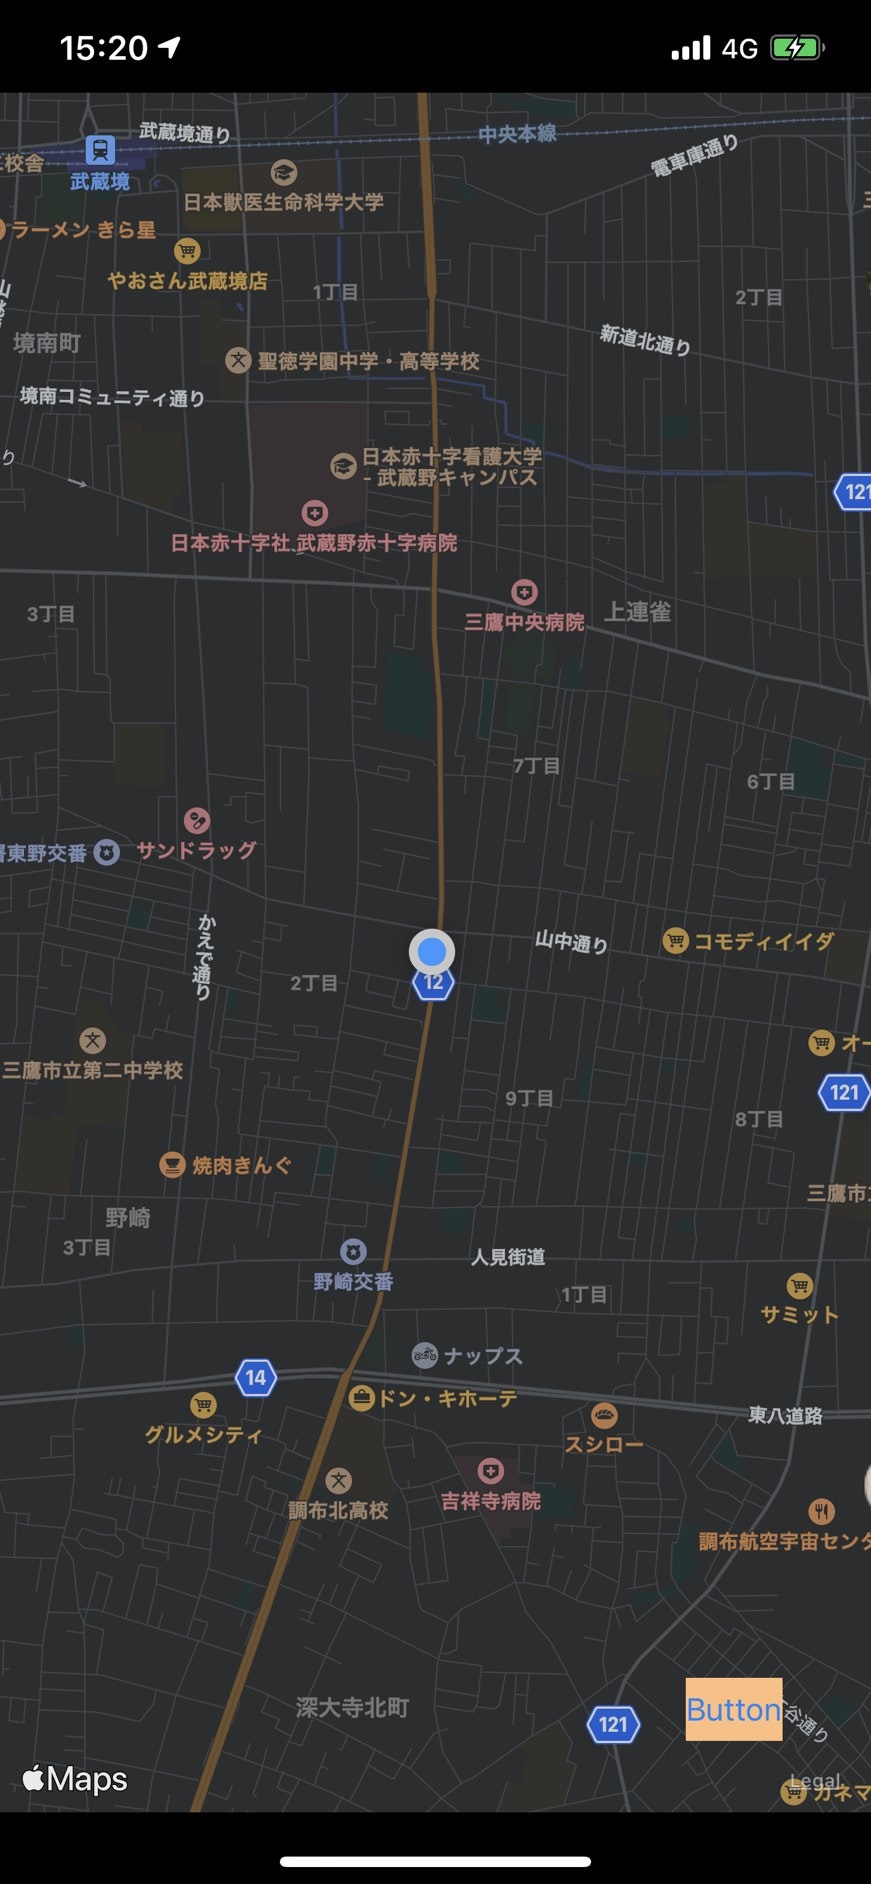
現在地に照準を合わせる
- コードの実装
import UIKit
import MapKit
import CoreLocation

class ViewController: UIViewController, CLLocationManagerDelegate {
  @IBOutlet weak var mapView: MKMapView!
  var locationManager: CLLocationManager!

  override func viewDidLoad() {
     super.viewDidLoad()
     // ロケーションマネージャーのセットアップ
     // 省略

   // 現在地に照準を合わす
     // 0.01が距離の倍率
     let span = MKCoordinateSpan(latitudeDelta: 0.01, longitudeDelta: 0.01)
     // mapView.userLocation.coordinateで現在地の情報が取得できる
     let region = MKCoordinateRegion(center: mapView.userLocation.coordinate, span: span)
     // ここで照準を合わせている
     mapView.region = region
  }

}
初期の照準位置を変更したい場合は、
mapView.userLocation.coordinateを変更すればよくて、
例えば東京駅に合わせたければ、
東京駅の緯度・経度を調べて
// 省略

  override func viewDidLoad() {
     super.viewDidLoad()
     // ロケーションマネージャーのセットアップ
     // 省略

   // 東京駅に照準を合わす
     let span = MKCoordinateSpan(latitudeDelta: 0.01, longitudeDelta: 0.01)
     // 東京駅の位置情報をセット
     let tokyoStation = CLLocationCoordinate2DMake(35.681236, 139.767125)
     // centerに東京駅のlocationDataをセット
     let region = MKCoordinateRegion(center: tokyoStation, span: span)
     mapView.region = region
  }
このように書くと東京駅に照準がアイマス。
指定した場所にピンを立てる
- コードの実装
    override func viewDidLoad() {
        super.viewDidLoad()
        // ロケーションマネージャーのセットアップ

        // 現在地に照準を合わす


        // 指定値にピンを立てる
        // ピンを立てたい緯度・経度をセット
        // let coordinate = CLLocationCoordinate2DMake(35.45, 139.56)
        // 今回は現在地とする
        let coordinate = mapView.userLocation.coordinate
        // ピンを生成
        let pin = MKPointAnnotation()
     // ピンのタイトル・サブタイトルをセット
        pin.title = "タイトル"
        pin.subtitle = "サブタイトル"
        // ピンに一番上で作った位置情報をセット
        pin.coordinate = coordinate
        // mapにピンを表示する
        mapView.addAnnotation(pin)
   {
ピンがタップされた時の処理
// MKMapViewDelegateを継承
class ViewController: UIViewController,CLLocationManagerDelegate,MKMapViewDelegate {
    @IBOutlet weak var mapView: MKMapView!
    var locationManager: CLLocationManager!

    override func viewDidLoad() {
        super.viewDidLoad()
        // 省略

        // delegateをセット
        mapView.delegate = self
  }

    func mapView(_ mapView: MKMapView, didSelect view: MKAnnotationView) {
        // タップされたピンの位置情報
        print(view.annotation?.coordinate)
        // タップされたピンのタイトルとサブタイトル
        print(view.annotation?.title)
        print(view.annotation?.subtitle)
    }

}
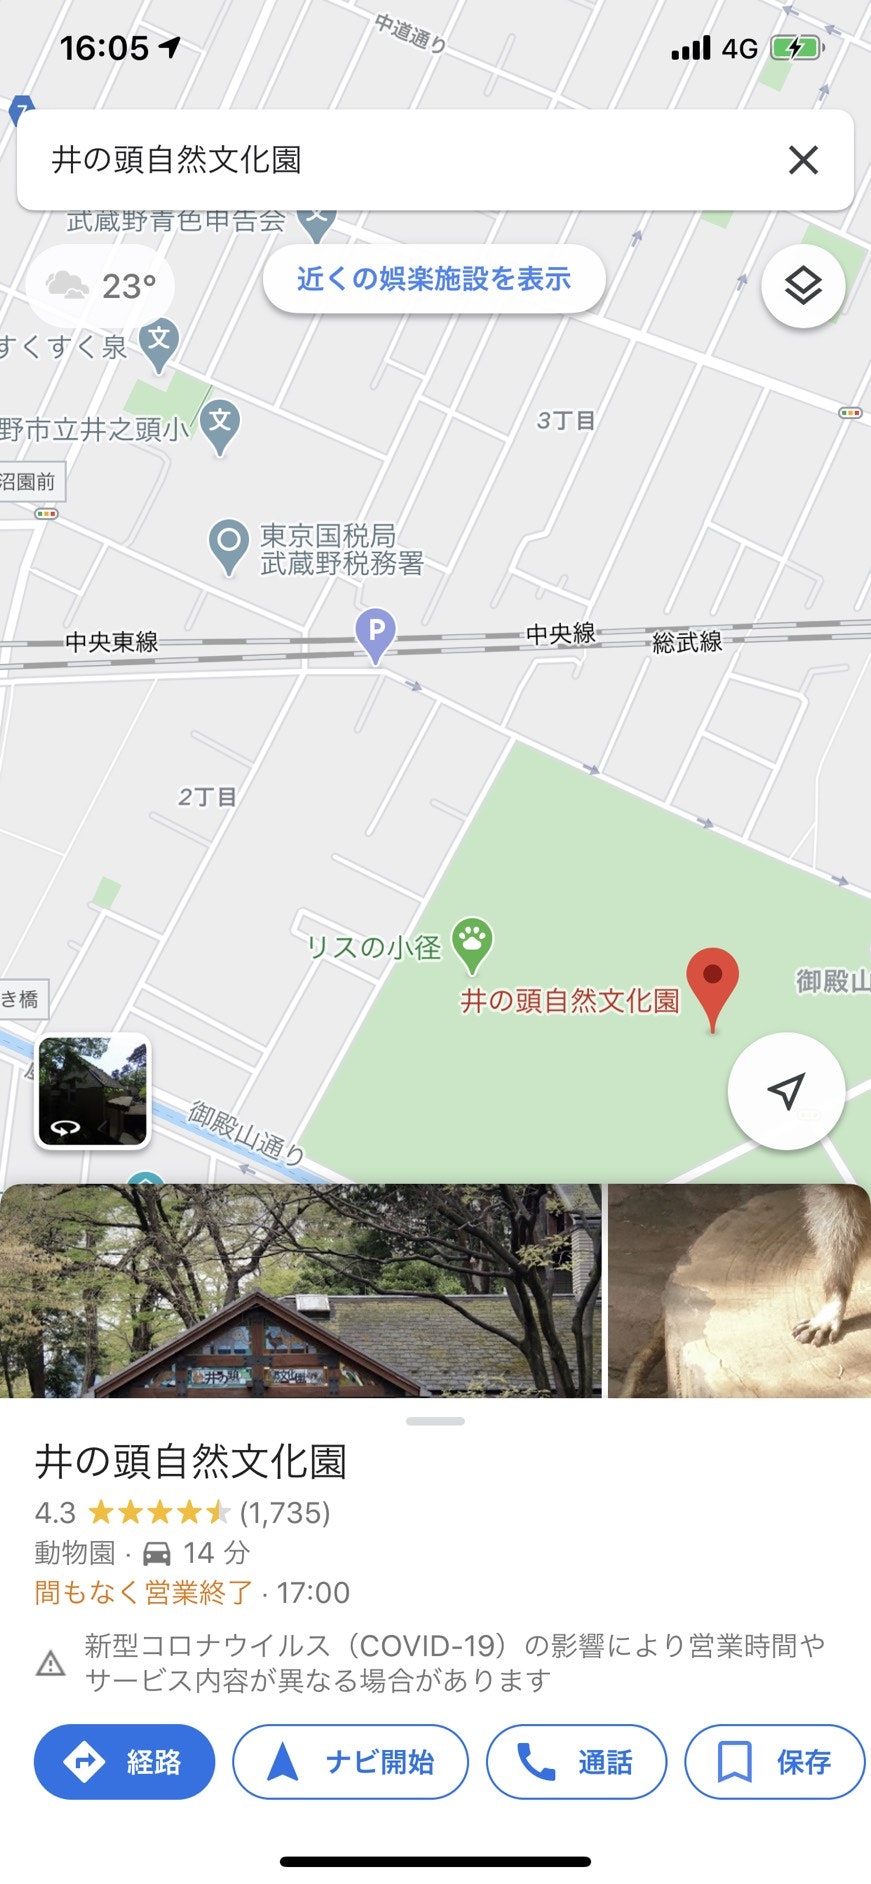
よくあるのはタップした時にモダール的な感じで、ピンの詳細がでてくるみたいな画面
GoogleMapで言うとこの井の頭自然文化公園の詳細情報みたいな感じを出すことが多いかも
ロングタップでタップした場所にピンを立てる(位置情報も取得)
- コードの実装
    override func viewDidLoad() {
        super.viewDidLoad()

        //  省略

        // ロングタップを検知
        let longPress = UILongPressGestureRecognizer(target: self, action: #selector(recognizeLongPress(sender:)))
        //MapViewにリスナーを登録
        self.mapView.addGestureRecognizer(longPress)
    }

    //ロングタップした時に呼ばれる関数
    @objc func recognizeLongPress(sender: UILongPressGestureRecognizer) {
        //長押し感知は最初の1回のみ
        if sender.state != UIGestureRecognizer.State.began {
            return
        }

        // 位置情報を取得
        let location = sender.location(in: self.mapView)
        let coordinate = self.mapView.convert(location, toCoordinateFrom: self.mapView)
        // 出力
        print(coordinate.latitude)
        print(coordinate.longitude)
        // タップした位置に照準を合わせる処理
        let span = MKCoordinateSpan(latitudeDelta: 0.01, longitudeDelta: 0.01)
        let region = MKCoordinateRegion(center: coordinate, span: span)
        self.mapView.region = region

        // ピンを生成
        let pin = MKPointAnnotation()
        pin.title = "タイトル"
        pin.subtitle = "サブタイトル"
        // タップした位置情報に位置にピンを追加
        pin.coordinate = coordinate
        self.mapView.addAnnotation(pin)
    }
ここで応用編でやる、逆ジオコーディングを使うと住所も取得できる。
応用編の実装
住所から緯度・経度を取得する(ジオコーディング)
よく使うのは住所検索した時に、検索位置に移動してピン立てるみたいな動き
※今回は簡略化のため、入力された想定で固定の住所から緯度・経度を取得する
class ViewController: UIViewController {
    override func viewDidLoad() {
        super.viewDidLoad()
    }

    // 画面に適当にボタンを配置する
    @IBAction func tap(_ sender: Any) {
        geoCording()
    }


    // ジオコーディング(住所から緯度・経度)
    func geoCording() {
        // 検索で入力した値を代入(今回は固定で東京駅)
        let address = "東京都千代田区丸の内1丁目"
        var resultlat: CLLocationDegrees!
        var resultlng: CLLocationDegrees!
        // 住所から位置情報に変換
        CLGeocoder().geocodeAddressString(address) { placemarks, error in
            if let lat = placemarks?.first?.location?.coordinate.latitude {
                // 問題なく変換できたら代入
                print("緯度 : \(lat)")
                resultlat = lat

            }
            if let lng = placemarks?.first?.location?.coordinate.longitude {
                // 問題なく変換できたら代入
                print("経度 : \(lng)")
                resultlng = lng
            }
            // 値が入ってれば
            if (resultlng != nil && resultlat != nil) {
          // 位置情報データを作成
                let cordinate = CLLocationCoordinate2DMake(resultlat, resultlng)
                let span = MKCoordinateSpan(latitudeDelta: 0.01, longitudeDelta: 0.01)
          // 照準を合わせる
                let region = MKCoordinateRegion(center: cordinate, span: span)
                self.mapView.region = region

                // 同時に取得した位置にピンを立てる
                let pin = MKPointAnnotation()
                pin.title = "タイトル"
                pin.subtitle = "サブタイトル"

                pin.coordinate = cordinate
                self.mapView.addAnnotation(pin)
            }
        }
    }
}
これでボタンをタップした時に東京駅に照準があってピンが立つ
緯度・経度から住所を取得する(逆ジオコーディング)
よく使われるのは、基本編でやったロングタップした時に
そこの住所を出すみたいな動き
class ViewController: UIViewController {
    override func viewDidLoad() {
        super.viewDidLoad()
    }

    // 画面に適当にボタンを配置する
    @IBAction func tap(_ sender: Any) {
        reverseGeoCording()
    }


    // 逆ジオコーデインング
    func reverseGeoCording() {
        // 住所を取得したい位置情報を宣言(今回は東京駅にセット)
        let location = CLLocation(latitude: 35.681236, longitude: 139.767125)
        // 位置情報から住所を取得
        CLGeocoder().reverseGeocodeLocation(location) { placemarks, error in
            guard let placemark = placemarks?.first, error == nil else { return }
            // 市区町村より下の階層が出力
            print(placemark.name!)
            // 都道府県
            print(placemark.administrativeArea!)
            // なんとか郡とかがあれば(ない場合もあるのでnull回避)
            print(placemark.subAdministrativeArea ?? "")
            // 市区町村
            print(placemark.locality!)
            // これで日本語の住所はいい感じにでる
            print(placemark.administrativeArea! + placemark.locality! + placemark.name!)
        }
    }
}
placemarkにはいろんな値が入ってるので、
リファレンスはこちらの記事がわかりやすかったので参考に!
[iOS] MapKitを使って”ジオコーディング・逆ジオコーディング”をやってみる
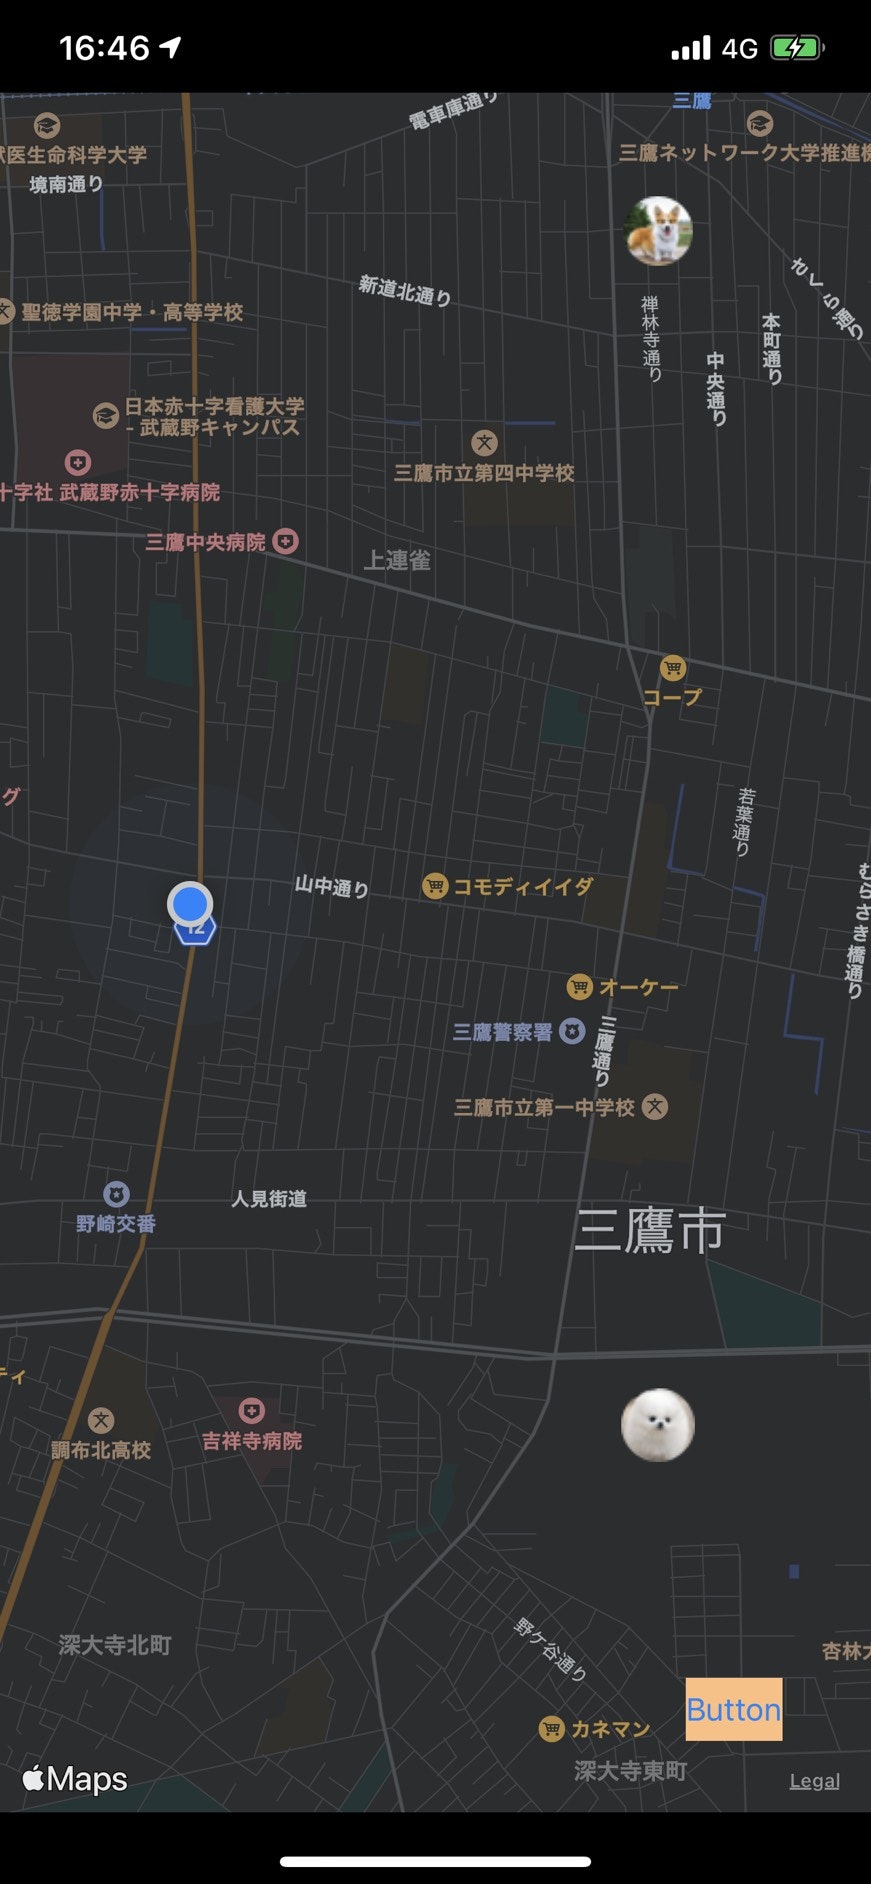
カスタムピンの表示
よくある自分のオリジナルのピンを表示したりする感じです。
APIなどで地図に表示するデータを取得して表示する、みたいな時に使う感じになると思います。
import UIKit
import MapKit
import CoreLocation

// MKPointAnnotation(要するにピン)を継承したカスタムクラスを作成
class MapAnnotationSetting: MKPointAnnotation {
    // デフォルトだとピンにはタイトル・サブタイトルしかないので、設定を追加する
    // 今回は画像だけカスタムにしたいので画像だけ追加
    var pinImage: UIImage?
}


class ViewController: UIViewController,CLLocationManagerDelegate,MKMapViewDelegate {
    @IBOutlet weak var mapView: MKMapView!
    var locationManager: CLLocationManager!

    // とりあえずテストデータで画像・タイトル・サブタイトル・位置情報を用意
    let pinImagges: [UIImage?] = [UIImage(named: "inu1"),UIImage(named: "inu2")]
    let pinTitles: [String] = ["白いい犬","茶色い犬"]
    let pinSubTiiles: [String] = ["比較的白いです","茶色いのが売りです"]
    let pinlocations: [CLLocationCoordinate2D] = [CLLocationCoordinate2DMake(35.68, 139.56),CLLocationCoordinate2DMake(35.70, 139.56)]

    override func viewDidLoad() {
        super.viewDidLoad()

        // 省略

        // カスタムピンの表示
        // for文で配列の値を回す(ここはいろんなやり方があると思います。)
        for (index,pinTitle) in self.pinTitles.enumerated() {
            // カスタムで作成したMapAnnotationSettingをセット(これで画像をセットできる)
            let pin = MapAnnotationSetting()

            // 用意したデータをセット
            let coordinate = self.pinlocations[index]
            pin.title = pinTitle
            pin.subtitle = self.pinSubTiiles[index]
            // 画像をセットできる
            pin.pinImage = pinImagges[index]

            // ピンを立てる
            pin.coordinate = coordinate
            self.mapView.addAnnotation(pin)
        }
    }

   func mapView(_ mapView: MKMapView, viewFor annotation: MKAnnotation) -> MKAnnotationView? {
        // 自分の現在地は置き換えない(青いフワフワのマークのままにする)
        if (annotation is MKUserLocation) {
            return nil
        }

        let identifier = "pin"
        var annotationView: MKAnnotationView!

        if annotationView == nil {
            annotationView = MKAnnotationView(annotation: annotation, reuseIdentifier: identifier)
        }

        // ピンにセットした画像をつける
        if let pin = annotation as? MapAnnotationSetting {
            if let pinImage = pin.pinImage {
               annotationView.image = pinImage
            }
        }
        annotationView.annotation = annotation
        // ピンをタップした時の吹き出しの表示
        annotationView.canShowCallout = true

        return annotationView
    }


}
これで、カスタムのピンが表示される
Mapを触ってみて
いろんなことができすぎるのと、仕組みがまだ理解できていないのでちゃんと理解しないとしんどそう・・。
次はFirebaseと連携してUber的なアプリ作る