概要
この記事では Context APIを使用して、グローバルな値を管理する方法をまとめます。
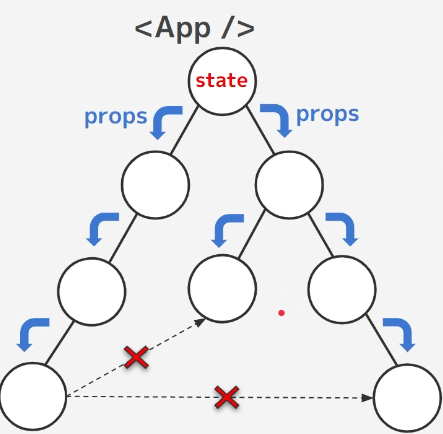
Context API は、コンポーネント間でグローバルな値を共有するための機能です。
公式から提供されている機能のため、Reduxのような外部の状態管理ライブラリを使わずに、状態管理が可能です。
Context APIを使用することで、propsのバケツリレー防ぐことができます。
Context APIの基本的な使い方
1. Contextの作成:
グローバル値を利用する親コンポーネントでcreateContextメソッドを使用し、Contextオブジェクトを作成します。
引数: デフォルト値
グローバルで管理したい値も合わせて定義しておきます。
// 1. contextの作成
type ParentContextType = [number, Dispatch<SetStateAction<number>>];
export const ParentContext = createContext<ParentContextType>({} as never);

const Parent: FC = () => {
  // 2. グローバル管理したい状態の定義
  const [state, setState] = useState(0);
  // ...
}
2. Provider コンポーネント:
Contextオブジェクトには Provider というコンポーネントが含まれています。
このコンポーネントを使用して、子コンポーネントにコンテキストの値を提供します。
// 1. contextの作成
type ParentContextType = [number, Dispatch<SetStateAction<number>>];
export const ParentContext = createContext<ParentContextType>({} as never);

const Parent: FC<PropsWithChildren> = ({ children }) => {
  // 2. グローバル管理したい状態の定義
  const [state, setState] = useState(0);

  return (
    // 3. Provider valueに、グローバル管理したい値を指定
    <ParentContext.Provider value={[state, setState]}>
      <h1>Parent</h1>
      { children }
    </ParentContext.Provider>
  );
};
3. useContext フックの使用
コンテキストの値を使用するには、useContext フックを使用します。
コンテキストに格納されている値を取得して、子コンポーネントで使用することができます。
import { FC, useContext } from 'react';
import { ParentContext } from './Parent';

const ChildSecond: FC = () => {
  // 1. Context Valueの取得
  const [state, setState] = useContext(ParentContext);

  return (
    <>
      <h2>ChildSecond</h2>
      <p>state is {state}</p>
      <button onClick={() => setState((state) => ++state)}>+</button>
    </>
  );
};
useReducerを使用した場合
useReducerを使用する場合のコードも紹介します。
まずはSliceを定義します。
// counterSlice.ts
import { createSlice, PayloadAction } from "@reduxjs/toolkit";

type CounterState = { value: number };
const initialState: CounterState = { value: 0 };

export const counterSlice = createSlice({
  name: "counter",
  initialState,
  reducers: {
    countUp(state, action: PayloadAction<number>) {
      state.value += action.payload;
    },
    countDown(state, action: PayloadAction<number>) {
      state.value -= action.payload;
    },
  },
});
Sliceを定義したら、ContextとProviderを定義して完了です。
// App.tsx
import { createContext, FC, PropsWithChildren, useReducer } from "react";
import { counterSlice, initialState } from "./stores/counter";

const { actions, reducer } = counterSlice;
const { countUp, countDown } = actions;

type CountContextType = [
  number,
  (count: number) => void,
  (count: number) => void
];
export const CountContext = createContext<CountContextType>({} as never);

const ContextProvider: FC<PropsWithChildren> = ({ children }) => {
  const [state, dispatch] = useReducer(reducer, initialState);
  const handleHogeUp = (count: number) => dispatch(countUp(count));
  const handleHogeDown = (count: number) => dispatch(countDown(count));

  return (
    <CountContext.Provider value={[state.value, handleHogeUp, handleHogeDown]}>
      {children}
    </CountContext.Provider>
  );
};

export default ContextProvider;
useContextの注意点
useContextを使用したコンテキストの値が更新されると、そのコンテキストを利用している全てのコンポーネントが再レンダリングされます。
1つのコンテキストに状態と更新関数を含める場合、更新関数のみを利用するコンポーネントについても、再レンダリングが発生するということです。
再レンダリングを防ぐ対策
- Stateと更新関数を別のProviderで渡す:
状態と更新関数を分離し、別々のコンテキストとして提供することで、状態変更時の再レンダリングを防ぎます。
return (
  <StateContext.Provider value={[state]}>
    <DispacherContext.Provider value={dispacher}>
      {children}
    </DispacherContext.Provider>
  </StateContext.Provider>
);
- useMemoやuseCallbackの活用:
コンポーネント内で計算される値や、propsを通じて渡されるコールバックがある場合、useMemoやuseCallbackを使用して、不要な再計算や再生成を防ぎます。
まとめ
useContextを利用する利点として、以下の点が挙げられます。
- シンプルで直接的: Reduxのような外部ライブラリに依存せず、Reactの内部機能だけで状態管理が行える
- パフォーマンスの向上: 不必要なpropsの受け渡しを減らすことで、コンポーネントの再レンダリングを抑制し、パフォーマンスを向上させることができる
- 保守性の向上: コンポーネント構造がシンプルになり、保守が容易になる
Reduxと適切に使い分けて、グローバルな状態管理を行っていきましょう ![]()