Amazon provides a hosted Container Service for Docker called EC2 Container Service (ECS) as part of its container focused suite of services. Many of our customers seem to love the ECR (EC2 Container Registry) and ECS combination to store and run their applications. Amazon ECS can be accessed by going to your [AWS Management Console] (https://console.aws.amazon.com/console), selecting EC2 Container Service from the list of Services.
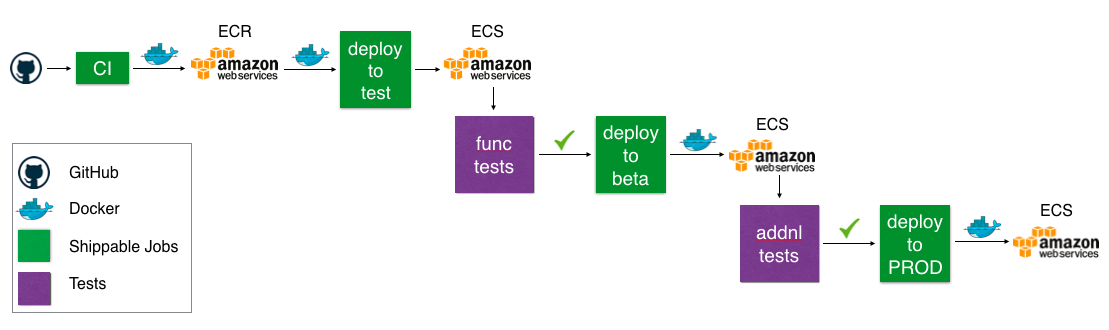
In [part I of this series] (http://blog.shippable.com/pushing-your-docker-image-to-amazon-ecr), we demonstrated a simple scenario where we built and pushed a Docker image to ECR as part of the CI build workflow. In this blog post, I will show how you can set up deployment of the same sample application into Amazon ECS, In the last part of this series, I'll show how you can complete your Continuous Delivery pipeline with deployment into subsequent environments, promotion workflows between environments, and release management.
If you want to see an extended version of this scenario in action, attend our webinar in February by [signing up] (http://cta-service-cms2.hubspot.com/ctas/v2/public/cs/c/?cta_guid=eeabe810-5be4-406f-99f7-f7ea88efdb3c&placement_guid=0a61d2bc-d5c4-43e6-8666-7db728d59e29&portal_id=362403&redirect_url=APefjpE2SRHNMeOY4WDUT1TKPyzDOGvR0hUPjQ1mn2FXqPjHKZXHPq5SfDzgdtCxI0HpHcQo7CtgLVemre2Xn1ehHCHOu17cHbVjuZR4KRlEY_uRDtaEcOI0DTFYU9VG1q8zS7AWZSlrs7oer5b_Eu0wf5sUIdAlKr_s3au0egpEl4-dsmdgij2o9LATyuocHYNLa-groxwFYL5IbpsIo0boAQD66JVsB36ves7LmQXPB47B_hTzINR_MH1ZhZfMTsGY-6Ii0Qk81EsGJE1aPHViMNGy_5f1WUfjzHJI2oCYusnKr8MWxS8&hsutk=090ea56cb3e56dc778fed9be6eb7a359&utm_referrer=http%3A%2F%2Fblog.shippable.com%2Fcontinuous-delivery-from-github-to-amazon-ecs&canon=http%3A%2F%2Fblog.shippable.com%2Fcontinuous-delivery-from-github-to-amazon-ecs&__hstc=218004681.090ea56cb3e56dc778fed9be6eb7a359.1474453820322.1486012226445.1486015057347.354&__hssc=218004681.3.1486015057347&__hsfp=3422217957)
Before you start, please follow all steps in [our blog] (http://blog.shippable.com/pushing-your-docker-image-to-amazon-ecr). You should have enabled the sample application for CI and run a build which will build and push a Docker image to Amazon ECR. The following steps assume you already have all this in place. Now, for the next steps.
Switch to the pipelines branch
If you followed all steps in the [Pushing your Docker image to Amazon ECR] (http://blog.shippable.com/pushing-your-docker-image-to-amazon-ecr) blog, you will have a [forked version of the sample application] (https://github.com/shippableSamples/sample-docker-push-registry). From your command line, switch to the pipelines branch by running git checkout pipelines
Create a cluster on Amazon ECS
- Before you can deploy your application, you will need a cluster on ECS with at least one machine. To create a cluster, follow the instructions in the Amazon ECS docs.
Note down your cluster name and region.
Edit pipeline configuration ymls
- The pipelines branch contains 2 files: shippable.resources.yml and shippable.jobs.yml. The resources file contains config for all resources needed for your pipeline, like clusters, key-value paramaters, pointer to docker image(s), etc. A full list of resources is available in our docs. The jobs file contains config for the jobs in your pipeline, like manifest generation, deployments, releases, etc. A complete list of jobs is available in our docs.
Update shippable.resources.yml and make the following edits:
dv-img resource
update your Amazon ECR integration in the integration: tag
update the path to your Docker image in the sourceName: tag
update the tag of the image you've pushed to Amazon ECR in the versionName: tag
env-test-ecs resource
update your Amazon ECS integration in the integration: tag
replace demo-shippable-ecs-test with your cluster name
replace us-east-1 with the region where your cluster is located
Commit and push your changes.
Understand the configuration
Before you proceed with setting up this pipeline on Shippable, let's take a moment to understand what it does.
The resources configured in shippable.resources.yml are:
shipdemo-img is an image resource for the [image] (http://docs.shippable.com/pipelines/resources/image/) to be deployed.
shipdemo-img-options is a [dockerOptions] (http://docs.shippable.com/pipelines/resources/image/) resource which specifies options for the container, like memory, port mappings, etc.
ecs-test-cluster is a [cluster] (http://docs.shippable.com/pipelines/resources/cluster/) resource specifying where the demo application should be deployed
The jobs configured in shippable.jobs.yml are:
shipdemo-manifest is a [manifest] (http://docs.shippable.com/pipelines/jobs/manifest/) job that creates a new service manifest each time the image dv-img is updated.
shipdemo-test-deploy is a [deploy] (http://docs.shippable.com/pipelines/jobs/deploy/) job that deploys the manifest dv-man to the Test cluster env-test-ecs
Seed your pipeline in Shippable
3. Seed your pipeline by following the instructions below:
From the [Shippable dashboard] (https://app.shippable.com/), go to the Subscription where you forked the sample repo
Follow instructions on the Pipelines page to [seed your pipeline] (http://docs.shippable.com/pipelines/gettingStarted/#seedPipeline). Please make sure to select the pipelines branch while seeding the pipeline.
Go to the SPOG pill menu of your Pipelines tab and voila! You should see your pipeline there.
Deploy to Test
- Right click on the shipdemo-manifest job in the SPOG view and click on Run. This will run the manifest job which creates a new service manifest. The deploy job is set up to run after manifest finishes, so it will be automatically triggered.
Check out your deployed demo on ECS
5. You can now go to your AWS management console and navigate to the deployed application by following the steps below:
Go to your ECS cluster by navigating to EC2 Container Service and clicking on the cluster name
Click on the Service Name starting with shipdemo. This will take you to the Tasks page
Click on the Task to navigate to the containers page.
Expand the container to view the IP address of your deployed application
Click on the IP address will open up a new browser tab and show you the running application.
Connect your CI to the newly created pipeline
Now that you have your pipeline, you should connect it to your CI. On completing this step, every code change to your sample application will trigger a deployment to the node cluster we set up in previous steps.
-
Create an API token for your account. To do this, go to your Account Settings by clicking on the gear icon in the top navbar. Then click on API tokens in the left sidebar menu and create a token. Copy the token since you won't be able to see it again.
-
Next, create an Event Trigger integration. Go to Integrations in the left sidebar menu of Account Settings and then click on Add Integration. Select Event Trigger from the list and complete the settings as shown below. Please make sure you update the Authorization textbox in the format apiToken . The resource name should be set to the image resource shipdemo-img. Save the integration.
-
Update shippable.yml in the master branch of your forked repository which contains the sample application. Uncomment the notifications section and include the event trigger name you created in the earlier step.
notifications:
- integrationName: #your event trigger integration name
type: webhook
payload:- versionName=$BUILD_NUMBER
on_success: always
Commit and push to the master branch of your forked repository. This should trigger a build which will create a new version of the manifest and redeploy to the Test environment on ECS. Watch the SPOG window to see all this in real time!
- versionName=$BUILD_NUMBER
Change your app and see the changes automatically deployed to ECS
Now make a simple change to the app in the master branch by changing the color from #fff to som other color in the css stylesheet static/app.css
.shippableText{
color: #fff;
text-align: center;
font-size: 8em;
}
Commit and push your changes. Your app will be continuously deployed to your Test environment and when you see deployment finish in SPOG, you can verify that your deployed app has been updated with the new color.
In part III of this series, I will show you how to complete the rest of the CD pipeline, including setting up additional environments, promotion workflows, release management, etc. Stay tuned!