概要
GPT-4 に全自動で Minecraft をプレイさせる論文 "Voyager: An Open-Ended Embodied Agent with Large Language Models" を紹介します。
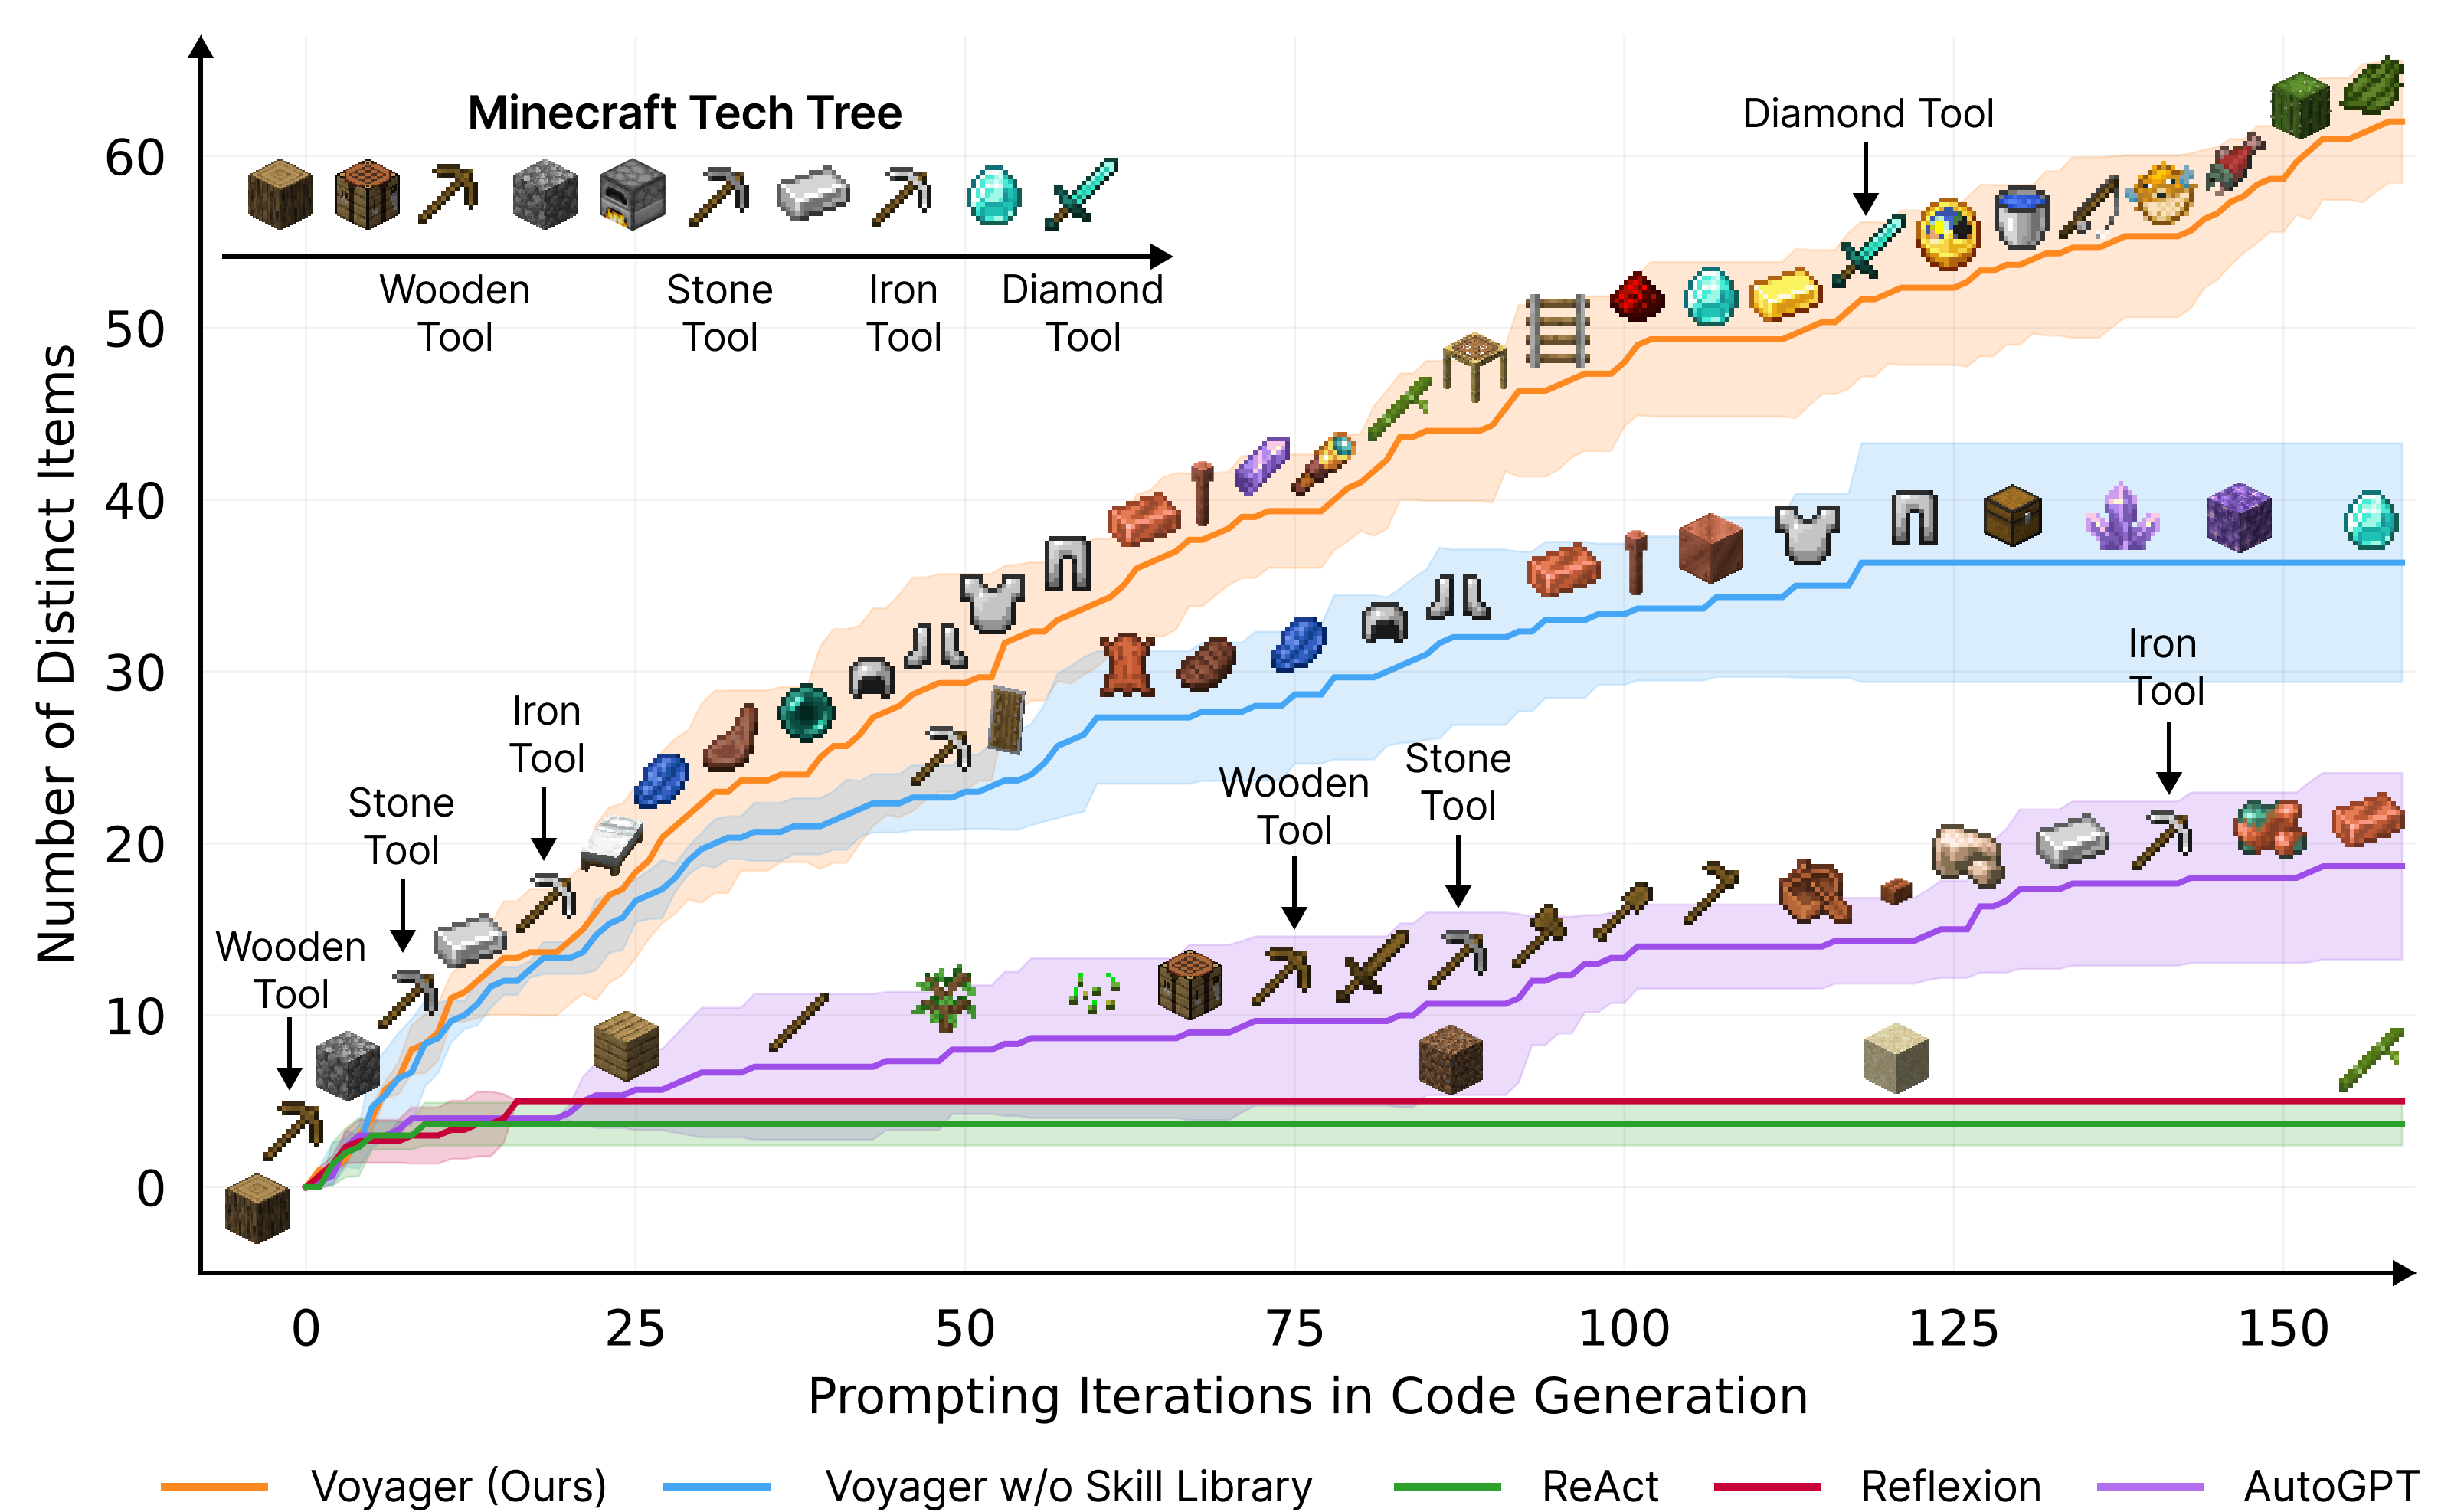
Voyager は、継続的・段階的に複雑なタスクを学習し続けることができ、マップ開拓や新アイテム獲得の能力で既存手法に勝ると主張されています。
既存手法との違い
LLM にツールや外部 API を与えて自律的に計画・行動させるアルゴリズムと言うと、ReAct, Reflexion, Auto-GPT などが特に有名です。
これらと Voyager の一番の差別化部分は、Iterative Prompting Mechanism および Skill Library と呼ばれるコンポーネントです。
Voyager はボットを操作するために Mineflayer という JavaScript API を利用しており、「ゾンビと戦う」などのタスクを実行するコードを GPT-4 に生成させて eval します。
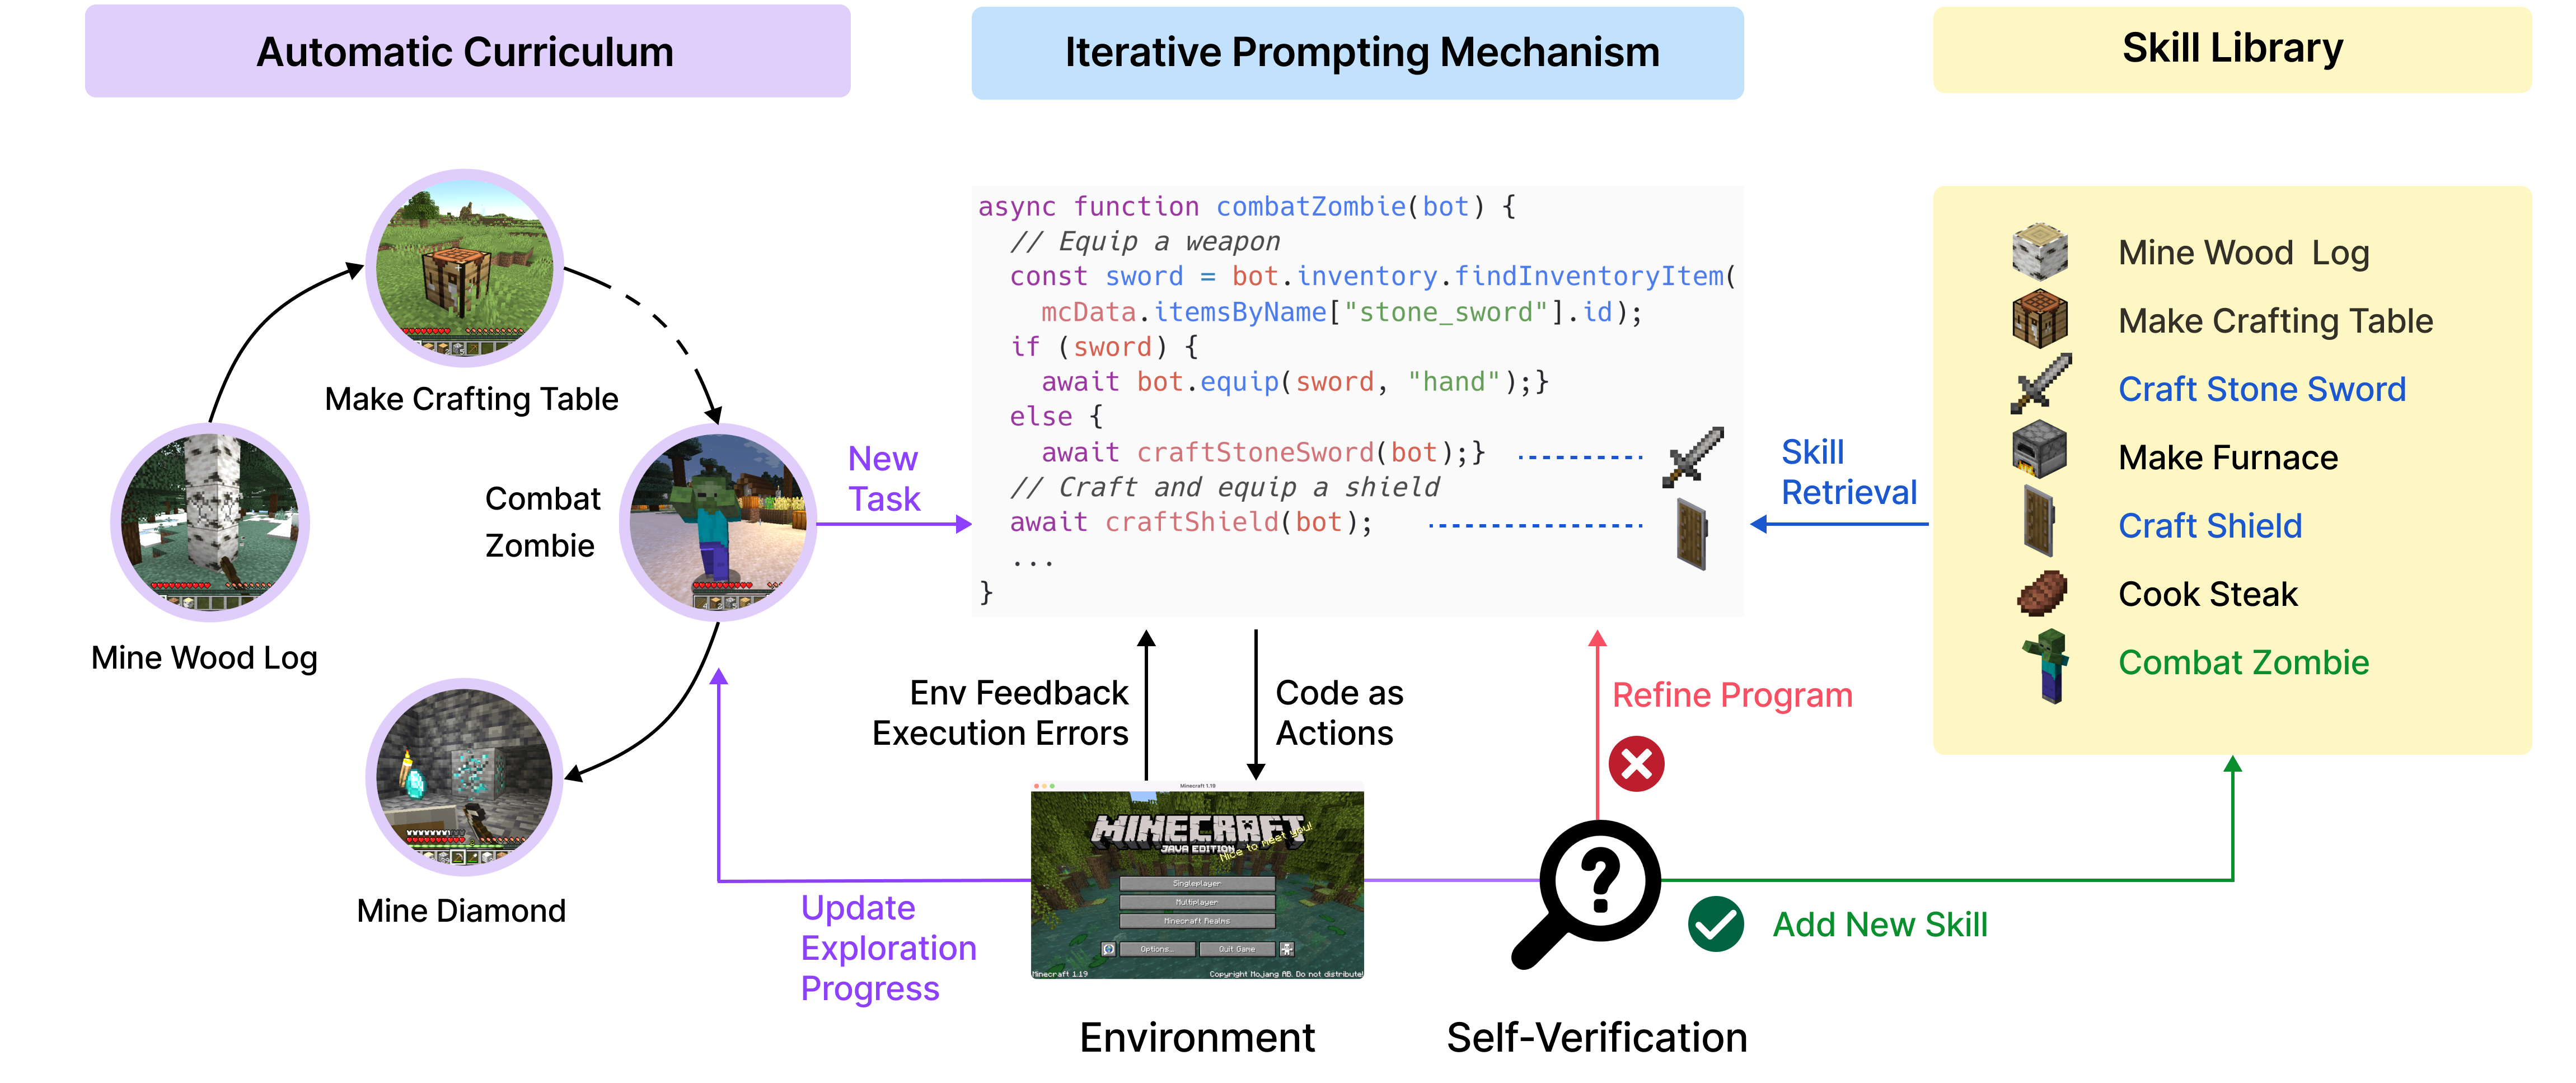
実行結果やエラーのフィードバックを受けて自動でコードを修正し、最終的にタスクに成功した場合のみコードが Skill Library に保存されます。この時にコードの説明文をベクトル埋め込みして保存し、必要に応じて学習済みのスキルを再度実行できるようになっています。
実行結果
コスト
Open AI API の使用料が 1 時間あたり大体 5 ドル程度かかります。
録画
次の動画は、Voyager を実行している様子をリアルタイムかつノーカットで録画したものです。
ほとんどの時間静止したままですが、これはバグではありません。
GPT のレスポンスを待つ間ボットは何もできないので、Minecraft サーバーを一時停止する処理がスクリプトに組み込まれています。
ReplayMod を使って、後半部分ボットが動いている間だけ抽出したのが以下の動画です。12:07 あたりでは金を採掘することに成功しています。
ボットが詰まった部分
動画の最後でインベントリが一杯になってチェストにアイテムを保管しようとしていますが、妙に狭い場所にいるためか上手くチェストに触れることができずスタックしています。
この時 GPT-4 が生成したコードは以下の通りで、特におかしな点は見当たりません。おそらく、プリミティブとして使われている JS コードの方が足を引っ張っていそうです。
6 月 2 日追記:ボットのチェスト管理周りのコードにバグがあったようで、無事修正されました。 (GitHub issue)
async function placeAndDepositUselessItems(bot) {
  // Find a suitable position to place the chest
  const chestPosition = bot.entity.position.offset(1, -1, 0);
  const chestBlock = bot.blockAt(chestPosition);
  if (chestBlock && chestBlock.name === "chest") {
    bot.chat("Chest already exists at the position.");
  } else {
    // Find an empty position to place the chest
    const emptyPosition = bot.entity.position.offset(1, -1, 1);
    const emptyBlock = bot.blockAt(emptyPosition);
    if (emptyBlock && emptyBlock.name === "air") {
      // Place the chest at the empty position
      await placeItem(bot, "chest", emptyPosition);
      bot.chat("Chest placed.");
    } else {
      bot.chat("No suitable position found to place the chest.");
      return;
    }
  }

  // Update the chest position after placing it
  const updatedChestPosition = bot.findBlock({
    matching: mcData.blocksByName.chest.id,
    maxDistance: 32
  }).position;

  // Define a list of useless items to deposit
  const uselessItems = {
    andesite: bot.inventory.count(mcData.itemsByName.andesite.id),
    dirt: bot.inventory.count(mcData.itemsByName.dirt.id),
    cobblestone: bot.inventory.count(mcData.itemsByName.cobblestone.id),
    wooden_pickaxe: bot.inventory.count(mcData.itemsByName.wooden_pickaxe.id)
  };

  // Deposit the useless items into the chest
  await depositItemIntoChest(bot, updatedChestPosition, uselessItems);
  bot.chat("Useless items deposited.");

  // Check the number of occupied inventory slots after depositing
  const occupiedSlots = bot.inventory.used();
  if (occupiedSlots <= 20) {
    bot.chat(`Success! Inventory has ${occupiedSlots} occupied slots.`);
  } else {
    bot.chat(`Failed! Inventory still has ${occupiedSlots} occupied slots.`);
  }
}
チェックポイント
Voyager を実行するとプロジェクトルート直下に /ckpt ディレクトリが作成され、イベント履歴などが保存されます。
特に /ckpt/skill/code 以下には Skill Library に追加された JavaScript コードが置かれるため、どんなタスクを達成したのか詳しく確認することができます。
今回生成された /ckpt のファイルと、GPT への全リクエスト履歴を以下の GitHub レポジトリで公開しています。
例として、金の採掘に成功した際のコードは以下の通りです。
async function mineGoldOreAndSmelt(bot) {
  // Check if the bot has an iron pickaxe or better in its inventory
  const ironPickaxe = bot.inventory.findInventoryItem(mcData.itemsByName.iron_pickaxe.id);
  const diamondPickaxe = bot.inventory.findInventoryItem(mcData.itemsByName.diamond_pickaxe.id);

  // If not, craft an iron pickaxe
  if (!ironPickaxe && !diamondPickaxe) {
    await craftItem(bot, "iron_pickaxe", 1);
    bot.chat("Iron pickaxe crafted.");
  }

  // Explore in a random direction until a gold ore is found
  const randomDirection = new Vec3(Math.random() > 0.5 ? 1 : -1, 0, Math.random() > 0.5 ? 1 : -1);
  const goldOre = await exploreUntil(bot, randomDirection, 300, () => {
    const foundGoldOre = bot.findBlock({
      matching: mcData.blocksByName.gold_ore.id,
      maxDistance: 32
    });
    return foundGoldOre;
  });
  if (goldOre) {
    // Mine the gold ore
    await mineBlock(bot, "gold_ore", 1);
    bot.chat("Gold ore mined.");

    // Place the furnace if not already placed
    const furnaceBlock = bot.findBlock({
      matching: mcData.blocksByName.furnace.id,
      maxDistance: 32
    });
    if (!furnaceBlock) {
      const furnacePosition = bot.entity.position.offset(1, -1, 1);
      await placeItem(bot, "furnace", furnacePosition);
      bot.chat("Furnace placed.");
    }

    // Smelt the gold ore in the furnace to obtain a gold ingot
    await smeltItem(bot, "gold_ore", "coal", 1);
    bot.chat("Gold ore smelted into gold ingot.");
  } else {
    bot.chat("Gold ore not found within exploration time.");
  }
}
手元で動かす方法
セットアップ
GitHub レポジトリの README に詳しい手順が記載されています。
- Python 3.11 だと依存パッケージインストール時にエラーが起きます。3.9 か 3.10 を使いましょう
- ローカルに Minecraft がインストールされている前提で諸々ハードコードされているので、Docker コンテナなどを使おうとすると面倒です
-
LAN に公開する時はゲームモード:サバイバルのままにしてください。クリエイティブモードだとインベントリが無いためボットがアイテムを拾ったか判定できず、同じタスクでスタックします
ボットを観察するには
- 実行時間の大半はポーズ状態なので、ReplayMod などを使って録画しておくことをお勧めします
- リアルタイムに監視する際には Minecraft の spectate コマンドが便利です (
/spectate bot) - ボットは松明無しに地下へ潜りがちなため、自キャラに暗視効果をつけておくと良いでしょう (
/effect give @s minecraft:night_vision) - タスクを 1 つ達成するたびにボットがサーバーを出入りするため、毎回 spectate が解除されてしまいます。コードのこの部分に以下のようなコマンドを仕込んでおくと楽です
    bot.once("spawn", async () => {
+       bot.chat("spectate @s @p)
        bot.removeListener("error", onConnectionFailed);