Bedrock AgentCoreを試したくて、最小構成で試してみました。
参考にしたのは、以下のドキュメントです。
bedrock-agentcore-starter-toolkit ありバージョン
1. 仮想環境を準備
Pythonの仮想環境を準備します。まずはターミナルを開いて、作業ディレクトリを用意します。
$ mkdir playground && cd $_
$ mkdir test-bedrock-agentcore
ここまできたら、一旦コードエディタ開いて、test-bedrock-agentcoreディレクトリを開きましょう。
エディタでターミナルを開いて、以下のコマンドを実行します。
$ mkdir venv
$ python3 -m venv ./venv
$ source ./venv/bin/activate
2. パッケージをインストール
以下のコマンドを実行します。
$ pip install bedrock-agentcore strands-agents bedrock-agentcore-starter-toolkit
3. Agent用のPythonファイルとパッケージの定義ファイルを作成する
$ mkdir source && cd $_
$ touch my_agent.py
$ touch requirements.txt
ファイルができるので、エディタで開きます。
4. Pythonコードをペースト
my_agent.pyに以下のコードをペーストします。
from bedrock_agentcore import BedrockAgentCoreApp
from strands import Agent

app = BedrockAgentCoreApp()
agent = Agent()

@app.entrypoint
def invoke(payload):
    """Your AI agent function"""
    user_message = payload.get("prompt", "Hello! How can I help you today?")
    result = agent(user_message)
    return {"result": result.message}

if __name__ == "__main__":
    app.run()
5. パッケージを定義する
requirements.txtに以下をペーストします。
bedrock-agentcore
strands-agents
6. Pythonコードを実行
ターミナルで、以下のコードを実行します。
$ python my_agent.py
これでAgentが起動します。Agentが起動したら、このターミナルは待機中状態になるので放置しておきます。
7. Agentの動作を確認
新しくターミナルを開いて、以下のコマンドを実行します。
$ curl -X POST http://localhost:8080/invocations \ -H "Content-Type: application/json" \ -d '{"prompt": "Hello!"}'
以下のような結果が返ってくれば成功です。(人によって文言は変わるはずです。)
{
  "result": {
    "role": "assistant",
    "content": [
      {
        "text": "Hello! It's nice to meet you. How are you doing today? Is there anything I can help you with?"
      }
    ]
  }
}
成功していることを確認したら、手順7で実行したAgentを止めます。
Agentが起動しているターミナルでCtrl + Cを押下してください。Agentが止まります。
8. Agentcoreの設定を確認
Agentが起動していたターミナルで以下のコマンドを実行します。
(どうしても別のターミナルで実行したい場合は、source ./venv/bin/activateをそのターミナルで実行してから、以下のコマンドを実行してください。)
$ agentcore configure -e my_agent.py
コマンドを実行すると、以下のような出力が確認できます。
$ agentcore configure -e my_agent.py

Configuring Bedrock AgentCore...
Entrypoint parsed: file=/Users/testuser/playground/test-bedrock-agentcore/source/my_agent.py, bedrock_agentcore_name=my_agent
Agent name: my_agent

🔐 Execution Role
Press Enter to auto-create execution role, or provide execution role ARN/name to use existing
Execution role ARN/name (or press Enter to auto-create):
IAMロールの名前どうしますか?って聞かれてますね。ここは特にこだわりがなければ、何も入力せずにEnterで良いでしょう。(Auto-Createなので、自動でIAMロールが作成されます。)
✓ Will auto-create execution role

🏗️  ECR Repository
Press Enter to auto-create ECR repository, or provide ECR Repository URI to use existing
ECR Repository URI (or press Enter to auto-create):
ECRのリポジトリはどこにしますか?って聞かれてますね。ここも特にこだわりがなければ、何も入力せずにEnterで良いでしょう。(Auto-Createなので、自動でECRリポジトリが作成されます。)
✓ Will auto-create ECR repository

🔍 Detected dependency file: requirements.txt
Press Enter to use this file, or type a different path (use Tab for autocomplete):
Path or Press Enter to use detected dependency file:
これも、何も入力せずにEnterでOKです。
✓ Using detected file: requirements.txt

🔐 Authorization Configuration
By default, Bedrock AgentCore uses IAM authorization.
Configure OAuth authorizer instead? (yes/no) [no]:
OAuth認証使いますか?って言われていますね。今回は使用しないので、noを入力してEnterを押下します。(何も入力せずにEnterでもnoが選択されたことになります。)
すると、以下のように出力されて、設定が成功します。
Configuring BedrockAgentCore agent: my_agent
Generated .dockerignore
Generated Dockerfile: /Users/testuser/playground/test-bedrock-agentcore/source/Dockerfile
Generated .dockerignore: /Users/testuser/playground/test-bedrock-agentcore/source/.dockerignore
Setting 'my_agent' as default agent
╭─────────────────────────────────────────────────────────────────────── Configuration Success ───────────────────────────────────────────────────────────────────────╮
│ Configuration Complete                                                                                                                                              │
│                                                                                                                                                                     │
│ Agent Details:                                                                                                                                                      │
│ Agent Name: my_agent                                                                                                                                                │
│ Runtime: Docker                                                                                                                                                     │
│ Region: us-east-1                                                                                                                                                   │
│ Account: 000000000000000                                                                                                                                               │
│                                                                                                                                                                     │
│ Configuration:                                                                                                                                                      │
│ Execution Role: None                                                                                                                                                │
│ ECR Repository: Auto-create                                                                                                                                         │
│ Authorization: IAM (default)                                                                                                                                        │
│                                                                                                                                                                     │
│ 📄 Config saved to: /Users/testuser/playground/test-bedrock-agentcore/source/.bedrock_agentcore.yaml                                                              │
│                                                                                                                                                                     │
│ Next Steps:                                                                                                                                                         │
│    agentcore launch                                                                                                                                                 │
╰─────────────────────────────────────────────────────────────────────────────────────────────────────────────────────────────────────────────────────────────────────╯
現在のファイル構成は以下のようになっているはずです。
.
├── .bedrock_agentcore.yaml # これが設定ファイル
├── .dockerignore
├── Dockerfile # Agentが動作するコンテナのDockerイメージ
├── my_agent.py
└── requirements.txt
9. AgentをAgentcore Runtimeのローンチ
ローンチって、英語だと「打ち上げ」っていう意味なのですが、いわば「デプロイ」のことです。
AgentをBedrock AgentcoreRuntimeにデプロイします。
$ agentcore launch
色々とゴニョゴニョとログが出力された後に、✅ CodeBuild Deployment Successful!と出力されたら、デプロイが完了です。
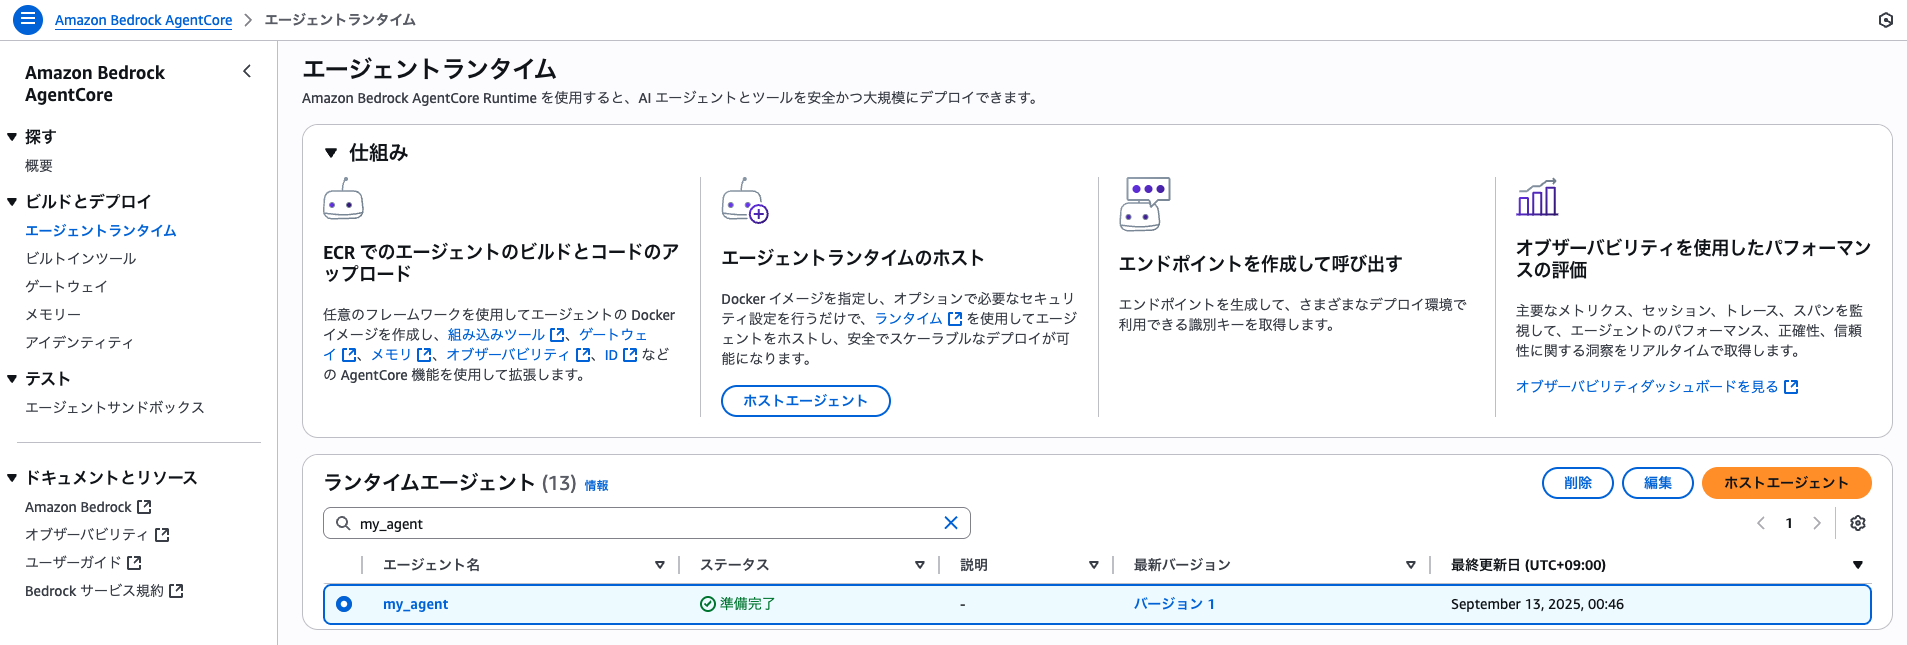
AWS マネジメントコンソールのBedrock AgentCore > エージェントランタイムの画面では、以下のように表示されているはずです。
10. ローンチしたAgentの動作を確認
デプロイしたAgentの動作確認のために、以下のリクエストを送信してみましょう。
$ agentcore invoke '{"prompt": "tell me a joke"}'
自分の場合は、以下の結果が返ってきました。
{
  "result": {
    "role": "assistant",
    "content": [
      {
        "text": "Why don't scientists trust atoms?\n\nBecause they make up everything!"
      }
    ]
  }
}
11. あとはAWS SDKで呼び出すだけ!
Pythonであれば、以下のコードで呼び出すことができます。
(このPythonコードはAgentを呼び出すコードなので、source/my_agent.pyに配置しておく必要はありません。)
# `test-bedrock-agentcore`ディレクトリに移動できればOK
$ cd ..
$ mkdir invoke && cd $_
$ touch invoke_agent.py
invoke_agent.pyに以下のコードをペーストします。
import json
import uuid
import boto3

agent_arn = "Agent ARN" # ここは自分で取得してください!
prompt = "Tell me a joke"

# Initialize the AgentCore client
agent_core_client = boto3.client('bedrock-agentcore')

# Prepare the payload
payload = json.dumps({"prompt": prompt}).encode()

# Invoke the agent
response = agent_core_client.invoke_agent_runtime(
    agentRuntimeArn=agent_arn,
    payload=payload
)

content = []
for chunk in response.get("response", []):
    content.append(chunk.decode('utf-8'))
print(json.loads(''.join(content)))
agent_arn = "Agent ARN"の部分で、必ず作成したエージェントのARNをペーストしてください!
最後に、以下を実行します。
python invoke_agent.py
先ほどを同じような結果が返ってくればOKです!
bedrock-agentcore-starter-toolkit なしバージョン
1. 仮想環境を準備
Pythonの仮想環境を準備します。まずはターミナルを開いて、作業ディレクトリを用意します。
$ mkdir playground && cd $_
$ mkdir test-bedrock-agentcore
ここまできたら、一旦コードエディタ開いて、test-bedrock-agentcoreディレクトリを開きましょう。
エディタでターミナルを開いて、以下のコマンドを実行します。
$ uv init --python 3.13
$ uv add fastapi 'uvicorn[standard]' pydantic httpx strands-agents
treeコマンドを実行したときに、以下のようになっていればOKです。
.
├── agent.py # main.pyになっている場合は変更しておく
├── pyproject.toml
├── README.md
└── uv.lock
2. agent.pyにPythonコードをペースト
agent.pyに以下のコードをペーストします。
from fastapi import FastAPI, HTTPException
from pydantic import BaseModel
from typing import Dict, Any
from datetime import datetime
from strands import Agent

app = FastAPI(title="Strands Agent Server", version="1.0.0")

# Initialize Strands agent
strands_agent = Agent()

class InvocationRequest(BaseModel):
    input: Dict[str, Any]

class InvocationResponse(BaseModel):
    output: Dict[str, Any]

@app.post("/invocations", response_model=InvocationResponse)
async def invoke_agent(request: InvocationRequest):
    try:
        user_message = request.input.get("prompt", "")
        if not user_message:
            raise HTTPException(
                status_code=400,
                detail="No prompt found in input. Please provide a 'prompt' key in the input."
            )

        result = strands_agent(user_message)
        response = {
            "message": result.message,
            "timestamp": datetime.utcnow().isoformat(),
            "model": "strands-agent",
        }

        return InvocationResponse(output=response)

    except Exception as e:
        raise HTTPException(status_code=500, detail=f"Agent processing failed: {str(e)}")

@app.get("/ping")
async def ping():
    return {"status": "healthy"}

if __name__ == "__main__":
    import uvicorn
    uvicorn.run(app, host="0.0.0.0", port=8080)
3. ローカルで動作テスト
Webサーバーを起動します。
$ uv run uvicorn agent:app --host 0.0.0.0 --port 8080
別のターミナルを開いて、以下を実行します。(ヘルスチェックです。)
$ curl http://localhost:8080/ping
以下のようなJSONが返ってくればOKです。
{"status":"healthy"}
実際にエージェントにリクエストを投げてみます。
$ curl -X POST http://localhost:8080/invocations \
  -H "Content-Type: application/json" \
  -d '{
    "input": {"prompt": "What is artificial intelligence?"}
  }'
以下のようにJSONが返ってくればOKです。
{
    "output": {
        "message": {
            "role": "assistant",
            "content": [
                {
                    "text": "Artificial intelligence (AI) refers to computer systems designed to perform tasks that typically require human intelligence. This includes abilities like:\n\n**Core capabilities:**\n- Learning from data and experience\n- Recognizing patterns\n- Making decisions and predictions\n- Understanding and generating language\n- Processing visual information\n- Solving complex problems\n\n**Common applications:**\n- Virtual assistants (like me!)\n- Image and speech recognition\n- Recommendation systems\n- Autonomous vehicles\n- Medical diagnosis assistance\n- Game playing (chess, Go, etc.)\n\n**Types of AI:**\n- **Narrow AI** - designed for specific tasks (most current AI)\n- **General AI** - hypothetical human-level intelligence across all domains\n- **Machine Learning** - AI that improves through data exposure\n- **Deep Learning** - uses neural networks inspired by the brain\n\nAI works by processing large amounts of data to identify patterns and make predictions or decisions. Rather than being explicitly programmed for every scenario, AI systems can adapt and improve their performance over time.\n\nThe field combines computer science, mathematics, cognitive science, and other disciplines to create systems that can augment or automate intelligent behavior.\n\nIs there a particular aspect of AI you'd like me to explain further?"
                }
            ]
        },
        "timestamp": "2025-09-13T00:52:55.536699",
        "model": "strands-agent"
    }
}
先ほどWebサーバーを起動したターミナルで、Ctrl + Cを実行してWebサーバーを止めておきましょう。
4. Dockerfile準備
Bedrock AgentCoreでは、ECRにDockerイメージをデプロイする必要があるので、Dockerfileを用意します。まず、以下のコマンドを実行します。
$ touch Dockerfile
Dockerfileが作成されるので、以下のコードをペーストします。
# Use uv's ARM64 Python base image
FROM --platform=linux/arm64 ghcr.io/astral-sh/uv:python3.13-bookworm-slim

WORKDIR /app

# Copy uv files
COPY pyproject.toml uv.lock ./

# Install dependencies (including strands-agents)
RUN uv sync --frozen --no-cache

# Copy agent file
COPY agent.py ./

# Expose port
EXPOSE 8080

# Run application
CMD ["uv", "run", "uvicorn", "agent:app", "--host", "0.0.0.0", "--port", "8080"]
5. Dockerイメージをビルド
ターミナルで以下のコマンドを実行します。
$ docker buildx create --use
6. ビルドしたDockerイメージをテスト
ターミナルで以下のコマンドを実行します。
$ docker buildx build --platform linux/arm64 -t my-agent:arm64 --load .
docker runコマンドでイメージを起動します。
$ docker run --platform linux/arm64 -p 8080:8080 \
  -e AWS_ACCESS_KEY_ID="$AWS_ACCESS_KEY_ID" \
  -e AWS_SECRET_ACCESS_KEY="$AWS_SECRET_ACCESS_KEY" \
  -e AWS_SESSION_TOKEN="$AWS_SESSION_TOKEN" \
  -e AWS_REGION="$AWS_REGION" \
  my-agent:arm64
以下のように、ログが出てくればOKです。
INFO:     Started server process [10]
INFO:     Waiting for application startup.
INFO:     Application startup complete.
INFO:     Uvicorn running on http://0.0.0.0:8080 (Press CTRL+C to quit)
7. ECRにログインする
以下のコマンドを実行します。
$ export AWS_ACCOUNT_ID=$(aws sts get-caller-identity --query Account --output text)
$ export AWS_REGION=us-east-1
$ aws ecr get-login-password --region ${AWS_REGION} | docker login --username AWS --password-stdin ${AWS_ACCOUNT_ID}.dkr.ecr.${AWS_REGION}.amazonaws.com
8. Dockerイメージをビルドする
以下のコマンドを実行します。
$ docker buildx build --platform linux/arm64 -t ${AWS_ACCOUNT_ID}.dkr.ecr.${AWS_REGION}.amazonaws.com/my-strands-agent:latest --push .
以下のようなエラーが出たら、以下のコマンドを実行してECRリポジトリを作成してください。
ERROR: failed to solve: failed to push 123456789012.dkr.ecr.us-east-1.amazonaws.com/my-strands-agent:latest: unknown: The repository with name 'my-strands-agent' does not exist in the registry with id '123456789012'
$ aws ecr create-repository \
    --repository-name my-strands-agent \
    --region us-east-1
9. ビルドしたDockerイメージをECRにデプロイする
以下のコマンドを実行します。
$ aws ecr describe-images --repository-name my-strands-agent --region ${AWS_REGION}
これで、AgentのDockerイメージをデプロイすることができました。
10. Bedrock AgentCoreにデプロイ
Bedrock AgentCoreにデプロイする前に、AgentRuntime用のIAMロールを作成します。
10-1. IAMポリシーの作成
まず、IAMポリシーの管理画面へ遷移し、「ポリシーの作成」ボタンをクリックします。
画面右の「ビジュアル」というところをいじって、「JSON」を選択します。
ポリシーエディタに以下をコピーします。この時、アカウントIDはご自身のものに変更してください。
{
    "Version": "2012-10-17"		 	 	 ,
    "Statement": [
        {
            "Sid": "ECRImageAccess",
            "Effect": "Allow",
            "Action": [
                "ecr:BatchGetImage",
                "ecr:GetDownloadUrlForLayer"
            ],
            "Resource": [
                "arn:aws:ecr:us-east-1:123456789012:repository/*"
            ]
        },
        {
            "Effect": "Allow",
            "Action": [
                "logs:DescribeLogStreams",
                "logs:CreateLogGroup"
            ],
            "Resource": [
                "arn:aws:logs:us-east-1:123456789012:log-group:/aws/bedrock-agentcore/runtimes/*"
            ]
        },
        {
            "Effect": "Allow",
            "Action": [
                "logs:DescribeLogGroups"
            ],
            "Resource": [
                "arn:aws:logs:us-east-1:123456789012:log-group:*"
            ]
        },
        {
            "Effect": "Allow",
            "Action": [
                "logs:CreateLogStream",
                "logs:PutLogEvents"
            ],
            "Resource": [
                "arn:aws:logs:us-east-1:123456789012:log-group:/aws/bedrock-agentcore/runtimes/*:log-stream:*"
            ]
        },
        {
            "Sid": "ECRTokenAccess",
            "Effect": "Allow",
            "Action": [
                "ecr:GetAuthorizationToken"
            ],
            "Resource": "*"
        },
        {
        "Effect": "Allow",
        "Action": [
            "xray:PutTraceSegments",
            "xray:PutTelemetryRecords",
            "xray:GetSamplingRules",
            "xray:GetSamplingTargets"
            ],
         "Resource": [ "*" ]
         },
         {
            "Effect": "Allow",
            "Resource": "*",
            "Action": "cloudwatch:PutMetricData",
            "Condition": {
                "StringEquals": {
                    "cloudwatch:namespace": "bedrock-agentcore"
                }
            }
        },
        {
            "Sid": "GetAgentAccessToken",
            "Effect": "Allow",
            "Action": [
                "bedrock-agentcore:GetWorkloadAccessToken",
                "bedrock-agentcore:GetWorkloadAccessTokenForJWT",
                "bedrock-agentcore:GetWorkloadAccessTokenForUserId"
            ],
            "Resource": [
              "arn:aws:bedrock-agentcore:us-east-1:123456789012:workload-identity-directory/default",
              "arn:aws:bedrock-agentcore:us-east-1:123456789012:workload-identity-directory/default/workload-identity/agentName-*"
            ]
        },
         {"Sid": "BedrockModelInvocation",
         "Effect": "Allow",
         "Action": [
                "bedrock:InvokeModel",
                "bedrock:InvokeModelWithResponseStream"
              ],
        "Resource": [
            "arn:aws:bedrock:*::foundation-model/*",
            "arn:aws:bedrock:us-east-1:123456789012:*"
        ]
        }
    ]
}
次へ進み、問題なければ保存します。(名前はagentcore-runtime-test-policyとしています。)
10-2. IAMロールの作成
次に、IAMロールを作成します。IAMロールの管理画面へ遷移し、「ロールの作成」ボタンをクリックします。
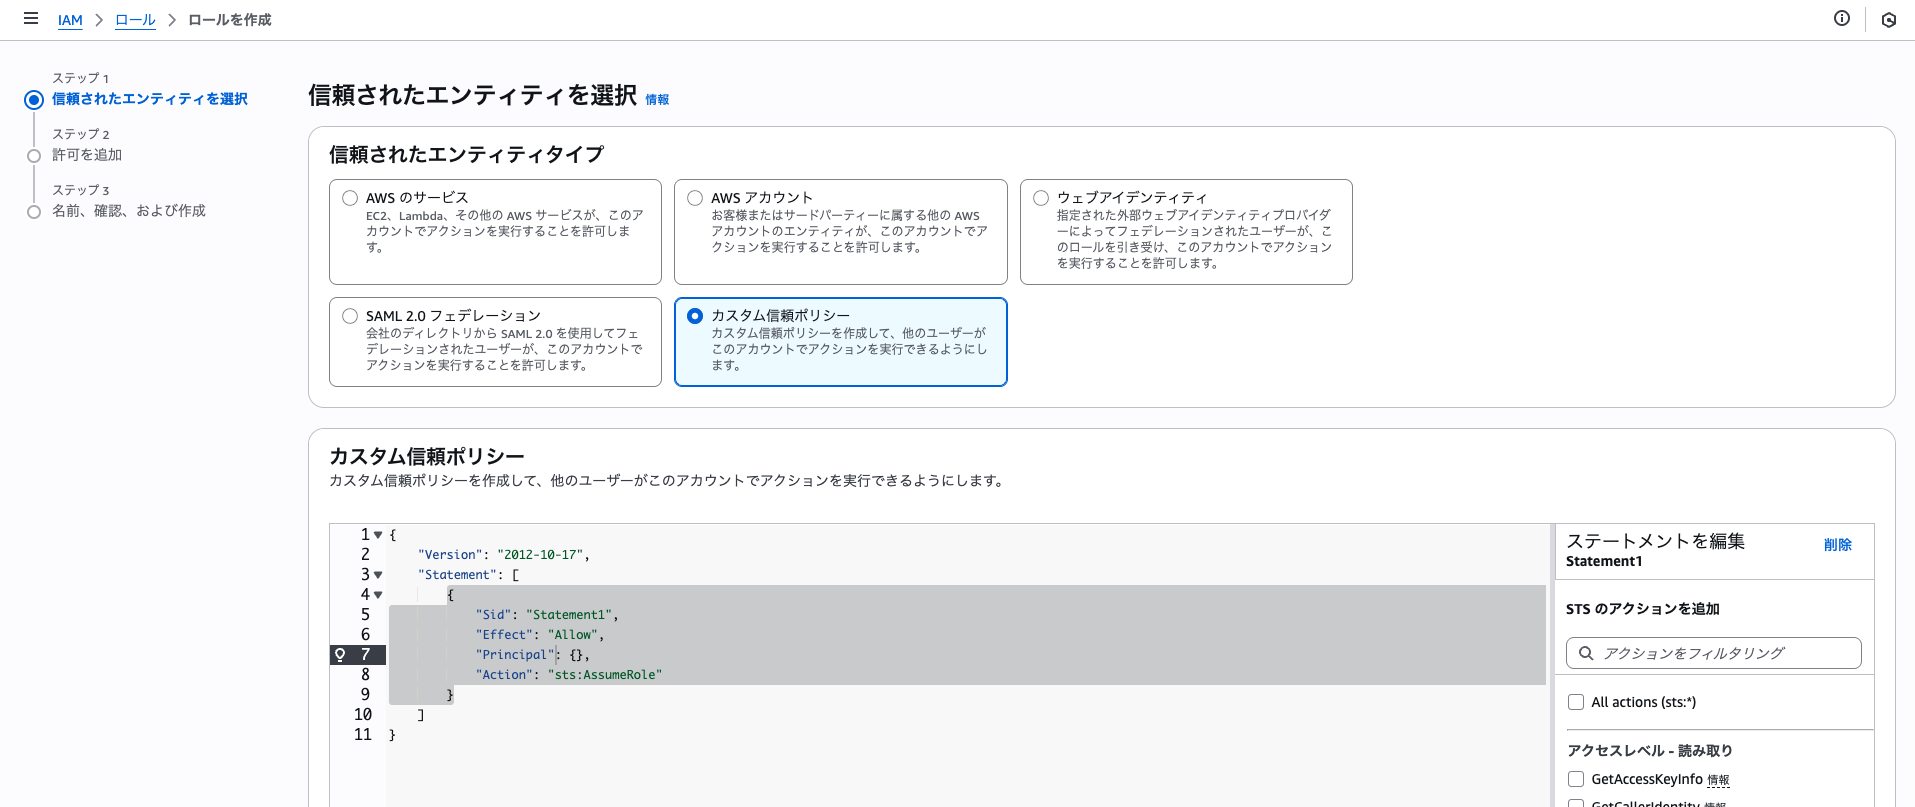
カスタム信頼ポリシーを選択します。
以下のJSONを貼り付けます。
{
  "Version": "2012-10-17"		 	 	 ,
  "Statement": [
    {
      "Sid": "AssumeRolePolicy",
      "Effect": "Allow",
      "Principal": {
        "Service": "bedrock-agentcore.amazonaws.com"
      },
      "Action": "sts:AssumeRole",
      "Condition": {
            "StringEquals": {
                "aws:SourceAccount": "123456789012"
            },
            "ArnLike": {
                "aws:SourceArn": "arn:aws:bedrock-agentcore:us-east-1:123456789012:*"
            }
       }
    }
  ]
}
貼り付けたら次へ進み、先ほど作成したIAMポリシーを選択して保存します。(ロール名はAgentRuntimeRoleTestとしておきます。)
これでIAMロールの作成は完了です。
10-3. デプロイ用コードを用意
デプロイ用のPythonコードを用意します。まずは、以下のコマンドでファイルを用意します。
$ touch deploy_agent.py
ファイルができたら、以下のコードをペーストします。
import boto3

client = boto3.client('bedrock-agentcore-control', region_name='us-east-1')

response = client.create_agent_runtime(
    agentRuntimeName='strands_agent',
    agentRuntimeArtifact={
        'containerConfiguration': {
            # ここのアカウントIDはご自身のものを入力してください。
            'containerUri': 'account-id.dkr.ecr.us-east-1.amazonaws.com/my-strands-agent:latest'
        }
    },
    networkConfiguration={"networkMode": "PUBLIC"},
    # ここのアカウントIDはご自身のものを入力してください。
    roleArn='arn:aws:iam::account-id:role/AgentRuntimeRoleTest'
)

print(f"Agent Runtime created successfully!")
print(f"Agent Runtime ARN: {response['agentRuntimeArn']}")
print(f"Status: {response['status']}")
コードをペーストしたら、以下のコマンドを実行します。
$ uv run deploy_agent.py
これによって、AgentRuntimeが作成されました。
11. デプロイしたエージェントにリクエストを送信してみる
invoke実行用のファイルを用意します。
$ touch invoke_agent.py
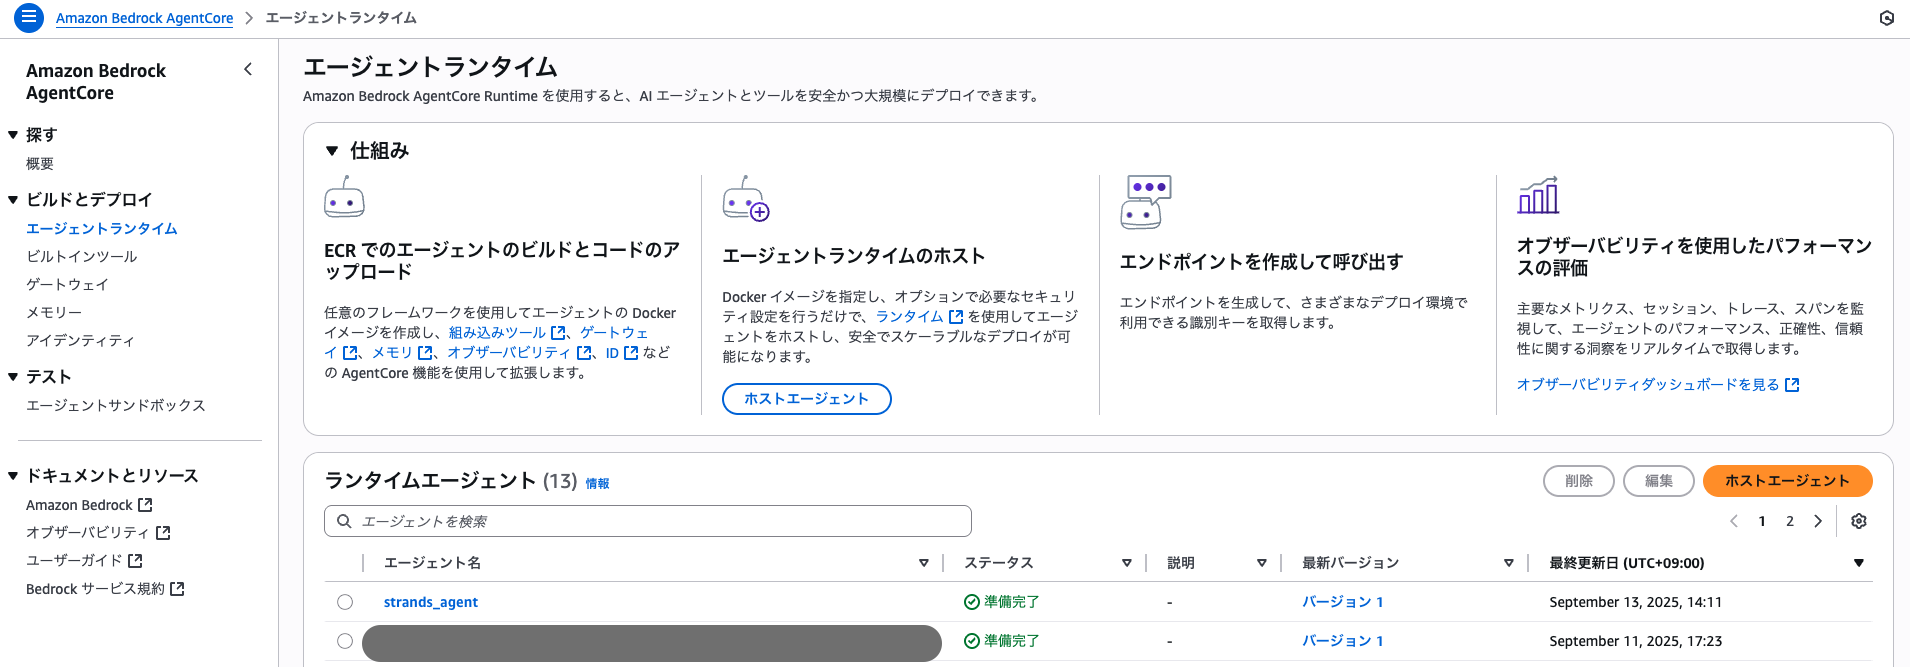
ファイルが作成されたら、作成されたAgentRuntimeをクリックします。
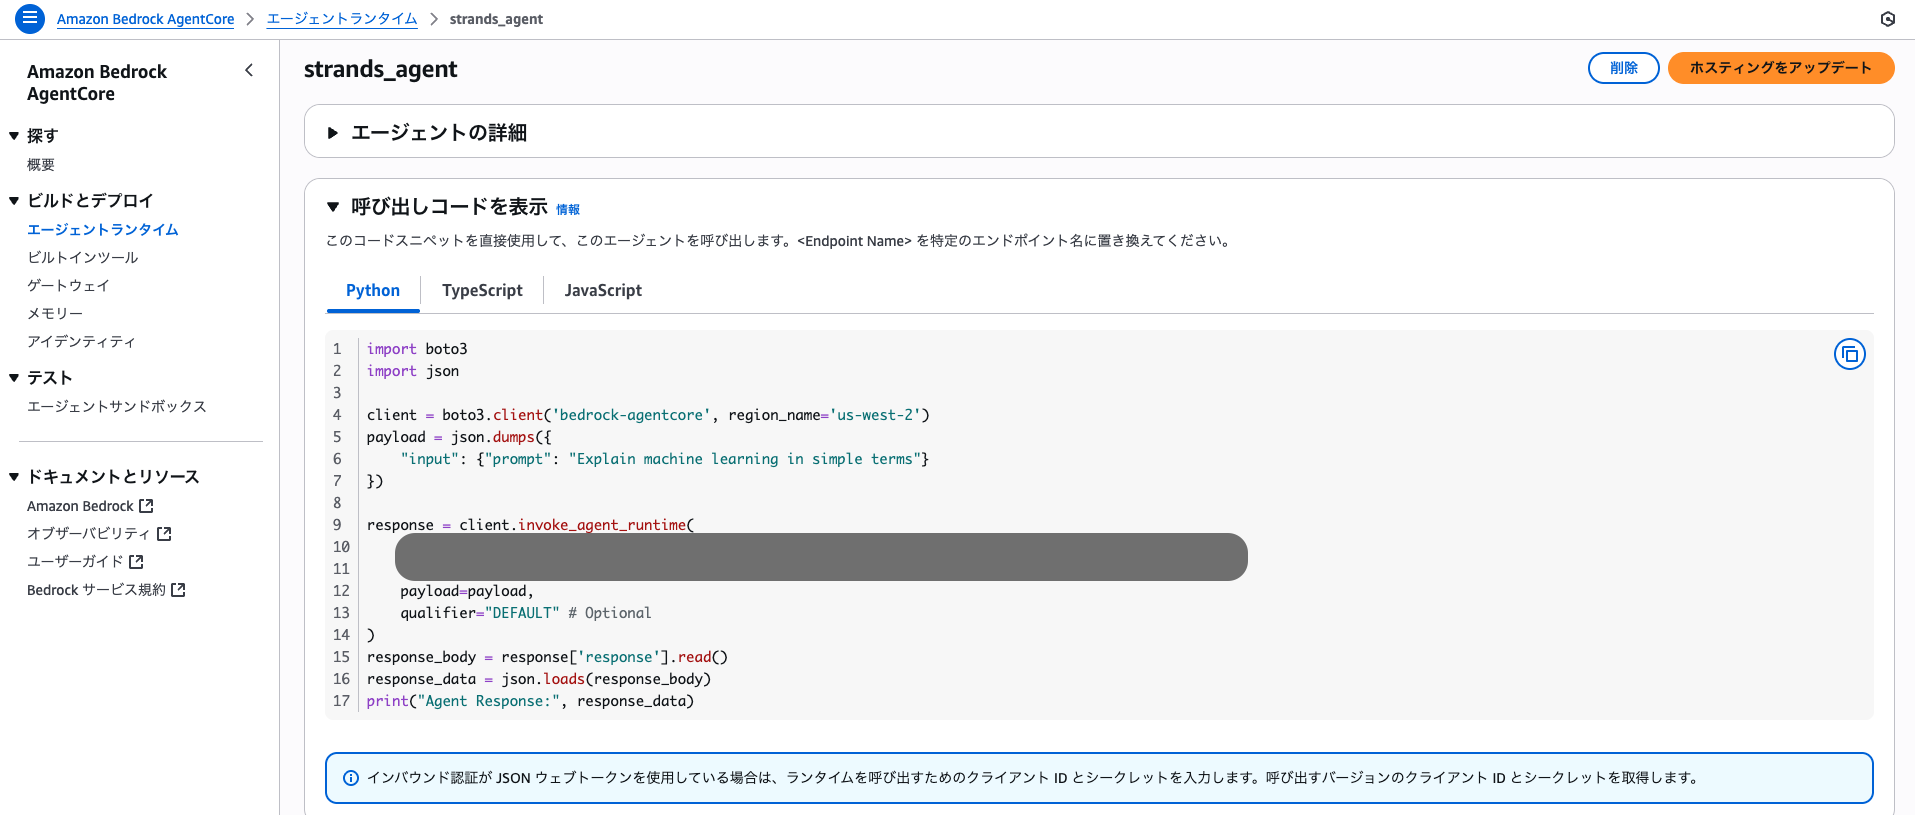
すると、以下のようにサンプルコードが用意されているので、コピーして、invoke_agent.pyにペーストします。
(region_nameは適切なリージョンに直してください。)
ここまでできたら、以下のコマンドを実行してエージェントを動かしてみましょう。
$ uv run invoke_agent.py
以下のような出力がされていればOKです!
Agent Response: {'output': {'message': {'role': 'assistant', 'content': [{'text': "Machine learning is like teaching a computer to recognize patterns and make predictions, similar to how humans learn from experience.\n\n## Simple Analogy\nThink of it like teaching a child to recognize animals:\n- You show them thousands of pictures of cats and dogs\n- You tell them which is which\n- Eventually, they learn the patterns (cats have pointy ears, dogs come in more size varieties, etc.)\n- Now they can identify cats and dogs in new photos they've never seen\n\n## How It Works\n1. **Feed data**: Give the computer lots of examples\n2. **Find patterns**: The computer identifies relationships in the data\n3. **Make predictions**: Use those patterns to make guesses about new, unseen data\n4. **Improve**: The more data it sees, the better it gets\n\n## Common Examples You Use Daily\n- **Email spam filters** - learned from millions of emails to spot spam\n- **Netflix recommendations** - suggests shows based on what similar users liked\n- **Voice assistants** - learned to understand speech from countless voice recordings\n- **Photo tagging** - automatically recognizes faces in your pictures\n\n## Key Point\nThe computer isn't programmed with specific rules. Instead, it discovers the rules by examining lots of examples - just like how you learned to recognize faces or ride a bike through practice rather than memorizing instructions.\n\nIt's essentially pattern recognition at scale, powered by lots of data and computing power."}]}, 'timestamp': '2025-09-13T05:32:14.234375', 'model': 'strands-agent'}}
まとめ
2種類のパターン(スターターキットを使用するパターンとしないパターン)で試してみました。
大きな違いはIAMロールを自分で用意する必要があること、デプロイ用コードを自分で用意する必要があることくらいでしょうか。
1エージェントのみであればスターターキットありバージョンで良いのでしょうが、複数エージェントを繋げて構築する場合にはスターターキットなしバージョンで構築するのが良いのかなと思いました。
また、1エージェントのみであれば、StrandsAgents×Lambda×ECRで作成しても手間はあまりかからなさそうだなと思います。ただ、今後は複数エージェントを繋げるのが主流になる気がするし、AgentCore Runtimeで構築することに慣れていった方が良さそうですね。
以上


