はじめに
前回、「クリック」や「文字を入力」といった人間の手の動きを真似するアクティビティの代わりに、「JSスクリプトを挿入」を使って電光石火のスピードでデータを登録した方法をご紹介しました。ただし、その際はハードコーディングで1行のデータだけを実行しました。「大量のデータがあった場合はどうするのか?」というご質問もいただいたため、今回は表データをJavaScriptでよく使うJSON Objectに変換し、あっという間に一括で表データをウェブサイトに登録する方法を説明しようと思います。
前提知識
この記事は前回の知識を利用するため、まだ前回の内容をご覧になっていない方は、以下の記事に目を通していただけますと幸いです。
環境準備
まず、今回は以下の環境でデモを作成していきます。
| 項目 | バージョン |
|---|---|
| UiPath Studio | 2024.10.6 |
| UiPath.UiAutomation.Activities | 24.10.0 |
| Chrome | 130.0.6723.116 |
次に、今回は筆者が用意したコードでウェブサイトを構築する予定なので、以下の手順に従って簡単なサイトを作ってください。
①新しいファイルを作成し、ファイル名を「index.html」にします。次に、そのファイルをメモ帳(またはNotepad++)で開き、以下のコードを貼り付けてください。
<!DOCTYPE html>
<html lang="en">
<head>
    <meta charset="UTF-8">
    <meta name="viewport" content="width=device-width, initial-scale=1.0">
    <title>User Input Form</title>
    <link rel="stylesheet" href="styles.css">
</head>
<body>
    <div class="container">
        <h1>User Information Form</h1>
        <form id="userForm">
            <label for="firstname">First Name:</label>
            <input type="text" id="firstname" required>

            <label for="lastname">Last Name:</label>
            <input type="text" id="lastname" required>

            <label for="companyName">Company Name:</label>
            <input type="text" id="companyName" required>

            <label for="role">Role in Company:</label>
            <input type="text" id="role" required>

            <label for="address">Address:</label>
            <input type="text" id="address" required>

            <label for="email">Email:</label>
            <input type="email" id="email" required>

            <button type="submit">Submit</button>
            <button type="button" id="showData">Show Data</button>
        </form>

        <table id="dataTable" style="display:none;">
            <thead>
                <tr>
                    <th>First Name</th>
                    <th>Last Name</th>
                    <th>Company Name</th>
                    <th>Role</th>
                    <th>Address</th>
                    <th>Email</th>
                </tr>
            </thead>
            <tbody id="tableBody"></tbody>
        </table>
    </div>

    <script src="script.js"></script>
</body>
</html>
②新しいファイルを作成し、ファイル名を「styles.css」にします。次にそのファイルをメモ帳(またはNotepad++)で開き、以下のコードを貼り付けてください。
body {
    font-family: Arial, sans-serif;
    background-color: #f4f4f4;
    margin: 0;
    padding: 20px;
}

.container {
    max-width: 600px;
    margin: auto;
    background: white;
    padding: 20px;
    border-radius: 8px;
    box-shadow: 0 0 10px rgba(0, 0, 0, 0.1);
}

h1 {
    text-align: center;
}

form {
    display: flex;
    flex-direction: column;
}

label {
    margin: 10px 0 5px;
}

input {
    padding: 10px;
    margin-bottom: 20px;
    border: 1px solid #ddd;
    border-radius: 4px;
}

button {
    padding: 10px;
    color: white;
    border: none;
    border-radius: 4px;
    cursor: pointer;
    margin-bottom: 15px;
}

button[type="submit"] {
    background-color: #28a745;
}

button[type="submit"]:hover {
    background-color: #218838;
}

button#showData {
    background-color: #007bff;
}

button#showData:hover {
    background-color: #0056b3;
}

table {
    width: 100%;
    margin-top: 20px;
    border-collapse: collapse;
}

th, td {
    border: 1px solid #ddd;
    padding: 8px;
    text-align: left;
}

th {
    background-color: #f2f2f2;
}
③新しいファイルを作成し、ファイル名を「script.js」にします。次に、そのファイルをメモ帳(またはNotepad++)で開き、以下のコードを貼り付けてください。
localStorage.removeItem('users');

document.getElementById('userForm').addEventListener('submit', function(e) {
    e.preventDefault();

    const firstname = document.getElementById('firstname').value;
    const lastname = document.getElementById('lastname').value;
    const companyName = document.getElementById('companyName').value;
    const role = document.getElementById('role').value;
    const address = document.getElementById('address').value;
    const email = document.getElementById('email').value;

    const userData = { firstname, lastname, companyName, role, address, email };

    let users = JSON.parse(localStorage.getItem('users')) || [];
    users.push(userData);
    localStorage.setItem('users', JSON.stringify(users));

    document.getElementById('userForm').reset();
});

document.getElementById('showData').addEventListener('click', function() {
    const users = JSON.parse(localStorage.getItem('users')) || [];
    const tableBody = document.getElementById('tableBody');
    tableBody.innerHTML = '';

    users.forEach(user => {
        const row = document.createElement('tr');
        row.innerHTML = `
            <td>${user.firstname}</td>
            <td>${user.lastname}</td>
            <td>${user.companyName}</td>
            <td>${user.role}</td>
            <td>${user.address}</td>
            <td>${user.email}</td>
        `;
        tableBody.appendChild(row);
    });

    document.getElementById('dataTable').style.display = 'table';
});
④上記の3つのファイルを同じフォルダーに保存してください。その後、「index.html」をChromeで開くと、以下のページが表示されるはずです。
試しに情報を入力して「Submit」をクリックし、「Show Data」をクリックすると、以下の表データが登録されます。
以上で問題なければ、サイトの構築は完成!!!
さらに、今回のRPA開発用のデータとJavaScriptのコードを格納するファイルを作成します。
⑤以下のDataTableは今回登録対象のデータです。Studioの表抽出でデータを取ってExcelに保存しましょう。(そのままコピーすると、データが乱れる可能性はあります)
| FirstName | LastName | CompanyName | RoleinCompany | Address | |
|---|---|---|---|---|---|
| John | Smith | IT Solutions | Analyst | 98 North Road | jsmith@itsolutions.co.uk |
| Jane | Dorsey | MediCare | Medical Engineer | 11 Crown Street | jdorsey@mc.com |
| Albert | Kipling | Waterfront | Accountant | 22 Guild Street | kipling@waterfront.com |
| Michael | Robertson | MediCare | IT Specialist | 17 Farburn Terrace | mrobertson@mc.com |
| Doug | Derrick | Timepath Inc. | Analyst | 99 Shire Oak Road | dderrick@timepath.co.uk |
| Jessie | Marlowe | Aperture Inc. | Scientist | 27 Cheshire Street | jmarlowe@aperture.us |
| Stan | Hamm | Sugarwell | Advisor | 10 Dam Road | shamm@sugarwell.org |
| Michelle | Norton | Aperture Inc. | Scientist | 13 White Rabbit Street | mnorton@aperture.us |
| Stacy | Shelby | TechDev | HR Manager | 19 Pineapple Boulevard | sshelby@techdev.com |
| Lara | Palmer | Timepath Inc. | Programmer | 87 Orange Street | lpalmer@timepath.co.uk |
⑥先ほどと同じフォルダーでも別の場所でも構いませんが、「Inject_JS_Script.js」という名前のファイルを作成しておいてください。

ワークフロー作成
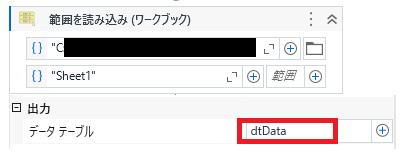
①上記の表データを読み込み、DataTable変数「dtData」に保存。

②DataTableをJSONに変換。
ここで「なぜDatatableをJSONに変換するのか?」と戸惑う方もいらっしゃるかもしれませんので、簡単に説明します。JSONはJavaScriptのオブジェクト形式に直接対応し、JavaScriptのオブジェクトリテラルに非常に似た構造を持っています。そのため、JSONはJavaScriptと非常に親和性が高く、サーバーとクライアント間でデータをやり取りする際、軽量で人間が読みやすい形式として一般的に利用されています。
DatatableをJSONに変換するためには、Newtonsoft.Jsonライブラリを使用すると簡単です。Newtonsoft.Jsonは、JSONデータを処理するための.NET用ライブラリです。以下の主な機能があります:
i.シリアライズ:DataTableなどのオブジェクトをJSON文字列に変換する。
ii.デシリアライズ:JSON文字列をJavaScriptのオブジェクトに変換する。
Newtonsoft.Jsonは、JsonConvertというクラスを提供しており、その中の SerializeObjectメソッドを使ってオブジェクトをJSON文字列に変換することができます。コードは以下の通りです。
Newtonsoft.Json.JsonConvert.SerializeObject(dtData)
JSON文字列に変換したら、こうなりますね。すべての情報はJSONのように整形されています。
③「アプリケーション/ブラウザを使用」を配置し、デモサイトを指定する。
指定が失敗することもあるかと思います。その場合は、Chromeの拡張機能画面を開き、UiPath拡張機能の詳細設定に入り、「ファイルのURLへのアクセスを許可する」をONにしてください。
④「JSスクリプトを挿入」をスコープの中に配置、設定する。
i.前回よりコードが少し長いため、直接スクリプトコードを書き込むのではなく、先ほど作成した「Inject Js_Script.js」でコードを埋め込みます。そのため、スクリプトコードのところで「Inject Js_Script.js」を選択してください。
ii.先ほど、DataTableから変換されたJSON文字列を引数としてスクリプトコードにインプットしてデータを処理します。そのため、入力パラメータのところにjsonStringを入れてください。
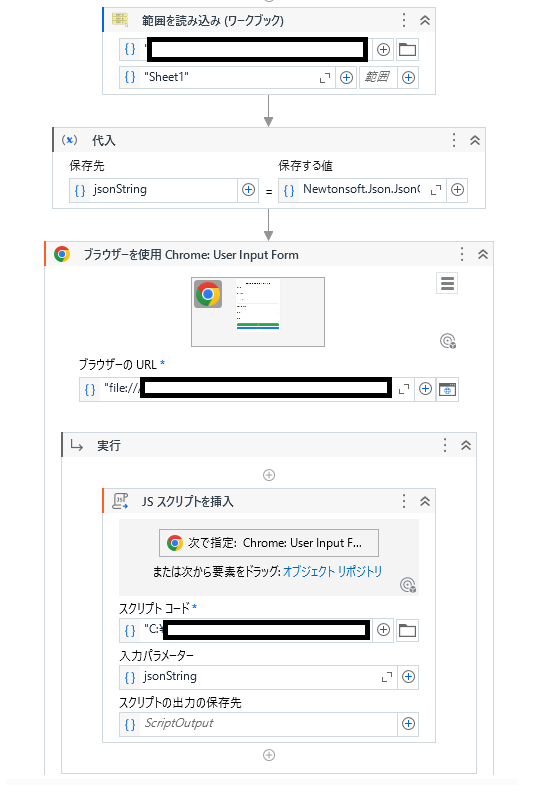
完成のイメージです。
⑤Inject Js_Script.jsでコーディング
まず、引数としてjsonStringを設定します。
function (element,jsonString)
次に、登録処理で情報を抽出しやすくするため、JsonStringをJSON Objectに変換する必要があります。
const jsonObject = JSON.parse(jsonString)
すると、一行一行の情報はループ可能のJSON Objectになったので、一行ずつ情報を読み取ってウェブサイトの欄に埋めてSubmitします。(DOMコードの書き方は前回の記事で説明していますので、ご参考ください。)
 for(i=0;i<jsonObject.length;i++){
	document.getElementById('firstname').value = (jsonObject[i]['FirstName']);
    document.getElementById('lastname').value = (jsonObject[i]['LastName']);
    document.getElementById('companyName').value = (jsonObject[i]['CompanyName']);
    document.getElementById('role').value = (jsonObject[i]['Roleinompany']);
    document.getElementById('address').value = (jsonObject[i]['Address']);
    document.getElementById('email').value = (jsonObject[i]['Email']);

    document.getElementById('userForm').dispatchEvent(new Event('submit'));

 };
最後に、登録された表データを表示させます。
document.getElementById('showData').click();
コードの完全版です。
function (element,jsonString) {

 const jsonObject = JSON.parse(jsonString);

 for(i=0;i<jsonObject.length;i++){
	document.getElementById('firstname').value = (jsonObject[i]['FirstName']);
    document.getElementById('lastname').value = (jsonObject[i]['LastName']);
    document.getElementById('companyName').value = (jsonObject[i]['CompanyName']);
    document.getElementById('role').value = (jsonObject[i]['Roleinompany']);
    document.getElementById('address').value = (jsonObject[i]['Address']);
    document.getElementById('email').value = (jsonObject[i]['Email']);

    document.getElementById('userForm').dispatchEvent(new Event('submit'));

 };

 document.getElementById('showData').click();

}
最後に
実装が完了したため、まずワークフローの全体図を確認して、問題なければ、実行してみましょう!
ワークフローの全体完成図です。
問題なければ、実行します。
複数行がありますが、本当に一瞬で終わりました!「文字を入力」と比べてだいぶ時間が節約できるのでは?データ量が多ければ多いほど、「JSスクリプトを挿入」と通常のUI操作の時間差も大きくなるでしょう!


