はじめに
前回サンプルの中身について詳しく見ました。今回はこれを踏まえてナビゲーションアプリとしての使い勝手を向上させたいと思います。
注意事項
- この記事では2021/11/25現在で最新の
v2.0.2を使用します。 - Pricingにご注意ください。特にMAUは100まで無料ですが、ここに記載されているようにアプリケーションの削除・インストールでカウントアップします。デバッグ中に何度も削除・インストールを繰り返すと無料枠を超える可能性があります。
変更点
以下の点について変更を行います。
- GPS
- 日本語(多言語)サポート
- カメラの変更
- バナー色の変更
- 音声案内の編集
- Map Styleの変更
- 通過済み経路の削除
GPS
前回見たように、サンプルではReplayLocationEngineが使用されています。デバッグには便利ですが、実用上不便なので(というか使えないので)
デフォルトのLocationEngineを使用するように変更します。
パーミッションの設定
マニフェストに以下のandroid.permission.ACCESS_FINE_LOCATIONを設定してください。
  2 <manifest xmlns:android="http://schemas.android.com/apk/res/android"
  3     package="com.example.navigationsdksample">
  4
  5     <uses-permission android:name="android.permission.ACCESS_FINE_LOCATION" />
  6
  7     <application
...
LocationEngineの変更
実はNavigationOptionsで何も指定しなければデフォルトのLocationEngineが使用されるので、前回のNavigation Coreの初期化の以下の部分をコメントアウトすればほとんど完了です。
430         // initialize Mapbox Navigation
431         mapboxNavigation = if (MapboxNavigationProvider.isCreated()) {
432             MapboxNavigationProvider.retrieve()
433         } else {
434             MapboxNavigationProvider.create(
435                 NavigationOptions.Builder(this.applicationContext)
436                     .accessToken(getString(R.string.mapbox_access_token))
437                     // comment out the location engine setting block to disable simulation
438                     .locationEngine(replayLocationEngine) // ここ
439                     .build()
440             )
441         }
あとは不要になったコード(mapboxReplayer, replayLocationEngine, replayProgressObserver等)をガシガシ消します。
パーミッションの取得
手動でパーミッションを与えても動きますが、ダイアログを表示たほうがユーザーフレンドリーでしょう。好きな方法で実装してOKですが、私はNavigation SDKの中にあるLocationPermissionsHelperを拝借してきました。
GitHub
変更点はこちらです。
日本語(多言語)サポート
音声案内および方向指示はDirections APIで生成されます。そこで、言語や単位の設定はRouteOptionsで行います。具体的には以下の場所にオプションを追加します。これらのオプションはDirections APIのlanguageとvoice_units に相当します。
615         mapboxNavigation.requestRoutes(
616             RouteOptions.builder()
617                 .applyDefaultNavigationOptions()
618                 .applyLanguageAndVoiceUnitOptions(this)
619                 .language("ja-JP") //ここ
620                 .voiceUnits(DirectionsCriteria.METRIC) //ここ
音声案内
MapboxSpeechApiとMapboxVoiceInstructionsPlayerの言語設定も変更します。MapboxSpeechApiはDirections APIで得られた音声案内の文字列(SSML)から音声ファイル(MP3)に変換する際のAmazon Pollyの設定に使用されます。MapboxVoiceInstructionsPlayerはデバイスのText to Speechを使用する際の設定です。
493         // initialize voice instructions api and the voice instruction player
494         speechApi = MapboxSpeechApi(
495             this,
496             getString(R.string.mapbox_access_token),
497             Locale.JAPAN.language
498         )
499         voiceInstructionsPlayer = MapboxVoiceInstructionsPlayer(
500             this,
501             getString(R.string.mapbox_access_token),
502             Locale.JAPAN.language
503         )
方向指示
バナー表示はデフォルトでシステムロケールにしたがいます。なので、もしデバイスがUSになっていると残りの距離がft単位になります。この挙動はDistanceFormatterOptionsで定義されています。そこで、以下のようにNavigationOptionsでDistanceFormatterOptionsの設定を変更すれば画面表示もm単位に切り替わります。
427             MapboxNavigationProvider.create(
428                 NavigationOptions.Builder(this.applicationContext)
429                     .accessToken(getString(R.string.mapbox_access_token))
430                     .distanceFormatterOptions(DistanceFormatterOptions.Builder(this.applicationContext).locale(Locale.JAPAN).build())
431                     .build()
432             )
多言語サポート
上記のように強制的に日本語設定にするのもアプリケーション次第ではアリですが、一般的にはシステムロケールに合わせたほうがユーザーフレンドリーです。
そこでバナー表示で追加したDistanceFormatterOptionsは削除し、他の部分は以下のように設定しました。
620         mapboxNavigation.requestRoutes(
621             RouteOptions.builder()
622                 .applyDefaultNavigationOptions()
623                 .applyLanguageAndVoiceUnitOptions(this)
624                 .language(application.inferDeviceLanguage())
625                 .voiceUnits(if(application.inferDeviceLocale().getUnitTypeForLocale() == UnitType.METRIC) DirectionsCriteria.METRIC else DirectionsCriteria.IMPERIAL)
498         // initialize voice instructions api and the voice instruction player
499         speechApi = MapboxSpeechApi(
500             this,
501             getString(R.string.mapbox_access_token),
502             applicationContext.inferDeviceLanguage()
503         )
504         voiceInstructionsPlayer = MapboxVoiceInstructionsPlayer(
505             this,
506             getString(R.string.mapbox_access_token),
507             applicationContext.inferDeviceLanguage()
508         )
GitHub
変更点はこちらです。
カメラの設定
経路設定後、ナビゲーション開始時にFollowing(Puck後方上空からの視点)に切り替わってほしいです。navigationCamera.requestNavigationCameraToOverview()を以下のように変えるだけでOKです。
661     private fun setRouteAndStartNavigation(routes: List<DirectionsRoute>) {
...
671         // move the camera to following when new route is available
672         navigationCamera.requestNavigationCameraToFollowing()
673     }
また、街中で使うにはズームが少し小さい気がします。もう少しズームレベルを上げましょう。ズーム等、カメラのパラメータはViewportDataSourceが生成しているため、そのオプションで決められています。
具体的には以下のように変更します。
438         // initialize Navigation Camera
439         viewportDataSource = MapboxNavigationViewportDataSource(mapboxMap)
440         viewportDataSource.options.followingFrameOptions.minZoom = 16.0 //ここ
441         viewportDataSource.options.followingFrameOptions.maxZoom = 18.0 //ここ
442         navigationCamera = NavigationCamera(
443             mapboxMap,
444             binding.mapView.camera,
445             viewportDataSource
446         )
GitHub
変更点はこちらです。
バナー色の変更
ボトムバナー(MapboxTripProgressView)の背景色を変えてみます。SDKでリソースで定義されているものは、リソースを再定義することで見た目を変更できます。MapboxTripProgressViewの場合、mapbox_trip_progress_layout.xmlで定義されているので、このファイルをコピーして、自分のアプリのres以下にペースト、修正すればOKです。
GitHub
変更点はこちらです。
オリジナルのファイルに対し、7行目を追加しました。
  1 <androidx.constraintlayout.widget.ConstraintLayout
  2     xmlns:android="http://schemas.android.com/apk/res/android"
  3     xmlns:app="http://schemas.android.com/apk/res-auto"
  4     xmlns:tools="http://schemas.android.com/tools"
  5     android:layout_width="match_parent"
  6     android:layout_height="wrap_content"
  7     android:background="#F5DEB3"
  8     >
音声案内の編集
Directions APIから受け取ったSSMLテキストをSDKがAmazon Pollyに送ることで音声案内が生成されます。VoiceInstructionsObserverはAmazon Pollyに送る直前に呼び出されるため、このタイミングで音声案内を編集すると任意の案内を行うことができます。特殊読みでどうしても正しく発話されない・・・等で使えるのではないでしょうか。
今回は以下のように変更してみました。語尾が「デステニー。」になります。ちなみに、元ネタはがんばれ!おでんくんの神様です。
243     /**
244      * Observes when a new voice instruction should be played.
245      */
246     private val voiceInstructionsObserver = VoiceInstructionsObserver { voiceInstructions ->
247         val announcement = voiceInstructions.announcement()?.replace(Regex("です。"), "デステニー。")
248         val ssmlAnnouncement = voiceInstructions.ssmlAnnouncement()?.replace(Regex("です。"), "デステニー。")
249         val customVoiceInstructions = VoiceInstructions.builder()
250             .announcement(announcement)
251             .ssmlAnnouncement(ssmlAnnouncement)
252             .distanceAlongGeometry(voiceInstructions.distanceAlongGeometry())
253             .build();
254
255         speechApi.generate(customVoiceInstructions, speechCallback)
256     }
GitHub
変更点はこちらです。
Map Styleの変更
サンプルではStreetsが使用されていますが、よりナビゲーション向きのmapbox://styles/mapbox/traffic-day-v2に変更します。Style.MAPBOX_STREETSを以下のように変更するだけで完了です。
535         // load map style
536         mapboxMap.loadStyleUri(
537             Style.TRAFFIC_DAY //ここ
538         ) {
...
ただし、Style内で使用されているLayer名が異なるので以下の部分も変更が必要です。
525         val mapboxRouteLineOptions = MapboxRouteLineOptions.Builder(this)
526             .withRouteLineBelowLayerId("road-label-motorway-trunk") //ここ
527             .build()
GitHub
変更点はこちらです。
通過済み経路の削除
すでに通った経路は表示を隠したほうがわかりやすいです。Navigation SDKではVanishingという機能を使用することで実現できます。
まずは機能をONします。
535         val mapboxRouteLineOptions = MapboxRouteLineOptions.Builder(this)
536             .withRouteLineBelowLayerId("road-label-motorway-trunk")
537             .withVanishingRouteLineEnabled(true) //ここ
538             .build()
onPositionChangedListenerを定義し、
338     private val onPositionChangedListener = OnIndicatorPositionChangedListener { point ->
339         val result = routeLineApi.updateTraveledRouteLine(point)
340         mapboxMap.getStyle()?.apply {
341             routeLineView.renderRouteLineUpdate(this, result)
342         }
343     }
turn-by-turnナビゲーション開始時にリスナに登録します。
684     private fun setRouteAndStartNavigation(routes: List<DirectionsRoute>) {
685         binding.mapView.location.addOnIndicatorPositionChangedListener(onPositionChangedListener)
これにより、Puckが動くたびに経路の通過地点が更新されます。また、処理の途中に現在のナビゲーションのステータス(Trackingなのか、終わったのか)を参照する箇所があります。このステータスをアップデートするために以下のコードを追加します。
348     private val routeProgressObserver = RouteProgressObserver { routeProgress ->
...
381         routeLineApi.updateWithRouteProgress(routeProgress,{})
382     }
GitHub
変更点はこちらです。
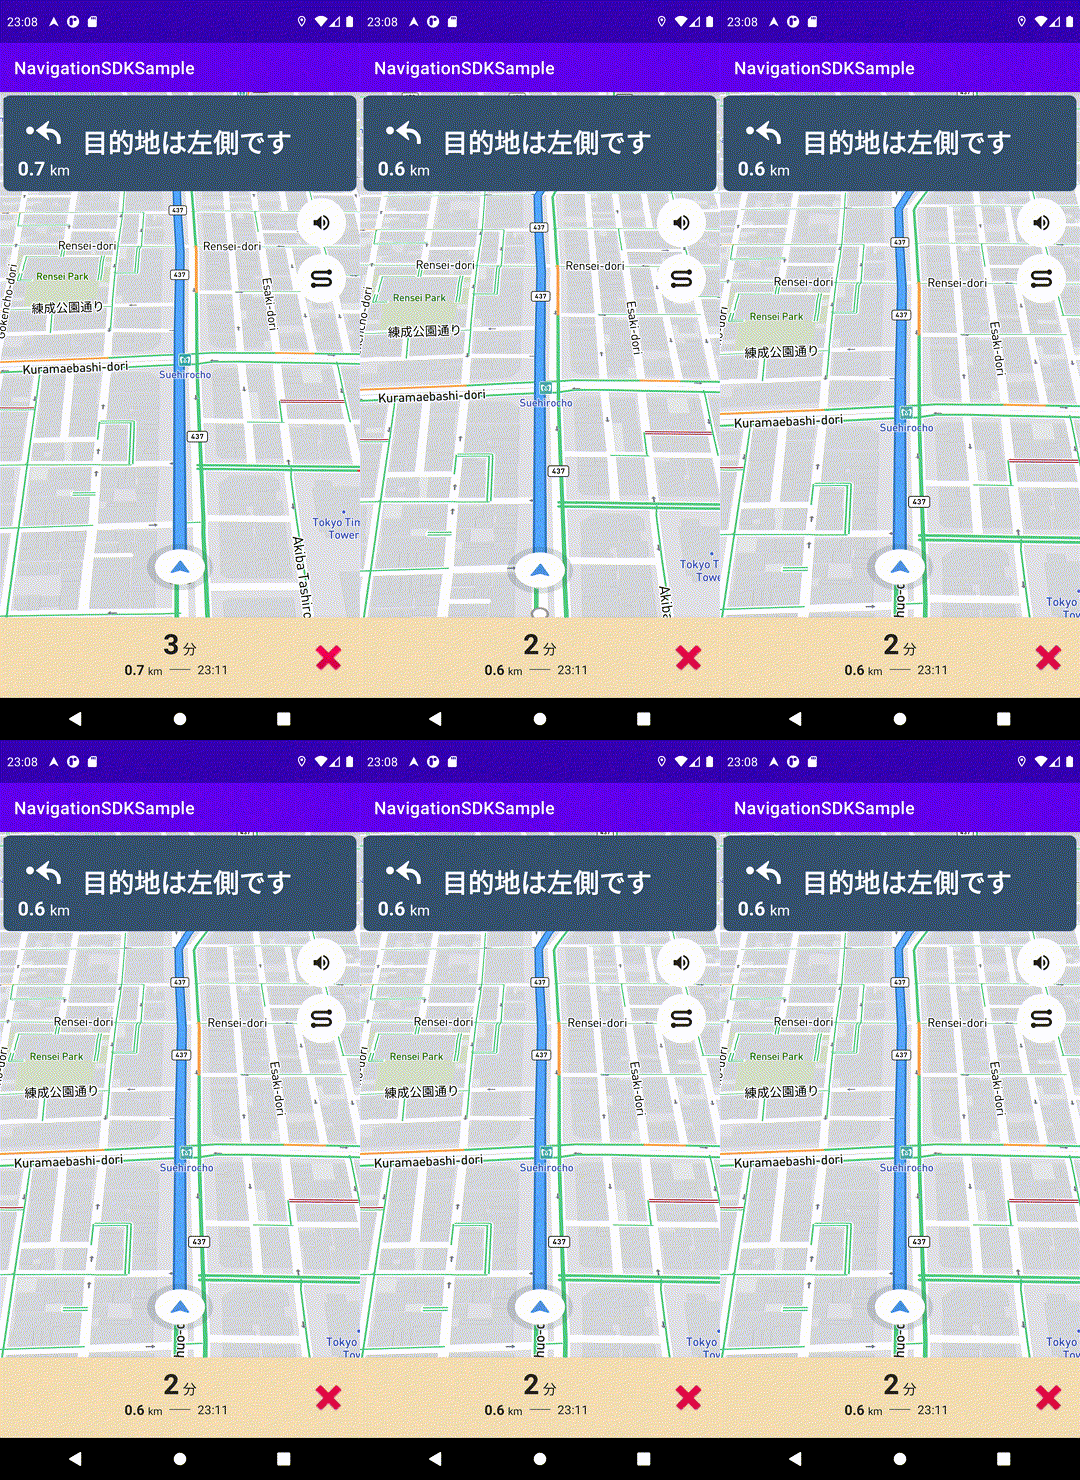
成果物
まとめ
Navigation SDKは非常にカスタマイズ性が高く、様々なユースケースにマッチします。ぜひ、色々と試してみてください!
