ゲームの画面キャプチャからタイムラプス動画を作ったり、加工して通常ではありえない状況(同じキャラクタが複数いる等)を作ったりする際に、ゲーム内のカメラアングルをぴったりと合わせたいことがある。
デフォルトのカメラアングルなら簡単にできるが、そうでない場合はぴったりと合わせるのが難しいので、基準となるカメラアングルを保持し、そこからの差分を表示する簡単な補助ツールをブラウザだけで作成してみた。
動作
GitHubにサンプルコード、GitHub Pagesにサンプルページを用意したので参考にして欲しい。サンプルページを開くと、以下のような説明画面が表示される。

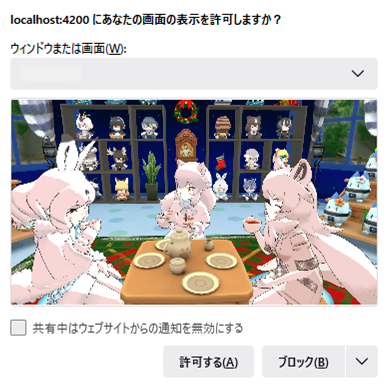
「クリックしてキャプチャする画面を選択する」ボタンをクリックすると、キャプチャ対象のウィンドウ・画面を選択するパネルが表示される。

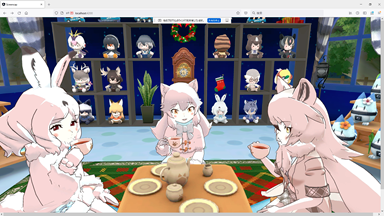
キャプチャ対象を選択して「許可する」をクリックすると、ブラウザにキャプチャ対象が表示される。

この状態で主ボタン(通常はLMB)をクリックすると、クリック時点の画面からの差分画像を表示する。Shiftキーを押しながら主ボタンをクリックすると、差分画像を非表示にする。
(キャプチャ画面は非可逆圧縮されているので、同じ画面に見えても差分画像が完全な黒にならない場合がある)

仕組み
まず、ゲーム画面をブラウザに表示するためにScreen Capture APIという機能により、開いているウィンドウや画面からMediaStreamを取得し、video要素に表示する。(図内1の部分)
次に、図内2で示すようにvideo要素に表示した内容を画像として取得してimg要素で表示する。
最後に、図内3で示すようにimg要素の背景となるvideo要素との混合方法(mix-blend-mode)を差分differenceに設定することで、差分画像を表示する。
あとはこれを見ながら、背景が真っ黒になる = カメラアングルが一致するよう頑張って調整する。(これは人にしかできない)
コード
HTML+Javascriptで実現可能だが、ここではAngularを用いたサンプルコードを紹介する。
app.component.ts
イベント処理がいくつかあるが、上記説明の1~2を実現している(3はCSSだけで実現している)。その他に、キャプチャ対象のサイズ変更に対応するために、onVideoUpdateメソッドでvideo要素とimg要素のサイズを変更したり、画面の共有を停止した際にキャプチャ画像の表示を消す処理を[1]で実現している。(詳細や参考となる情報はコメント参照)
import { Component, ElementRef, NgZone, ViewChild } from '@angular/core';

@Component({
  selector: 'app-root',
  templateUrl: './app.component.html',
  styleUrls: ['./app.component.scss']
})
export class AppComponent {
  /** video要素 */
  @ViewChild( 'videoOutput' ) video: ElementRef<HTMLVideoElement>;

  /** img要素 */
  @ViewChild( 'overlay' ) overlay: ElementRef<HTMLImageElement>;

  // Angular外で発生するイベントを処理するためにNgZoneを使用
  constructor( private readonly ngZone: NgZone ) {}

  /** キャプチャ開始ボタンクリック時の処理 */
  onClickStartButton() {
    this.startCapture();
  }

  /** キャプチャ画像(のコンテナ)クリック時の処理 */
  onClickContainer( evt: MouseEvent ) {
    // ボタンの判定: 主ボタン(0)をクリックしたかの判定
    // 参考: https://developer.mozilla.org/ja/docs/Web/API/MouseEvent/button
    if ( evt.button === 0 ) {
      if ( evt.shiftKey ) {
        this.clearDiffImage();
      } else {
        this.updateDiffImage();
      }
    }
  }

  /** ビデオの情報が変わった際の処理
   * loadedmetadata, timeupdateイベントを扱う */
   onVideoUpdate( evt: any ) {
    // 適切な型情報が無いので any で受け取る
    // 参考: https://stackoverflow.com/questions/38438741/detecting-video-resolution-changes
    const width  = evt.target.videoWidth;
    const height = evt.target.videoHeight;
    if ( width && height ) {
      // 一時停止してからサイズ変更すると、チラつきが少しだけ低減する。
      this.video.nativeElement.pause();
      this.width = width;
      this.height = height;
      this.video.nativeElement.play();
    }
  }

  /** キャプチャ中かどうか */
  isCapturing: boolean = false;

  /** [1]画面キャプチャの開始 */
  private async startCapture() {
    if ( this.isCapturing ) {
      // 念のためのガード
      return;
    }

    // 差分画像をクリアする
    this.clearDiffImage();

    // ユーザにキャプチャする画面を選択させ、MediaStreamを取得する。
    const media = await navigator.mediaDevices.getDisplayMedia( {
      video: true,
      audio: false
    } );

    // video要素にユーザが選択したMediaStreamを設定し、再生を開始する。
    this.video.nativeElement.srcObject = media;
    this.video.nativeElement.play();

    // ユーザがキャプチャを停止したことを検知したら、初期状態に戻す。
    // 参考: https://stackoverflow.com/questions/25141080/how-to-listen-for-stop-sharing-click-in-chrome-desktopcapture-api
    const track = media.getTracks()[0];
    track.onended = () => {
      this.ngZone.run( () => {
        // track.onendedはAngularの変更検知外のイベントなので、
        // 処理結果が画面に反映されるようNgZone内で実行する。
        // 参考: https://angular.jp/guide/zone#ngzone-run-%E3%81%A8-runoutsideofangular
        this.video.nativeElement.srcObject = null;
        this.isCapturing = false;
      } );
    }

    this.isCapturing = true;
  }

  // ビデオサイズ
  width: number  = 0;
  height: number = 0;

  // 差分のベース画像のデータURI
  imageUrl: string | null = null;

  /** [2]差分のベース画像更新 */
  private updateDiffImage() {
    console.log('test')
    if ( !this.isCapturing ) {
      return;
    }
    const dataUrl = getImageUrl( this.video.nativeElement );
    this.imageUrl = dataUrl;
  }

  /** 差分のベース画像削除 */
  private clearDiffImage() {
    this.imageUrl = null;
  }
}

/** video要素から画像のデータURIを生成する */
function getImageUrl( video: HTMLVideoElement ) {
  // 参考: https://stackoverflow.com/questions/23745988/get-an-image-from-the-video/44325898
  const canvas = document.createElement( 'canvas' );
  const context = canvas.getContext( '2d' );
  if ( !context ) {
    throw new Error( 'Cannot get 2d context.' );
  }

  canvas.width = video.clientWidth;
  canvas.height = video.clientHeight;
  context.drawImage( video, 0, 0, canvas.width, canvas.height );

  return canvas.toDataURL();
}
app.component.html
video要素では、メタデータの更新時に発生するloadedmetadataとtimeupdateイベントのハンドラから取得することで、初回だけでなくキャプチャ中のサイズ変更にも対応している。サイズはプロパティバインディングしている。
img要素では、imageUrl(差分のベース画像)をsrcにバインディングすることで、video要素から取得したキャプチャ画像を表示できるようにしている。
これらをまとめるdiv要素で、クリック時のイベント処理(差分画像の表示ON/OFF)を行っている。
<div>
  <!-- 説明 -->
  <div [hidden]="isCapturing">
    <h1>使い方</h1>
    <ol>
      <li>キャプチャしたいウィンドウ・画面を指定する。</li>
      <li>キャプチャ画像を主ボタンでクリックすると、その時点の画面との差分を表示する。</li>
      <li>キャプチャ画像をShift+主ボタンでクリックすると差分表示をやめる。</li>
    </ol>
    <button (click)="onClickStartButton()">クリックしてキャプチャする画面を選択する</button>
  </div>

  <div (click)="onClickContainer($event)" [hidden]="!isCapturing">
    <!-- キャプチャ画像 -->
    <video
      #videoOutput
      [style.width.px]="width"
      [style.height.px]="height"
      (loadedmetadata)="onVideoUpdate($event)"
      (timeupdate)="onVideoUpdate($event)">
    </video>

    <!-- 差分画像 -->
    <img
      #overlay
      class="overlay"
      [hidden]="!imageUrl"
      [src]="imageUrl"
      [style.width.px]="width"
      [style.height.px]="height">
  </div>
</div>
app.component.scss
img要素がvideo要素の真上に表示され、背景となるvideo要素との差分を表示できるよう設定している。differenceの効果についてはmix-blend-mode 参照。
.overlay {
  position:absolute;
  top: 0;
  left: 0;
  mix-blend-mode: difference;
}
