はじめに
実装しようとしたときに調べた範囲では、動的webプロジェクトの国際化についてまとめてる記事はなかったのでまとめてみました。
ここでの国際化は、クライアントのwebブラウザが使用しているLocale(言語と国/地域)クラスを取得し、表示する言語をクライアントに合わせて動的に対応する事です。
今回紹介する手法は、サーバーサイドのjavaではメッセージを全てIDでやりとりし、クライアント側のjspとjavascriptで、あらかじめ用意しておいた言語ごとのpropertiesファイルを参照しIDと対応する文字列を表示するというものです。
この手法では、サーバーサイドはメッセージをIDに変換するのみ、クライアントサイドはメッセージを言語ファイルから参照する一文に変換するのみなので、将来的な拡張にも影響も少なく、簡単に国際化することが可能だと思います。
考え方としては、サーバーサイドはクライアント側のLocaleが何であれ動きは変わらず、クライアントサイドに最初から対応する言語ファイルを送っておき、webページに表示する際に翻訳を行うというものです。
また、動的に変化するメッセージ
例:あなたはボタンを○○回押しました!
という文章にも対応できるように、文章を分割して翻訳する手法も紹介します。
今回のサンプルは、jspでhtmlを用いて文章を表示する、ボタンを押したらjavascriptで処理をし文章を表示する、もうひとつのボタンを押したらサーバーからIDが送られてそれを翻訳して文章を表示するというプログラムです。
環境は以下の通りです。
IDE:eclipse
tomcatバージョン:9.0
jdkバージョン:11
OS:Windows
ブラウザ:Chrome、Edge、firefox
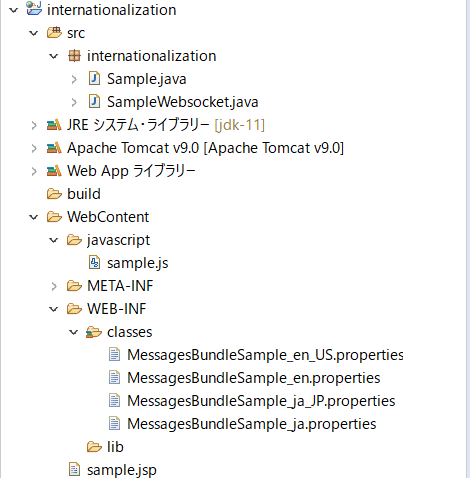
1.フォルダ構成
2.サーバーサイド実装
package internationalization;

import java.io.IOException;
import javax.servlet.ServletException;
import javax.servlet.annotation.WebServlet;
import javax.servlet.http.HttpServlet;
import javax.servlet.http.HttpServletRequest;
import javax.servlet.http.HttpServletResponse;


@WebServlet(name="Sample", loadOnStartup=1, description = "Starting servlet for opening screen.", urlPatterns = { "/sample", "/sample2", "" })
public class Sample extends HttpServlet {


	public Sample() {}


	protected void doGet(HttpServletRequest request, HttpServletResponse response) throws ServletException, IOException {

		request.getRequestDispatcher("sample.jsp").forward(request, response);
	}


	protected void doPost(HttpServletRequest request, HttpServletResponse response) throws IOException {

	}

}
package internationalization;

import javax.websocket.OnMessage;
import javax.websocket.server.ServerEndpoint;

@ServerEndpoint("/event")
public class SampleWebsocket {

	int i = 0;
    @OnMessage
    public String post(String event) {
    	i++;
    	String number =  Integer.toString(i);
        return "sentenceID1" + "|" + number + "|"+ "sentenceID2";
    }
}
3.クライアント側実装
<%@ page language="java" contentType="text/html; charset=UTF-8"
    pageEncoding="UTF-8"%>


<%
String message="HelloWorld";
%>
<!DOCTYPE html>
<html>
<head>
<meta charset="UTF-8">


<meta charset="ISO-8859-1">

<script src="https://code.jquery.com/jquery-1.11.1.min.js"></script>
<script src="https://code.jquery.com/ui/1.11.1/jquery-ui.min.js"></script>
<link rel="stylesheet" href="https://code.jquery.com/ui/1.11.1/themes/smoothness/jquery-ui.css" />


<%
	java.util.Locale locale = request.getLocale();
	java.util.ResourceBundle bundle = java.util.ResourceBundle.getBundle("/MessagesBundleSample", locale);
	System.out.println(locale);

%>

<%@page import="java.util.ResourceBundle,
	                java.util.Enumeration" %>


<script type="text/javascript">
		            var Resources = {
		    		        <%
		    		            Enumeration<String> e = bundle.getKeys();
		    		            while (e.hasMoreElements()) {
		    		                String param = e.nextElement();
		    		                out.print('"'+param+ '"' +":\""+ bundle.getString(param) +"\"");
		    		                if (e.hasMoreElements())    out.println(",");
		    		            }
		    		        %>

		    		    };
</script>

<script src="javascript/sample.js" type="text/javascript"></script>
<title>Internationalization</title>


</head>
<body>
<%=bundle.getString("helloWorld")%>
<br>
<br>
<input type="button" value=<%=bundle.getString("button")%> onclick="OnButtonClick();"/>
<br>
<div id="output"></div>
<br>
<input type="button" value=<%=bundle.getString("button2")%> onclick="OnButtonClick2();"/>
<br>
<div id="output2"></div>
</body>
</html>
sample.js
function OnButtonClick(){
	$("#output").text(Resources["helloWorld2"]);
}


function OnButtonClick2(){
	websocket.send("event");
}


$(document).ready(function()
{
	var loc = window.location, new_uri;
	url = "ws:";
	url += "//" + loc.host;
	url += loc.pathname;
	websocket = new WebSocket(url+"/event");

        websocket.onmessage = function(mes) {
    	    var messages=mes.data.split("|");
    	    post="";
    	    for(var i=0;i<messages.length;i++)
    		if(messages[i].match(/^[0-9]/)){
    			post+= " "+messages[i];
    		}
    		else{post+=" "+Resources[messages[i]];
    		};

    	   $("#output2").text(post);
	}

});
4.説明
サーバーサイド
Sample.java
-
Sample.javaはサーブレットファイルsample.jspを呼び出します。
SampleWebsocket.java
-
SampleWebsocket.javaでは、クライアント側でボタンが押されたときに、sample.jsからwebsocket通信でメッセージを送るのでpost(event)リスニングして、あなたはボタンを○○回押しました!というメッセージを表すIDをクラアント側のsample.jsに送っています。
@ServerEndpoint("/event")
public class SampleWebsocket {

	int i = 0;
    @OnMessage
    public String post(String event) {
    	i++;
    	String number =  Integer.toString(i);
        return "sentenceID1" + "|" + number + "|"+ "sentenceID2";
    }
}
-
@OnMessageでメソッドをアノテートするとクライアントからメッセージが来た時に呼び出されます。 -
javascriptのsplit()で分割できるように、IDの間には|を挿入します。 -
それぞれのIDは日本語では
setenceID1="あなたはボタンを" number=ボタンを押した回数 sentenceID2="回押しました!" -
英語では
setenceID1="You pushed the button" number=ボタンを押した回数 sentenceID2="times!"
を表しますので、それぞれのIDを参照して一つの文として表示します。
クライアントサイド
sample.jsp
-
request.getLocale();でクライアントのlocaleを取得し、java.util.ResourceBundle.getBundle("ファイル名",locale)でlocaleに一致する言語プロパティファイルを取得しています。
<%
    java.util.Locale locale = request.getLocale();
    java.util.ResourceBundle bundle = java.util.ResourceBundle.getBundle("/MessagesBundleSample", locale);
    System.out.println(locale);

%>
-
javascriptで扱うことができるように
Resoucesにプロパティファイルを格納します。 -
javascriptのlocaleクラスは使い勝手が良くないので、jspでjavaのlocaleを扱い、javascriptのObject.keysにそのまま格納する手法にしました。
<script type="text/javascript">
		            var Resources = {
		    		        <%
		    		            Enumeration<String> e = bundle.getKeys();
		    		            while (e.hasMoreElements()) {
		    		                String param = e.nextElement();
		    		                out.print('"'+param+ '"' +":\""+ bundle.getString(param) +"\"");
		    		                if (e.hasMoreElements())    out.println(",");
		    		            }
		    		        %>

		    		    };
</script>
- htmlの記述では、表示する文字列を
getString("ID名")でプロパティファイルから参照します。
<%=bundle.getString("helloWorld")%>
<br>
<br>
<input type="button" value=<%=bundle.getString("button")%> onclick="OnButtonClick();"/>
- また、エンコードはさまざまな言語に対応できるよう
UTF-8が推奨です。
sample.js
-
OnButtonClick2()では二個目のボタンを押した際に、WebSocket通信でサーバーにイベントを送ります。
function OnButtonClick2(){
    websocket.send("event");
}
-
サーバーはイベントが送られてきたら
senteceID+"|"+"ボタンを押した数"+"|"+sentenceID2を送り返すので、websocket.onmessageが呼び出されます。 -
websocket.onmessageでは、送られてきた文字列を分割|で分割し、それぞれを"Resouces"で参照してからoutput2に表示します。
  websocket.onmessage = function(mes) {
            var messages=mes.data.split("|");
            post="";
            for(var i=0;i<messages.length;i++)
            if(messages[i].match(/^[0-9]/)){
                post+= " "+messages[i];
            }
            else{post+=" "+Resources[messages[i]];
            };

           $("#output2").text(post);
    }
- 数字はそのまま表示するようにしていますが、アラビア数字以外を使用している言語圏の場合は、それぞれ対応を追加してください。
5.プロパティファイル
-
propertiesファイルは、全て
WebContent/WEB-INF/classesに置きましょう。自動的に読み込んでくれます。
classesフォルダがない場合は新規に作成してください。 -
propertiesファイルの名前は用途が同じもので揃え、最後にlocaleを記入します。
"ファイル名"_locale.language_locale.country.properties -
ブラウザの設定、環境によってはlocaleがlanguageのみしか取得できない場合があるので、必要であれば
"ファイル名"_locale.language.propertiesも用意します。 -
javaでサポートされているlocaleはhttps://www.oracle.com/technetwork/java/javase/javase7locales-334809.html で確認できます。
自分でlocaleを作成することも可能です。 -
propertiesファイルをjavascriptで扱うことができるように配列に格納しますが、その際にダブルクオーテーション
""を使用しているので、シングルクォーテーション''などを使用してください。 -
Key:
helloWorldはjspで表示しますが、jspではhtmlタグが使用できます。
helloWorld=<strong>ハローワールドjsp</strong>
helloWorld2=ハローワールドjs
button=ボタン
sentenceID1=あなたはボタンを
sentenceID2=回押しました!
button2=サーバーにイベントを送信
helloWorld=<strong>ハローワールドjsp</strong>
helloWorld2=ハローワールドjs
button=ボタン
sentenceID1=あなたはボタンを
sentenceID2=回押しました!
button2=サーバーにイベントを送信
helloWorld=<strong>HelloWorld(jsp)</strong>
helloWorld2=HelloWorld(js)
button=button(english)
sentenceID1=You pushed the button
sentenceID2=times!
button2=Send event to server
helloWorld=<strong>HelloWorld(jsp)</strong>
helloWorld2=HelloWorld(js)
button=button(english)
sentenceID1=You pushed the button
sentenceID2=times!
button2=Send event to server
6.動作
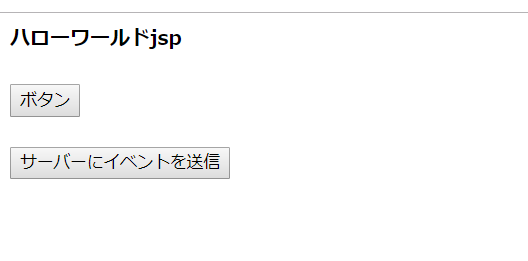
ページにアクセスするとこのように表示されます。
jspではhtmlタグが適用されるので、プロパティファイルで指定した通りに太字で表示されます。
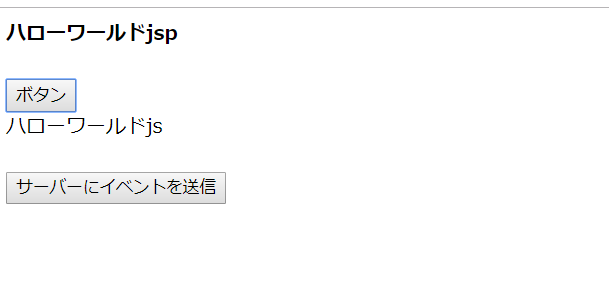
ボタンを押すとsample.jsのOnbuttonClickが動作し、IDhelloWorld2とキーが一致しているハローワールドjsをproperteisファイルを格納しているResoucesから参照して表示します。
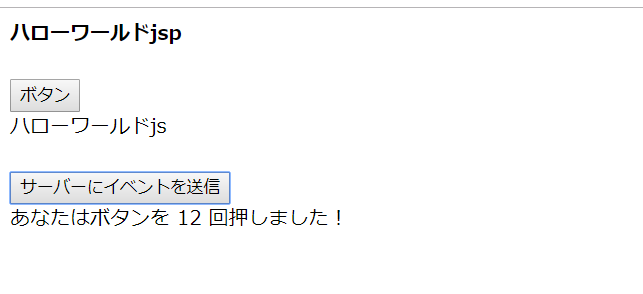
サーバーにイベントを送信ボタンを押すとOnButtonClick2()がイベントをサーバーに送り、サーバーサイドのSampleWebsocket.javaがリッスンし、IDsentenceID1とsentenceID2とボタンを押した回数がクライアント側に送り返され、プロパティファイルを参照してから表示されます。