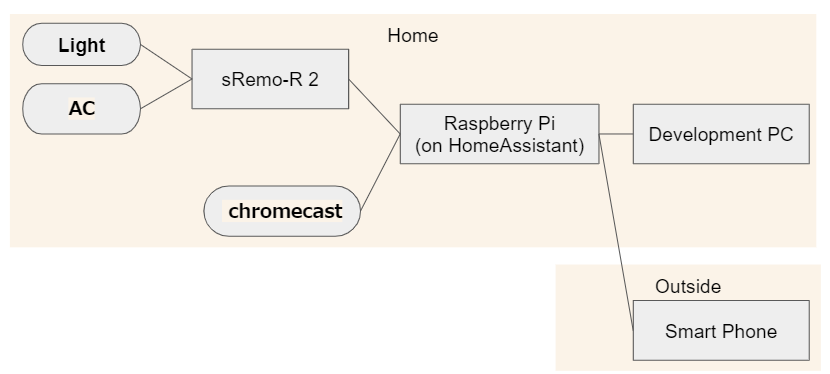
家の環境
ホームコントローラーの環境としては、常時起動が望ましいため。
その辺にあるRaspberry Piを活用します。
今回は下記の感じで、Raspberry PiにHomeAssitantという家電操作用OSを入れる手順に触れます。
Home Assistantって
「Home Assistant」は、オープンソースで提供されるホームコントローラーのツールになります。家電製品の管理や電気などのインフラ系の使用量を記録して、使用料金の算出などもできる様です。公式ホームページにデモムービーがあるのでそれを見た方がイメージはつかみやすいです。
Home Assistantのインストール
此方のリンクが公式になります。
インストール方法に関しては幾つかあるので、次の章で触れています。
Home Assistant のインストール方法
2022/3/20 現在、公式にサポートされている Home Assistant のインストール方法は 4 つあります。
①Home Assistant Operating System
②Home Assistant Container
③Home Assistant Supervised
④Home Assistant Core
ここでは③の方法を選択します。理由としては、、、Raspberry Piとしてはそのまま使いたいので、Raspberry Pi OSとHome Assistantの機能が全部使える方法として選択しました。
因みに、ラズパイの仮想PC上で動かすことになるので、オススメ方法ではないです…公式でも…
①~④の違いはざっくり下記のようです。
① Home AssistantのOSをRaspberry Piにインストールする方法。
② DockerというLinuxのコンテナ技術を使った方法です。
③ Linuxの仮想環境にHome Assistant OSを入れる方法。⇦今回これ!
④ Python パッケージになっているHome Assistantを使う方法
公式を参考にインストール
③に関しては下記がインストール方法の手順になります。
https://github.com/home-assistant/supervised-installer
Step 1:Install the following dependacy's with this command:
apt-get install \
jq \
wget \
curl \
udisks2 \
libglib2.0-bin \
network-manager \
dbus -y
Step 2: Install Docker-CE with the following command:
Duckerの公式インストール
curl -fsSL get.docker.com | sh
Step 3:Install the OS-Agent:
OS-Agentをインストールします。これが無いとSuperviserがタスクをちゃんと処理できないようです。インストール方法はこちらを参照。
因みにOS-AgentはProcessaに応じたものをダウンロードする必要があります。
Processaの調べ方は
cat /proc/cpuinfo
で確認できます。
私はARMv7 Processor rev 4でしたので、os-agent_1.2.2_linux_armv7.debを使いました。
Step 4:Install the Home Assisistant Supervised Debian Package:
wget https://github.com/home-assistant/supervised-installer/releases/latest/download/homeassistant-supervised.deb
dpkg -i homeassistant-supervised.deb
無事インストール出来たら、起動状態を確認します。
$ docker ps -a
NAMESのところにhomeassistantのsupervisorがあればOK!
Home Assistant へのアクセス
同じネットワーク内のpcからポート 8123 でアクセスできます。
私の環境では、WindowsPCからhttp://192.168.○.○:8123 でHomeAssistantへアクセスできました。
まとめ
という事で、HomeAssitantのインストールまでを扱いました。
ラズパイ on 仮想環境 on HomeAssistantという少し微妙な構成ですが、、、参考になれば幸いです。
