はじめに
Angularチュートリアル:Tour of Heroesを読み進めていきます。
開発環境
- OS: Windows10
- Nodeバージョン: 18.18.0
- Angular CLI バージョン: 17.3.8
- エディタ: VSCode
6. サーバーからデータの取得
6. サーバーからデータの取得を読んでいきます。
何をやるの?
今までは何かしらの処理をするメソッドを定義し、それを外部から呼んでいました。
この章では、API経由でメソッドを呼び出して処理をするということをやっていきます。
そのための下準備として以下を実施します。
HTTPサービスの有効化
HttpClientの利用により、HTTPを通してリモートサーバと通信できるようになります。
以下の手順を踏みます。
手順1. HttpClientModuleのインポート
import { HttpClientModule } from '@angular/common/http';
手順2. NgModuleのimportにHttpClientModuleを追加する
@NgModule({
  imports: [
    HttpClientModule,
  ],
})
In-memory Web API
このチュートリアルでは、In-memory Web APIを使って「WebAPIを実行する」を実現します。
本来であれば実際のWebサーバがあればそちらを使いますが、現時点でそれはありません。
サーバはないが検証したい、といった場合はIn-memory Web APIを利用するとよいです。
In-memory Web APIの導入
npm install angular-in-memory-web-api --save コマンドを実行。
これによりIn-memory Web APIパッケージをインストールできます。
プロジェクトのルートディレクトリでこのコマンドを実行する必要あり。
間違った場所でコマンド実行したことで、少しハマりました。
何が起こったか、どう対応したかについては別記事(Angularチュートリアルでハマった件)に記載しています。
ng generate service InMemoryDataコマンドを実行してできたサービスクラスを、チュートリアルにある通りの実装で上書きします。
そのサービスクラスをアプリとして利用できるようにします。記載対象はapp.module.tsです。
import { HttpClientInMemoryWebApiModule } from 'angular-in-memory-web-api';
import { InMemoryDataService } from './in-memory-data.service';
...

@NgModule({
  ...
  imports: [
    ...,
    // The HttpClientInMemoryWebApiModule module intercepts HTTP requests
    // and returns simulated server responses.
    // Remove it when a real server is ready to receive requests.
    HttpClientInMemoryWebApiModule.forRoot(
      InMemoryDataService, { dataEncapsulation: false }
    )
  ],
  ...
})
HttpClientInMemoryWebApiModule.forRoot(...)ではインメモリデータベースを操作するInMemoryDetaServiceクラスを受け取ります。
このサービスクラスを使って、インメモリに保存されているHeroたちのオブジェクトに対して追加や検索といった操作が可能になります。
In-memor Web APIについて、こちら (TECHSCORE BLOG)でも言及されています。
ソースコードを読み解いてみる
HTTPリクエストを送る準備
import { HttpClient, HttpHeaders } from '@angular/common/http';
...

export class HeroService {
  constructor(
    private messageService: MessageService,
    private http: HttpClient
  ) { }
  ...
}
HTTPリクエストを送るためにHttpClientをインポート。
...

export class HeroService {
  private heroesUrl = 'api/heroes';  // Web APIのURL
  ...
}
Web APIのベースURLを定義。
HttpClient [GET]: ヒーローを取得
ヒーロー一覧を取得
...

export class HeroService {
  ...
  getHeroes(): Observable<Hero[]> {
-    const heroes = of(HEROES);
-    return heroes;
+    //HTTPのGET経由でヒーロー一覧を取得
+    return this.http.get<Hero[]>(this.heroesUrl)
  }
}
HttpClientのGETを実行してヒーロー一覧を取得。
今まではメソッド呼び出しでヒーロー一覧を取得していました。
これまでの記載も、HttpClient#get もObservableを返すので、getHeroesメソッドの戻り値の型は変更ありません。
オプションの型指定子 <Hero[]> を適用すると、TypeScriptの機能が追加され、コンパイル時のエラーが少なくなります。
Javaでいうところのジェネリクスみたいな感じってことですかね。
特定のIDのヒーローを取得
api/heroes/13(api/heroes の部分は変数heroesUrlの値)という形式のリクエストが送られると、そのIDに対応するHeroを返すようにします。
ヒーロー一覧ではなく、特定のヒーローを取得します。
...

/** IDによりヒーローを取得する。見つからなかった場合は404を返却する。 */
getHero(id: number): Observable<Hero> {
  const url = `${this.heroesUrl}/${id}`;
  return this.http.get<Hero>(url).pipe(
    tap(_ => this.log(`fetched hero id=${id}`)),
    catchError(this.handleError<Hero>(`getHero id=${id}`))
  );
}
※.pipe(...)の部分はあとで言及します。
- getHero()は求めたいヒーローのIDを含んだURLを生成する
- サーバーはヒーローたちの配列ではなく、一人のヒーローの情報を返す必要がある
- したがって、getHero()はヒーローの配列のObservableを返すのではなく、Observable<Hero> (ヒーローのオブジェクトのObservable)を返す
HttpClient [PUT]: ヒーローを更新
ヒーロー名を変更して保存ボタンを押すと、その名前がサーバに届き、その変更を永続化することができます。
更新のためのUIパーツを追加
...
<button type="button" (click)="save()">save</button>
saveボタンがclickされたらsave() メソッドを実行するイベントバイディングですね。
【Q】ヒーロー名を更新するんだろう?
html側でsaveをコールする際に変更後のヒーロー名が必要なのでは(引数なしで大丈夫か)?
【A】大丈夫。
双方向データバインディングにより、該当Heroのnameが置き換わっている。そのためsave実行時に名前が必要という訳ではない。
もちろん変更後の名前を引数に取る設計も考えられるだろうが、少なくともチュートリアルでは引数なしの方針で説明されている。
該当部分は以下。
<div>
  <label for="hero-name">Hero name: </label>
  <input id="hero-name" [(ngModel)]="hero.name" placeholder="name">
</div>
ロジック部分の実装
...
save(): void {
  if (this.hero) {
    this.heroService.updateHero(this.hero)
      .subscribe(() => this.goBack());
  }
}
まずはコンポーネント側の実装。
HeroService経由でヒーロー更新を実行し終えたら、goBack() を実行して前の画面に遷移します。goBack()自体は今回のチュートリアルで作成したメソッドです。
...
httpOptions = {
  headers: new HttpHeaders({ 'Content-Type': 'application/json' })
};

...
/** PUT: サーバー上でヒーローを更新 */
updateHero(hero: Hero): Observable<Hero> {
  return this.http.put<Hero>(this.heroesUrl, hero,
    this.httpOptions).pipe(
      tap(_ => this.log(`updated hero id=${hero.id}`),
      catchError(this.handleError<Hero>("updateHero")))
    );
}
※.pipe(...)の部分はあとで言及します。
HttpClient #putを実行することで、PUTリクエストを送信するためのオブジェクトの組み立てが行われます。その結果がObservableです。実際リクエストが送られるのは、subscribeが実行されたときです。
subscribeについては、DELETEセクションに書かれている記載が参考になります。
subscribeについて
リターンされたObservableオブジェクトはsubscribeされるまで何もしないのでsubscribeを忘れずに実行する必要がある。
If you neglect to subscribe(), the service can't send the delete request to the server. As a rule, an Observable does nothing until something subscribes.
送信先のWebAPIのURLthis.heroesUtlを引数に使います。
また、送信するデータ形式を定義するヘッダ情報も添えます。
そのヘッダを添えてPUTを実行します。
ヘッダ定義はhttpOptions定数を参照。
HttpClient [POST]: ヒーローを追加
ヒーロー一覧画面にて、ヒーロー名を入力してもらうためのUIパーツと、Add heroボタンを配置します。
ボタンを押下すると、ヒーロー一覧画面に新しいヒーローが追加されます。ヒーローのIDも新しいものが採番されます。
更新のためのUIパーツを追加
...
<div>
  <label for="new-hero">Hero name: </label>
  <input id="new-hero" #heroName />

  <!-- (click) 入力値をadd()に渡したあと、入力をクリアする -->
  <button type="button" class="add-button" (click)="add(heroName.value); heroName.value=''">
    Add hero
  </button>
</div>
テキストボックスに入力された値(heroName.valueで取得可能)を引数に、ボタンが押下されたらaddメソッドをコールするイベントバインディング。
ロジック部分の実装
...
add(name: string): void {
  name = name.trim();
  if (!name) { return; }
  this.heroService.addHero({ name } as Hero)
    .subscribe(hero => {
      this.heroes.push(hero);
    });
}
まずはコンポーネント側の実装。
HeroService経由でヒーロー追加(addHero経由でPOSTのコール)を実行し終えたら、そのヒーローをヒーロー一覧に追加pushします。
...
/** POST: サーバーに新しいヒーローを登録する */
addHero(hero: Hero): Observable<Hero> {
  return this.http.post<Hero>(this.heroesUrl, hero, this.httpOptions).pipe(
    tap((newHero: Hero) => this.log(`added hero w/ id=${newHero.id}`)),
    catchError(this.handleError<Hero>('addHero'))
  );
}
※.pipe(...)の部分はあとで言及します。
HttpClient #postを実行することで、POSTリクエストを送信するためのオブジェクトの組み立てが行われます。その結果がObservableです。実際リクエストが送られるのは、subscribeが実行されたときです。
subscribeについては、DELETEセクションに書かれている記載が参考になります。
subscribeについて
リターンされたObservableオブジェクトはsubscribeされるまで何もしないのでsubscribeを忘れずに実行する必要がある。
If you neglect to subscribe(), the service can't send the delete request to the server. As a rule, an Observable does nothing until something subscribes.
送信先のWebAPIのURLthis.heroesUtlを引数に使います。
PUTのときと同様、送信するデータ形式を定義するヘッダ情報(httpOptions定数)も添えます。
HttpClient [DELETE]: ヒーローを削除
ヒーロー一覧画面にて、ヒーローを削除する機能を追加します。
ヒーローごとに削除ボタンが表示されており、それを押すと、該当のヒーローが一覧から削除されます。
もちろん、他画面に遷移して再度ヒーロー一覧画面に戻って来ても、削除された状態です。
削除のためのUIパーツを追加
<ul class="heroes">
  <li *ngFor="let hero of heroes">
    ...
    <button type="button" class="delete" title="delete hero"
      (click)="delete(hero)">x</button>
  </li>
</ul>
毎度おなじみイベントバインディング。削除ボタンがclickされたら、そのHeroオブジェクトを引数にdeleteメソッドが実行されます。
ロジック部分の実装
...
delete(hero: Hero): void {
  this.heroes = this.heroes.filter(h => h !== hero);
  this.heroService.deleteHero(hero.id).subscribe();
}
this.heroes = this.heroes.filter(h => h !== hero);の意味
-
filterメソッドを使って、指定されたheroを一覧から削除。 -
h => h !== hero- ヒーローリストの各要素(
h)が削除対象のヒーロー(hero)と一致しない(!==)場合にその要素を保持するという条件。 - 削除対象のヒーローと一致しないHeroオブジェクトのリスト
this.heroesが再定義される=指定されたheroが存在しない、つまり削除された状態を作る。
- ヒーローリストの各要素(
this.heroService.deleteHero(hero.id).subscribe();の意味
- HeroService #deleteHero経由でHTTPのDELETEを実行する。
-
subscribeは、非同期操作の完了を待つために使用される。ここでは、削除リクエストが完了するのを待つ。
コンポーネント側のdeleteメソッドでは、
- まずローカルのヒーローリストから指定されたヒーローを削除し、
- その後サーバー側でも同じヒーローを削除するリクエストを送信する。
これにより、データの一貫性が保たれます。
/** DELETE: サーバーからヒーローを削除 */
deleteHero(id: number): Observable<Hero> {
  const url = `${this.heroesUrl}/${id}`;

  return this.http.delete<Hero>(url, this.httpOptions).pipe(
    tap(_ => this.log(`deleted hero id=${id}`)),
    catchError(this.handleError<Hero>('deleteHero'))
  );
}
※.pipe(...)の部分はあとで言及します。
HttpClient #deleteを実行することで、DELETEリクエストを送信するためのオブジェクトの組み立てが行われます。その結果がObservableです。実際リクエストが送られるのは、subscribeが実行されたときです。
subscribeについて
リターンされたObservableオブジェクトはsubscribeされるまで何もしないのでsubscribeを忘れずに実行する必要がある。
If you neglect to subscribe(), the service can't send the delete request to the server. As a rule, an Observable does nothing until something subscribes.
送信先のWebAPIのURLthis.heroesUrlを使います。
そのまま使うのではなく、urlに削除対象のヒーローIDを連結させます。その連結した値をDELETE実行に使います。
const url = `${this.heroesUrl}/${id}`;
PUTのときと同様、ヘッダ情報(httpOptions定数)も添えます。
【応用編】HttpClient [GET]: ヒーロー検索
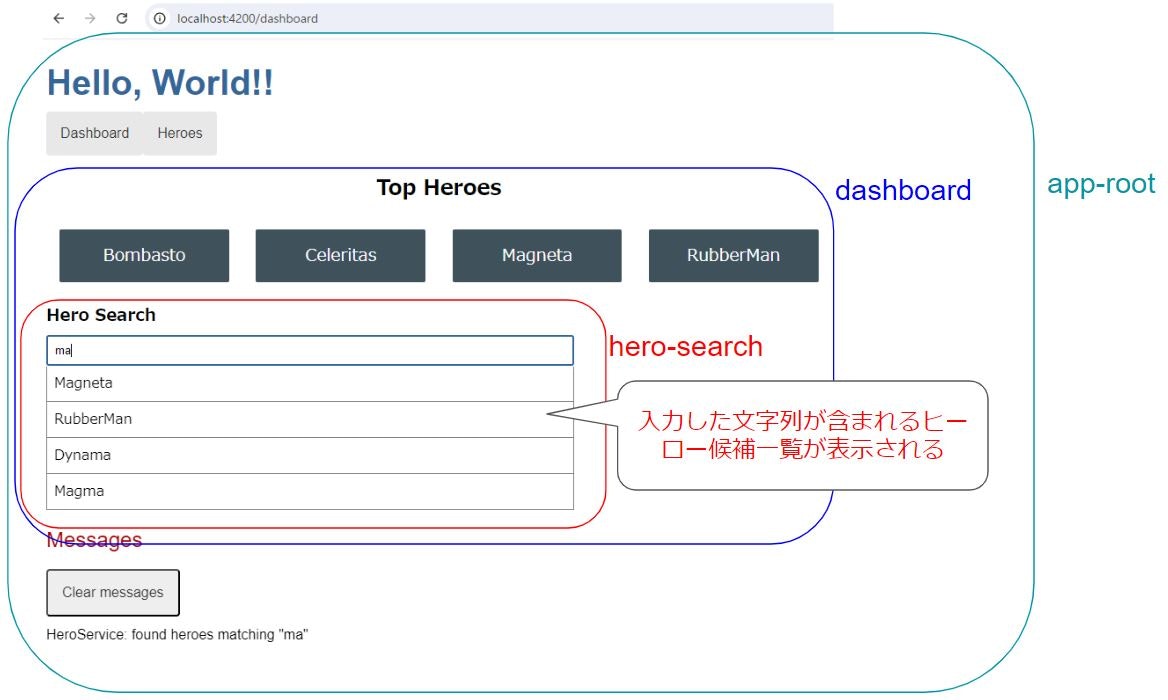
画面に検索用のテキストボックスを追加し、文字がタイプされるたびにそれが含まれる候補一覧を表示するということをやります。
※正確には、「タイプされるたびに」ではありません。検索のHTTP通信が走ることへのサーバや通信トラフィックへの負荷を考慮して、「入力されたらちょっと待って、その時点で入力された文字列を使って検索する」が正確なところです。
手順に沿ってhero-searchコンポーネントを作ります。
最終的には↓のような感じになります。候補をクリックすると、そのヒーローの詳細画面に遷移します。
AsyncPipe
<div id="search-component">
  <label for="search-box">Hero Search</label>
  <input #searchBox id="search-box" (input)="search(searchBox.value)" />

  <ul class="search-result">
    <li *ngFor="let hero of heroes$ | async" >
      <a routerLink="/detail/{{hero.id}}">
        {{hero.name}}
      </a>
    </li>
  </ul>
</div>
*ngForでのループ処理ですが、少し独特です。<li *ngFor="let hero of heroes$ | async" >のところです。
-
heroes$- heroesが
Observableであることを意味します。$を付けることで、その意味を持たせることができます。
- heroesが
-
| async- Observableのままでは*ngForで処理できません。
- AsyncPipeを使うことでそれを実現できます。
-
| asyncと書くことでObservableがsubscribeされます。
RxJS Subject
hero-search.component.htmlで登場するheroes$についての言及があるのは、HeroSearchComponentクラスです。
import { Component, OnInit } from '@angular/core';

import { Observable, Subject } from 'rxjs';

import {
   debounceTime, distinctUntilChanged, switchMap
 } from 'rxjs/operators';

import { Hero } from '../hero';
import { HeroService } from '../hero.service';

@Component({
  selector: 'app-hero-search',
  templateUrl: './hero-search.component.html',
  styleUrls: [ './hero-search.component.css' ]
})
export class HeroSearchComponent implements OnInit {
  heroes$!: Observable<Hero[]>;
  private searchTerms = new Subject<string>();

  constructor(private heroService: HeroService) {}

  // 検索語をobservableストリームにpushする
  search(term: string): void {
    this.searchTerms.next(term);
  }

  ngOnInit(): void {
    this.heroes$ = this.searchTerms.pipe(
      // 各キーストロークの後、検索前に300ms待つ
      debounceTime(300),

      // 直前の検索語と同じ場合は無視する
      distinctUntilChanged(),

      // 検索語が変わる度に、新しい検索observableにスイッチする
      switchMap((term: string) => this.heroService.searchHeroes(term)),
    );
  }
}
heroes$!: Observable<Hero[]>;ここですね。
heroes$の値は、searchTermsの値によって決定します。
import { Observable, Subject } from 'rxjs';
...
private searchTerms = new Subject<string>();

...
search(term: string): void {
    this.searchTerms.next(term);
}
searchメソッドは、hero-search.component.htmlで記載されているイベントバインディングによってコールされるメソッドです。
Subjectについて、チュートリアルでは以下の記載があります。
A Subject is both a source of observable values and an Observable itself. You can subscribe to a Subject as you would any Observable.
(日本語)Subjectはobservableな値の元でもあり、Observableそのものでもあります。 ObservableにするようにSubjectをsubscribeすることができます。
You can also push values into that Observable by calling its next(value) method as the search() method does.
(日本語)next(value)メソッドを呼ぶことで、Observableに値をpushすることができます。
つまり、検索用テキストボックスに文字が入力されると、
- イベントバインディングによりsearchメソッドがコールされ、
- Subject型(実質Observable)のsearchTermsにその文字が追加(push)される
ということが起こっているということです。
Subject: https://rxjs.dev/guide/subject
RxJSオペレーターの連結
冒頭で書いた「入力後ちょっと待って検索実行する」を実現するために、RxJSオペレーターを連結して指定します。
ここで用いるのは以下の3つ。
- https://rxjs.dev/api/operators/debounceTime
- https://rxjs.dev/api/operators/distinctUntilChanged
- https://rxjs.dev/api/operators/switchMap
this.heroes$ = this.searchTerms.pipe(
  // 各キーストロークの後、検索前に300ms待つ
  debounceTime(300),

  // 直前の検索語と同じ場合は無視する
  distinctUntilChanged(),

  // 検索語が変わる度に、新しい検索observableにスイッチする
  switchMap((term: string) => this.heroService.searchHeroes(term)),
);
(term: string) => this.heroService.searchHeroes(term)の部分では、
- searchTermが持っている検索文字列
termを使って - HeroService #searchHeroesを実行する
- その戻り値
Observable<Hero[]>を取得する
をしています。
そしてswitchMap(...)により、heroes$は古い値から新しい値(HeroService #searchHeroesの実行結果)に置き換わります。
ちなみに、「いろんな処理を連結させる」ことを実現するための手法がpipe(...)の部分です。
pipe(): 処理を連結させる
catchErrorによるエラーハンドリング
.pipe(...)を使って処理を連結します。
その中でエラーハンドリングの例がチュートリアルで示されています。
import { catchError, map, tap } from 'rxjs/operators';
...

getHeroes(): Observable<Hero[]> {
  return this.http.get<Hero[]>(this.heroesUrl)
    .pipe(
      catchError(this.handleError<Hero[]>('getHeroes', []))
    );
}
たとえば↑ の例。
- GET実行したときに何かしら実行させたい処理を連結
Observable #pipe(...)
- エラーが発生したときは
catchError()を利用する- Javaでいうところの try-catchのcatch説みたいな感じだと理解しました
tapによる副作用処理(ログ記載など)
エラーハンドリングとは少し違いますが、連結させる処理のひとつで、以下のようにtapを使って処理をさせることができます。たとえばログを書くとか。
tapについて:
Used to perform side-effects for notifications from the source observable
/** サーバーからヒーローを取得する */
getHeroes(): Observable<Hero[]> {
  return this.http.get<Hero[]>(this.heroesUrl)
    .pipe(
      tap(heroes => this.log('fetched heroes')),
      catchError(this.handleError<Hero[]>('getHeroes', []))
    );
}
Copilotさんにもtapについて教えてもらった。
tapオペレーターは、RxJSライブラリの一部で、Observableのデータストリームに副作用を追加するために使用されます。tapはデータ自体を変換せず、データを観察したり、ログを出力したり、その他の副作用を実行するために使われます。
参考
正直まだよくわかってないところもある(ヒーローを追加したとき、どういうシーケンスをたどって新規IDが採番されるのかとか)が、とりあえず読み切ったのでヨシ。
