きっかけ
スマホを充電する際に 100% まで充電して放置しておくのは、バッテリーに優しくないと聞くので、寝るときには充電しないようにしている。ただ、そうすると、朝起きて出かける際に全然充電出来ていないじゃん(泣)ということがよくある…
あと、自分が使用しているソニーの Xperia では、"いたわり充電" という機能があるっちゃあるんだけど、睡眠サイクルが通常と外れる場合、例えば、祝日や休暇中などいつもより長く寝る場合とかには、起きたときにはとっくにフル充電状態になってるし、そもそもゆっくり充電するので、深夜に急用ができた場合に充電されていないということが起こりえるので、そこまで使えない…(あくまで個人的な感想)
そんなこんなで、全速力で充電しつつも、バッテリーがいっぱいになる前に充電を自動で止めるような充電ができないかなぁとずっと思っていた。そしたら、最近、スマートプラグなる IoT 機器が登場して、電源のオン/オフをネットワーク経由でプログラマブルにコントロールできるとのこと。これを使えば、スマホのバッテリー状態を監視しておいてバッテリーがいっぱいになる直前にスマートプラグをオフれば、電源が遮断され、充電も止められるんじゃない? という発想のもと、ちょっと作ってみることにした。
ちなみに、スマートプラグでタイマー設定して何時間後にオフにする、というような夢のないことはしません。バッテリーがあと何%残っているから充電時間はこれぐらいだよねって都度計算するのも面倒ですしね。
スマートプラグは TP-Link 社の HS105 を使用
→ IFTTT で電源オン/オフ
電源オン/オフをネットワーク経由でプログラムにコントロールできるスマートプラグをざっと探したところ TP-Link 社の HS105 が IFTTT 対応していて if this then that の that でコントロールできるようなので、今回は HS105 を使ってみることにした。this の部分は、今回は、Google スプレッドシートを採用した。
#本当は、API などが用意されているスマートプラグがあればよかったのだが見つからなかったので仕方なく…
構成としてはこんな感じ。スマートプラグ経由でスマホをコンセントにつなぐ
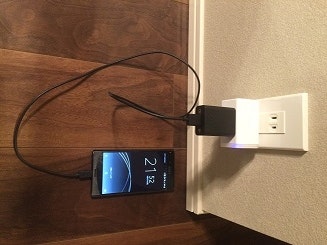
スマートプラグをオン/オフできれば、電源が遮断され、充電もオン/オフできる仕組み
やったこと
- スマホでバッテリー状態を監視、バッテリー状態によって電源オン/オフのトリガーを Google スプレッドシートに書き込む Android アプリ(サービス)を作成 (IFTTT の this の部分)
- IFTTT で「Google スプレッドシートに更新があったら、スマートプラグの電源をオン/オフする」アプレットを作成
1. スマホでバッテリー状態を監視、バッテリー状態によって電源オン/オフのトリガーを Google スプレッドシートに書き込む Android アプリ(サービス)を作成 (IFTTT の this の部分)
使用しているのが Android OS スマホ (Xperia) なので Android で実装
実装することは大きく分けて3つ
1-1. フォアグラウンドサービスを立てて ACTION_BATTERY_CHANGED の Intent を受け取る
(注) Android 8.0 Oreo でバックグラウンドでの実行制限がかかっている のでフォアグラウンドにする必要あり
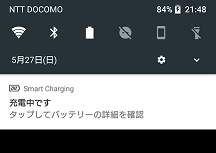
フォアグラウンドサービスなのでこんな風にフォアグラウンド通知が表示されます。
1-2. Intent からバッテリー状態を取得し、バッテリー状態によって充電を続けるか(充電を開始するか)、充電をやめるかを決める
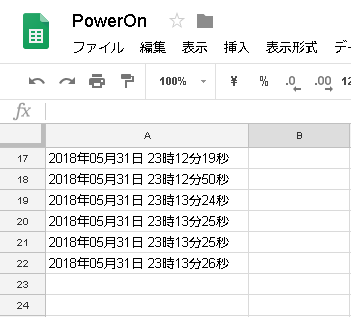
1-3. 充電を開始する場合は電源オン、充電を止める場合は電源オフのトリガーを Google スプレッドシートに書き込む
電源オン/オフのトリガーを書き込むスプレッドシートはそれぞれ用意
Google スプレッドシートにアクセスする際の認証は、今回はサービス アカウント キーを使用
こんな風にスプレッドシートに行を追加していきます。今回はそのときの時刻を書き込んでいます。
IFTTT で、スプレッドシートに行が追加されたことをトリガーとします。
サービスのソースコードはこんな感じ
...

public class SmartChargingService extends Service {
    private static final int NOTIFICATION_ID = 1;

    private static final int BATTERY_UPPER_LIMIT = 90;
    private static final int BATTERY_LOWER_LIMIT = 85;

    private static final String POWER_ON_SPREAD_SHEET_ID = "電源オンのトリガーを書き込む Google スプレッドシートの ID";
    private static final String POWER_OFF_SPREAD_SHEET_ID = "電源オフのトリガーを書き込む Google スプレッドシートの ID";

    private static com.google.api.services.sheets.v4.Sheets SERVICE;

    private int mPreviousStatus = BatteryManager.BATTERY_STATUS_UNKNOWN;

    private boolean mIsForeground = false;

    public static void start(Context context) {
        Intent intent = new Intent(context, SmartChargingService.class);
        context.startService(intent);

        Credential credential = authorize(context);
        SERVICE = getService(credential);
    }

    @Override
    public void onCreate() {
        super.onCreate();

        // バッテリー状態が変化したときにインテントを受け取るブロードキャストレシーバーを登録
        IntentFilter filter = new IntentFilter();
        filter.addAction(Intent.ACTION_BATTERY_CHANGED);
        registerReceiver(mBatteryChangedReceiver, filter);
    }

    @Override
    public void onDestroy() {
        super.onDestroy();

        // ブロードキャストレシーバーを解除
        unregisterReceiver(mBatteryChangedReceiver);

        mPreviousStatus = BatteryManager.BATTERY_STATUS_UNKNOWN;
        mIsForeground = false;
    }

    @Nullable
    @Override
    public IBinder onBind(Intent intent) {
        return null;
    }

    private BroadcastReceiver mBatteryChangedReceiver = new BroadcastReceiver() {
        @Override
        public void onReceive(Context context, Intent intent) {
            int status = intent.getIntExtra(BatteryManager.EXTRA_STATUS, -1);

            int scale = intent.getIntExtra("scale", 0);
            int level = intent.getIntExtra("level", 0);
            float remainingBattery = 100;
            if (level != -1 && scale != -1) {
                remainingBattery = (int) (level / (float) scale * 100);
            }

            // 充電中の場合
            if (status == BatteryManager.BATTERY_STATUS_CHARGING
                    || status == BatteryManager.BATTERY_STATUS_FULL) {
                // 電池残量が十分の場合
                if (remainingBattery >= BATTERY_UPPER_LIMIT) {
                    // スマートプラグを電源オフして充電を止める
                    powerOff();
                // 電池残量が不十分の場合
                } else {
                    // そのまま充電を続ける

                    // フォアグラウンドサービスを開始していなかったら開始する
                    if (!mIsForeground) {
                        startForeground(NOTIFICATION_ID, createNotification(context, "充電中です"));
                        mIsForeground = true;
                    // 充電が始まったらメッセージを更新する
                    } else {
                        if (mPreviousStatus != BatteryManager.BATTERY_STATUS_CHARGING
                                && mPreviousStatus != BatteryManager.BATTERY_STATUS_FULL) {
                            updateNotification(context, "充電中です");
                        }
                    }
                }
            // 充電中ではない場合
            } else {
                // 電池残量が不十分の場合
                if (remainingBattery < BATTERY_LOWER_LIMIT) {
                    // 直前まで充電されていた場合
                    if (mPreviousStatus == BatteryManager.BATTERY_STATUS_CHARGING
                            || mPreviousStatus == BatteryManager.BATTERY_STATUS_FULL) {
                        // 強制的に充電を中止されたとみなしてスマートプラグを電源オフし、サービスも止める
                        powerOff();
                        stopSelf();
                    } else {
                        // スマートプラグを電源オンして充電を開始する
                        powerOn();

                        // フォアグラウンドサービスを開始していなかったら開始する
                        if (!mIsForeground) {
                            startForeground(NOTIFICATION_ID, createNotification(context, "充電を開始中です"));
                            mIsForeground = true;
                        }
                    }
                // 電池残量が十分の場合
                } else {
                    // 充電の必要がないので、何もせずサービスを止める
                    stopSelf();
                }
            }

            mPreviousStatus = status;
        }
    };

    private Notification createNotification(Context context, String message) {
        final String notificationTitle = message;
        final String notificationContentText = "タップしてバッテリーの詳細を確認";

        final String channelId = "smart charging notification channel";

        NotificationManager notificationManager =
                (NotificationManager) context.getSystemService(Context.NOTIFICATION_SERVICE);

        NotificationChannel notificationChannel = new NotificationChannel(
                channelId, notificationTitle, NotificationManager.IMPORTANCE_DEFAULT);

        notificationManager.createNotificationChannel(notificationChannel);

        Intent notificationIntent = new Intent(this, SmartChargingActivity.class);

        PendingIntent pendingIntent = PendingIntent.getActivity(
                context, 0, notificationIntent, PendingIntent.FLAG_UPDATE_CURRENT);

        Notification notification = new Notification.Builder(context, channelId)
                .setSmallIcon(R.drawable.battery)
                .setContentTitle(notificationTitle)
                .setContentText(notificationContentText)
                .setContentIntent(pendingIntent)
                .setAutoCancel(true)
                .build();

        return notification;
    }

    private void updateNotification(Context context, String message) {
        final String notificationTitle = message;
        final String notificationContentText = "タップしてバッテリーの詳細を確認";

        final String channelId = "smart charging notification channel";

        NotificationManager notificationManager =
                (NotificationManager) getSystemService(Context.NOTIFICATION_SERVICE);

        NotificationChannel notificationChannel = new NotificationChannel(
                channelId, notificationTitle, NotificationManager.IMPORTANCE_DEFAULT);

        notificationManager.createNotificationChannel(notificationChannel);

        Intent notificationIntent = new Intent(this, SmartChargingActivity.class);

        PendingIntent pendingIntent = PendingIntent.getActivity(
                context, 0, notificationIntent, PendingIntent.FLAG_UPDATE_CURRENT);

        Notification notification = new Notification.Builder(context, channelId)
                .setSmallIcon(R.drawable.battery)
                .setContentTitle(notificationTitle)
                .setContentText(notificationContentText)
                .setContentIntent(pendingIntent)
                .setAutoCancel(true)
                .build();

        notificationManager.notify(NOTIFICATION_ID, notification);
    }

    private void powerOn() {
        new SpreadSheetAddRowTask(POWER_ON_SPREAD_SHEET_ID).execute();
    }

    private void powerOff() {
        new SpreadSheetAddRowTask(POWER_OFF_SPREAD_SHEET_ID).execute();
    }

    private class SpreadSheetAddRowTask extends AsyncTask<Void, Void, Void> {
        private Exception mLastError = null;
        private String mSpreadSheetId;

        SpreadSheetAddRowTask(String spreadSheetId) {
            mSpreadSheetId = spreadSheetId;
        }

        @Override
        protected Void doInBackground(Void... params) {
            try {
                return request();
            } catch (Exception e) {
                mLastError = e;
                cancel(true);
                return null;
            }
        }

        private Void request() throws IOException {
            String range = "sheet!A1";

            ValueRange valueRange = new ValueRange();

            List row = new ArrayList<>();

            // 現在時刻を記録
            Date date = new Date();
            SimpleDateFormat sdf = new SimpleDateFormat("yyyy'年'MM'月'dd'日' kk'時'mm'分'ss'秒'");
            List col = Arrays.asList(sdf.format(date));
            row.add(col);
            valueRange.setValues(row);

            valueRange.setRange(range);

            SERVICE.spreadsheets().values()
                    .append(mSpreadSheetId, range, valueRange)
                    .setValueInputOption("RAW")
                    .setInsertDataOption("INSERT_ROWS")
                    .setIncludeValuesInResponse(false)
                    .setResponseValueRenderOption("FORMATTED_VALUE")
                    .execute();

            return null;
        }

        @Override
        protected void onCancelled() {
            if (mLastError != null) {
                System.out.println("The following error occurred:\n" + mLastError.getMessage());
            } else {
                System.out.println("Request cancelled.");
            }
        }
    }

    private static GoogleCredential authorize(Context context) {
        GoogleCredential credential = null;

        try {
            Resources res = context.getResources();
            // サービスアカウントキーの JSON ファイルを res/raw フォルダにおいておく
            InputStream inputStream = res.openRawResource(R.raw.serviceaccountkey);
            credential = GoogleCredential.fromStream(inputStream)
                    .createScoped(Arrays.asList(SheetsScopes.SPREADSHEETS));
        } catch (Exception e) {
            System.out.println(e.toString());
        }

        return credential;
    }

    private static com.google.api.services.sheets.v4.Sheets getService(Credential credential) {
        com.google.api.services.sheets.v4.Sheets service = null;

        try {
            HttpTransport transport = AndroidHttp.newCompatibleTransport();
            JsonFactory jsonFactory = JacksonFactory.getDefaultInstance();
            service = new com.google.api.services.sheets.v4.Sheets.Builder(transport, jsonFactory, credential)
                    .setApplicationName("Smart Charging")
                    .build();
        } catch (Exception e) {
            System.out.println(e.toString());
        }

        return service;
    }
}
2. IFTTT で「Google スプレッドシートに更新があったら、スマートプラグの電源をオン/オフする」アプレットを作成
電源オンと電源オフの二つのアプレットを作成する
電源オンのアプレットを作成する場合の流れ
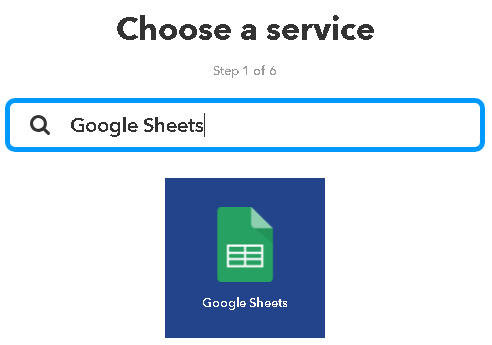
2-1. if this then that の this を設定
2-1-1. サービスの選択
Choose a service (Step 1 of 6) で 「Google Sheets」 を選択
※Google のアカウント設定が済んでいる前提です
2-1-2. トリガーの選択
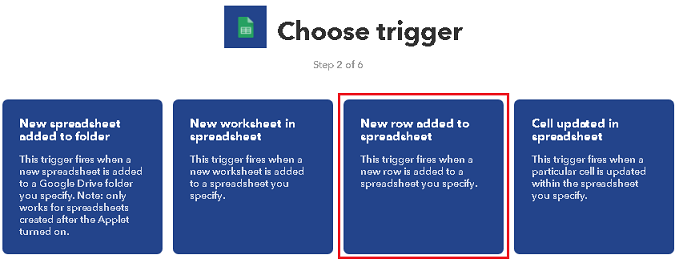
Choose trigger (Step 2 of 6) で、赤枠で囲った 「New row added to spreadsheet」 を選択
2-1-3. トリガーの詳細を設定
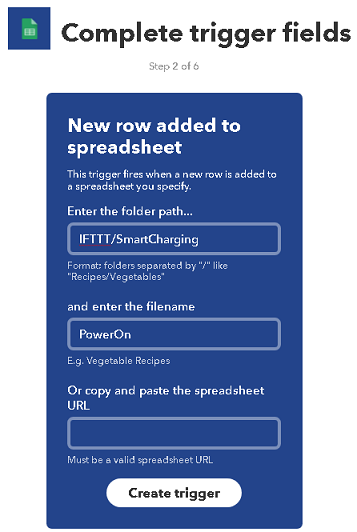
Complete trigger fields (Step 3 of 6) で、電源オンのトリガーが書き込まれるスプレッドシートを指定
※電源オフの場合は、電源オフのトリガーが書き込まれるスプレッドシートを指定してください。
2-2. if this then that の that を設定
2-2-1. サービスの選択
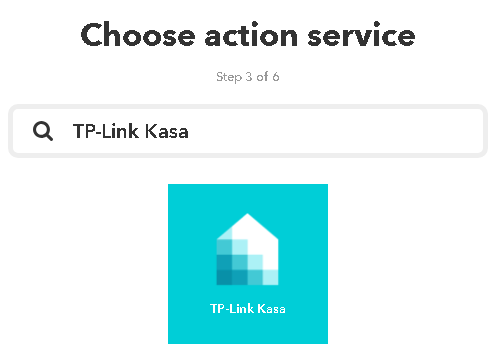
Choose action service (Step 3 of 6) で 「TP-Link Kasa」 を選択
※TP-Link Kasa のアカウントの設定が済んでいる前提です
2-2-2. アクションの選択
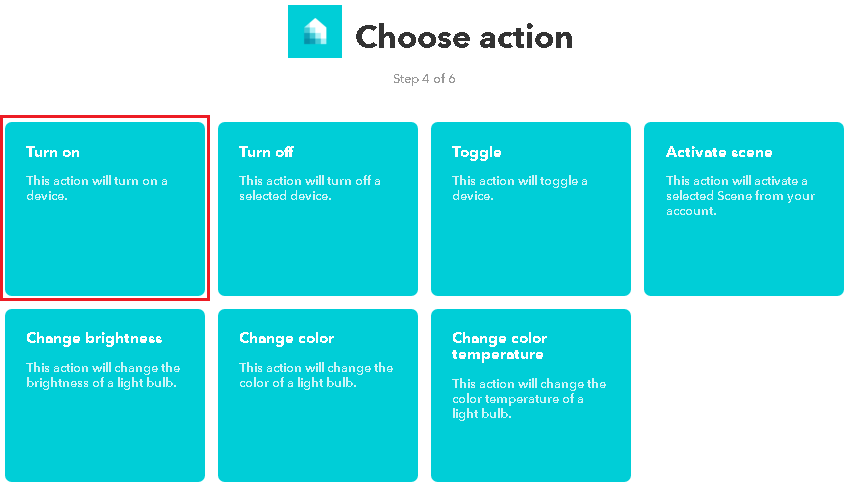
Choose action (Step 4 of 6) で、赤枠で囲った 「Turn on」 を選択
※電源オフの場合は 「Turn off」 を選択してください
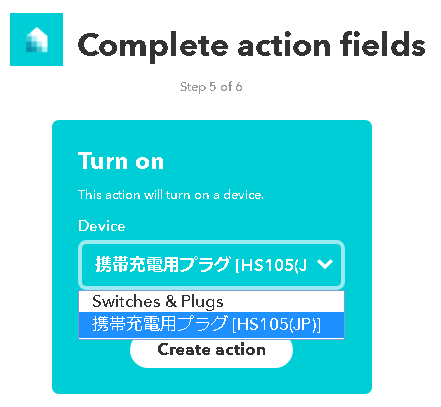
2-2-3. スマートプラグを選択
Complete action fields で、コントロールしたいスマートプラグを選択
Create action ボタンを押して終了
2-3. 最後
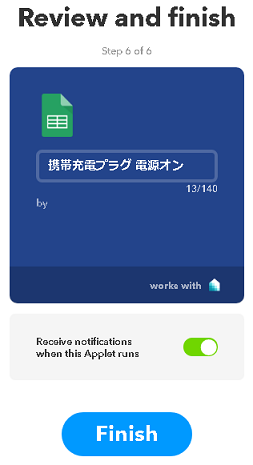
アプレットの名前(140文字以内)を編集して完成
[補足] Receive notifications when this Applet runs が ON のままだと、電源オン/オフが実行されるたびに Notification がくるので、OFF しておくことをお勧めします
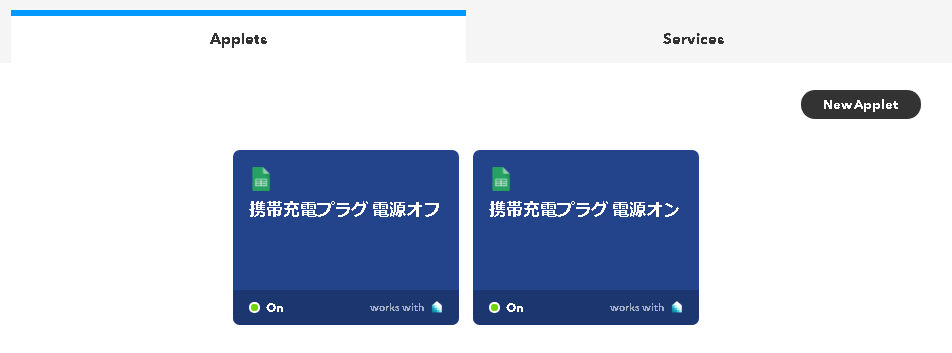
電源オフの場合も同様に作ると、My Applets 上にこのように2個作られます。
これで、やることは全て終わり
動かしてみる

ちゃんと動きます。電源オンされると「カチッ」といって青く光ります。
なお、Google スプレッドシートに更新があってから、電源オン/オフが実行されるまでに1分強のタイムラグがあります。気長にお待ちください。
まとめ
スマートプラグと IFTTT を使って、スマートフォンをスマート?に充電する仕組みを作ってみました。抜き差しするような意地悪をせず、普通に使っている分には、特に問題なく動いています。スマートプラグを用意するのに投資が必要ですが(HS105 の場合は Amazon で 4000円弱)、個人で使用する分には、今のところ満足しています。