きっかけ
dotnet ef migrationsコマンドでマイグレーションファイルを生成する際は、DBコンテキストをDIする必要があるため、実行形式のプロジェクトのディレクトリでコマンドを打つ必要があります。
しかし、下記の用にソリューション構成のように複数のスタートアッププロジェクト(WebApi、WebSite)がある場合、WebApi、WebSiteのどちらかで行う必要がありますが、どちらか片方のプロジェクトにだけマイグレーションファイルがあるのは違和感があります。
$ tree .
├── ECommerceSample.sln
├── LICENSE
├── README.md
└── src
    ├── Application
    │   ├── Application.csproj
    ├── Domain
    │   ├── Domain.csproj
    ├── Infrastructure
    │   ├── Infrastructure.csproj
    ├── WebApi
    │   ├── Controllers
    │   │   └── WeatherForecastController.cs
    │   ├── Program.cs
    │   ├── Properties
    │   │   └── launchSettings.json
    │   ├── Startup.cs
    │   ├── WeatherForecast.cs
    │   ├── WebApi.csproj
    │   ├── appsettings.Development.json
    │   ├── appsettings.json
    └── WebSite
        ├── Pages
        │   ├── Index.cshtml
        │   ├── Index.cshtml.cs
        │   (略...)
        ├── Program.cs
        ├── Properties
        │   └── launchSettings.json
        ├── Startup.cs
        ├── WebSite.csproj
        ├── appsettings.Development.json
        ├── appsettings.json
        └── wwwroot
            ├── css
            (略...)
できれば共通で呼び出すInfrastructureプロジェクト直下にマイグレーションファイルを生成したいところです。
しかし作成していたソリューション構成ではInfrastructureプロジェクトがクラスライブラリのプロジェクトでした。
そのため、Infrastructureプロジェクト直下でdotnet ef migrationsコマンドをうってもエラーになってマイグレーションファイルを生成できません。
そこでInfrastructureプロジェクトをクラスライブラリからコンソールアプリに変えてしまって、DIコンテナを起動できる用に変更します。
Infrastructureプロジェクト以下にマイグレーションファイルを生成できるようにする
NUGETから.NET汎用ホストとDI(依存性注入)のライブラリの参照をInfrastructureに追加します。
$ cd /path/to/Infrastructure
$ dotnet add package Microsoft.Extensions.Hosting
$ dotnet add package Microsoft.Extensions.DependencyInjection
さらにマイグレーションのためにエンティティフレームワークとDB(今回はSQLite)プロバイダも追加します。
$ dotnet add package Microsoft.EntityFrameworkCore
$ dotnet add package Microsoft.EntityFrameworkCore.Design
$ dotnet add package Microsoft.EntityFrameworkCore.Sqlite
プロジェクトファイルに下記のように追加されるはずです。
<Project Sdk="Microsoft.NET.Sdk">
  <!--略-->
  <ItemGroup>
    <PackageReference Include="Microsoft.EntityFrameworkCore" Version="5.0.4" />
    <PackageReference Include="Microsoft.EntityFrameworkCore.Design" Version="5.0.4">
      <PrivateAssets>all</PrivateAssets>
      <IncludeAssets>runtime; build; native; contentfiles; analyzers; buildtransitive</IncludeAssets>
    </PackageReference>
    <PackageReference Include="Microsoft.EntityFrameworkCore.Sqlite" Version="5.0.4" />
    <PackageReference Include="Microsoft.EntityFrameworkCore.Tools" Version="5.0.4">
      <PrivateAssets>all</PrivateAssets>
      <IncludeAssets>runtime; build; native; contentfiles; analyzers; buildtransitive</IncludeAssets>
    </PackageReference>
    <PackageReference Include="Microsoft.Extensions.DependencyInjection" Version="5.0.1" />
    <PackageReference Include="Microsoft.Extensions.Hosting" Version="5.0.0" />
  </ItemGroup>
  <!--略-->
</Project>
次にDBのモデルのクラスを作成します。
私はドメインモデルとDBモデルを明確に分けるのが好みなのでInfrastructureプロジェクトに作成します。
public record AdminAccount
{
    public int Id { get; init; }
    public DateTime CreateAt { get; init; }
    public DateTime? UpdatedAt { get; init; }
    public string AccountName { get; init; }
    public bool Enabled { get; init; }
    public AdminAccountRole[] AdminAccountRoles { get; init; }
}

public class AdminAccountConfiguration : IEntityTypeConfiguration<AdminAccount>
{
    public void Configure(EntityTypeBuilder<AdminAccount> builder)
    {
        builder.HasKey(adminAccount => adminAccount.Id);
        builder.Property(adminAccount => adminAccount.AccountName).IsRequired(true);
        builder.Property(adminAccount => adminAccount.Enabled).IsRequired(true);
        builder.Property(adminAccount => adminAccount.CreateAt).IsRequired(true);
        builder.Property(adminAccount => adminAccount.UpdatedAt).IsRequired(false);
    }
}

/*
 * 他のモデルは省略します
 */
DBコンテキストを用意します。
今回は通常のDBコンテキストとそれを継承したローカル開発用のSQLite用のDBコンテキストの2つを用意します。
public class ECommerceDbContext : DbContext
{
    public DbSet<AdminAccount> AdminAccounts { get; set; }
    public DbSet<AdminAccountRole> AdminAccountRoles { get; set; }
    public DbSet<AdminRole> AdminRoles { get; set; }
    public DbSet<AdminRolePermission> AdminRolePermissions { get; set; }
    public DbSet<AdminPermission> AdminPermissions { get; set; }
    public ECommerceDbContext(DbContextOptions<ECommerceDbContext> options) : base(options) { }

    protected override void OnModelCreating(ModelBuilder builder)
    {
        base.OnModelCreating(builder);
        builder.ApplyConfiguration(new AdminAccountConfiguration());
        builder.ApplyConfiguration(new AdminAccountRoleConfiguration());
        // 略...
    }
}

public class SqliteECommerceDbContext : ECommerceDbContext
{
    public SqliteECommerceDbContext(DbContextOptions<ECommerceDbContext> options) : base(options) { }
    protected override void OnConfiguring(DbContextOptionsBuilder builder)
    {
        builder.UseSqlite("Data Source=ECommerceSample.sqlite");
    }
}
ここまで完了したらInfrastructureプロジェクトをクラスライブリからコンソールアプリ(実行ファイル)に変更します。
<OutputType>Exe</OutputType>を追加します。
  <Project Sdk="Microsoft.NET.Sdk">
    <!--略-->
    <PropertyGroup>
+     <OutputType>Exe</OutputType>
      <TargetFramework>net5.0</TargetFramework>
      <AssemblyName>ECommerceSample.Infrastructure</AssemblyName>
      <RootNamespace>ECommerceSample.Infrastructure</RootNamespace>
      <Nullable>disable</Nullable>
    </PropertyGroup>
   <!--略-->
  </Project>
DIコンテナにDBコンテキストのDI設定を追加します。
WebSiteやWebApiプロジェクトでも同じ用に設定すると考えると拡張メソッドで共通化しておくと便利かと思います。
public static class DefaultDependencyInjection
{
    public static IServiceCollection AddInfrastructureServices(this IServiceCollection services)
    {
        services.AddDbContext<ECommerceDbContext>();
        services.AddDbContext<SqliteECommerceDbContext>();
        return services;
    }
}
エントリーポイントを作成しホスティング構成をして上記のDI設定を呼び出します。
class Program
{
    static async Task Main(string[] args)
    {
        using IHost host = CreateHostBuilder(args).Build();
        await host.RunAsync();
    }

    static IHostBuilder CreateHostBuilder(string[] args) =>
        Host.CreateDefaultBuilder(args)
            .ConfigureServices((_, services) =>
            {
                services.AddInfrastructureServices();
            });
}
これでマイグレーションファイルが生成できるようになりました。
ただその前に、SQLiteのDBの実体.sqliteとSQL Client(DB Browser)で作成される一時ファイルはプロジェクトに追加されないようにし、git管理下からも外しておくと良いと思います。
<Project Sdk="Microsoft.NET.Sdk">
  <!--略-->
  <ItemGroup>
    <None Remove="*.sqlite" />
    <None Remove="*.sqlite-shm" />
    <None Remove="*.sqlite-wal" />
  </ItemGroup>
  <!--略-->
</Project>
# SQLite
*.sqlite
*.sqlite-shm
*.sqlite-wal
マイグレーションファイルを生成します。
$ dotnet ef migrations add InitialCreate --context SqliteECommerceDbContext --output-dir /Migrations/Sqlite -v
--contextでSQLite用のDBコンテキストを指定しています。
--output-dirでマイグレーションファイルが生成されるフォルダを指定できます。他のDBのものと混ざらないようにフォルダを分けておくといいと思います。
また、-vをつけるとターミナルへの出力が詳しくなり、生成失敗時に調査しやすくなります。
下記のようにマイグレーションファイルが生成されます。
$ tree .
.
├── ECommerceSample.sln
(略)
└── src
    ├── Application
    ├── Domain
    ├── Infrastructure
    │   ├── ECommerceDbContext.cs
    │   ├── Migrations
    │   (略)└── Sqlite
    │           ├── 20210325163438_InitialCreate.Designer.cs
    │           ├── 20210325163438_InitialCreate.cs
    │           └── SqliteECommerceDbContextModelSnapshot.cs
    (略)
    ├── WebApi
    └── WebSite
実際にDBマイグレーションしてテーブルを作成します。
今回は.sqliteファイルの生成になります。
$ dotnet ef database update --context SqliteECommerceDbContext -v
Infrastructureプロジェクト直下にECommerceSample.sqliteが生成されました。
中身を覗くとテーブルが生成出来ていることが確認できました。
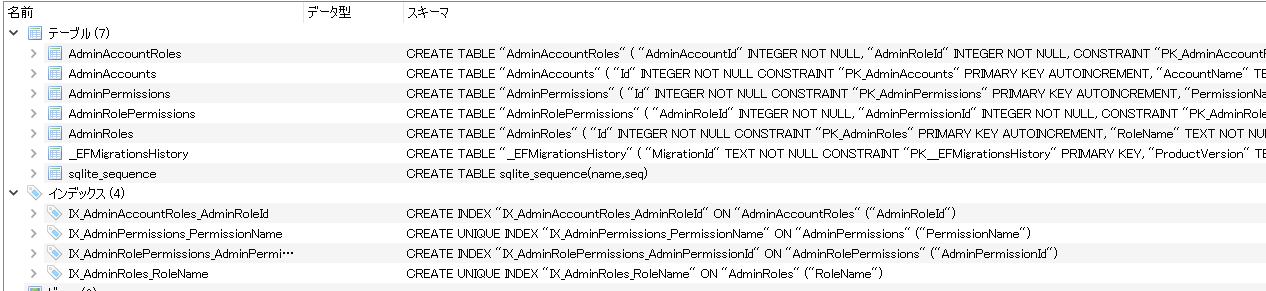
これで数スタートアッププロジェクト構成のソリューションで、DBマイグレーションファイルをインフラ層のプロジェクトに生成する目的が達成できました。