そろそろスクショ職人から卒業すべく、protractorを使ってAngularの自動テスト技術を磨いています。
でも上司への提出用に、エクセルに証跡を残していかないといけないんだろーなー。
自動で取得したスクショをエクセルに貼って、テストの流れがわかるように矢印図形なんかもつけて…
ああ、嫌になりますね。やっぱりスクショ職人じゃないか!
こんな状態になる前に、テストコードとスクショファイルから自動で証跡を作ってくれるVBAを組みました。
テスト対象のAngularコード
<div style="text-align:center">
  <h1>
    Welcome to {{ title }}!
  </h1>
  <img width="300" alt="Angular Logo" src="data:image/svg+xml;base64,PHN2ZyB4bWxucz0iaHR0cDovL3d3dy53My5vcmcvMjAwMC9zdmciIHZpZXdCb3g9IjAgMCAyNTAgMjUwIj4KICAgIDxwYXRoIGZpbGw9IiNERDAwMzEiIGQ9Ik0xMjUgMzBMMzEuOSA2My4ybDE0LjIgMTIzLjFMMTI1IDIzMGw3OC45LTQzLjcgMTQuMi0xMjMuMXoiIC8+CiAgICA8cGF0aCBmaWxsPSIjQzMwMDJGIiBkPSJNMTI1IDMwdjIyLjItLjFWMjMwbDc4LjktNDMuNyAxNC4yLTEyMy4xTDEyNSAzMHoiIC8+CiAgICA8cGF0aCAgZmlsbD0iI0ZGRkZGRiIgZD0iTTEyNSA1Mi4xTDY2LjggMTgyLjZoMjEuN2wxMS43LTI5LjJoNDkuNGwxMS43IDI5LjJIMTgzTDEyNSA1Mi4xem0xNyA4My4zaC0zNGwxNy00MC45IDE3IDQwLjl6IiAvPgogIDwvc3ZnPg==">
</div>

<input type="button" id="click1" value="クリック!" routerLink="./sub" />
<input type="button" id="click2" value="もどる" routerLink="./.." />
<br />
<router-outlet></router-outlet>
<h1>Angularです</h1>
<img src="../../assets/react.png" />
import { NgModule } from '@angular/core';
import { Routes, RouterModule } from '@angular/router';
import { SubComponent } from './sub/sub.component';


const routes: Routes = [
  { path: 'sub', component: SubComponent },
];

@NgModule({
  imports: [RouterModule.forRoot(routes)],
  exports: [RouterModule]
})
export class AppRoutingModule { }
大体こんな感じの超簡易なコードです。app.component.tsとかは省略。
これを動かすとこんな感じ。
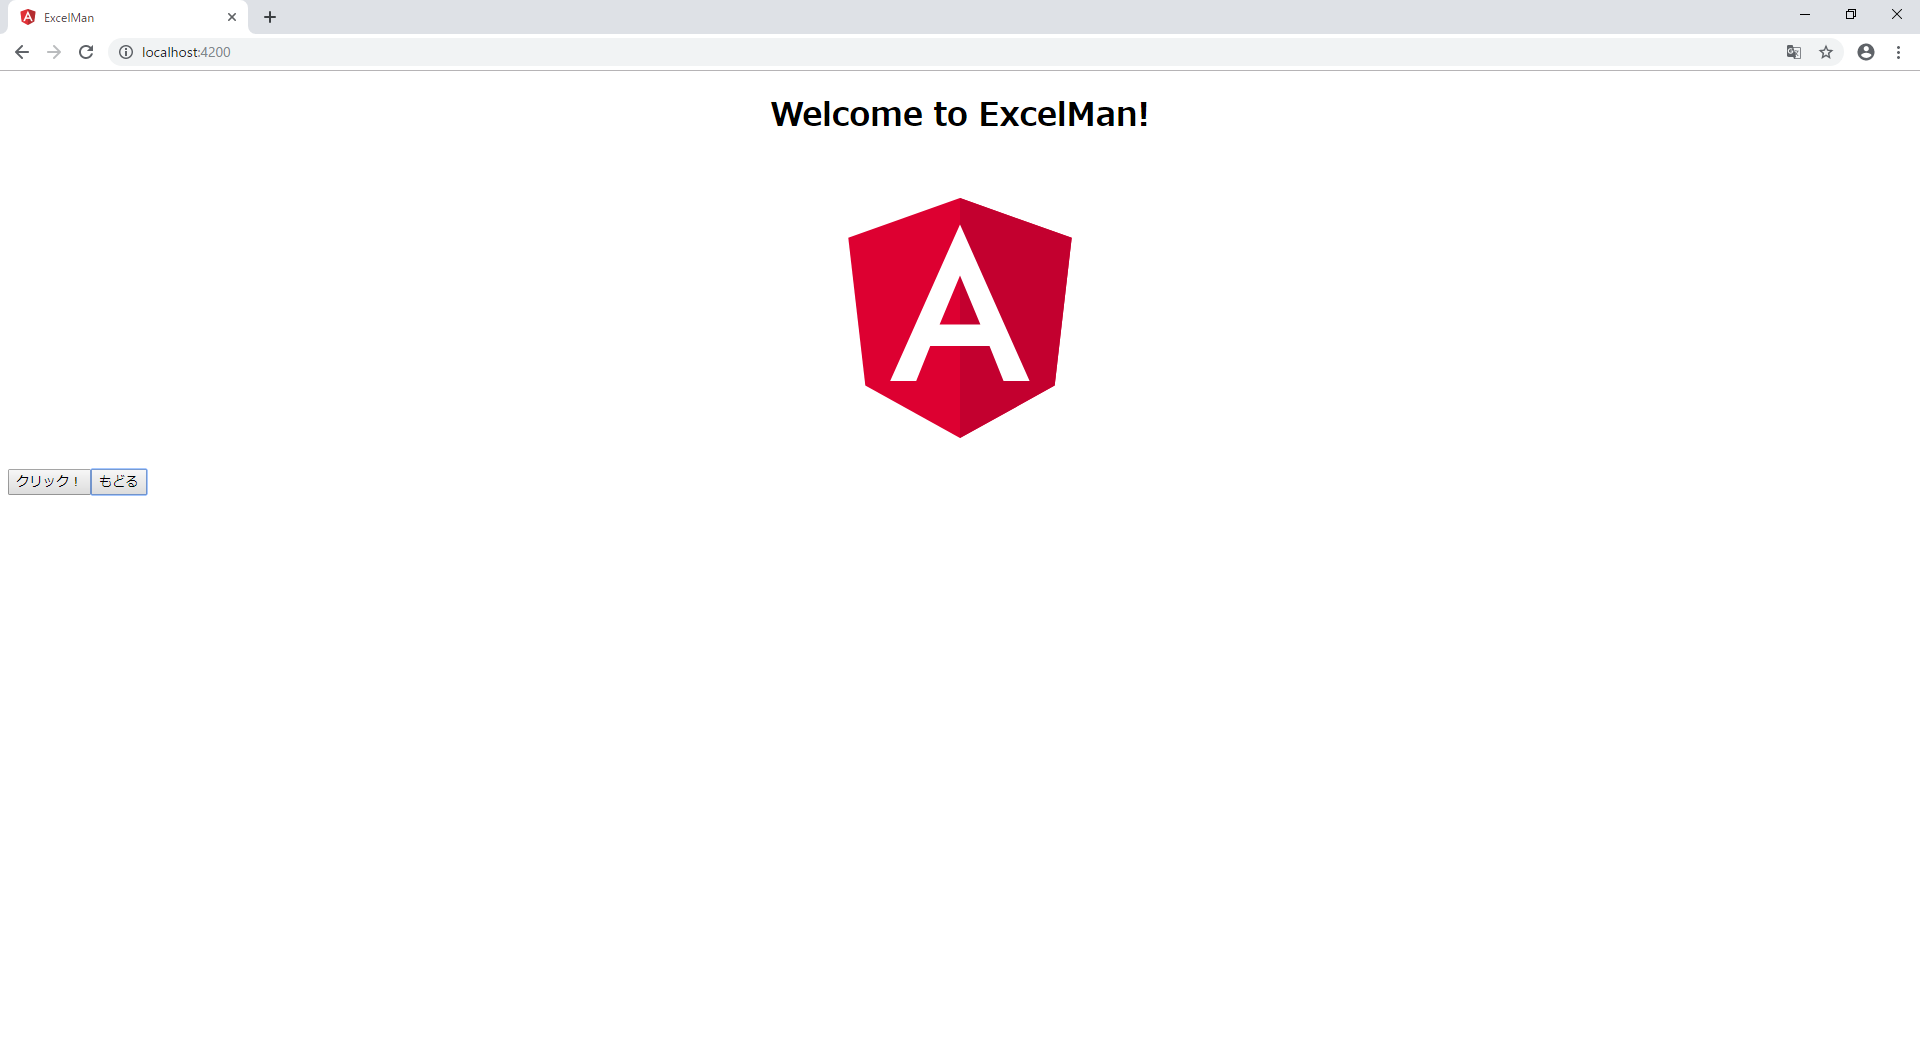
クリックボタンを押します。
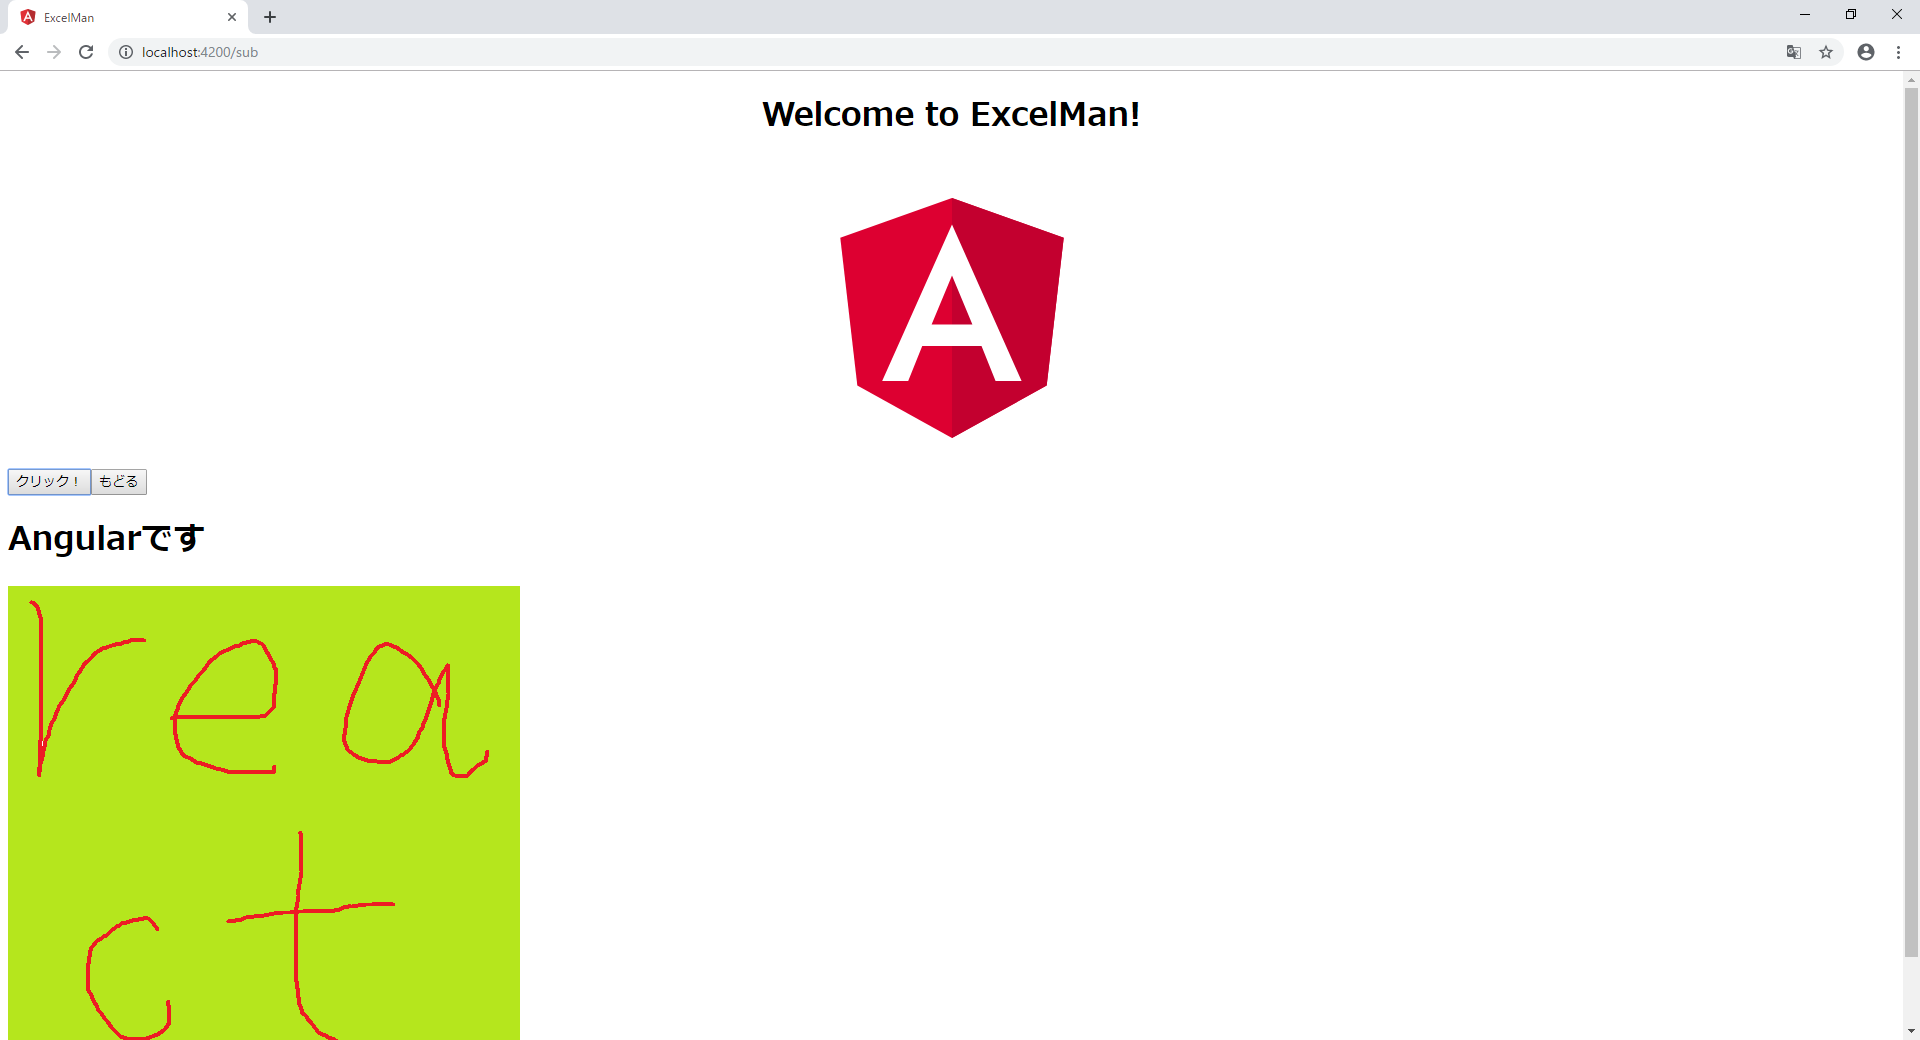
下にsubのコンポーネントが現れました。
このsubコンポーネントの「Angularです」の文字列が間違いなく表示されているかチェックすることを今回のテストの目的とします。
現実的じゃないけど許して
テストコード
以下がテストコード。
app.po.tsは置いてきた。
import { browser, logging, by, element } from 'protractor';

describe('workspace-project App', () => {
  const fs = require('fs');

  beforeEach(() => {
    browser.get('');
  });

  it('テストケース1', () => {
    browser.takeScreenshot().then((png) => {
      saveScreenshot(png, 'スクショ1.png');
    })

    element(by.id('click1')).click();

    expect(element(by.css('app-sub h1')).getText()).toEqual('Angularです');

    browser.takeScreenshot().then((png) => {
      saveScreenshot(png, 'スクショ2.png');
    })
  });

  afterEach(async () => {
    const logs = await browser.manage().logs().get(logging.Type.BROWSER);
    expect(logs).not.toContain(jasmine.objectContaining({
      level: logging.Level.SEVERE,
    } as logging.Entry));
  });

  //スクショ保存
  function saveScreenshot(data: any, name: string) {
    const stream = fs.createWriteStream(name);
    stream.write(new Buffer(data, 'base64'));
    stream.end();
  }
});
itでテストケースのひとかたまりです。
そこで起動直後のスクショを「スクショ1.png」という名前で取得し、
その後クリックボタンを押下。
遷移したsubコンポーネントのh1テキストが「Angularです」だということを確認しています。
そしてまたスクショ保存。「スクショ2.png」という名前。
VBAコード
これでテストは終わりですが、ここからが今回のキモ。
今回私が組んだVBAはこちら。
Type TestStruct
    testCaseIt As String
    testCaseSc() As String
End Type

Sub subLfFileRead()

    Dim buf As String
    Dim arrOneLine() As String
    Dim i As Long
    Dim RE, strPattern As String, reMatch
    Dim RESc, strPatternSc As String, reMatchSc
    Dim testSet() As TestStruct, intTestSet As Integer: intTestSet = 0
    Dim intTestCaseScCnt As Integer: intTestCaseScCnt = 0
    Dim strPath As String: strPath = Cells(4, 1).Value

    Set RE = CreateObject("VBScript.RegExp")
    Set RESc = CreateObject("VBScript.RegExp")

    strPattern = "it\(\'.+\'"
    strPatternSc = "savescreenshot.+\'.+\'"

    RE.Pattern = strPattern
    RE.IgnoreCase = True
    RE.Global = False

    RESc.Pattern = strPatternSc
    RESc.IgnoreCase = True
    RESc.Global = False

    'テストコードオープン
    With CreateObject("ADODB.Stream")
        .Charset = "UTF-8"
        .Open
        .LoadFromFile Cells(2, 1).Value
        buf = .ReadText
        .Close
        arrOneLine = Split(buf, vbLf)
    End With

    'テストコード読み込み
    For i = 0 To UBound(arrOneLine) - 1
        'コメント行は除外
        If InStr(arrOneLine(i), "//") = 0 Then
            '正規表現の検索・テストケース
            Set reMatch = RE.Execute(arrOneLine(i))
            If reMatch.Count > 0 Then
                ReDim Preserve testSet(intTestSet)
                testSet(intTestSet).testCaseIt = fncReturnCommaExclude(reMatch(0))
                intTestSet = intTestSet + 1
            End If

            '正規表現の検索・スクショ名
            Set reMatchSc = RESc.Execute(arrOneLine(i))
            If reMatchSc.Count > 0 Then
                ReDim Preserve testSet(intTestSet - 1).testCaseSc(intTestCaseScCnt)
                testSet(intTestSet - 1).testCaseSc(intTestCaseScCnt) = fncReturnCommaExclude(reMatchSc(0))
                intTestCaseScCnt = intTestCaseScCnt + 1
            End If
        End If
    Next i

    Call subFilePasteSheet(testSet, strPath)


End Sub

Sub subFilePasteSheet(ByRef structType() As TestStruct, ByVal strScreenshotPath As String)

    Dim myFileName As String
    Dim sglLastPictureHeight As Single
    Dim sglLastPictureWidth As Single
    Dim sglAllowHeight As Single
    Dim myShape As Shape
    Dim newSheet As Worksheet

    sglLastPictureHeight = 0
    sglAllowHeight = 0
    sglLastPictureWidth = 0

    For i = 0 To UBound(structType)
        Set newSheet = ThisWorkbook.Worksheets.Add
        newSheet.Name = structType(i).testCaseIt
        newSheet.Cells(i + 1, 1).Value = structType(i).testCaseIt

        For j = 0 To UBound(structType(i).testCaseSc())
            myFileName = strScreenshotPath & "\" & structType(i).testCaseSc(j)

            Set myShape = newSheet.Shapes.AddPicture( _
                  Filename:=myFileName, _
                  LinkToFile:=True, _
                  SaveWithDocument:=False, _
                  Left:=54, _
                  Top:=13.5 + sglLastPictureHeight * j + sglAllowHeight * j, _
                  Width:=0, _
                  Height:=0)

            With myShape
                .ScaleHeight 1, msoTrue
                .ScaleWidth 1, msoTrue
            End With

            sglLastPictureHeight = myShape.Height
            sglLastPictureWidth = myShape.Width

            If j <> UBound(structType(i).testCaseSc()) Then

                Set myShape = newSheet.Shapes.AddShape( _
                                    Type:=msoShapeDownArrow, _
                                    Left:=(54 + sglLastPictureWidth) / 2 - 100, _
                                    Top:=13.5 + sglLastPictureHeight * (j + 1) + sglAllowHeight * j, _
                                    Width:=200, _
                                    Height:=45)
                sglAllowHeight = myShape.Height
            Else
                sglAllowHeight = 0
            End If

        Next j

        sglAllowHeight = 13.5
    Next i

End Sub

'コンマに挟まれている文字列を返す関数
Function fncReturnCommaExclude(ByVal strData As String)

    fncReturnCommaExclude = ""

    intfrontcomma = InStr(strData, "'") + 1
    intBackComma = InStr(intfrontcomma, strData, "'")

    fncReturnCommaExclude = Mid(strData, intfrontcomma, intBackComma - intfrontcomma)

End Function
ざっくり言うと、テストコード内のitやsavescreenshotを検索、その中から文字列抽出、
抽出した文字列からスクショを拾いエクセルのシートに貼る。スクショのサイズも見ながら調節する。
こんな感じです。
これをこんな感じで使う。
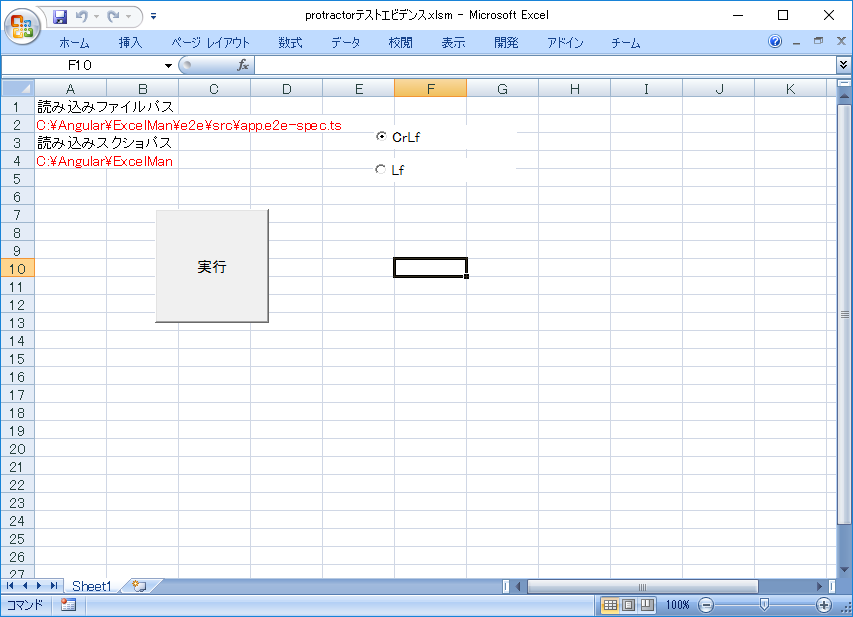
vscodeの改行コードがLfになってたので、そっちのみ対応してます。CrLfまでやるのは気が向かなかった。
実行ボタンを押すと新しくこんなシートができあがります。(倍率を低くする処理はありません。)
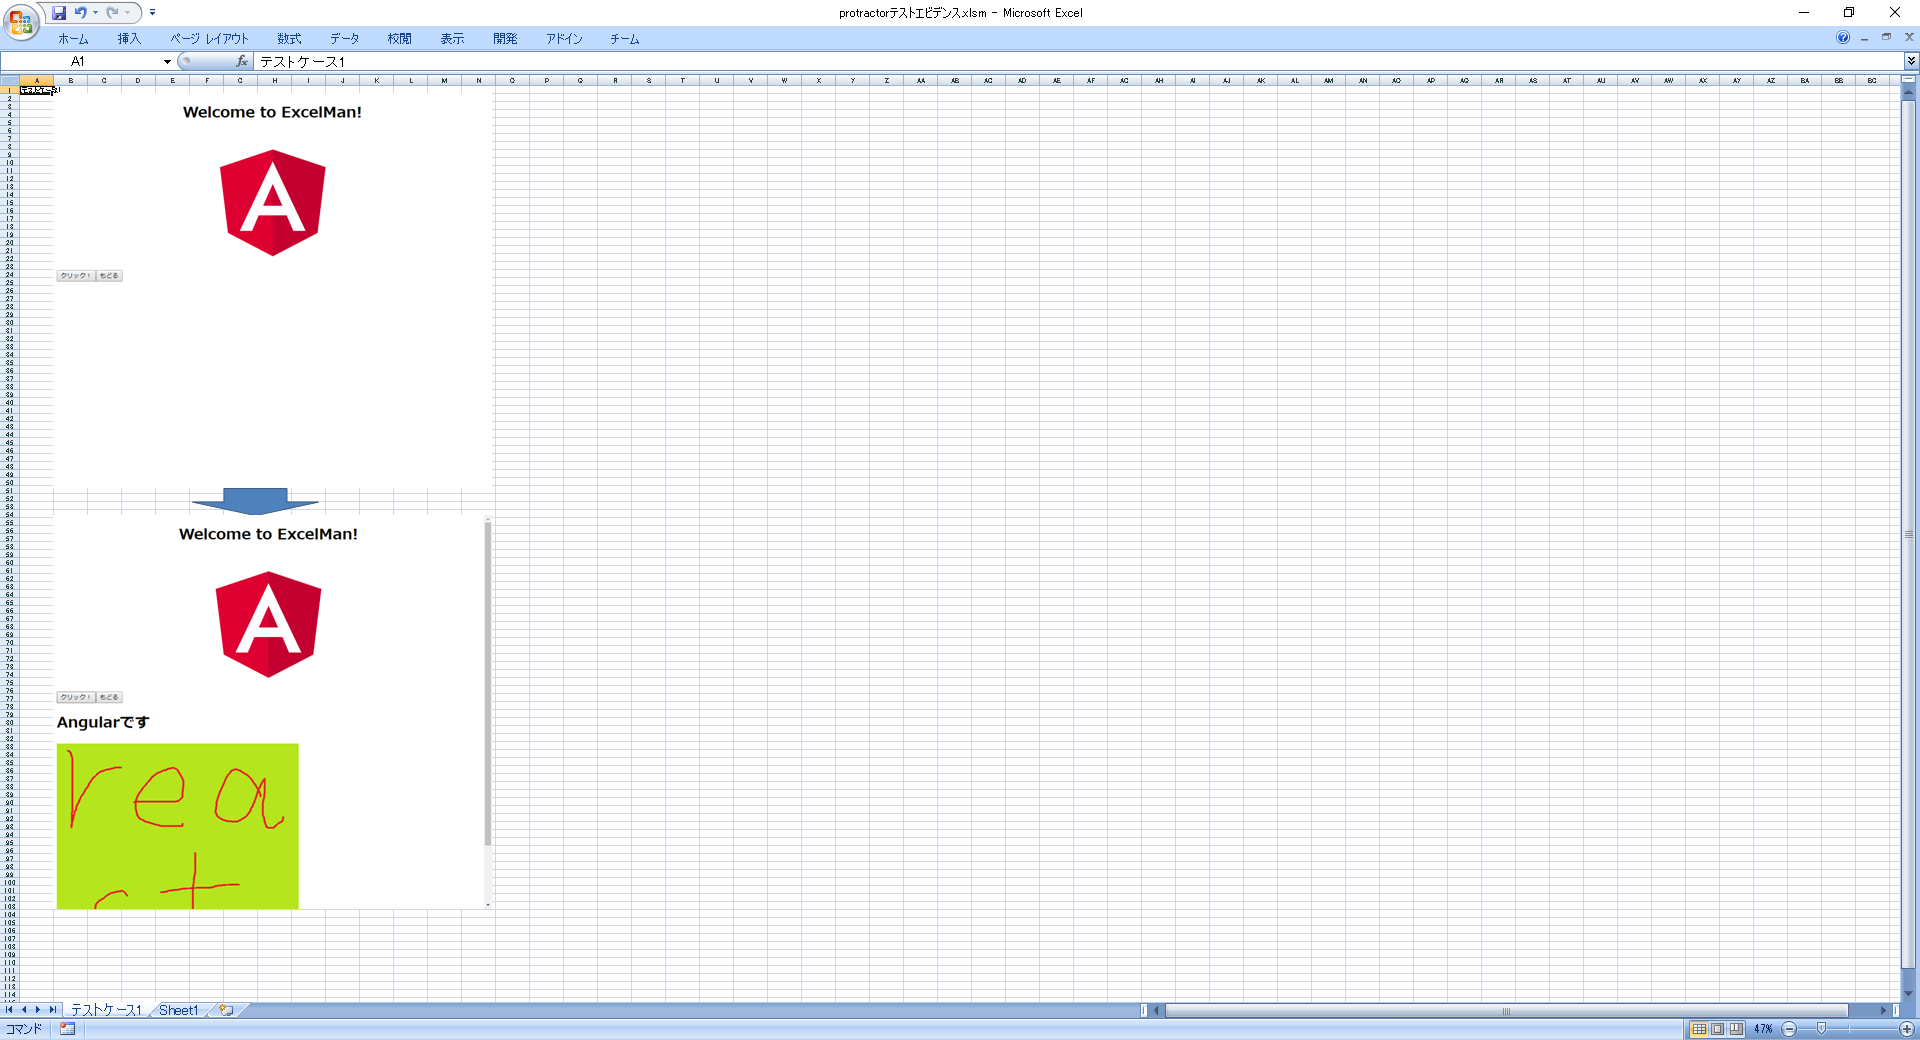
よく見るエビデンスの出来上がりですね。
これでスクショ職人は卒業だ!
でも今回の記事に載せる画像作るためにいくつかスクショ撮ったな…
やっぱりスクショ職人じゃないか!