#【概要】
EclipseのGradleプロジェクトでStruts2の環境構築をする。
(何故か動的Webプロジェクトからはprefix="s"関連のエラーが出て動かなかったため、Gradleプロジェクトを使用)
※GradleプラグインのインストールとかTomcatのインストールとか必要かもしれない。
#【方法】
①Gradleプロジェクトを作成する。
プロジェクト名は適当(ここではStruts2_gradle)で、「完了」ボタンをクリックする。

②動的プロジェクトのフォルダ構成にする。
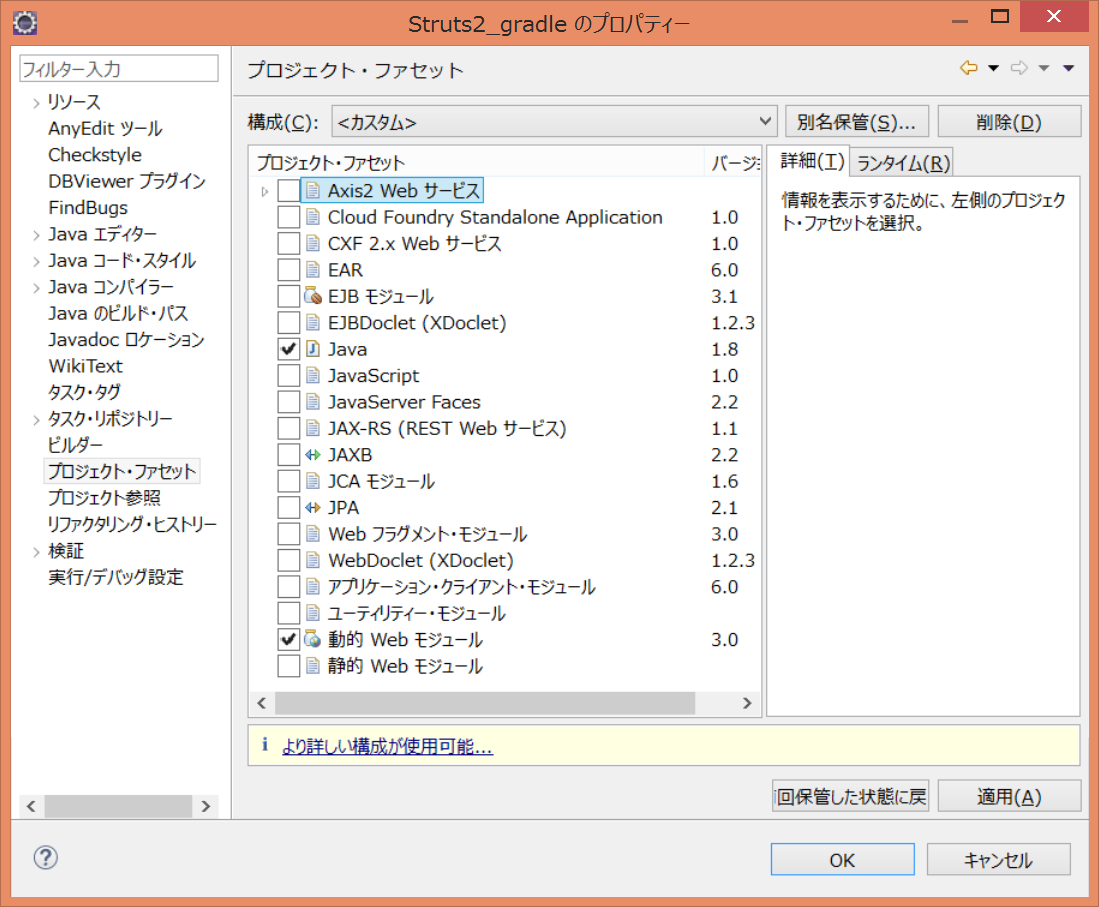
作成したStruts2_gradleを右クリック→「プロパティ」をクリックする。
左側の一覧から「プロジェクト・ファセット」をクリックし、「ファセット・フォームへ変換・・・」をクリックする。
「動的 Webモジュール」にチェックを入れ、「OK」をクリックする。
③build.gradleを書き換える。
Struts2_gradleプロジェクトに存在する「build.gradle」を以下のように書き換える。
/*
 * This build file was auto generated by running the Gradle 'init' task
 * by 'nobu' at '17/06/18 8:36' with Gradle 2.14.1
 *
 * This generated file contains a sample Java project to get you started.
 * For more details take a look at the Java Quickstart chapter in the Gradle
 * user guide available at https://docs.gradle.org/2.14.1/userguide/tutorial_java_projects.html
 */

// Apply the java plugin to add support for Java
apply plugin: 'java'

// In this section you declare where to find the dependencies of your project
repositories {
    // Use 'jcenter' for resolving your dependencies.
    // You can declare any Maven/Ivy/file repository here.
    jcenter()
}

// In this section you declare the dependencies for your production and test code
dependencies {
    // The production code uses the SLF4J logging API at compile time
    compile 'org.slf4j:slf4j-api:1.7.21'

    // Declare the dependency for your favourite test framework you want to use in your tests.
    // TestNG is also supported by the Gradle Test task. Just change the
    // testCompile dependency to testCompile 'org.testng:testng:6.8.1' and add
    // 'test.useTestNG()' to your build script.
    testCompile 'junit:junit:4.12'
    compile "org.apache.struts:struts2-core:2.3.15.1"
    compile "javax.servlet:javax.servlet-api:3.1.0"
}

task copyDependencies(type:Copy) {
    copy {
        from configurations.runtime
        into 'WebContent/WEB-INF/lib'
    }
}
④ライブラリを追加する。
Struts2_gradleプロジェクトを右クリック→「Gradle」→「Gradleプロジェクトのリフレッシュ」をクリックする。
⑤以下のようにフォルダ・ファイルを作成する。
Struts_gradle
├── build.gradle
├── src
│   └── main
│       └── java
│           └── com
│               └── tutorialspoint
│                   └── struts2
│                       └── HelloWorldAction.java
└── WebContent
    ├── HelloWorld.jsp
    ├── index.jsp
    └── WEB-INF
        ├── logging.properties
        ├── web.xml
        └── classes
            └── struts.xml
⑥ファイルの内容を書き換える。
package com.tutorialspoint.struts2;

public class HelloWorldAction {
	private String name;

	public String execute() throws Exception {
		return "success";
	}

	public String getName() {
		return name;
	}

	public void setName(String name) {
		this.name = name;
	}
}
<%@ page contentType="text/html; charset=UTF-8" %>
<%@ taglib prefix="s" uri="/struts-tags" %>
<html>
<head>
<title>Hello World</title>
</head>
<body>
Hello World, <s:property value="name"/>
</body>
</html>
<%@ page language="java" contentType="text/html; charset=UTF-8"
    pageEncoding="UTF-8"%>
<%@ taglib prefix="s" uri="/struts-tags" %>
<!DOCTYPE html PUBLIC "-//W3C//DTD HTML 4.01 Transitional//EN" "http://www.w3.org/TR/html4/loose.dtd">
<html>
<head>
<meta http-equiv="Content-Type" content="text/html; charset=UTF-8">
<title>Hello World</title>
</head>
<body>
	<h1>Hello World From Struts2</h1>
	<form action="hello">
		<label for="name">Please enter your name</label><br/>
		<input type="text" name="name" />
		<input type="submit" value="Say Hello" />
	</form>
</body>
</html>
org.apache.catalina.core.ContainerBase.[Catalina].level = INFO
org.apache.catalina.core.ContainerBase.[Catalina].handlers = \
java.util.logging.ConsoleHandler
<?xml version="1.0" encoding="UTF-8"?>
<web-app xmlns:xsi="http://www.w3.org/2001/XMLSchema-instance"
xmlns="http://java.sun.com/xml/ns/javaee"
xmlns:web="http://java.sun.com/xml/ns/javaee/web-app_2_5.xsd"
xsi:schemaLocation="http://java.sun.com/xml/ns/javaee
http://java.sun.com/xml/ns/javaee/web-app_3_0.xsd"
id="WebApp_ID" version="3.0">
  <display-name>Struts2</display-name>
  <welcome-file-list>
    <welcome-file>index.jsp</welcome-file>
  </welcome-file-list>
  <filter>
  	<filter-name>struts2</filter-name>
  	<filter-class>
  		org.apache.struts2.dispatcher.FilterDispatcher
  	</filter-class>
  </filter>
  <filter-mapping>
  	<filter-name>struts2</filter-name>
  	<url-pattern>/*</url-pattern>
  </filter-mapping>
</web-app>
<?xml version="1.0" encoding="UTF-8"?>
<!DOCTYPE struts PUBLIC
	"-//Apache Software Foundation//DTD Struts Configuration 2.0//EN"
	"http://struts.apache.org/dtds/struts-2.0.dtd	">
<struts>
<constant name="struts.devMode" value="true" />
	<package name="helloworld" extends="struts-default">
		<action name="hello"
			class="com.tutorialspoint.struts2.HelloWorldAction"
			method="execute">
				<result name="success">/HelloWorld.jsp</result>
			</action>
	</package>
</struts>
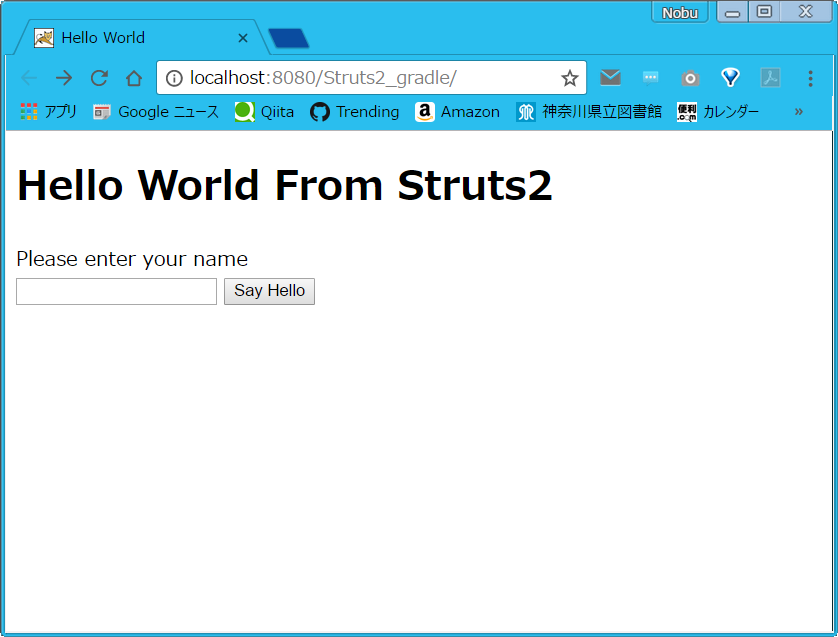
⑦プロジェクトを実行する。
Struts2_gradleを右クリック→「実行」→「サーバで実行」をクリックする。
そうすると下記画面が立ち上がる。
#【WARファイル】
GitHubに今回作成したプロジェクトのWARファイルをアップロードした。
GitHub_nobu1234(Struts_gradle)
#【参考サイト】
tutorialspoint_Struts2 → Javaファイルやxmlファイルの内容
Struts2をやってみる (1) → build.gradleにStruts2のライブラリ追加
Gradleで依存するライブラリをコピーする → WEB-INF/libにライブラリ追加する方法
[備忘録!]GradleでWARを作る → jspファイルでServlet関連のエラーが発生して、build.gradleにservlet-apiを追加