やること
前回記事の続きです。
ESP32とUnityをWiFiのアクセスポイント経由で連携します。
前回はESP32-UnityのUDPパケットを用いた一方向通信でしたが、
今回はそれに加え、送信・受信の両方をおこないます。
送受信するデータ形式は符号あり2バイトのShort型が配列で10個並んだものです。
これを1バイトずつ送り、ESP32,Unityそれぞれで受信後に2バイト数値に戻します。
ESP32からは一定間隔で送信、Unity側からは毎フレーム送信を行います。
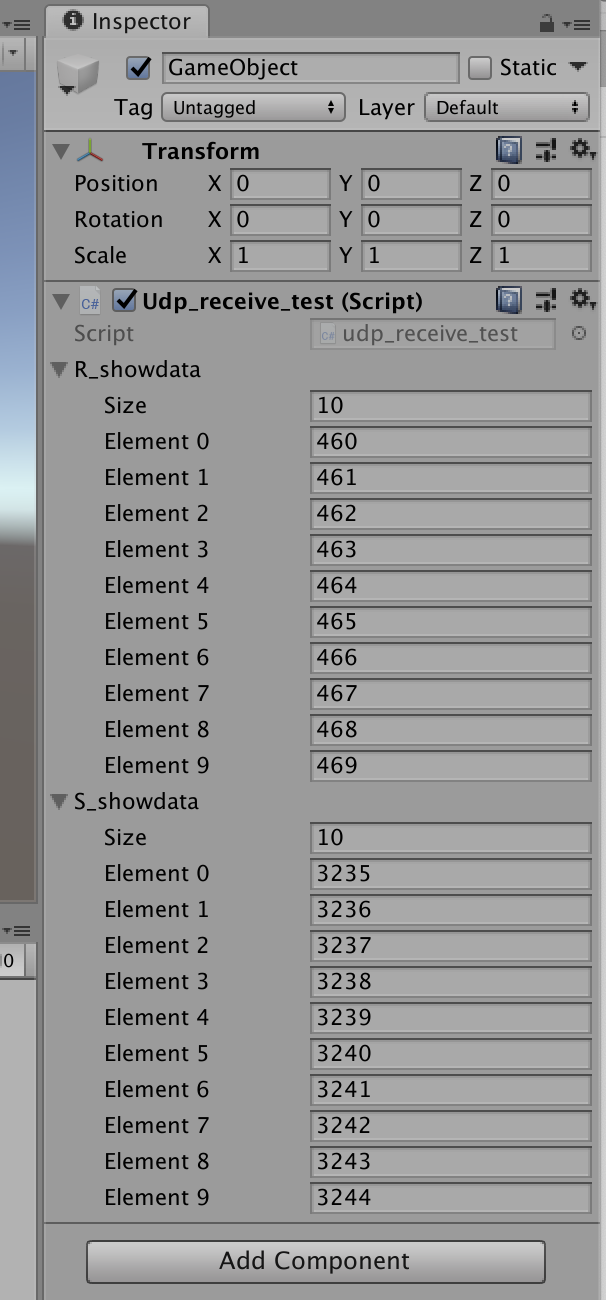
Unity側ではインスペクターに受信データ、送信データを表示します。
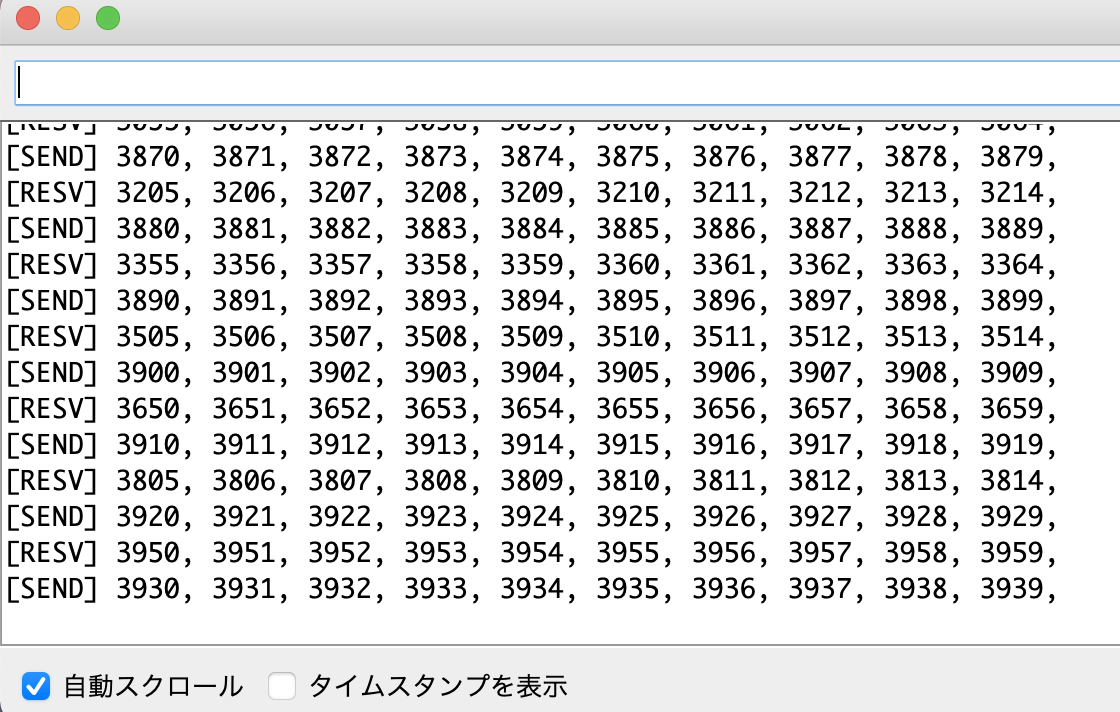
ESP32側はシリアルモニタに送受信結果を表示します。
ポイント
- ESP32側では2バイトを1バイトに変換するために共用体を利用
- Unity側では近い処理をBitConverterで実施
- Unity側の受信処理はスレッドを立てて実行
参考
今回の記事はほぼこちらのトレースであります。ありがたく勉強させていただきます。
ESP32用スクリプト
//ESP32 to Unity via UDP

# include <WiFi.h>
# include <WiFiUdp.h>

const char* ssid = "xxxxxxxxxx";//接続するアクセスポイントのSSID
const char* password = "xxxxxxxxxx";//上記のパスワード
const char* send_address = "192.168.xxx.xxx";  //送り先
const int send_port = 22222;  //送り先
const int receive_port = 22224;  //このESP32 のポート番号

WiFiUDP udp;

//送るデータのサイズ。データはショート型の符号付き2バイト、送信時は1バイトに変換。
static const int MSG_SIZE = 10;//送信データの数
static const int MSG_BUFF = MSG_SIZE * 2;//送信データのバイト数

//共用体の設定。共用体はたとえばデータをショートで格納し、バイト型として取り出せる
typedef union {
  short sval[MSG_SIZE];//ショート型
  uint8_t bval[MSG_BUFF];//符号なしバイト型
} UDPData;
UDPData s_upd_message_buf; //送信用共用体のインスタンスを宣言
UDPData r_upd_message_buf; //受信用共用体のインスタンスを宣言

int count = 0;//送信変数用のカウント

void setup() {
  Serial.begin(115200);
  delay(500);//シリアル準備待ち用ディレイ
  //WiFi 初期化
  WiFi.disconnect(true, true);//WiFi接続をリセット
  Serial.println("Connecting to WiFi to : " + String(ssid));//接続先を表示
  delay(100);
  WiFi.begin(ssid, password);//Wifiに接続
  while ( WiFi.status() != WL_CONNECTED) {//https://www.arduino.cc/en/Reference/WiFiStatus 返り値一覧
    delay(100);//接続が完了するまでループで待つ
  }
  Serial.println("WiFi connected.");//WiFi接続完了通知
  Serial.print("WiFi connected. ESP32's IP address is : ");
  Serial.println(WiFi.localIP());//デバイスのIPアドレスの表示

  //UDP 開始
  udp.begin(receive_port);
  delay(500);
}


//受信用の関数
//パケットが来ているか確認し、r_upd_message_buf配列に保存する
void receiveUDP() {
  int packetSize = udp.parsePacket();
  byte tmpbuf[MSG_BUFF];//パケットを一次受けする配列

  //データの受信
  Serial.print("[RESV] ");
  if (packetSize == MSG_BUFF) {//受信したパケットの量を確認
    udp.read(tmpbuf, MSG_BUFF);//パケットを受信
    for (int i = 0; i < MSG_BUFF; i++)
    {
      r_upd_message_buf.bval[i] = tmpbuf[i];//受信データを共用体に転記
    }
    for (int i = 0; i < MSG_SIZE; i++)
    {
      Serial.print(String(r_upd_message_buf.sval[i]));//シリアルモニタに出力
      Serial.print(", ");
    }
  } else
  {
  Serial.print("none.");//受信していない場合はシリアルモニタにnone.を出力
  }
  Serial.println();
}


//送信用の関数
void sendUDP() {
  String test = "";//表示用の変数

  udp.beginPacket(send_address, send_port);//UDPパケットの開始

  for (int i = 0; i < MSG_BUFF; i++) {
    udp.write(s_upd_message_buf.bval[i]);//1バイトずつ送信
    if (i % 2 == 0) {//表示用に送信データを共用体から2バイトずつ取得
      test += String(s_upd_message_buf.sval[i / 2]) + ", ";
    }
  }
  Serial.println("[SEND] " + test );//送信データ(short型)を表示

  udp.endPacket();//UDPパケットの終了
}


void loop() {

  //もしデータパケットが来ていれば受信する
  receiveUDP();

  //送信するデータを作成
  for (int i = 0; i < MSG_SIZE; i++) {
    s_upd_message_buf.sval[i] = (short)( i + count);
  }

  sendUDP();//UDPで送信

  count += 10;//データ作成用のカウントを追加
  if (count > 10000) {
    count = 0;
  }

  delay(500);
}
まずこちらのスケッチをESP32に書き込みます。
実行直後(リセット直後)に、シリアルモニタにESP32のIPアドレスを表示し、
その後は送信データを表示し続けます。
Unity用スクリプト
using UnityEngine;
using System.Net;
using System.Net.Sockets;
using System.Threading;
using System;

public class udp_send_receive_test : MonoBehaviour
{
    const string HOST = "192.168.xxx.xxx";//送信先(ESP32)のIPアドレス
    const int SEND_PORT = 22224;//送信用ポート設定
    const int RECEIVE_PORT = 22222;//受信に使うポートの番号
    static UdpClient udp_receive;//UDP受信を使う準備
    static UdpClient udp_send;//UDP送信を使う準備
    Thread thread;//スレッドを使う準備

    const int MSG_SIZE = 10;//受信するshort型データの個数
    static char[] r_char_buf = new char[MSG_SIZE * 2];//データ受信用のchar型変数(1バイト)
    static short[] r_short_buf = new short[MSG_SIZE];//データ格納用のshort型変数(2バイト)
    public int[] r_showdata = new int[10];//受信データインスペクタ表示用

    static byte[] s_char_buf = new byte[MSG_SIZE * 2];//データ送信用のchar型変数(1バイト)
    static short[] s_short_buf = new short[MSG_SIZE];//データ送信格納用のshort型変数(2バイト)
    public int[] s_showdata = new int[MSG_SIZE];//送信データインスペクタ表示用

    static long count = 0;//データ受信用のchar型変数(1バイト)
    string s_string;


    void Start()
    {
        udp_receive = new UdpClient(RECEIVE_PORT);
        udp_receive.Client.ReceiveTimeout = 1000;//UDP通信のタイムアウト設定 うまくいかない場合は0に?
        udp_send = new UdpClient();
        udp_send.Connect(HOST, SEND_PORT);
        thread = new Thread(new ThreadStart(ThreadMethod));//受信用スレッドを準備
        thread.Start();//受信用スレッドを開始
    }


    void Update()
    {
        //受信データをインスペクターに反映
        for (int i = 0; i < MSG_SIZE; i++)
        {
            r_showdata[i] = r_short_buf[i];//受信データをインスペクター表示用配列に転記
        }
        senddataUDP();//毎フレームデータを送信してみる
    }


    void OnApplicationQuit()//アプリ終了時の処理
    {
        udp_send.Close();//UDPの送信を終了
        thread.Abort();
    }

    private static void ThreadMethod()//受信スレッド用の関数
    {
        while (true)
        {
            IPEndPoint remoteEP = null;
            byte[] data = udp_receive.Receive(ref remoteEP);

            //パケットサイズをチェックし、受信データをUnityに反映
            if (data.Length == MSG_SIZE * 2) //
            {
                for (int i = 0; i < MSG_SIZE; i++)
                {
                    r_short_buf[i] = BitConverter.ToInt16(data, i * 2);
                }
            }
        }
    }

    public void senddataUDP()
    {
        //送信するデータを作成
        for (int i = 0; i < MSG_SIZE; i++)
        {
            s_short_buf[i] = (short)(i + count);
        }

        //ショート型をバイトに変換
        for (int i = 0; i < MSG_SIZE; i++)
        {
            byte[] byteArray = BitConverter.GetBytes(s_short_buf[i]);
            s_char_buf[i * 2] = (byte)byteArray[0];
            s_char_buf[i * 2 + 1] = (byte)byteArray[1];
            s_showdata[i] = s_short_buf[i];//インスペクタ表示に送信データを反映
        }
        udp_send.Send(s_char_buf, MSG_SIZE * 2);

        count += 5;//データ作成用のカウントを追加
        if (count > 10000)
        {
            count = 0;
        }
    }
}
使い方と実行
・Unityの新規プロジェクトを立ち上げます。
・アセットに新規スクリプトを作成してファイル名を「udp_send_receive_test」とし、上記のスクリプトをコピペします。
・ヒエラルキーウィンドウに空のオブジェクトを作成し、スクリプトをアタッチします。
・空のオブジェクトを選択し、インスペクターを表示します。
・スケッチが書き込まれたESP32を起動します。
・インスペクターにカウントアップする数値が表示されます。
実行画面
おわりに
まだ変なところや無駄なところがあるかもしれません。
お気づきの点ございましたらご指摘いただければ幸いです。


