今回は、ニューラルネットワークの実装をしてみましょう。
ニューラルネットワーク
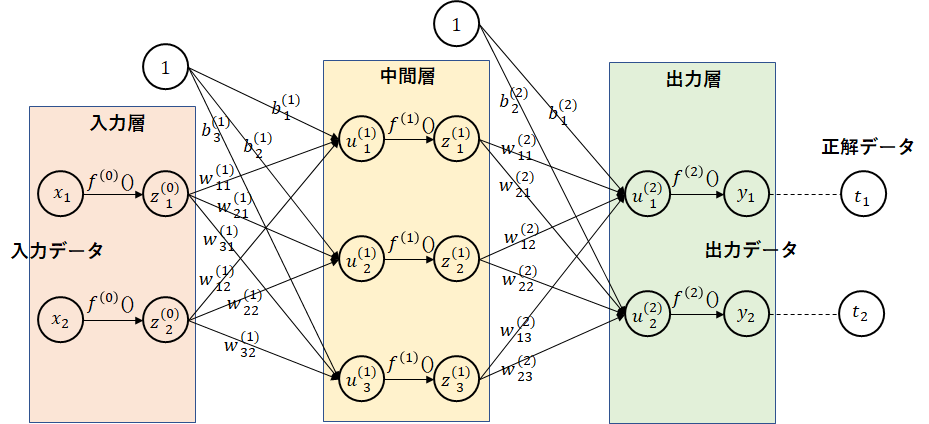
下図に、ニューラルネットワークの例を示します。
入力データを出力データに変換します。入力データは、重みとバイアスにより次の層のデータとして渡されます。重みは、ニューロンの太さ、すなわち次の層にどの程度の割合でデータを伝えるか、バイアスは、次に説明する活性化関数の閾値になります。活性化関数は、次の層に渡すためのデータ変換を行います。(活性化関数を利用しないと層を深くしても意味をなしません。詳細は詳しい書物を当たってください。)
この図では、中間層(隠れ層とも言う)が1つしかありませんが、中間層は複数階層持てます。この階層を深くしていことからディープラーニングと言われています。
重み、バイアスを学習により調整していけば、正しい予測結果を得られるようになると言うことです。
記号説明
図中の○は、ノードを表します。各層ごとにノードの上から番号を振ってます。
各記号の右上の括弧内の数字は層を表します。入力層を0として、出力層まで順に振っています。
$ x_i $は、入力データです。図では2つのデータですが、MNISTでは各ピクセルをデータにするので、784個になります。$ y_i $は、出力データです。図では2つのデータですが、MNISTでは、0~9を表す10個になります。$ t_i $は、教師データ(正解データ)になります。学習時に利用します。出力データと同じ個数になります。
$ w_{ij}^{(n)} $は、重みを表します。$ n $は、層の番号を、$ i $、$ j $は、それぞれ、次階層のノードの番号、前階層のノードの番号を表します。$ b_i^{(n)} $は、バイアスを表します。$ n $は、層の番号を、$ i $は、次階層のノードの番号を表します。前階層の番号は、1固定のためありません。重みとバイアスから計算された値を$ u_i^{(n)} $としています。
$ f^{n} $は、活性化関数を表します。ただし、入力層の$ f^{0} $は、活性化関数ではなく、入力データを標準化するための関数です。一般的には、事前に標準化下データを入力データとして渡すのですが、実装上、標準化も行えるようにしています。活性化関数を適用後の値を$ z_i^{(n)} $としています。出力層は、特別に、$ y_i $としています。
入力層
入力層では、入力データを標準化します。例えば、後述する活性化関数のシグモイド関数では、値が大きいとすべてほぼ1の値に近づきます。よって、基本は、1以下の数値にするようです。また、値に偏りの大きいデータでは、均一にばらけるような方法がとられます。
0~1または-1~1の範囲に正規化
データがほぼ均一の場合は、最大値-最小値のデータで割ります。以下の関数になります。axisには、どの次元で正規化するかを入れます。axisを指定しない場合は、全データの最大値、最小値から正規化します。axis=0を指定すると、$ x_i $ごとに最大値、最小値から計算します。入力データが例えば、気温、湿度のように範囲が異なる場合はaxis=0を指定します。
import numpy as np
def min_max(x, axis=None):
    x_min = np.min(x, axis=axis, keepdims=True) # 最小値を求める
    x_max = np.max(x, axis=axis, keepdims=True) # 最大値を求める
    return (x-x_min)/(x_max-x_min)
MNISTの学習データの各要素ごとの最大値を見てみましょう。前回の関数で読み出します。見やすいように28$ \times $28の配列にします。
import gzip
import numpy as np
x_train, t_train, x_test, t_test = load_mnist('c:\\mnist\\')
x_train = np.reshape(x_train,(60000,28,28))
x_train = x_train.astype(np.int16)
print(np.max(x_train, axis=0))
[[  0   0   0   0   0   0   0   0   0   0   0   0 116 254 216   9   0   0   0   0   0   0   0   0   0   0   0   0]
 [  0   0   0   0  16  47 157 254 255 254 255 255 255 255 255 255 255 255 255 255 244 255 184 197   0   0   0   0]
 [  0   0  64  29 134  62 234 255 255 255 255 255 255 255 255 255 255 255 255 255 255 255 255 255 255 165   0   0]
 [  0   0 141 101  96 255 255 255 255 255 255 255 255 255 255 255 255 255 255 255 255 255 255 255 255 192 121   0]
 [  0  38 144 101 254 255 255 255 255 255 255 255 255 255 255 255 255 255 255 255 255 255 255 255 255 254 221  63]
 [  0   0  95 255 255 255 255 255 255 255 255 255 255 255 255 255 255 255 255 255 255 255 255 255 255 255 255  93]
 [  0   7 210 255 255 255 255 255 255 255 255 255 255 255 255 255 255 255 255 255 255 255 255 255 255 255 254 253]
 [ 47 191 255 255 255 255 255 255 255 255 255 255 255 255 255 255 255 255 255 255 255 255 255 255 255 255 255 253]
 [191 252 255 255 255 255 255 255 255 255 255 255 255 255 255 255 255 255 255 255 255 255 255 255 255 255 254 221]
 [184 254 255 255 255 255 255 255 255 255 255 255 255 255 255 255 255 255 255 255 255 255 255 255 255 255 255 220]
 [214 255 255 255 255 255 255 255 255 255 255 255 255 255 255 255 255 255 255 255 255 255 255 255 255 255 254 203]
 [150 255 255 255 255 255 255 255 255 255 255 255 255 255 255 255 255 255 255 255 255 255 255 255 255 255 253 131]
 [163 255 255 255 255 255 255 255 255 255 255 255 255 255 255 255 255 255 255 255 255 255 255 255 255 254 252 152]
 [ 32 253 255 255 255 255 255 255 255 255 255 255 255 255 255 255 255 255 255 255 255 255 255 255 255 254 252 247]
 [113 188 254 255 255 255 255 255 255 255 255 255 255 255 255 255 255 255 255 255 255 255 255 255 255 255 254  52]
 [ 37 226 254 255 255 255 255 255 255 255 255 255 255 255 255 255 255 255 255 255 255 255 255 255 255 255 255 190]
 [ 40 107 254 255 255 255 255 255 255 255 255 255 255 255 255 255 255 255 255 255 255 255 255 255 255 255 254 223]
 [  0 133 254 255 255 255 255 255 255 255 255 255 255 255 255 255 255 255 255 255 255 255 255 255 255 255 253 104]
 [ 60 197 255 255 255 255 255 255 255 255 255 255 255 255 255 255 255 255 255 255 255 255 255 255 255 255 255 153]
 [ 15 166 255 255 255 255 255 255 255 255 255 255 255 255 255 255 255 255 255 255 255 255 255 255 255 255 253 128]
 [  0 185 255 255 255 255 255 255 255 255 255 255 255 255 255 255 255 255 255 255 255 255 255 255 255 255 255  51]
 [ 32 185 255 255 255 255 255 255 255 255 255 255 255 255 255 255 255 255 255 255 255 255 255 255 255 255 252  39]
 [ 31  38 255 255 255 255 255 255 255 255 255 255 255 255 255 255 255 255 255 255 255 255 255 255 255 254 225  72]
 [  0   0 217 255 255 255 255 255 255 255 255 255 255 255 255 255 255 255 255 255 255 255 255 255 255 254 150   0]
 [  0   0 253 253 255 255 255 255 255 255 255 255 255 255 255 255 255 255 255 255 255 255 255 255 254 252  98   0]
 [  0   0  42 254 255 255 255 255 255 255 255 255 255 255 255 255 255 255 255 255 255 255 255 255 253 127 104   0]
 [  0   0   0  38 255 255 255 255 255 255 255 255 255 255 255 255 255 255 255 255 255 255 255 137  28  59   0   0]
 [  0   0   0   0  94 252 245 254 254 255 255 255 255 255 255 255 255 255 254 254 253 253 254  62   0   0   0   0]]
左上、右上、左下、右下部分は、0ですね。当たり前といえば当たり前ですが、数字を書く時には使いませんよね。
MNISTの場合は、値が0~255のためすべてのデータを255で割ればよいと思います。
平均を0、分散を1となるように標準化(z-スコア)
以下の式で表されます。
\frac{x_i-\bar{x}}{\sigma}\\
\bar{x} :平均 \sigma :標準偏差
実装は簡単です。numpyが関数を用意してくれているので、
def z_score(x, axis = None):
    x_mean = np.mean(x, axis=axis, keepdims=True) # 平均値を求める
    x_std  = np.std(x, axis=axis, keepdims=True)  # 標準偏差を求める
    return (x-x_mean)/x_std
MNISTのデータ分布がどのようになるか見てみましょう。
import gzip
import numpy as np
import matplotlib.pyplot as plt
x_train, t_train, x_test, t_test = load_mnist('c:\\mnist\\')
x_train = np.reshape(x_train, 60000*28*28)
x_train = z_score(x_train)
plt.hist(x_train)
plt.show()
下図のような分布になりました。0=空白の部分がほとんどですからね。
中間層
アフィン変換
重みとバイアスから次の層の値を決定します。行列の演算で表すことができます。図中の$ u^{(1)}
$は、以下となります。
\begin{pmatrix}
u_1^{(1)}\\
u_2^{(1)}\\
u_3^{(1)}
\end{pmatrix}
=
\begin{pmatrix}
w_{11}^{(1)} & w_{12}^{(1)}\\
w_{21}^{(1)} & w_{22}^{(1)}\\
w_{31}^{(1)} & w_{32}^{(1)}
\end{pmatrix}
\begin{pmatrix}
z_1^{(0)}\\
z_2^{(0)}
\end{pmatrix}
+
\begin{pmatrix}
b_1^{(1)}\\
b_2^{(1)}\\
b_3^{(1)}
\end{pmatrix}
=
\begin{pmatrix}
w_{11}^{(1)}z_1^{(0)}+w_{12}^{(1)}z_2^{(0)}+b_1^{(1)}\\
w_{21}^{(1)}z_1^{(0)}+w_{22}^{(1)}z_2^{(0)}+b_2^{(1)}\\
w_{31}^{(1)}z_1^{(0)}+w_{32}^{(1)}z_2^{(0)}+b_3^{(1)}
\end{pmatrix}
$ u^{(2)} $は、以下となります。
\begin{pmatrix}
u_1^{(2)}\\
u_2^{(2)}
\end{pmatrix}
=
\begin{pmatrix}
w_{11}^{(2)} & w_{12}^{(2)} & w_{13}^{(2)}\\
w_{21}^{(2)} & w_{22}^{(2)} & w_{23}^{(2)}
\end{pmatrix}
\begin{pmatrix}
z_1^{(1)}\\
z_2^{(1)}\\
z_3^{(1)}
\end{pmatrix}
+
\begin{pmatrix}
b_1^{(2)}\\
b_2^{(2)}
\end{pmatrix}
=
\begin{pmatrix}
w_{11}^{(2)}z_1^{(1)}+w_{12}^{(2)}z_2^{(1)}+w_{13}^{(2)}z_3^{(1)}+b_1^{(2)}\\
w_{21}^{(2)}z_1^{(1)}+w_{22}^{(2)}z_2^{(1)}+w_{23}^{(2)}z_3^{(1)}+b_2^{(2)}
\end{pmatrix}
それぞれ、以下のように表せます。
u^{(1)} = W^{(1)} z^{(0)}+b^{(1)}\\
u^{(2)} = W^{(2)} z^{(1)}+b^{(2)}
numpyでは、行列の掛け算(内積)は、dotで計算できます。行列演算も普通の数値と同様に書くことができます。ただし、1次元目が列方向のため、見直します。
\begin{pmatrix}
u_1^{(1)} & u_2^{(1)} & u_3^{(1)}
\end{pmatrix}
=
\begin{pmatrix}
z_1^{(0)} & z_2^{(0)}
\end{pmatrix}
\begin{pmatrix}
w_{11}^{(1)} & w_{21}^{(1)} & w_{31}^{(1)}\\
w_{12}^{(1)} & w_{22}^{(1)} & w_{32}^{(1)}
\end{pmatrix}
+
\begin{pmatrix}
b_1^{(1)} & b_2^{(1)} & b_3^{(1)}
\end{pmatrix}
\\
\begin{pmatrix}
u_1^{(2)} & u_2^{(2)}
\end{pmatrix}
=
\begin{pmatrix}
z_1^{(1)} & z_2^{(1)} & z_3^{(1)}
\end{pmatrix}
\begin{pmatrix}
w_{11}^{(2)} & w_{21}^{(2)}\\
w_{12}^{(2)} & w_{22}^{(2)}\\
w_{13}^{(2)} & w_{23}^{(2)}
\end{pmatrix}
+
\begin{pmatrix}
b_1^{(2)} & b_2^{(2)}
\end{pmatrix}
行列を入れ替えました。また、内積の演算上、$ W $と$ z $の順が逆にします。
$ W $の行数は、ひとつ前の層のノード数、列数は、次の層のノード数と一致してる必要があります。$ b $の列数は、次のノード数と一致させます。
u^{(1)} = z^{(0)} W^{(1)} +b^{(1)}\\
u^{(2)} = z^{(1)} W^{(2)} +b^{(2)}
import numpy as np
def affine(z, W, b):
    return np.dot(z, W) + b
NMISTの1つ目のデータに適用してみます。重みの値はすべて1、バイアスはすべて0を設定、出力するノード数は10とします。
W = np.ones((784,10))
b = np.zeros(10)
x_train, t_train, x_test, t_test = load_mnist('c:\\mnist\\')
affine(x_train[0], W, b)
重みがすべて1のためすべてのデータが単純に1つ目のデータの値をすべて足したものとなりました。それぞれの値は、np.sum(x_train[0])と同じになります。
array([ 27525., 27525., 27525., 27525., 27525., 27525., 27525., 27525., 27525., 27525.])
ちなみに重みをすべて0にすると、値もすべて0になります。どうも重みの値をすべて同じ値とするとあまりよくなさそうです。後で、重み、バイアスの決め方を考えてみます。
活性化関数
活性化関数には、過去にシグモイド関数がよく利用されていたとのことですが、現在は、ReLU関数が利用されているようです。それぞれの関数を見てみましょう。
シグモイド関数
シグモイド関数は、以下の関数です。$ \exp(-x) $は、$ e^{-x} $を表し、$ e $は、ネイピア数です。
f(x) = \frac{1}{1+\exp(-x)}
例によって、numpyで簡単に書くことができます。
import numpy as np
def sigmoid(x):
    return 1/(1 + np.exp(-x))
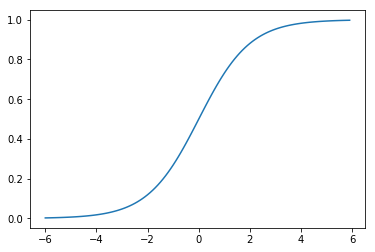
どのような関数かグラフを書いてみましょう。
import numpy as np
import matplotlib.pyplot as plt
x = np.arange(-6.0, 6.0, 0.1)
y = sigmoid(x)
plt.plot(x, y)
plt.show()
0~1の間で、負の小さい値だと0に近づき、正の大きい値だと1に近づきます。
双曲線正接関数
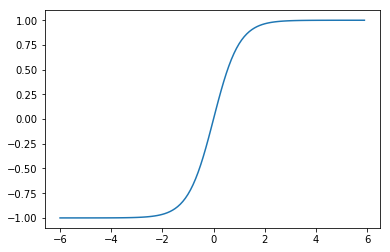
値を-1~1の間としたい場合に利用されます。
f(x) = \tanh(x)
import numpy as np
def tanh(x):
    return np.tanh(x)
import numpy as np
import matplotlib.pyplot as plt
x = np.arange(-6.0, 6.0, 0.1)
y = tanh(x)
plt.plot(x, y)
plt.show()
ReLU
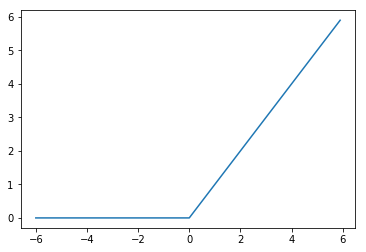
0以上の場合は、そのままの値となり、0以下の場合は、0となります。
f(x) =  \left\{
\begin{array}{ll}
x & (x \gt 0) \\
0 & (x \leq 0)
\end{array}
\right.
import numpy as np
def relu(x):
    return np.maximum(0, x)
import numpy as np
import matplotlib.pyplot as plt
x = np.arange(-6.0, 6.0, 0.1)
y = relu(x)
plt.plot(x, y)
plt.show()
その他にもReLUの改良版など利用されるようですが、ここでは記載しません。
出力層
活性化関数
出力層は、求める値により、利用する関数が異なります。特定の値を求める場合(回帰問題)は、恒等関数を、MNISTの0~9など、どれに分類されるかを求める場合(分類問題)は、ソフトマックス関数がよく利用されるようです。
恒等関数
単に同じ値を返すのみです。
f(x) = x
import numpy as np
def identity(x):
    return x
ソフトマックス関数
分類問題の場合、確率を求める関数になります。出力層のすべての値を合計すると1になります。
f(x_i) = \frac{\exp(x_i)}{\sum_{k=1}^{n}\exp(x_k)}
import numpy as np
def softmax(x):
    exp_x = np.exp(x)
    sum_exp_x = np.sum(exp_x)
    return exp_x/sum_exp_x
パラメータ
今まで見てきたように、実際に実行させるためには決めるべきことが多数あります。
- 中間層の階層数(深さ)
- 各層のノード数
- 入力層の標準化方法
- 中間層、出力層の活性化関数
- 重み、バイアスの初期値
どれもすべてのデータに通用する最適なものがあるわけではなく、データによって試行錯誤して決めるようです。これこそ機械学習で決められないものか、
階層数やノード数は増やしすぎると計算量が膨大になるためCPU(GPU)との相談になります。
重み、バイアスの初期値
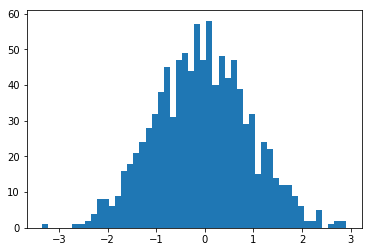
バイアスの初期値については、0が一般的なようです。重みの初期値は、0を中心とした一様分布または正規分布とする乱数が利用されるようです。一様分布は、範囲内に均等な分布となります。正規分布の例として、平均を0、標準偏差を1の乱数を1000件生成した際のヒストグラムを示します。
x = np.random.normal(0, 1, 1000)
plt.hist(x,bins=50)
plt.show()
LeCunの初期化
平均を 0 、標準偏差を $ \frac{1}{\sqrt{d^{(l-1)}}} $とする正規分布、または、$ -\sqrt{\frac{3}{d^{(l-1)}}} $~$ \sqrt{\frac{3}{d^{(l-1)}}} $の一様分布。$ d^{(l-1)} $は、ひとつ前の階層のノード数を示します。
import numpy as np
def lecun_normal(d_1, d):
    std = 1/np.sqrt(d_1)
    return np.random.normal(0, std, (d_1, d))
def lecun_uniform(d_1, d):
    min = -np.sqrt(3/d_1)
    max = np.sqrt(3/d_1)
    return np.random.uniform(min, max, (d_1, d))
Glorotの初期化
平均を 0 、標準偏差を $ \sqrt{\frac{2}{d^{(l-1)}+d^{(l)}}} $とする正規分布、または、$ -\sqrt{\frac{6}{d^{(l-1)}+d^{(l)}}} $~$ \sqrt{\frac{6}{d^{(l-1)}+d^{(l)}}} $の一様分布。$ d^{(l-1)} $は、ひとつ前の階層のノード数、$ d^{(l)} $は、次の階層のノード数を示します。
import numpy as np
def glorot_normal(d_1, d):
    std = np.sqrt(2/(d_1+d))
    return np.random.normal(0, std, (d_1, d))
def glorot_uniform(d_1, d):
    min = -np.sqrt(6/(d_1+d))
    max = np.sqrt(6/(d_1+d))
    return np.random.uniform(min, max, (d_1, d))
Heの初期化
平均を 0 、標準偏差を $ \sqrt{\frac{2}{d^{(l-1)}}} $とする正規分布、または、$ -\sqrt{\frac{6}{d^{(l-1)}}} $~$ \sqrt{\frac{6}{d^{(l-1)}}} $の一様分布。$ d^{(l-1)} $は、ひとつ前の階層のノード数を示します。
import numpy as np
def he_normal(d_1, d):
    std = np.sqrt(2/d_1)
    return np.random.normal(0, std, (d_1, d))
def he_uniform(d_1, d):
    min = -np.sqrt(6/d_1)
    max = np.sqrt(6/d_1)
    return np.random.uniform(min, max, (d_1, d))
MNISTへの適用
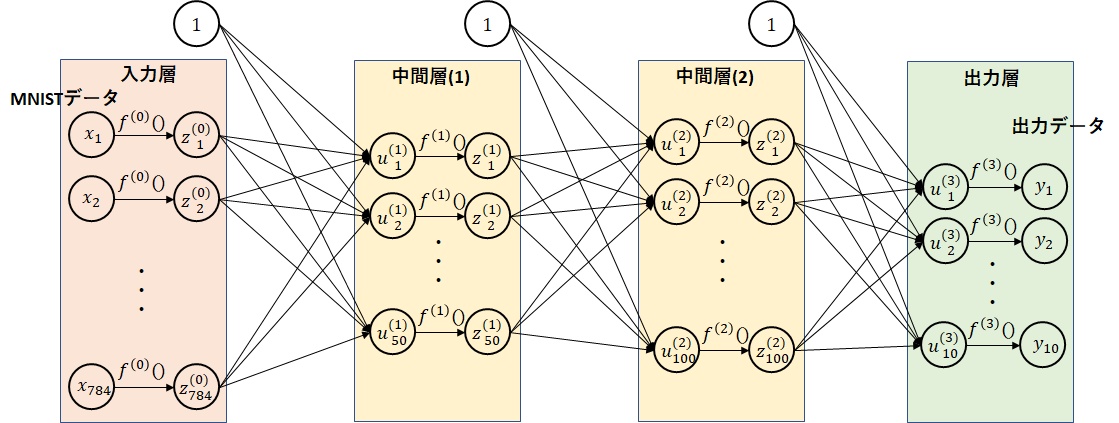
今回の最後に、MNISTに適用してみます。例として、以下の図のように中間層の1つめは、50ノード、2つめは、100ノードとします。ノード数は適当に決めました。入力データは、784個、出力データは、0~9である確率を表す10個になります。
入力データの標準化として、min_max関数を、中間層は、relu関数を、出力層は、softmax関数を適用します。重みの初期化は、he_normalとし、バイアスはすべて0とします。出力層のsoftmax関数以外は、特に理由はなく適当に選択しています。適当に変更して実行してみてください。
MNISTの1枚目のデータを計算してみます。
import numpy as np
# ノード数
d0 = 784
d1 = 50
d2 = 100
d3 = 10
# 重み、バイアスの初期化
W1 = he_normal(d0,d1)
b1 = np.zeros(d1)
W2 = he_normal(d1,d2)
b2 = np.zeros(d2)
W3 = he_normal(d2,d3)
b3 = np.zeros(d3)
# MNISTデータ読み込み
x_train, t_train, x_test, t_test = load_mnist('c:\\mnist\\')
# 入力データの正規化
z0 = min_max(x_train)
# 中間層(1)
u1 = affine(z0[0], W1, b1)
z1 = relu(u1)
# 中間層(2)
u2 = affine(z1, W2, b2)
z2 = relu(u2)
# 出力層
u3 = affine(z2, W3, b3)
y = softmax(u3)
print(y)
以下のような結果になりました。0~9である確率です。
[ 0.07801212  0.11621325  0.1715662   0.11645457  0.04418619  0.06040322
  0.16116579  0.08831403  0.11561257  0.04807207]
もう一度実行してみます。当たり前ですが、重みが乱数なので実行するごとに値が違います。また、1回実行しただけで、正解が分かるわけではありません。
[ 0.08927317  0.11975044  0.03798723  0.1689926   0.04481414  0.05841479
  0.12604823  0.18952135  0.08656767  0.07863037]
MNISTデータを複数まとめて、一気に処理可能となるように見直しをします。
ソフトマックス関数で利用しているsum関数は、このままだと、全部のデータの和を求めてしまいます。1データごと和を求めるように見直します。また、1データごと計算できるように、行列の転置を利用しています。
def softmax(x):
    x = x.T
    exp_x = np.exp(x)
    sum_exp_x = np.sum(exp_x, axis=0)
    y = exp_x/sum_exp_x
    return y.T
今回までの関数を整理します。
min_max、z_scoreは、0割りが起きないように見直しました。ソフトマックス関数は、オーバフローが起きないように若干手直ししています。
import gzip
import numpy as np
def load_mnist( mnist_path ) :
    return _load_image(mnist_path + 'train-images-idx3-ubyte.gz'), \
           _load_label(mnist_path + 'train-labels-idx1-ubyte.gz'), \
           _load_image(mnist_path + 't10k-images-idx3-ubyte.gz'), \
           _load_label(mnist_path + 't10k-labels-idx1-ubyte.gz')
def _load_image( image_path ) :
    # 画像データの読み込み
    with gzip.open(image_path, 'rb') as f:
        buffer = f.read()
    size = np.frombuffer(buffer, np.dtype('>i4'), 1, offset=4)
    rows = np.frombuffer(buffer, np.dtype('>i4'), 1, offset=8)
    columns = np.frombuffer(buffer, np.dtype('>i4'), 1, offset=12)
    data = np.frombuffer(buffer, np.uint8, offset=16)
    image = np.reshape(data, (size[0], rows[0]*columns[0]))
    image = image.astype(np.float32)
    return image
def _load_label( label_path ) :
    # 正解データ読み込み
    with gzip.open(label_path, 'rb') as f:
        buffer = f.read()
    size = np.frombuffer(buffer, np.dtype('>i4'), 1, offset=4)
    data = np.frombuffer(buffer, np.uint8, offset=8)
    label = np.zeros((size[0], 10))
    for i in range(size[0]):
        label[i, data[i]] = 1
    return label

def min_max(x, axis=None):
    x_min = np.min(x, axis=axis, keepdims=True) # 最小値を求める
    x_max = np.max(x, axis=axis, keepdims=True) # 最大値を求める
    return (x-x_min)/np.maximum((x_max-x_min),1e-7)

def z_score(x, axis = None):
    x_mean = np.mean(x, axis=axis, keepdims=True) # 平均値を求める
    x_std  = np.std(x, axis=axis, keepdims=True)  # 標準偏差を求める
    return (x-x_mean)/np.maximum(x_std,1e-7)

def affine(z, W, b):
    return np.dot(z, W) + b

def sigmoid(x):
    return 1/(1 + np.exp(-x))

def tanh(x):
    return np.tanh(x)

def relu(x):
    return np.maximum(0, x)

def identity(x):
    return x

def softmax(x):
    x = x.T
    max_x = np.max(x, axis=0)
    exp_x = np.exp(x - max_x)
    sum_exp_x = np.sum(exp_x, axis=0)
    y = exp_x/sum_exp_x
    return y.T

def lecun_normal(d_1, d):
    std = 1/np.sqrt(d_1)
    return np.random.normal(0, std, (d_1, d))
def lecun_uniform(d_1, d):
    min = -np.sqrt(3/d_1)
    max = np.sqrt(3/d_1)
    return np.random.uniform(min, max, (d_1, d))

def glorot_normal(d_1, d):
    std = np.sqrt(2/(d_1+d))
    return np.random.normal(0, std, (d_1, d))
def glorot_uniform(d_1, d):
    min = -np.sqrt(6/(d_1+d))
    max = np.sqrt(6/(d_1+d))
    return np.random.uniform(min, max, (d_1, d))

def he_normal(d_1, d):
    std = np.sqrt(2/d_1)
    return np.random.normal(0, std, (d_1, d))
def he_uniform(d_1, d):
    min = -np.sqrt(6/d_1)
    max = np.sqrt(6/d_1)
    return np.random.uniform(min, max, (d_1, d))
次回は、学習により、重み、バイアスを変更していく方法について考えます。
