はじめに
- Ubuntu にてSphinxを用いたドキュメント生成環境の構築を試みる。
- ネット上に様々な情報が転がっている上、qiitaでも複数の記事を見かけるものの、個人的に最適な組み合わせではなかったので自分向けのメモとして投稿します。
動作環境
- Ubuntu 22.4 LTS
- AWS EC2 の Ubuntu 22.4 AMI
- VSCodeのremoteSSHを用いて環境構築を推進
※いくつかVSCodeの拡張機能を使用します。
本投稿の目次
| 項番 | ページ内リンク | 章毎の進捗 |
|---|---|---|
| 1 | Sphinxとは? | Sphinxについて紹介 |
| 2 | インストールからHTML生成まで | とりあえずbuildまで出来るようになる |
| 3 | sphinx-autobuildによる自動ビルドの導入 | 自動ビルドとブラウザでの検証環境が導入される |
| 4 | 見た目を整えるテーマの導入 | ここでHTMLの見た目が良くなる |
| 5 | reStructuredTextを書いてみる | サンプルページが完成する |
| 6 | markdown記述が混在可能な環境の導入 | markdownでページを書けるようになる |
| 7 | 図を生成するplamtUML拡張の導入 | 図表が導入されて見栄えが良くなる |
| 8 | docstringからソース仕様書を生成する | ソース仕様書が作れるようになる |
| 9 | jupyter notebook を取り込む | notebookがそのままHTML文書になる |
1. Sphinxとは?
- 公式サイトはこちら
- HTML,LaTeX(PDF),ePub など様々な文章を自動生成してくれるツール
- 基本はreStructuredTextを活用して内容を記載する
以下、あくまで個人的な感想です
導入のメリット
- ドキュメントが散らかりがちな業務の中、適切に活用することで情報を整理することができる
※個人的に割と綺麗に文章を整えてくれるツールだと思います。 - サードパーティー含む様々な拡張機能が提供されており、やりたいことは何かしら実現できる場合が多い
※例えば markdown 形式の導入、他のツールとの連携など。 - 上と被るが、割とメジャーなツールなので新しい技術への拡張機能も早めに整備される印象
導入のデメリット
- reStructuredText に慣れていない人が多く、メンバの習得にコストがかかる
- 拡張機能は便利だが、情報が多く陳腐化する事もあり、案外検索に時間がかかる
- 拡張機能でデメリットを打ち消すこともできるが、習熟した環境立ち上げメンバが必要
2. インストールからHTML生成まで
とにかく、インストールから生成までをやってみます。
- sphinxの導入
sudo apt install python3-pip -y
pip install sphinx
※python3系が入っている前提です。
- 作業ディレクトリの作成とプロジェクトの開始
mkdir sample_docs && cd sample_docs
sphinx-quickstart
※対話式で質問されます。n, sample_docs, [作成者名], [バージョン], jaの順番で入れました。
※現在のディレクトリ構造はこんな感じ。
以下については理解が浅いので間違っていたらすみません。
sample_docs
    ├─_build       # 出力が格納される
    ├─_static      # 静的なデータ置き場?
    ├─_templates   # quickstartのtemplateなどを置く
    ├─conf.py      # Sphinxの設定ファイル
    ├─index.rst    # 本文を書くファイル
    ├─make.bat     # Windows向けのmakeコマンドの実行ファイル
    └─Makefile     # Linux向けのmakeコマンド定義ファイル
※一部の出力を切り出して以下に示します。(クリックで開く)
sphinx-quickstartの出力
You have two options for placing the build directory for Sphinx output.
Either, you use a directory "_build" within the root path, or you separate
"source" and "build" directories within the root path.
> Separate source and build directories (y/n) [n]: n # とりあえずNoでOK

The project name will occur in several places in the built documentation.
> Project name: sample_docs # プロジェクト名を入れる
> Author name(s): kotaro # 作成者
> Project release []: 0.1 # バージョン

For a list of supported codes, see
https://www.sphinx-doc.org/en/master/usage/configuration.html#confval-language.
> Project language [en]: ja # 日本語は ja 英語は en
※割と丁寧で出力の最後に使い方をちゃんと書いてくれている。(クリックで開く)
翻訳すると…
You should now populate your master file path/to/workdir/sample_docs/index.rst
and create other documentation source files. Use the Makefile to build the docs, like so:
   make builder
where "builder" is one of the supported builders, e.g. html, latex or linkcheck.
マスターファイルの path/to/workdir/sample_docs/index.rst にデータを追加して、他のドキュメントソースファイルを作成してください。
Makefileをmake builderのようにドキュメントをビルドしてください。
ここで "builder" はサポートされているビルダーです。例: html, latex, linkcheck など
- まずはとにかくbuildしてみる
make html
※build succeeded. で成功! makeを使用せずに実行する場合は以下になります。
sphinx-build -b html ./sample_docs ./sample_docs/build/html
3. sphinx_autobuildによる自動ビルドの導入
このままだとビルド結果が見れずに不便です。
autobuildを使用して、自動ビルドとブラウザ表示を可能にします。
なお、以降の内容では、こちらを参考にさせてもらいました。
ユーザとして明確にまとめてもらえています。
参考にしつつ、自分好みの内容を取り入れています
- autobuildのインストールとautobuildの実行
pip install sphinx-autobuild
cd ..
sphinx-autobuild -b html ./sample_docs ./sample_docs/_build/html
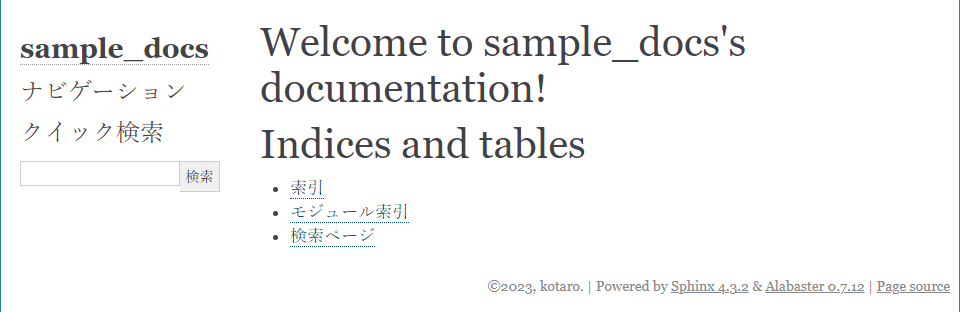
※出力を見ると8000番でwebサーバが立ち上がり、見ることができます。
[I 230528 11:49:35 server:335] Serving on http://127.0.0.1:8000
※ブラウザでの表示はこんな感じです。(おや、あまり綺麗じゃないぞ…?)
-
以下は VSCode の remoteSSH 環境における内容です。不要な人はスキップしてください。
-
vscodeを使用している場合はポップアップで以下が出ます。ブラウザで開くを選択してください。
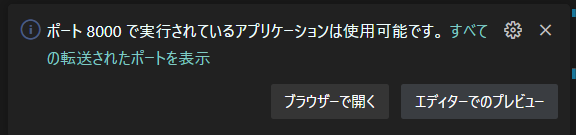
-
閉じてしまっても、ターミナルタブの横にあるポートタブから設定して飛べます。
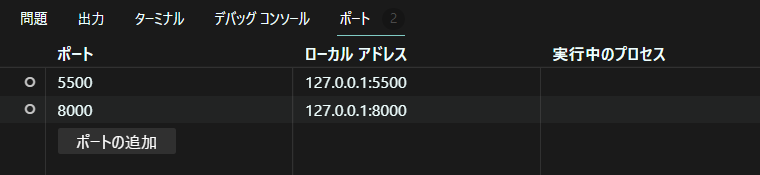
※ポートの追加 → 8000を入力 → 127.0.0.1:8000 をブラウザで開く
-
4. 見た目を整えるテーマの導入
綺麗な文章を自動生成できる!と聞いた割には、なんか崩れているな、と感じた人も居ると思います。
実は初期状態での生成物はそこまで見た目が良くないのです。
ということで、拡張機能であるテーマを導入します。
- 拡張機能の導入(sphinx-rtd-theme, sphinx_fontawesome)
pip install sphinx-rtd-theme sphinx_fontawesome
- conf.py の修正(以下を追加)
+ import sphinx_rtd_theme
+ import sphinx_fontawesome

extensions = [
+    'sphinx_rtd_theme',
+    'sphinx_fontawesome',
]
-html_theme = "alabaster"
+html_theme = "sphinx_rtd_theme"
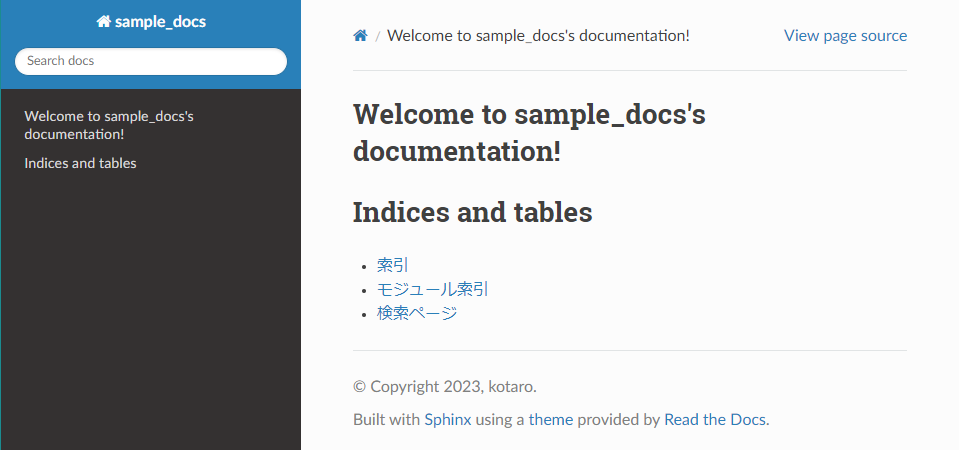
- ということで、もう一度 build。(本来は裏側で回しておけば大丈夫です)
sphinx-autobuild -b html ./sample_docs ./sample_docs/_build/html
※ブラウザでの表示はこんな感じです。(やればできるじゃん!)
拡張機能の導入について:
この後いくつか拡張機能を入れますが、同じ要領でいけます。
(動作環境の構築) -> pip install -> conf.pyの編集 -> (.rstファイルの編集)
※()は不要な時もある、という意味。
テーマについて:
今回使用したのは sphinx_rtd_theme でしたが、他にも様々なテーマがあります。
以下のURLで標準で用意されている記事が紹介されています。
5. reStructuredTextを書いてみる
ここまではドキュメントの内容について触れていませんが、ここから編集を進めていきます。
まずは Sphinx が公式にサポートしているreStructuredTextを活用する形で進めます。
markdownの方が好みという方は、スキップしてマークダウンを導入するセクションを参照してください。
- まずは公式ページを見て学んでみる
- 必要なファイルを追加する
mkdir content1
touch content1/page1.rst
※sample_docsディレクトリ内で実行します。
※現在のディレクトリ構造はこんな感じ
sample_docs
    ├─_build
    ├─_static
    ├─_templates
+   ├─content1
+   │  └─page1.rst
    ├─conf.py
    ├─index.rst
    ├─make.bat
    └─Makefile
- content1/page1.rst を編集する
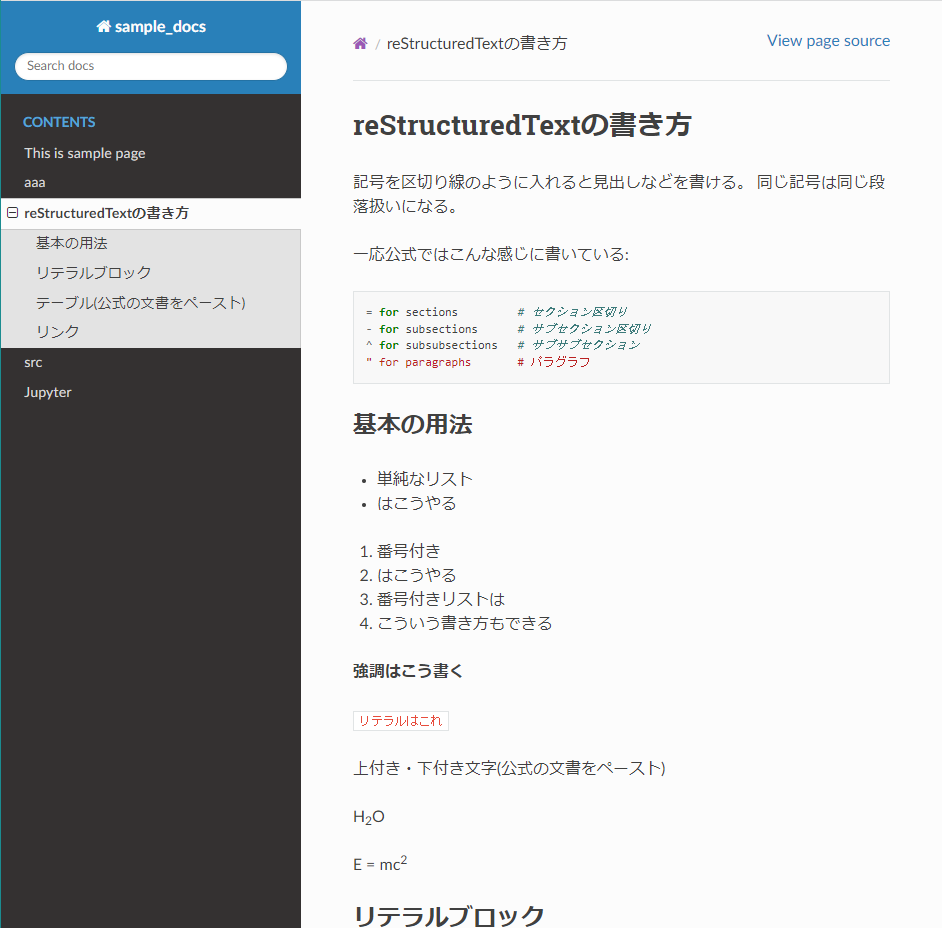
reStructuredTextの書き方
=================
記号を区切り線のように入れると見出しなどを書ける。
同じ記号は同じ段落扱いになる。
一応公式ではこんな感じに書いている::
= for sections # セクション区切り
- for subsections # サブセクション区切り
^ for subsubsections # サブサブセクション
" for paragraphs # パラグラフ
基本の用法
----------------
* 単純なリスト
* はこうやる
1. 番号付き
2. はこうやる
#. 番号付きリストは
#. こういう書き方もできる
**強調はこう書く**
``リテラルはこれ``
上付き・下付き文字(公式の文書をペースト)
H\ :sub:`2`\ O
E = mc\ :sup:`2`
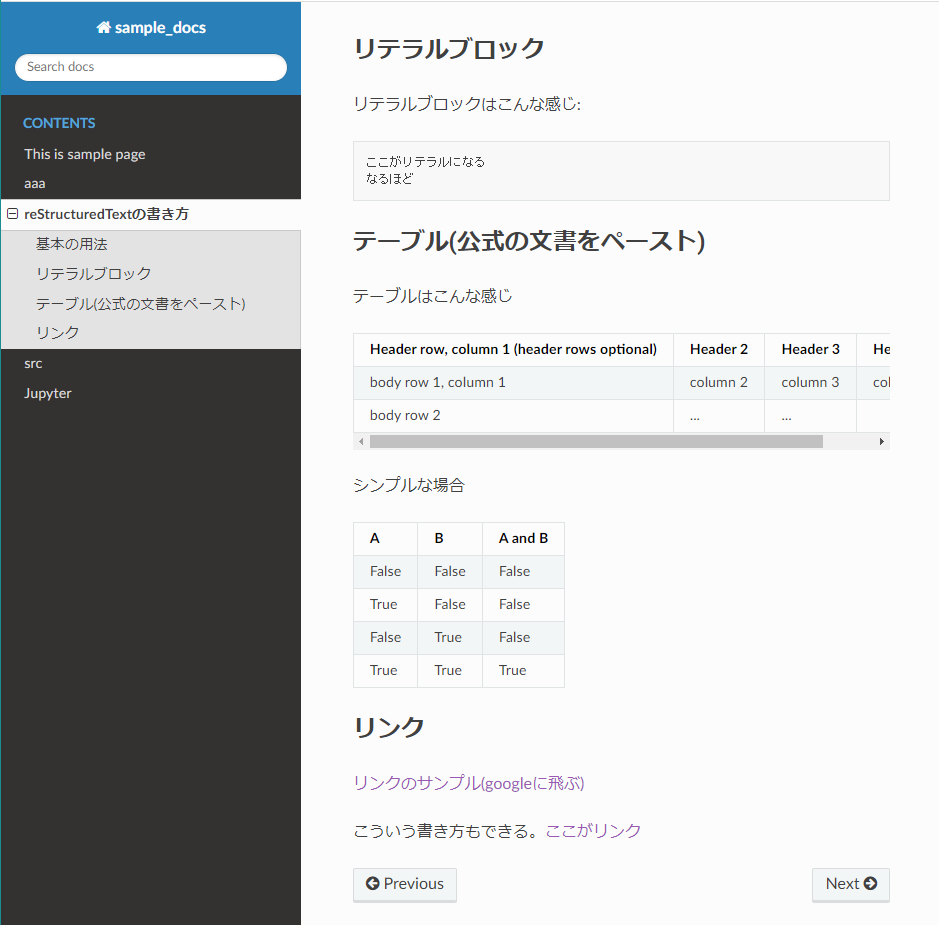
リテラルブロック
----------------
リテラルブロックはこんな感じ::
ここがリテラルになる
なるほど
テーブル(公式の文書をペースト)
--------
テーブルはこんな感じ
+------------------------+------------+----------+----------+
| Header row, column 1 | Header 2 | Header 3 | Header 4 |
| (header rows optional) | | | |
+========================+============+==========+==========+
| body row 1, column 1 | column 2 | column 3 | column 4 |
+------------------------+------------+----------+----------+
| body row 2 | ... | ... | |
+------------------------+------------+----------+----------+
シンプルな場合
===== ===== =======
A B A and B
===== ===== =======
False False False
True False False
False True False
True True True
===== ===== =======
リンク
-------
`リンクのサンプル(googleに飛ぶ) <https://google.com>`_
こういう書き方もできる。`ここがリンク`_
.. _ここがリンク: https://google.com
- index.rstを編集する。
.. sample_docs documentation master file, created by
   sphinx-quickstart on Sat May 27 15:23:04 2023.
   You can adapt this file completely to your liking, but it should at least
   contain the root `toctree` directive.

Welcome to sample_docs's documentation!
=======================================

.. toctree::
   :maxdepth: 2
   :caption: Contents:

+  content1/page1

Indices and tables
==================

* :ref:`genindex`
* :ref:`modindex`
* :ref:`search`
※ファイル拡張子はつけません。
※index.rstからの相対パスで書きます。
- 出来上がりはこんな感じです。(メニューバーに勝手に項目増えてますがお気になさらず)
6. markdown記述が混在可能な環境の導入
reStructuredTextもやっていることは分かる。
書こうと思ったらかける…けど、なんだか違和感がある。
※業務で一度仕様書を書きましたが、他で使わないので、すぐに書き方を忘れてしまった…
ということで、markdown(.md)ファイルを混在できる環境を構築します。
- まずはpip install で必要な拡張を導入
pip install myst_parser
pip install --upgrade myst-parser
※公式では --upgrade が推奨されているので、念のために両方書いておきます。
ここで導入した myst_parser は markdown と reStructuredText をいい感じに変換してくれます。
markdownだけでSphinxを動かすのは難しいので、足りない所をサポートする機能があります。
以下、mystの公式ページです。
- conf.py を編集する
extensions = [
    'sphinx_rtd_theme',
    'sphinx_fontawesome',
+   'myst_parser',
]

# ファイルの最後に以下を付け足す。
source_suffix = {
+   '.rst': 'restructuredtext',
+   '.txt': 'markdown',
+   '.md': 'markdown',
}
- 必要なファイルを追加する
touch content1/page2.rst
※sample_docsディレクトリ内で実行します。
※現在のディレクトリ構造はこんな感じ
sample_docs
    ├─_build
    ├─_static
    ├─_templates
    ├─content1
    │  └─page1.rst
+   │  └─page2.rst
    ├─conf.py
    ├─index.rst
    ├─make.bat
    └─Makefile
- markdownファイルを書いていく
mystはmarkdownに寄せてくれますが、微妙に書き方が違います。
以下、公式のチートシートです。これが一番わかりやすい。
- content1/page2.md を編集する
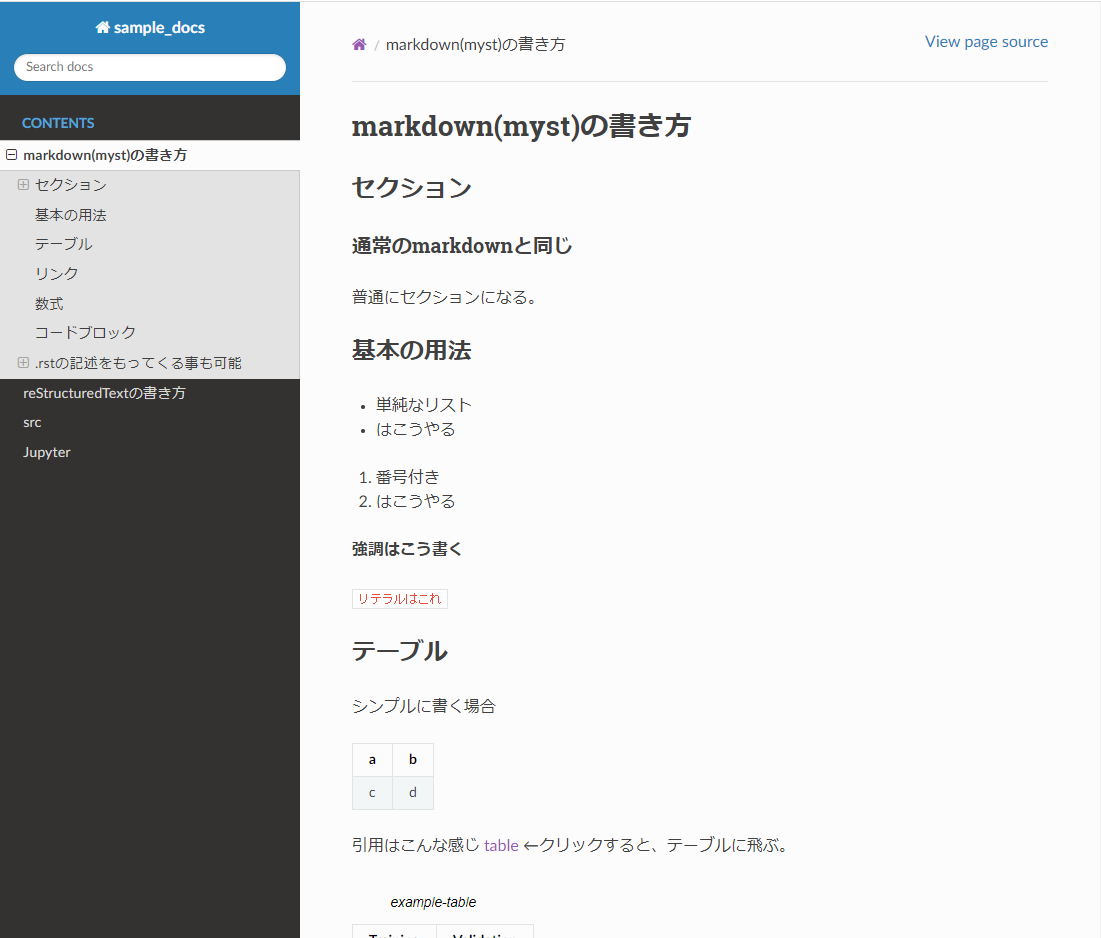
# markdown(myst)の書き方
## セクション
### 通常のmarkdownと同じ
普通にセクションになる。
## 基本の用法
* 単純なリスト
* はこうやる
1. 番号付き
2. はこうやる
**強調はこう書く**
``リテラルはこれ``
## テーブル
シンプルに書く場合
| a | b |
| :--- | ---: |
| c | d |
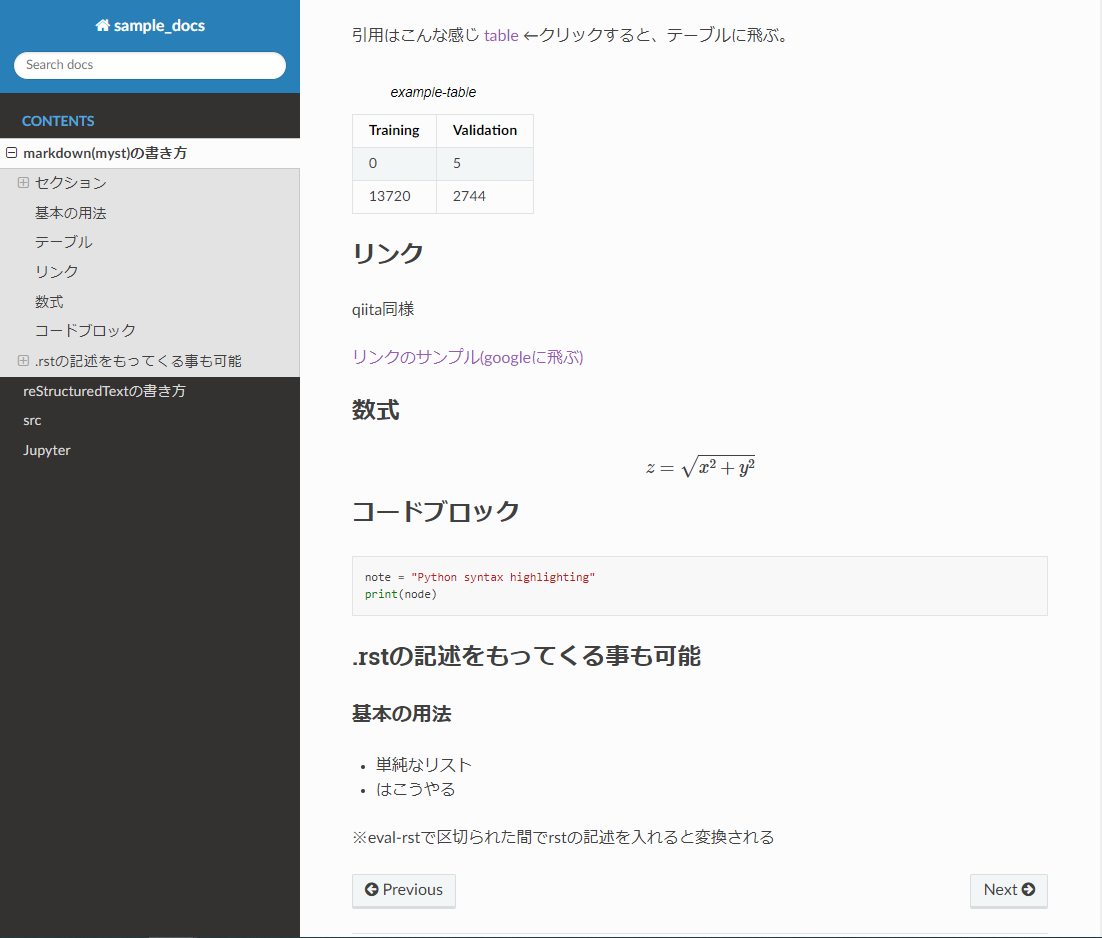
引用はこんな感じ {ref}`table <example-table>` ←クリックすると、テーブルに飛ぶ。
```{list-table} example-table
:header-rows: 1
:name: example-table
* - Training
- Validation
* - 0
- 5
* - 13720
- 2744
```
## リンク
qiita同様
[リンクのサンプル(googleに飛ぶ)](https://google.com)
## 数式
```{math}
z=\sqrt{x^2+y^2}
```
## コードブロック
```python
note = "Python syntax highlighting"
print(node)
```
## .rstの記述をもってくる事も可能
```{eval-rst}
基本の用法
----------------
* 単純なリスト
* はこうやる
```
※eval-rstで区切られた間でrstの記述を入れると変換される
- index.rstを編集する。
.. sample_docs documentation master file, created by
   sphinx-quickstart on Sat May 27 15:23:04 2023.
   You can adapt this file completely to your liking, but it should at least
   contain the root `toctree` directive.

Welcome to sample_docs's documentation!
=======================================

.. toctree::
   :maxdepth: 2
   :caption: Contents:

   content1/page1
+  content1/page2

Indices and tables
==================

* :ref:`genindex`
* :ref:`modindex`
* :ref:`search`
※index.rstをindex.mdに変更することもできます。
index.mdはこちら
% sample_docs documentation master file, created by
% sphinx-quickstart on Sat May 27 15:23:04 2023.
% You can adapt this file completely to your liking, but it should at least
% contain the root `toctree` directive.

# Welcome to sample_docs's documentation!

```{toctree}
:maxdepth: 2
:caption: Contents

content1/page1
content1/page2
```

# Indices and tables

* {ref}`genindex`
* {ref}`modindex`
* {ref}`search`
※コメントは%をつける
※変化があるのは{toctree}と{ref}の部分
※.rstで :caption: Contents の末尾にある : は不要
- 出来上がりはこんな感じです。
7. 図を生成するplamtUML拡張の導入
ここまでで文章の生成環境は大分整いました。
しかし、仕様書などを書く上で欠かせないのはフローチャート、シーケンス図などの図表です。
UML関係の図表を生成する有名なツールにplantUMLがあります。
plantUMLは図表をテキストから生成します。
実はqiitaも対応しています。例えば以下でエディタ入力すると…
```plantuml
Bob->Alice : Hello!
```
こんな感じで出力されます。

これと同様の事がsphinxでもできるplantUML拡張を導入していきます。
- plantUML自体の導入
sudo apt-get -y install plantuml
※Ubuntu22.04では、これでjavaもgraphvizの環境も入りました。。
※planuUMLを導入する必要があるので、もし入らなかった人は以下を参考に入れてみてください。
- pip install で必要な拡張を導入
pip install sphinxcontrib-plantuml
- conf.py を編集する
extensions = [
    'sphinx_rtd_theme',
    'sphinx_fontawesome',
    'myst_parser',
+   'sphinxcontrib.plantuml',
]

# 以下は最後の方に追記しておく
+plantuml_output_format = 'png'
+plantuml_syntax_error_image = True
- 必要なファイルを追加する。今回はmarkdownで作ってみます。
touch content1/page3.md
※現在のディレクトリ構造はこんな感じ
sample_docs
    ├─_build
    ├─_static
    ├─_templates
    ├─content1
    │  └─page1.rst
    │  └─page2.rst
+   │  └─page3.rst
    ├─conf.py
    ├─index.rst
    ├─make.bat
    └─Makefile
- markdownファイルを書いていく。content1/page3.md を編集する。
# PlantUMLの使い方
## 書いてみる

```{eval-rst}
.. uml::

    A -> B: request
    return response
```
- index.rstを編集する。
.. sample_docs documentation master file, created by
   sphinx-quickstart on Sat May 27 15:23:04 2023.
   You can adapt this file completely to your liking, but it should at least
   contain the root `toctree` directive.

Welcome to sample_docs's documentation!
=======================================

.. toctree::
   :maxdepth: 2
   :caption: Contents:

   content1/page1
   content1/page2
+  content1/page3

Indices and tables
==================

* :ref:`genindex`
* :ref:`modindex`
* :ref:`search`
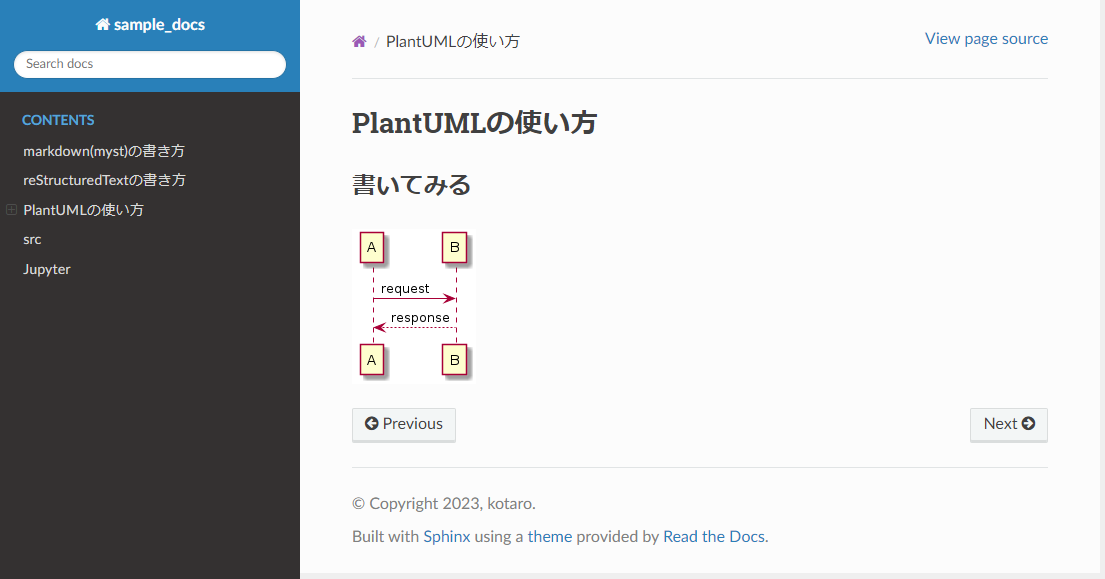
- 出来上がりはこんな感じです。
8. docstringからソース仕様書を生成する
リッチな環境ができてきました。
ここまでくると、もうソースコード直接入れちゃダメなの?ってなってきます。
ソースコードの解析はさすがにしてもらえませんが、
Sphinxには説明用のコメント、すなわちdocstringを読み取る機能があります。
ということで、本章ではdocstringを読み取るautodoc拡張について記載します。
- はじめに読み込ませるソースコードを書きます。
class test:
    """
    Summary of this class.
    """

    def __init__(self, arg1):
        """ _init__
        Args:
            arg1(int): argument1
        Returns:
            void: nothing
        Examples:
            >>> testClass = test.test(1)
        """

        print('initializing...')
        self.arg1 = arg1

    def method1(self):
        """  method1
        Args:
            void: nothing
        Returns:
            void: nothing
        Examples:
            >>> testClass.method1()
        """
        print(self.arg1)

    def method2(self, arg1, arg2):
        """  method2
        Args:
            arg1(int): argument1
            arg2(int): argument2
        Returns:
            int: sum arg1 to arg2
        Examples:
            >>> testClass.method2(3, 4)
        """
        result = arg1 + arg2
        return result
classやmethod付近にコメントがついています。引数、戻り値、使い方の例などです。
この書き方はgoogleスタイルと呼ばれる書き方です。
ほかにもrestructureTextスタイルとNumpyスタイルがあります。
docstringについては以下の記事が非常に詳しく説明してくださっています。
つまりは、こんな感じで書けば仕様書っぽい物が勝手に出来上がる、ということ。
とはいえ、面倒くさそう。実際にどんな物ができるか見てから実用するかは考えよう。
ということで、サンプルページをビルドしていきます。
- まずは上記ファイルを以下の部分に生成します。
mkdir src
touch src/test.py
※./sample_docsの外側で実行します。test.pyには先ほどのpythonコードをコピペしてください。
※現在のディレクトリ構造はこんな感じ
./ ← 基本ここで作業する
+├─src
+│ └─test.py ← ここに先ほどの test.py をコピペする。
 └─sample_docs
   ├─_build
   ├─_static
   ├─_templates
   ├─content1
   │  └─page1.rst
   │  └─page2.rst
   │  └─page3.rst
   ├─conf.py
   ├─index.rst
   ├─make.bat
   └─Makefile
- 拡張機能を pip installする
pip install sphinx-autobuild sphinxcontrib-napoleon
- conf.py を編集する
# 以下はファイルの最初の方にコメントアウトされています。コメントアウトを外してpathだけ変更します。
import os
import sys
sys.path.insert(0, os.path.abspath('../src')) # ソースがおかれているディレクトリ(conf.py からの相対パス)

extensions = [
    'sphinx_rtd_theme',
    'sphinx_fontawesome',
    'myst_parser',
    'sphinxcontrib.plantuml',
+   'sphinx.ext.autodoc',
+   'sphinx.ext.napoleon',
]
- sphinx-apidocで.rstファイルを生成する
sphinx-apidoc -f -o ./sample_docs/ ./src
※上記の意味は-fで上書き強制、-o ./sample_docs でsample_docsディレクトリに出力、最後の引数はpythonファイルがおかれているディレクトリを指定
※ファイルが追加される(modules.rstとtest.rst)
./
 ├─src
 │ └─test.py ← ここに先ほどの test.py をコピペする。
 └─sample_docs
   ├─_build
   ├─_static
   ├─_templates
   ├─content1
   │  └─page1.rst
   │  └─page2.rst
   │  └─page3.rst
   ├─conf.py
   ├─index.rst
+  ├─test.rst
+  ├─modules.rst
   ├─make.bat
   └─Makefile
test.rstとmodules.rstの中身はこんな感じ(クリックで開く)
src
===

.. toctree::
   :maxdepth: 4

   test
test module
===========

.. automodule:: test
   :members:
   :undoc-members:
   :show-inheritance:
- 最後にindex.rstを編集する。
.. sample_docs documentation master file, created by
   sphinx-quickstart on Sat May 27 15:23:04 2023.
   You can adapt this file completely to your liking, but it should at least
   contain the root `toctree` directive.

Welcome to sample_docs's documentation!
=======================================

.. toctree::
   :maxdepth: 2
   :caption: Contents:

   content1/page1
   content1/page2
   content1/page3
+  modules

Indices and tables
==================

* :ref:`genindex`
* :ref:`modindex`
* :ref:`search`
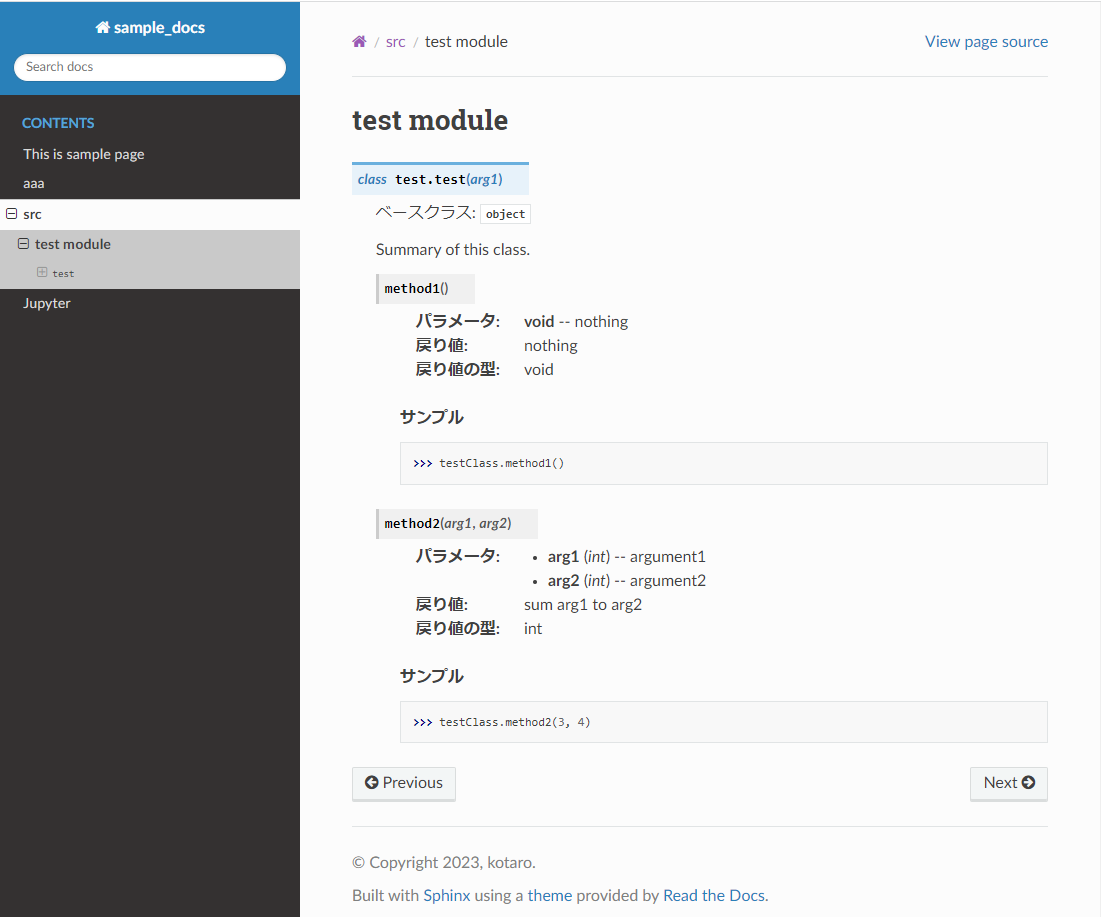
- 出来上がりはこんな感じ(すごくそれっぽい!)
9. jupyter notebook を取り込む
いよいよ最後です。
色々やってきましたが、結局のところ普段はjupyter派なんだよねって人。
なんとjupyter notebook も取り込めます。
面倒な前振りは置いておいて…まず、やってみましょう。
今回はVSCode上でnotebookを作るところからやります。
- 事前準備としてpandocを入れる
wget https://github.com/jgm/pandoc/releases/download/3.1.2/pandoc-3.1.2-1-amd64.deb
sudo dpkg -i pandoc-3.1.2-1-amd64.deb
※最新バージョンではないかもしれません。以下で最新のリリースを確認してください。
- jupyterと拡張機能を pip intall する。
pip install jupyter
pip install nbsphinx
- conf.py を編集する
extensions = [
    'sphinx_rtd_theme',
    'sphinx_fontawesome',
    'myst_parser',
    'sphinxcontrib.plantuml',
    'sphinx.ext.autodoc',
    'sphinx.ext.napoleon',
+   'nbsphinx',
]

# 真ん中ちょいしたのところに以下の項目があるので、最後のものを足す。
exclude_patterns = [
    '_build',
    'Thumbs.db',
    '.DS_Store',
+   '**.ipynb_checkpoints'
]
-
VSCodeの拡張機能を入れる。
- python拡張
- jupyter拡張
- python拡張
-
ファイルを作る(もう面倒なのでsample_docsの中に作ります)
touch sample_docs/jupyter.ipynb
-
VSCodeから編集する(適当に何か書く)
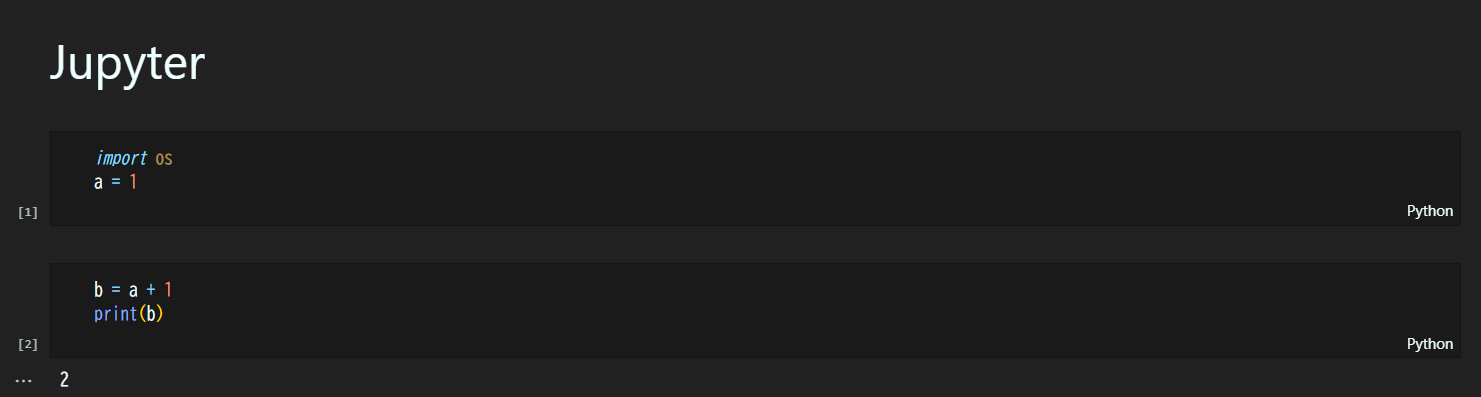
※一つ目のセルは「マークダウン」にして見出しを付けること! -
最後にindex.rstを編集する。
.. sample_docs documentation master file, created by
   sphinx-quickstart on Sat May 27 15:23:04 2023.
   You can adapt this file completely to your liking, but it should at least
   contain the root `toctree` directive.

Welcome to sample_docs's documentation!
=======================================

.. toctree::
   :maxdepth: 2
   :caption: Contents:

   content1/page1
   content1/page2
   content1/page3
   modules
+  jupyter

Indices and tables
==================

* :ref:`genindex`
* :ref:`modindex`
* :ref:`search`
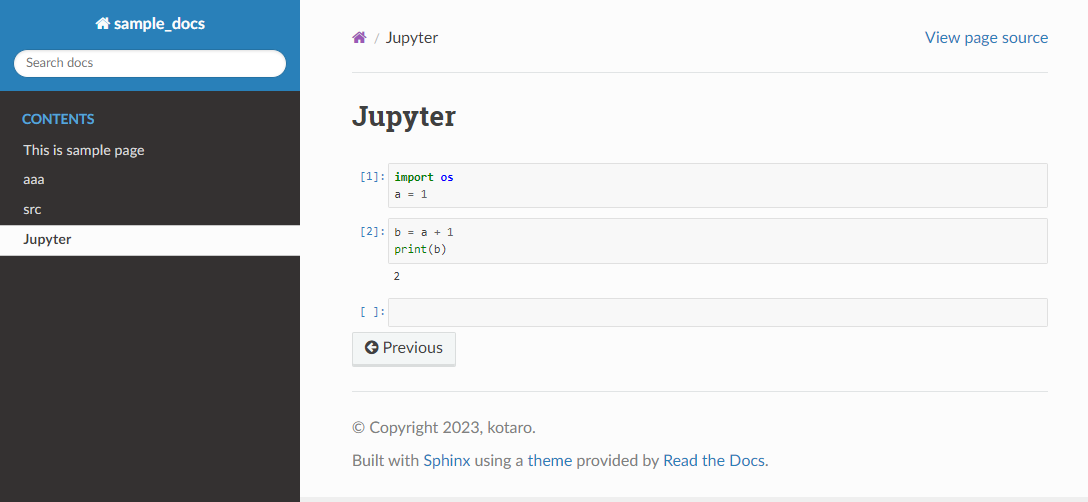
- 出来上がりはこんな感じ
まとめと感想
- sphinxを使って、あれよこれよと書いてみました。誰かのためになれば幸いです。
- ここまでやれば大体なんでもできると思います。(できないときは追記します)
- 実は他にも mermaid拡張にチャレンジしましたが、うまくできませんでした。
- 調べると本当に色々な情報が出てくる。精査して、並べなおしてが大変でした…。
- しかし長い。完全に自分が環境構築するとき回見たいメモ状態ですね…。
2回目の投稿ですが、やっぱり長くなってしまう。
もう少し簡略化したいですね。
ここまでお付き合いいただき、ありがとうございました。