3Dのブロック作成ツールを作成してみました。
プログラムの動き
See the Pen Cube-20200701 by Naru0607 (@naru0607) on CodePen.
コード
const boxes = [1, 1, 1, 1, 1, 1, 1, 1, 1, 1, 1, 1, 1, 1, 1, 1, 1, 1, 1, 1, 1, 1, 1, 1, 1, 1, 1];
const size = 0.5;
const scene = new THREE.Scene();
const renderer = new THREE.WebGLRenderer({
  antialias: true
});
const camera = new THREE.PerspectiveCamera(45, window.innerWidth / window.innerHeight, 1, 100);
const light = new THREE.DirectionalLight(0xFFFFFF);
const geometry = new THREE.BoxGeometry(size, size, size);
let material = new THREE.MeshLambertMaterial({
  color: 0xFF0000
});
const interval = 100;
const group = new THREE.Group();

camera.position.set(size / 2, 0, Math.cbrt(boxes.length) * 4);
light.position.set(0, 100, 100);
scene.add(light);

for (let i = 0; i < boxes.length; ++i) {
  ((i) => {
    if (boxes[i] === 0) {
      return;
    }

    const cube = new THREE.Mesh(geometry, material);
    const pos = getPosition(i);

    cube.position.set(
      pos.x * size,
      pos.y * size,
      pos.z * size
    );

    setTimeout(() => {
      group.add(cube);
    }, i * interval);
  })(i);
}

scene.add(group);
renderer.setSize(window.innerWidth, window.innerHeight);
document.body.appendChild(renderer.domElement);

render();

function getPosition(i) {
  const length = boxes.length;

  const x = i % Math.cbrt(length);
  const y = Math.floor(i / Math.pow(Math.cbrt(length), 2));
  const z = Math.floor(i / Math.cbrt(length)) % Math.cbrt(length);

  return {
  x: x,
  y: y,
  z: z
};
}

function render() {
   group.rotation.x += .01;
   group.rotation.y += .01;
   group.rotation.z += .01;
  renderer.render(scene, camera);
  requestAnimationFrame(render);
}
コードの解説
以下のように、Boxを置くか置かないかを"0","1"で保持しています。
const boxes = [1, 0, 1, 1, 0, 1, 1, 1, 1, 1, 1, 1, 1, 1, 1, 1, 1, 1, 1, 1, 1, 1, 1, 1, 1, 1, 1];
配列に格納されている値を順に処理して"0"の場合には何もせずにループを抜けて、
"1"の場合にはBOXを置いています。
for (let i = 0; i < boxes.length; ++i) {
  ((i) => {
    if (boxes[i] === 0) {
      return;
    }

    const cube = new THREE.Mesh(geometry, material);
    const pos = getPosition(i);

    cube.position.set(
      pos.x * size,
      pos.y * size,
      pos.z * size
    );
どの順番でBOXを配置していくか
x軸、Y軸、Z軸を以下のようなイメージで定義しました。
次に配列要素iの値に応じてどの順番でBOXを配置していくかを決定します。
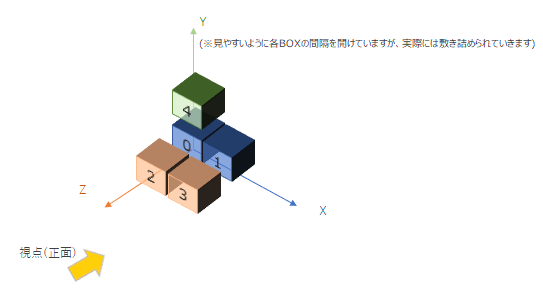
今回はBOX配置順を次のように決めています。(コードでは3×3×3ですが、2×2×2で例をあげています)
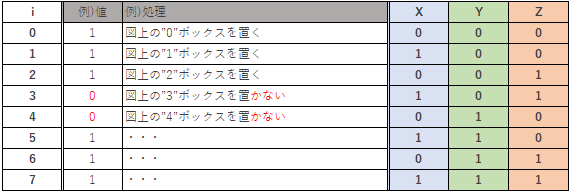
getPosition関数のなかで配列要素iの値に応じてどこにBOXを配置していくかを決めているのですが、この際に重要なのは配列数と配列要素iの値の2つの情報から上記テーブルのX,Y,Z座標のそれぞれの値を表現することです。こうすることで2×2×2や3×3×3以外にも、6×6×6というようにボックス数を増やしていった場合でも対応ができるようになります。この点が難しいのですが、Excelを使用して以下に具体例を記載しています。
マトリックスの数
マトリックスの数は、配列数の立方根(∛)で求めることができます。
例えば、
配列数が8個の場合には、2×2×2なので、2
配列数が27個の場合には、3×3×3なので、3
となります。
X軸、Y軸、Z軸
X軸、Y軸、Z軸を順に説明します。
X軸
Xは配列要素iの値をマトリックス数で割ったときの余りで求めることができます。

※ExcelのMOD関数(数値,除数)は、数値を除数で割ったときの余りを返します。
該当コード
const x = i % Math.cbrt(length);
Y軸
Yは配列要素iの値をマトリックス数を2倍した値で割ったときの整数部で求めることができます。

※ExcelのQUOTIENT関数(数値,除数)は、数値を除数で割ったときの整数部を返します。余り部分(小数部) は切り捨てられます。
該当コード
const y = Math.floor(i / Math.pow(Math.cbrt(length), 2));
Z軸
Zは配列要素iの値をマトリックス数で割って求めた小数点以下切捨ての値にさらに、マトリックス数で割ったときの余りで求めることができます。
※Excelの関数では、小数点以下切捨てを求める際にはROUNDDOWN関数を使用します

該当コード
const z = Math.floor(i / Math.cbrt(length)) % Math.cbrt(length);
最終的には次のようになります。
function getPosition(i) {
  const length = boxes.length;

  const x = i % Math.cbrt(length);
  const y = Math.floor(i / Math.pow(Math.cbrt(length), 2));
  const z = Math.floor(i / Math.cbrt(length)) % Math.cbrt(length);

  return {
  x: x,
  y: y,
  z: z
};
}
プログラムの動き(回転アニメーションをOFF)
[rerun]ボタンをクリックしてください。
See the Pen Cube-20200701-1 by Naru0607 (@naru0607) on CodePen.
BOXに色付けをする
先ほどの例では、配列名Boxesには"0","1"のいずれかを保持していましたが、
少し発展させて配列の要素に、"red","yellow","green","blue"のように色情報を持たせた場合の動きです。これで任意の色でブロックの配置ができるようになりました。
プログラムの動き
[rerun]ボタンをクリックしてください。
See the Pen Cube-20200705-2 by Naru0607 (@naru0607) on CodePen.