はじめに...
投稿が大変遅れてしまって本当にすみません!!!
こんなつもりではなかったのですが、書いていく中で色々と思い通りに動かずに、
書く内容をコロコロ変えていたらこんなことになってしまいました。:-(
今回書く内容は長い題名からわかる通り、
UnityにあるGridLayoutGroupと言うコンポーネントを使ってみようと言うススメです。
GridLayoutGroupと言うのは、Inspector上で設定された条件に沿って、Gridと呼ばれる マス?パネル?を順番に綺麗に自動生成してくれるコンポーネントです!
(多分この解釈であってる!はずだ...)
その機能を使って簡単な2Dのマップ、ステージを生成して、設定したplayerを動かしてみよう!!
と言うことを目的に書きました!
(注意):入門者向けに書いたつもりな為、**「こんなにクドイ説明いらんやろ?」とか、「いや、雑すぎん!?」**などもあると思いますが生暖かく!読んでもらえるとありがたいです!!
自分もまだまだ入門者の域を出ることが出来ていないと思いますので。;-)
完成コード
using System.Collections;
using System.Collections.Generic;
using UnityEngine;
using UnityEngine.UI;

public class MazeController : MonoBehaviour
{
	[SerializeField]
	GridLayoutGroup grid;
	[SerializeField]
	RectTransform player;
	[SerializeField]
	GameObject panel;
	Dictionary<int, GameObject> gridInfo;
	RectTransform rectTransform;
	int mapSize = 9;
	bool Movable = false;
	int playerPosition = 0; //初期位置

	void Start()
	{
		MakeGrid();
		StartCoroutine(SetPlayerPos());
	}

	void MakeGrid()
	{
		gridInfo = new Dictionary<int, GameObject>();
		for (int i = 0; i < mapSize; i++)
		{
			gridInfo.Add(i, Instantiate(panel, grid.transform));
		}
	}

	IEnumerator SetPlayerPos()
	{
		yield return new WaitForEndOfFrame();
		player.localPosition = GetLocalPosition(gridInfo[0]);    //初期位置
		Movable = true;
	}

	Vector3 GetLocalPosition(GameObject objectPanel)
	{
		return objectPanel.transform.localPosition;
	}

	public void Move(int button)
	{
		int currentPanel;
		if (Movable != true) return;

		switch (button)
		{
			case 0: //上
				currentPanel = playerPosition - grid.constraintCount;
				if (gridInfo.ContainsKey(currentPanel))
				{
					player.localPosition = GetLocalPosition(gridInfo[currentPanel]);
					playerPosition = currentPanel;
				}
				break;

			case 1: //右
				currentPanel = playerPosition + 1;
				if (gridInfo.ContainsKey(currentPanel) && playerPosition % grid.constraintCount != 2)
				{
					player.localPosition = GetLocalPosition(gridInfo[currentPanel]);
					playerPosition = currentPanel;
				}
				break;

			case 2: //左
				currentPanel = playerPosition - 1;
				if (gridInfo.ContainsKey(currentPanel) && playerPosition % grid.constraintCount != 0)
				{
					player.localPosition = GetLocalPosition(gridInfo[currentPanel]);
					playerPosition = currentPanel;
				}
				break;

			case 3: //下
				currentPanel = playerPosition + grid.constraintCount;
				if (gridInfo.ContainsKey(currentPanel))
				{
					player.localPosition = GetLocalPosition(gridInfo[currentPanel]);
					playerPosition = currentPanel;
				}
				break;
		}
	}
}
このコードでは privateは省略しています。
それでは、それぞれの関数がどのような機能を働いているのかある程度説明していきます。
GridLayoutGroupの設定
今回の設定です。
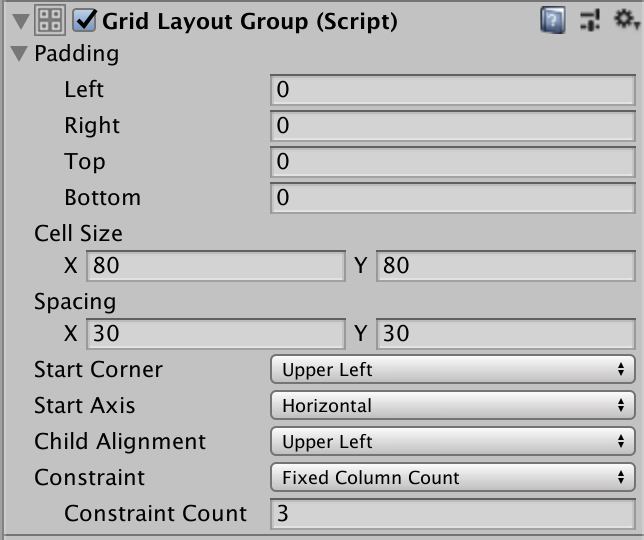
・Paddingはgridの端の余白
・CellSizeはgridの大きさ
・Spacingはそれぞれのgridの間隔
・StartCornerはgridの生成をどこから始めるか
・StartAxisはgridの生成をどの方角、角度、向きで始めるか
・ChildAlignmentは生成する際にスペースが余ったらどこから子要素を始めるか
・Constraintは縦と横かFlexibleで選択してその軸の生成上限grid数
詳しくは下のマニュアルをご参照ください。
GridLayoutGroup -Unity マニュアル
グローバル変数について
[SerializeField]
	GridLayoutGroup grid;
[SerializeField]
	RectTransform player;
[SerializeField]
	GameObject panel;
	Dictionary<int, GameObject> gridInfo;
	RectTransform rectTransform;
	int mapSize = 9;
	bool Movable = false;
	int playerPosition = 0;
グローバル変数、またはフィールド変数と呼び方は様々あります。
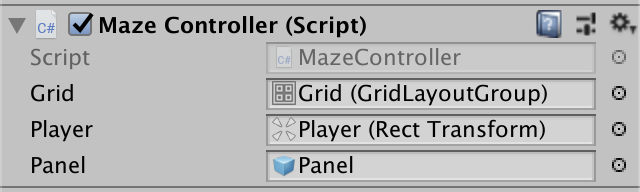
まずSerializeFieldとは、privateな変数をInspector上で設定できるようにする機能です。
下の画像のように、**[SerializeField]**した変数はその型にあったオブジェクトをアタッチすることが出来、変数にその値、データを保存することが出来ます。
・Dictionary型のgridInfoは、gridを生成する時に、そのgridに割り振る番号と、gridのGameObjectとしてgridのtransform(位置情報)を保存する変数です。
これは後に、Move()関数やplayerの位置を変更するのに使用します!
・RectTransform型のrectTransformは、GetLocalPositon()関数の為に用意した変数です。
・int型のmapSizeは、生成するgridの数を設定する為の変数です。
・bool型のMovableは、playerの移動をするタイミングの調整などを行う為の変数です。
・int型のplayerPositionは、Move()関数で生成されたgridにおけるplayerの初期位置を定めた変数です。
(playerの初期位置を設定するのはこのやり方でしないほうがいいです...今回は簡略化する為に用意しました。)
MakeGrid()関数について
この関数は名前の通り、Gridを生成する関数です。
最初に、gridInfo変数を初期化します。グローバル変数で宣言した時に初期化しなかった理由は、もう一度ゲームをロードした時に前回生成したGridをリセットする為です。
この関数をもう一度ロードすると、新しいGridの情報が保存されます。
void MakeGrid()
	{
		gridInfo = new Dictionary<int, GameObject>();	//Dictionary型の初期化
		for (int i = 0; i < mapSize; i++)	//gridの生成
		{
			gridInfo.Add(i, Instantiate(panel, grid.transform));
			//grid.transformでGridLayoutGroupに設定した通りにtransformが設定される。
		}
	}
SetPlayerPos()関数について
IEnumerator SetPlayerPos()
	{
		yield return new WaitForEndOfFrame();	//1フレーム待った後に下の命令に移行。
		player.localPosition = GetLocalPosition(gridInfo[0]);    //初期位置
		Movable = true;	//playerのポジションを移動した後は移動しても大丈夫なのでtrueを代入する。
	}
これは所謂**Coroutine(コルーチン)**と呼ばれるもので,IEnumeratorを返す関数です。
WaitForEndOfFrameとは、1フレーム待機した後に動作を開始すると言うものです。
player変数はRectTransformで宣言されている変数で、その位置をDictionary型のgridInfoのKeyが[0]の時のlocalPositionに更新すると言うものです。それを初期位置と設定しています。
GetLocalPosition()関数は下で解説します。
Movableはコメントに書いている通りです。
僕は下に記したサイトを参考に学びました。参考に掲載しておきます。
Unityのコルーチンの使い方まとめ
GetLocalPosition()関数について
Vector3 GetLocalPosition(GameObject objectPanel)
	{
		return objectPanel.transform.localPosition;
	}
この関数は簡単で、引数に指定したGameObject型の変数のlocalPosionを返す関数です。
使い方としては、上のSetPlayerPos()関数についてと、下のMove()関数についてで使用されているので確認ください!
Move()関数について
public void Move(int button)
	{
		//gridに割り振られている番号
		//0,1,2
		//3,4,5
		//6,7,8

		int currentPanel;
		if (Movable != true) return;
		//Movableがfalseの時はMove関数が動かずに終了する命令式。

		switch (button)
		{
			case 0: //上
				currentPanel = playerPosition - grid.constraintCount;	//grid.constraintCount == 3
				if (gridInfo.ContainsKey(currentPanel))
				{
					player.localPosition = GetLocalPosition(gridInfo[currentPanel]);
					playerPosition = currentPanel;
				}
				break;
			///<解説>:ContainsKeyとは引数に渡したcurrentPanelの値に相応したValueが存在するかどうかを判定するものです。
			///			存在する時はtrueを返します。
			///			つまり、currentPanel < 0 はありえない為、その時は動かないようにする条件です。

			case 1: //右
				currentPanel = playerPosition + 1;
				if (gridInfo.ContainsKey(currentPanel) && playerPosition % grid.constraintCount != 2)
				{
					player.localPosition = GetLocalPosition(gridInfo[currentPanel]);
					playerPosition = currentPanel;
				}
				break;
			///<理由>:右に進む中で右端は2,5,8となっている。これをconstraintCount(== 3)で割ると、余りが必ず2となる
			///			右端ではそれ以上右に行ってはいけない為 != で右端にいる際は動けないようにしてある

			case 2: //左
				currentPanel = playerPosition - 1;
				if (gridInfo.ContainsKey(currentPanel) && playerPosition % grid.constraintCount != 0)
				{
					player.localPosition = GetLocalPosition(gridInfo[currentPanel]);
					playerPosition = currentPanel;
				}
				break;
			///<理由>:左に進む中で左端は0,3,6となっている。これをconstraintCount(== 3)で割ると、必ず割り切れる
			///			左端ではそれ以上左に行ってはいけない為 != で左端にいる際は動けないようにしてある

			case 3: //下
				currentPanel = playerPosition + grid.constraintCount;
				if (gridInfo.ContainsKey(currentPanel))
				{
					player.localPosition = GetLocalPosition(gridInfo[currentPanel]);
					playerPosition = currentPanel;
				}
				break;
		}
	}
実際のグリッドは次のように展開されています。
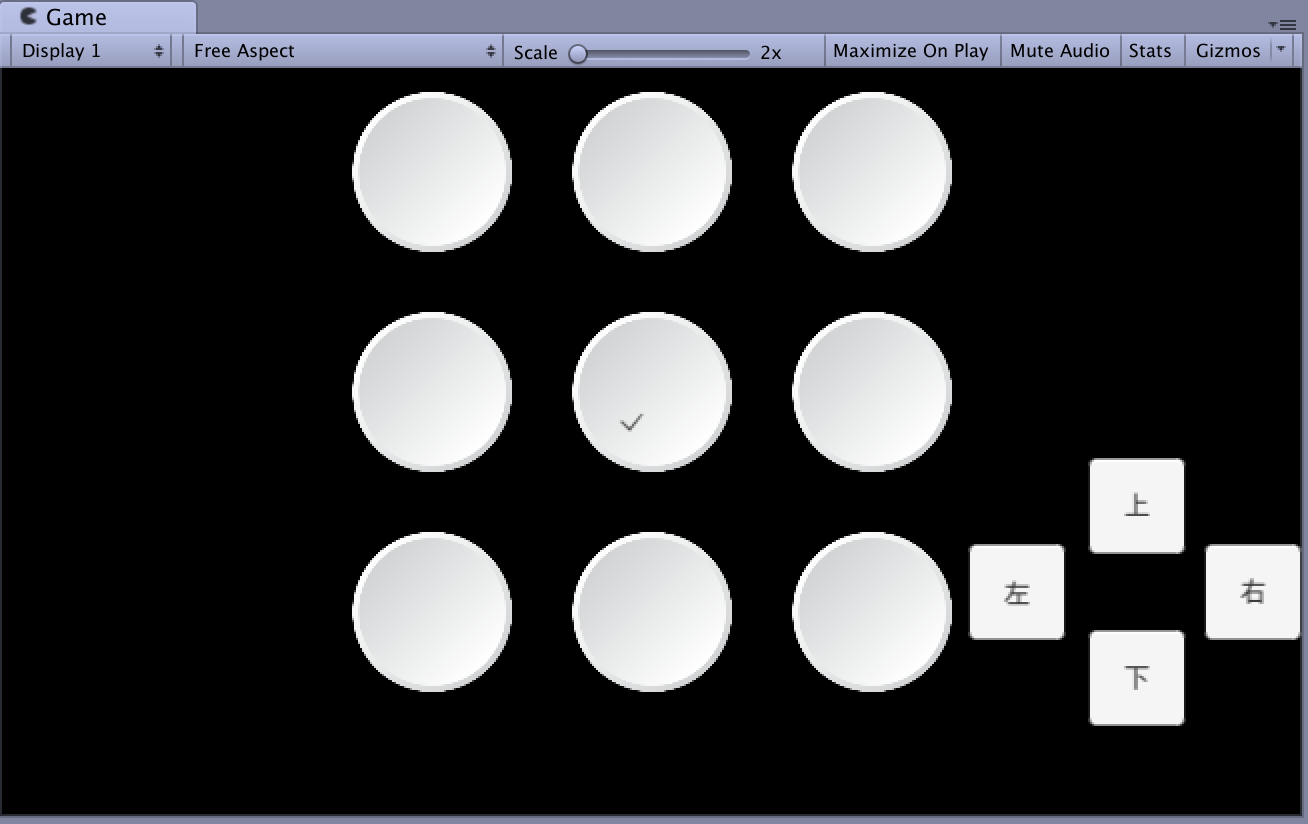
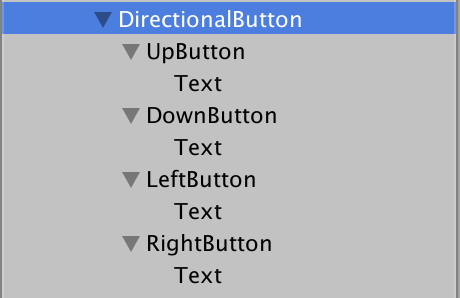
右端に見えるボタンはCreate→UI→Button から生成したものである。以下がその情報である。
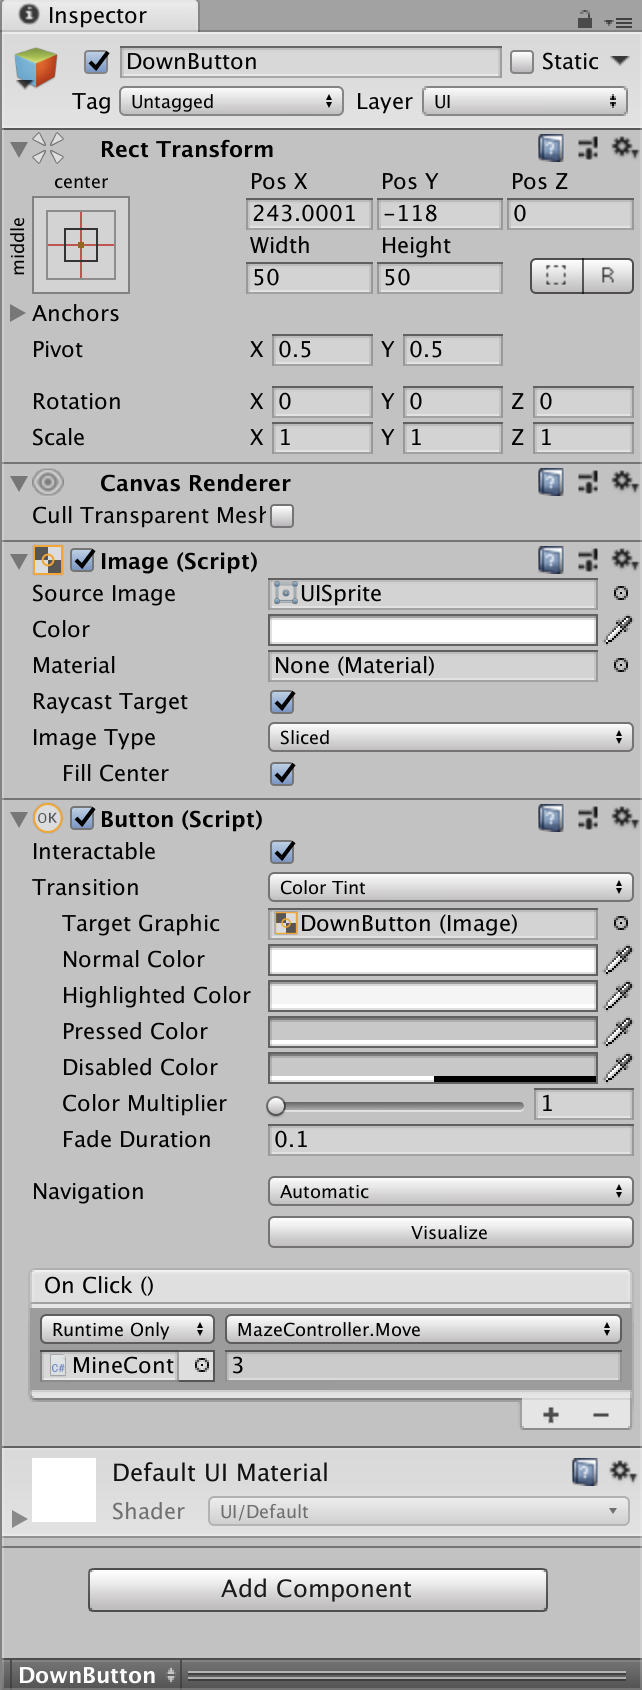
条件式の内容や、理由、解説はコメントとして書いていますのでご確認ください。
ButtonのUIにOn Clickという機能がある、ここにMove()関数を記したScriptをアタッチし、Move()関数を選択してcaseに設定した数字を設定する。
それによって、それぞれのUIに役目を与えることが出来ます!
Start()関数について
void Start()
	{
		MakeGrid();
		StartCoroutine(SetPlayerPos());
		//IEnumeratorを返す関数を引数に置くことでCoroutineが動く。
	}
Start関数はUnityを触り始めた初心者にも馴染みのある関数だと思う。
これはゲームを起動すると早めに処理される関数である。
下にイベントの処理順の詳細なリンクを参照しておきます!
イベントの実行順序-Unity
最後に
今回、色々と時間がなかったこともあり、誤ってる部分もあると思います。
そのような点は発見次第、順次修正していきます!!
文章や言い回し、口調が変わったり、おかしなところもあるでしょうが、お許しください。
ここまで読んで頂きありがとうございます。