はじめに
今回はUnrealC++で作成するインターフェース( UInterface )の意外と便利な使い方について紹介します。
UE4のバージョンは4.24です。最新バージョンで記事を書いていたら4.25がリリースされてしまいました...。
Blueprintで作成するインターフェースと同様の使い方は以下の記事で分かりやすく解説されていますが、今回はUnrealC++ならではの使い方をご紹介します。
【Unreal C++】⑥Interface【UE4】 - zer0から始めるプログラミング生活
つくるもの
今回作成するのはインターフェースの関数の実装部分をインターフェース側で作成する方法です。
通常なら以下のようにI~Interfaceに作る関数のUFUNCTIONにはBlueprintNativeEventを付け、
# include "UObject/Interface.h"
# include "TestInterface.generated.h"

UINTERFACE(Blueprintable)
class TEST_API UTestInterface : public UInterface
{
	GENERATED_UINTERFACE_BODY()
};


class TEST_API ITestInterface
{
	GENERATED_IINTERFACE_BODY()

public:
	UFUNCTION(BlueprintNativeEvent)
	void TestFunc();
}
実装先のクラスで、以下のように<関数名>_Implementationを定義し関数の内容を決めます。
# include "CoreMinimal.h"
# include "GameFramework/Actor.h"
# include "TestInterface.h”
# include "TestActor.generated.h"

UCLASS()
class Test_API ATestActor : public AActor, public ITestInterface
{
	GENERATED_BODY()
public:
	virtual void TestFunc_Implementation() override;
};
今回ご紹介する方法では、<関数名>_Implementationで定義する動作をインターフェース側で決め、インターフェースを継承するればオーバーライドせずとも動作するようになります。もちろん、継承したクラスで内容をオーバーライドすることも可能です。
つくってみる
今回は例として独自のコンポーネントとセットで使用する感じの使い方で作ります。
まずは、以下のクラスとインターフェースを作成します。
| クラス名 | 詳細 |
|---|---|
| SampleComponent | ActorComponentクラスを継承して作成してください。 |
| Interface_SampleComponent | UObjectクラスを継承して作成し、生成されたクラスは消してインターフェースのクラスを記述すると便利です。 |
| SampleActor | Actorクラスを継承してください。 |
SampleComponent
まずはSampleComponentから見ていきましょう。内容的には整数の変数を持ち、それを取得/設定できるコンポーネントです。
# pragma once

# include "CoreMinimal.h"
# include "Components/ActorComponent.h"
# include "SampleComponent.generated.h"

UCLASS( ClassGroup=(Custom), meta=(BlueprintSpawnableComponent) )
class INTERFACESAMPLE_API USampleComponent : public UActorComponent
{
	GENERATED_BODY()

public:
	// Sets default values for this component's properties
	USampleComponent();

protected:
	// Called when the game starts
	virtual void BeginPlay() override;

public:
	// Called every frame
	virtual void TickComponent(float DeltaTime, ELevelTick TickType, FActorComponentTickFunction* ThisTickFunction) override;

//**
//* 追記した部分
//**
public:
	UPROPERTY(EditAnywhere, BlueprintReadWrite, Category = "SampleComponent")
	int SampleNumber = 0;

public:
	virtual int GetSampleNumber() const { return SampleNumber; }
	virtual void SetSampleNumber(int InNumber) { SampleNumber = InNumber; }
};
これでコンポーネントの実装は完了です。
Interface_SampleComponent
この記事のメインであるインターフェースクラス、Interface_SampleComponentを見ていきましょう。
# pragma once

# include "UObject/Interface.h"
# include "Interface_SampleComponent.generated.h"

class USampleComponent;

UINTERFACE(meta = (CannotImplementInterfaceInBlueprint))
class UInterface_SampleComponent : public UInterface
{
	GENERATED_UINTERFACE_BODY()
};

class IInterface_SampleComponent
{
	GENERATED_IINTERFACE_BODY()

public:
	virtual USampleComponent* GetSampleComponent() const = 0;

	UFUNCTION(BlueprintCallable, Category = "Interface_SampleComponent")
	virtual int GetSampleNumber() const;

	UFUNCTION(BlueprintCallable, Category = "Interface_SampleComponent")
	virtual void SetSampleNumber(int InNumber);
};
ヘッダーファイルでは先程ご紹介したBlueprintと同様の動作のインターフェースとの違いは2つほどあります。
まず、UINTERFACEがBlueprintableではなくメタ指定子のCannotImplementInterfaceInBlueprint
であること、
次に、インターフェースの関数のUFUNCTIONがBlueprintNativeEventではなくBlueprintCallableになっていることです。
# include "Interface_SampleComponent.h"
# include "SampleComponent.h"

UInterface_SampleComponent::UInterface_SampleComponent(const FObjectInitializer& ObjectInitializer)
	:Super(ObjectInitializer)
{
}

int IInterface_SampleComponent::GetSampleNumber() const
{
	USampleComponent* Component = GetSampleComponent();
	if (Component)
	{
		return Component->GetSampleNumber();
	}

	return 0;
}

void IInterface_SampleComponent::SetSampleNumber(int InNumber)
{
	USampleComponent* Component = GetSampleComponent();
	if (Component)
	{
		Component->SetSampleNumber(InNumber);
	}
}
このようにすることで上記のようにインターフェースクラス側で関数の中身を定義することができます。
また、CannotImplementInterfaceInBlueprintと書いてある通りこのメタ指定子を持ったインターフェースの関数はBlueprint側で実装することができません。
ASampleActor
最後に作成したインターフェースとコンポーネントを実装するアクタクラスを作成します。インターフェースの性質上、インターフェースとコンポーネントの実装はC++側でやる必要があります。
# pragma once

# include "CoreMinimal.h"
# include "GameFramework/Actor.h"
# include "Interface_SampleComponent.h"
# include "SampleActor.generated.h"

class USapmleComponent;

UCLASS()
class INTERFACESAMPLE_API ASampleActor
	: public AActor
	, public IInterface_SampleComponent
{
	GENERATED_BODY()

protected:
	UPROPERTY(VisibleAnywhere, BlueprintReadOnly, Category = "SampleActor ", meta = (AllowPrivateAccess = "true"))
	USampleComponent* SampleComponent;

public:
	// Sets default values for this actor's properties
	ASampleActor();

	// IInterface_SampleComponent
	USampleComponent* GetSampleComponent() const override { return SampleComponent; }
	// End of IInterface_SampleComponent

protected:
	// Called when the game starts or when spawned
	virtual void BeginPlay() override;

public:
	// Called every frame
	virtual void Tick(float DeltaTime) override;
};
コンポーネントを実装し、インターフェースを継承して、GetSampleComponentでメンバ変数のコンポーネントを返すようにします。
# include "SampleActor.h"
# include "SampleComponent.h"

// Sets default values
ASampleActor::ASampleActor()
{
 	// Set this actor to call Tick() every frame.  You can turn this off to improve performance if you don't need it.
	PrimaryActorTick.bCanEverTick = true;

	SampleComponent = CreateDefaultSubobject<USampleComponent>(TEXT("SampleComponent"));
}
コンストラクタ内でコンポーネントを初期化すれば準備完了です。
動作確認
エディタを起動したらASampleActorを継承したBPクラスを作成してレベルに配置します。
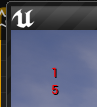
次に作成したBPクラスのSampleComponentのSampleNumberを5にします。
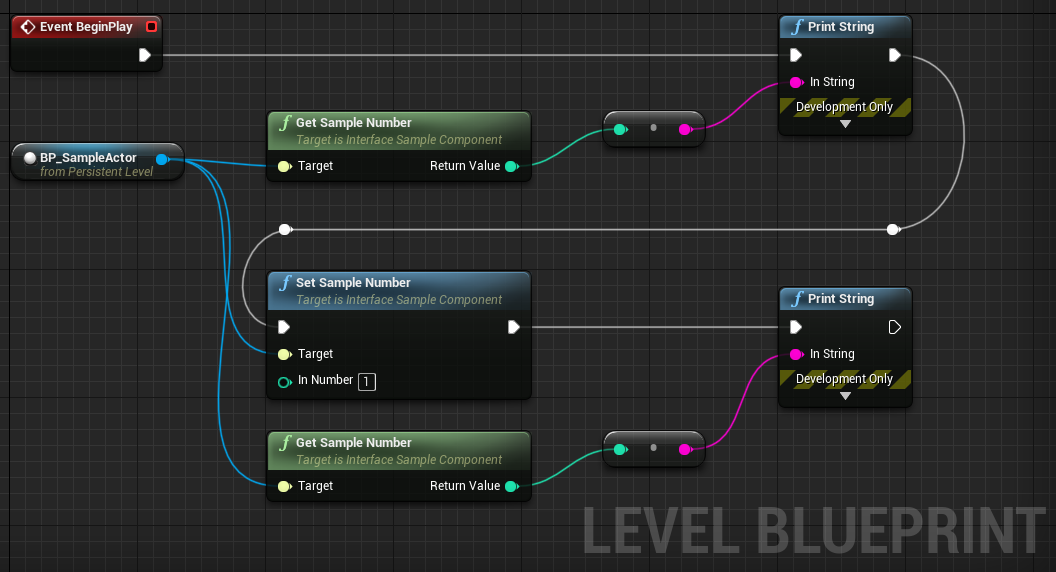
続いてレベルのBlueprintで以下のように処理を組み実行します。
実行結果は以下のようになり、正常に動作していることが分かります。
おわりに
今回ご紹介した方法を使うとコンポーネントの関数を呼ぶといったように継承先で処理があまり変わらない処理を実装するのに向いているのではないかと思います。(逆にコンポーネントとセットで使う以外で使い道が思い浮かばない...)
基底クラスをC++で作っていて、標準のコンポーネントを独自に拡張するような場合に便利かと思いますので何かの参考になれば幸いです。
この記事で紹介したプロジェクトは以下でダウンロードできます。
https://github.com/Naotsun19B/InterfaceSample