Reduxを使ってみる
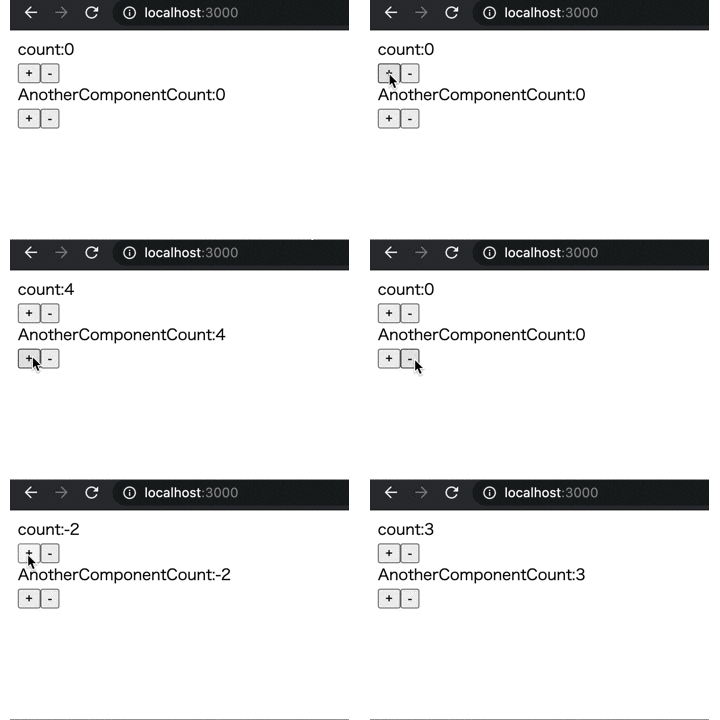
Reduxを使って以下のようなカウントアップする簡単なアプリケーションを作成していきます。
カウントを行うコンポーネントが2つ存在し、propsで受け渡すことなく状態を共有しています。

事前準備
サンプルアプリの作成とReduxのインストールから行います。
// アプリケーション作成
npx create-react-app redux-practice

// Reduxインストール
yarn add redux react-redux
Redux Hooks
まずはHooksを使用した書き方で作成します。
アプリケーションの名前は「redux-practice」とします。
以下のようなファイル構成でファイルを作成します。
redux-practice
├── public
└── src
    ├── actions
    │   └── index.js
    ├── components
    │   ├── Another.js
    │   └── App.js
    └── reducers
    │   └── index.js
    └── index.js
次に以下のようにactions/index.jsを編集していきます。
今回はカウンターアプリなので「increment」と「decrement」というアクションを作成しています。
export const INCREMENT = 'INCREMENT'
export const DECREMENT = 'DECREMENT'

export const increment = () => {
  return {type: INCREMENT}
}

export const decrement = () => {
  return {type: DECREMENT}
}
続いて、reducers/index.jsを以下のように編集します。
こちらは、先ほど定義したActionと最新のstateを自動的に受け取って新しいstateを返しています。
import { INCREMENT, DECREMENT } from '../actions'
const initialState = { value: 0 }

const count = (state = initialState, action) => {
  switch (action.type) {
    case INCREMENT:
      return { value: state.value + 1 }
    case DECREMENT:
      return { value: state.value - 1 }
    default:
      return state
  }
}

export default
次にcomponents/App.jsで表示部分を以下のように作成していきます。
以下では「+」ボタンが押された時に「increment」、「-」ボタンが押された時に「decrement」というイベントを発行するようにしています。
import React from 'react'
import { useDispatch, useSelector } from 'react-redux'
import { increment, decrement } from '../actions'

const App = () => {
  const value = useSelector((state) => state.value)
  const dispatch = useDispatch();
  return (
    <>
      <div>count:{value}</div>
      <button onClick={() => dispatch(increment())}>+</button>
      <button onClick={() => dispatch(decrement())}>-</button>
    </>
  );
}

export default App
最後に他のコンポーネントからstateを参照してみましょう。
components/Another.jsでuseSelectorを使うことで、stateの値を参照することができます。
import React from 'react'
import { useSelector } from 'react-redux'

const Another = () => {
  const value = useSelector((state) => state.value)

  return (
      <div>AnotherComponentCount:{value}</div>
  );
}

export default Another
ReduxがHooksに対応する前の書き方
先ほどはHooksを使用した書き方を紹介しましたが、
古いコードではHooksを使用しない書き方を使っていることもあるので、
先ほどのコードを古いコードで書き換えてみます。
import React from 'react'
import { connect } from 'react-redux'
import { increment, decrement } from '../actions'

const App = (props) => {
  return (
    <>
      <div>count:{props.value}</div>
      <button onClick={props.increment}>+</button>
      <button onClick={props.decrement}>-</button>
    </>
  );
}

// stateから必要な情報をコンポーネントにマッピングする関数
const mapStateToProps = state => ({ value: state.count.value })

// dispatch関数をコンポーネントにマッピングする関数
const mapDispatchToProps = dispatch => ({
  increment: () => dispatch(increment()),
  decrement: () => dispatch(decrement())
})

// 指定したコンポーネントのpropsにstateを混ぜ込む
export default connect(mapStateToProps, mapDispatchToProps)(App)
import React from 'react'
import { connect } from 'react-redux'

const Another = (props) => {
  return (
      <div>AnotherComponentCount:{props.value}</div>
  );
}

// stateから必要な情報をコンポーネントにマッピングする関数
const mapStateToProps = state => ({ value: state.count.value })

// 指定したコンポーネントのpropsにstateを混ぜ込む
export default connect(mapStateToProps)(Another)
connectという関数を使う必要があるため、少し冗長になってしまいます。。。
Redux Toolkitを使う
ここまでReduxのコードを見てきて感じたかもしれませんが、Reduxを使うとコード量が増えます。
その課題を解決するのがRedux Toolkitです。
実際にRedux Toolkitでコードを書いていきましょう。
ファイル構成は以下
redux-practice
├── public
└── src
    ├── components
    │   ├── Another.js
    │   └── App.js
    └── counter
    │   └── counter.js
    └── index.js
まず、counter/counter.jsを以下のように編集します。
import { createSlice } from '@reduxjs/toolkit'

const initialState = { value: 0 }

export const counterSlice = createSlice({
  name: 'counter',
  initialState,
  reducers: {
    increment: (state) => ({...state, value: state.value + 1}),
    decrement: (state) => ({...state, value: state.value - 1})
  }
})
Redux Toolkitで提供されているcreateSlice関数を使用すると、ActionとReducerをまとめて記述することができます。
components/App.jsとcomponents/Another.jsは以下のように編集します。
(ここら辺は以前とほぼ同じです)
import React from 'react'
import { useDispatch, useSelector } from 'react-redux'
import { counterSlice } from '../counter/counter';

const App = () => {
  const value = useSelector((state) => state.value)
  const dispatch = useDispatch();
  const { increment, decrement } = counterSlice.actions;
  return (
    <>
      <div>count:{value}</div>
      <button onClick={() => dispatch(increment())}>+</button>
      <button onClick={() => dispatch(decrement())}>-</button>
    </>
  );
}

export default App
import React from 'react'
import { useSelector } from 'react-redux'

const Another = () => {
  const value = useSelector((state) => state.value)

  return (
      <div>AnotherComponentCount:{value}</div>
  );
}

export default Another
最後にindex.jsを編集して終わりです。
import React from 'react'
import ReactDOM from 'react-dom'
import { Provider } from 'react-redux'
import { configureStore } from '@reduxjs/toolkit'
import App from './components/App'
import Another from './components/Another'
import {counterSlice} from './counter/counter'

const store = configureStore({reducer: counterSlice.reducer})

ReactDOM.render(
  <Provider store={store}>
    <App/>
    <Another/>
  </Provider>,
  document.getElementById('root')
);
useReducerとuseContextを使って、Reduxのようなグローバルステートを実現する
useReducerとuseContext
これまでReduxを使用してグローバルステートを実現していましたが、
HooksのuseReducerとuseContextを使ってReduxのようにグローバルステートを実現することができます。
ではuseReducerとuseContextでコードを書いていきましょう。
ファイル構成は以下
redux-practice
├── public
└── src
    ├── actions
    │   ├── index.js
    ├── components
    │   ├── Another.js
    │   └── App.js
    └── counter
    │   └── counter.js
    └── index.js
まず、actions/index.jsは以下のように編集します。
(最初のコードと同じです)
export const INCREMENT = 'INCREMENT'
export const DECREMENT = 'DECREMENT'

export const increment = () => {
  return {type: INCREMENT}
}

export const decrement = () => {
  return {type: DECREMENT}
}
続いて、counter/counter.jsを以下のように編集します。
(こちらも最初のコードとほぼ同じです)
export const counterReducer = (state, action) => {
  switch (action.type) {
    case "INCREMENT":
      return {value: state.value + 1}
    case "DECREMENT":
      return {value: state.value - 1}
    default:
      return state
  }
}
次にcomponents/App.jsを以下のように編集します。
import React, { createContext, useReducer } from "react";
import { counterReducer } from '../counter/counter'
import Another from './Another'
import { increment, decrement } from "../actions";

export const CounterContext = createContext();

const App = () => {
  const initialState = { value: 0 }
  const [state, dispatch] = useReducer(counterReducer, initialState);
  return (
    <>
      <CounterContext.Provider value={{state, dispatch}}>
        <div>count:{state.value}</div>
        <button onClick={() => dispatch(increment())}>+</button>
        <button onClick={() => dispatch(decrement())}>-</button>
        <Another/>
      </CounterContext.Provider>
    </>
  );
}

export default App
ここでのポイントは以下の3つです。
-
useReducerの引数にReducerとstateの初期値を渡し、その返り値として最新のstateとdispatchを受け取っている
-
CounterContextという定数を定義し、CounterContext.Providerのvalue属性にグローバルで扱いたいstateを設定
-
CounterContext.Providerコンポーネントに囲まれているコンポーネントは、設定したstateを使用できる
上記のようにReact Hooksを使えばReduxのように状態管理を行えるようになります。