はじめに
先日、GKE(Google Continer Engine)へRailsアプリをデプロイする際に「passenger」を利用したことでnginxとrailsの連携が容易だったのでPassengerについて理解を深めたいと思いました。
参考:GKEに Rails + nginx(+Phusion Passenger ) + CloudSQL を利用したアプリをデプロイする - Qiita
本投稿ではCentOS7にnginxとpassengerを導入してRailsアプリを動かすまでの手順を備忘録として残したいと思います。
Phusion Passengerについて
Phusion PassengerはApache HTTP Server及びnginx用のフリー・モジュールである。(Wikipedia)
自分の理解では、
一般的にnginxとrails(puma, unicorn)を連携させる場合
- nginxを起動して、リクエストをport:80で受け付ける
- rails(puma, unicorn)を起動して、リクエストをport:3000で受け付ける
- リクエストをnginx(port:80)からrails(port:3000)にリパースプロキシさせる
としますが、
Passengerを利用するとrailsがnginx上で動作するようになり、リバースプロキシが不要になります。
Railsガイド
Railsガイドにおいても3.15.1 Passengerを使用するという章でPassengerを使用すると、アプリケーションをサブディレクトリで実行するのが容易になります。と紹介されてました。
導入手順
Passengerの公式サイトでは導入手順が詳細に解説されてます。
今回は
- Select infrastructure: Generic Linux/Unix deployment tutorial
- Pick integration mode : nginx
- Open source vs Enterprise : Passenger open Source
- Operationg system : Red Hat 7 / CentOS 7
を選択した手順で構築を行いました。
参考:Deploying a Ruby app with Passenger to production - Passenger Library
1. Ruby,Railsの導入
Passengerのチュートリアルでも解説されてますが、
過去の自分の投稿を参考にRuby,Railsを導入しました。
CentOSにrbenv, Rubyをインストールする - Qiita
CentOSにRailsをインストールする - Qiita
2. Nginx, Passengerの導入
EPELインストール
$ sudo yum install -y epel-release yum-utils
$ sudo yum-config-manager --enable epel
$ sudo yum clean all && sudo yum update -y
Nginx,Passengerインストール
チュートリアルに従ってNginxとPassengerをインストールします。
# 事前準備のためにpygpgme,curlをインストール
$ sudo yum install -y pygpgme curl

$ date
# => Sat Sep 16 04:56:58 UTC 2017

# 時刻が出力されない場合は、ntpをインストール
$ sudo yum install -y ntp
$ sudo chkconfig ntpd on
$ sudo ntpdate pool.ntp.org
 $sudo service ntpd start

# リポジトリを追加する
$ sudo curl --fail -sSLo /etc/yum.repos.d/passenger.repo https://oss-binaries.phusionpassenger.com/yum/definitions/el-passenger.repo

# nginx,passengerをインストール
$ sudo yum install -y nginx passenger || sudo yum-config-manager --enable cr && sudo yum install -y nginx passenger
Passenger Nginx moduleを有効化する
passenger.confの初期値を確認
$ cat /etc/nginx/conf.d/passenger.conf
# passenger_root /usr/share/ruby/vendor_ruby/phusion_passenger/locations.ini;
# passenger_ruby /usr/bin/ruby;
# passenger_instance_registry_dir /var/run/passenger-instreg;
passenger.confに指定するパスを確認
# passenger_root
$ passenger-config --root
/usr/share/ruby/vendor_ruby/phusion_passenger/locations.ini

$ passenger-config about ruby-command
...
To use in Nginx : passenger_ruby /home/xxxxx/.rbenv/versions/2.4.2/bin/ruby
...
passenger.confを修正する
$ sudo vi /etc/nginx/conf.d/passenger.conf
# ↓コメントアウトを外す
passenger_root /usr/share/ruby/vendor_ruby/phusion_passenger/locations.ini;

# ↓コメントアウトを外す&rbenvでRubyを導入した場合はパスを書き換える
passenger_ruby /home/xxxxx/.rbenv/versions/2.4.2/bin/ruby;

# ↓コメントアウトを外す
passenger_instance_registry_dir /var/run/passenger-instreg;
設定ファイルを検証する
# sudo nginx -t
nginx: the configuration file /etc/nginx/nginx.conf syntax is ok
nginx: configuration file /etc/nginx/nginx.conf test is successful
nginxを起動する
$ sudo service nginx start
Redirecting to /bin/systemctl reload nginx.service
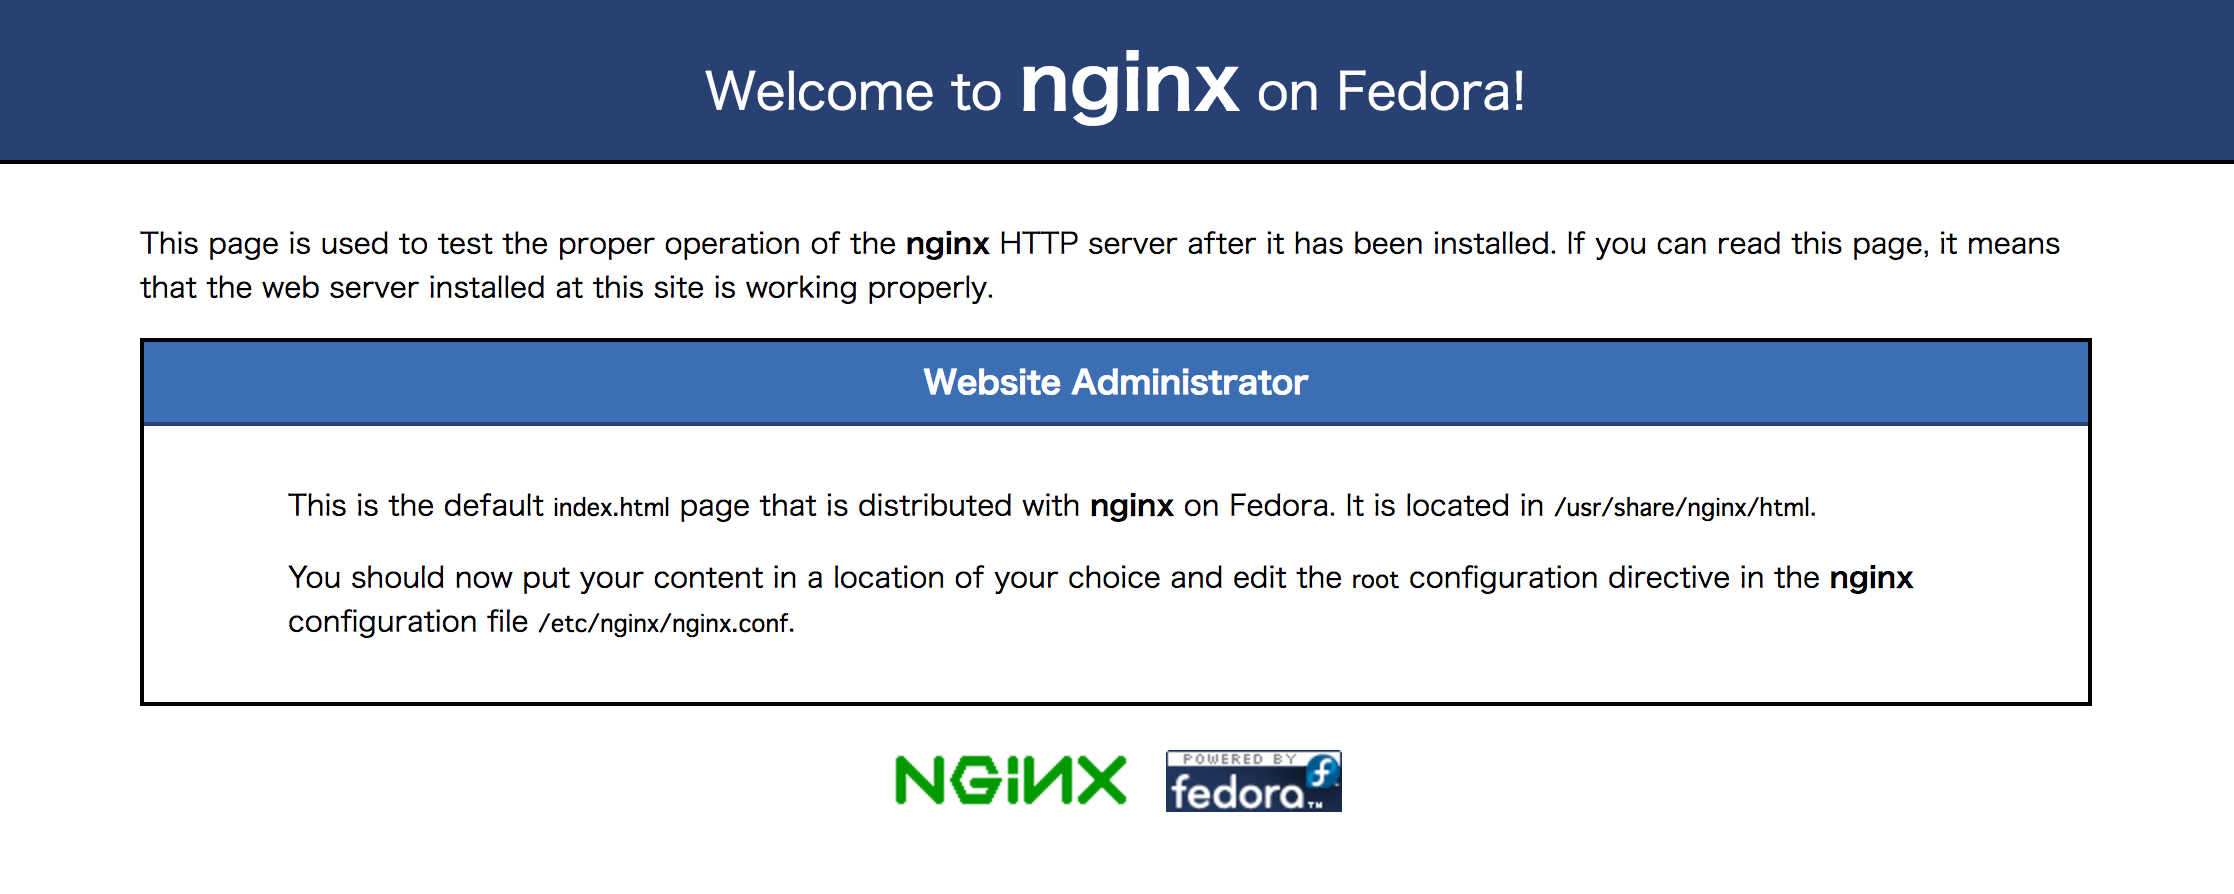
アクセス確認
ブラウザでサーバのIPアドレスにアクセスして、nginxのwelcome画面が表示されることを確認
http://xxx.xxx.xxx.xxx
3. Railsアプリの配置
Passengerのチュートリアルに従い/var/www/myapp/codeにアプリを配置する
# ディレクトリの作成
$ sudo mkdir -p /var/www/myapp

# ディレクトリ所有者の変更
$ sudo chown [USERNAME]: /var/www/myapp

# カレントディレクトリの変更
$ cd /var/www/myapp

# アプリの配置
# GitからCloneする場合
$ sudo -u [USERNAME] -H git clone git://github.com/username/myapp.git code

# 新たにアプリを作成する場合
$ rails new code
4. Railsアプリのデプロイ
nginx.confの修正
ブラウザでサーバのIPアドレスにアクセスした際にRailsアプリが表示されるように設定します。
# nginx.confに変更を加える前にバックアップしておく
$ sudo cp /etc/nginx/nginx.conf /etc/nginx/nginx.conf.bk

# nginx.confを修正(server{...}を削除)
$ sudo vi /etc/nginx/nginx.conf
# For more information on configuration, see:
#   * Official English Documentation: http://nginx.org/en/docs/
#   * Official Russian Documentation: http://nginx.org/ru/docs/

user  nginx;
worker_processes  1;

error_log  /var/log/nginx/error.log;
# error_log  /var/log/nginx/error.log  notice;
# error_log  /var/log/nginx/error.log  info;

pid        /run/nginx.pid;


events {
    worker_connections  1024;
}


http {
    include       /etc/nginx/mime.types;
    default_type  application/octet-stream;

    log_format  main  '$remote_addr - $remote_user [$time_local] "$request" '
                      '$status $body_bytes_sent "$http_referer" '
                      '"$http_user_agent" "$http_x_forwarded_for"';

    access_log  /var/log/nginx/access.log  main;

    sendfile        on;
    #tcp_nopush     on;

    #keepalive_timeout  0;
    keepalive_timeout  65;

    #gzip  on;

    index   index.html index.htm;

    # Load modular configuration files from the /etc/nginx/conf.d directory.
    # See http://nginx.org/en/docs/ngx_core_module.html#include
    # for more information.
    include /etc/nginx/conf.d/*.conf;

}
サーバ設定を追加
$ sudo vi /etc/nginx/conf.d/myapp.conf
チュートリアルでは下記のようになってますが、
server {
    listen 80;
    server_name yourserver.com;

    # Tell Nginx and Passenger where your app's 'public' directory is
    root /var/www/myapp/code/public;

    # Turn on Passenger
    passenger_enabled on;
    passenger_ruby /path-to-ruby;
}
こちらのリポジトリを参考に少し修正を加えました。
server {
    listen 80;
    server_name localhost;

    root /var/www/myapp/code/public;

    passenger_enabled on;
    passenger_app_env development;

    client_max_body_size 100m;

    location ^~ /assets/ {
        access_log off;
        gzip_static on;
        expires 0;
        add_header Cache-Control public;
        add_header ETag "";
        add_header Access-Control-Allow-Origin *;
        add_header Access-Control-Request-Method *;
    }
}
# 設定ファイルを検証
$ sudo nginx -t
nginx: the configuration file /etc/nginx/nginx.conf syntax is ok
nginx: configuration file /etc/nginx/nginx.conf test is successful

# 設定ファイルを再読込
$ sudo service nginx reload
Redirecting to /bin/systemctl reload nginx.service
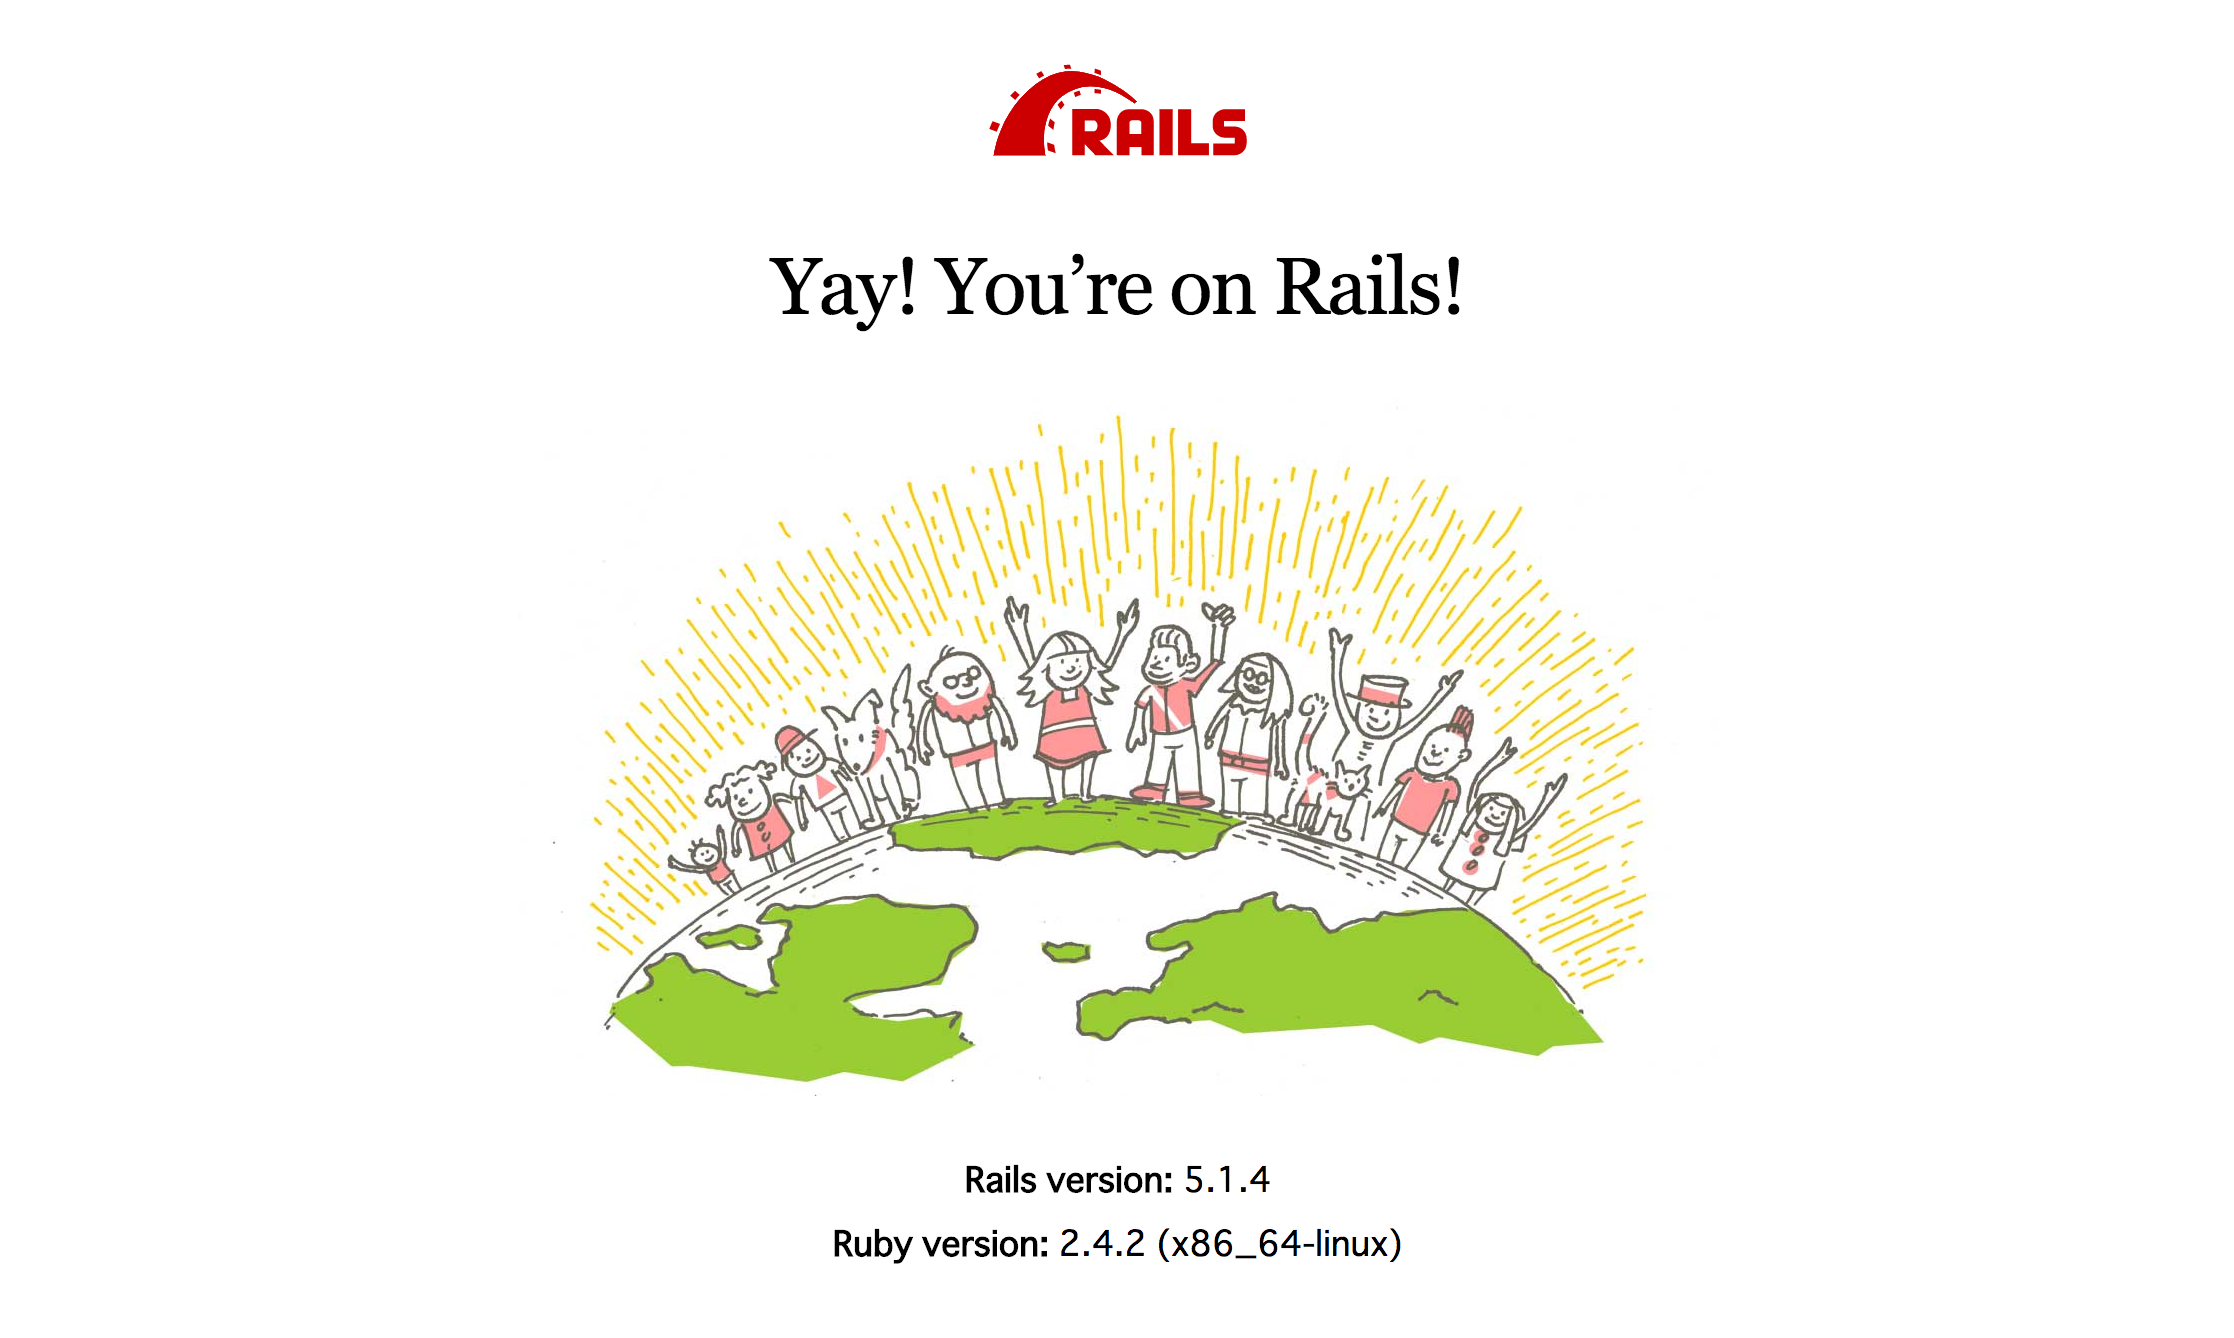
アクセス確認
ブラウザでサーバのIPアドレスにアクセスする
http://xxx.xxx.xxx.xxx
補足:動作環境の変更
passenger_app_envを変更することで動作環境を切り替えることができる
# 開発環境
passenger_app_env development;
# 本番環境
passenger_app_env production;
# 設定ファイルを検証
$ sudo nginx -t

# 設定ファイルを再読込
$ sudo service nginx reload
補足:アクセス時のエラー
500エラー
エラーログ:
nginxユーザがconfig.ruにアクセスできないのが原因
$ sudo tail /var/log/nginx/error.log
2017/09/16 06:02:56 [alert] 22400#0: *3 Cannot stat '/var/www/myapp/code/config.ru': Permission denied (errno=13);
This error means that the Nginx worker process (PID 22400, running as UID 996) does not have permission to access t
his file. Please read this page to learn how to fix this problem: https://www.phusionpassenger.com/library/admin/ng
inx/troubleshooting/?a=upon-accessing-the-web-app-nginx-reports-a-permission-denied-error; Extra info, client: 111.
216.58.83, server: localhost, request: "GET / HTTP/1.1", host: "xx.xxx.xxx.xxx"
解決方法:
SELinuxを無効にする
# SELinux無効化
$ sudo setenforce 0

# 永続化する
$ sudo vi /etc/selinux/config
SELINUX=disabled
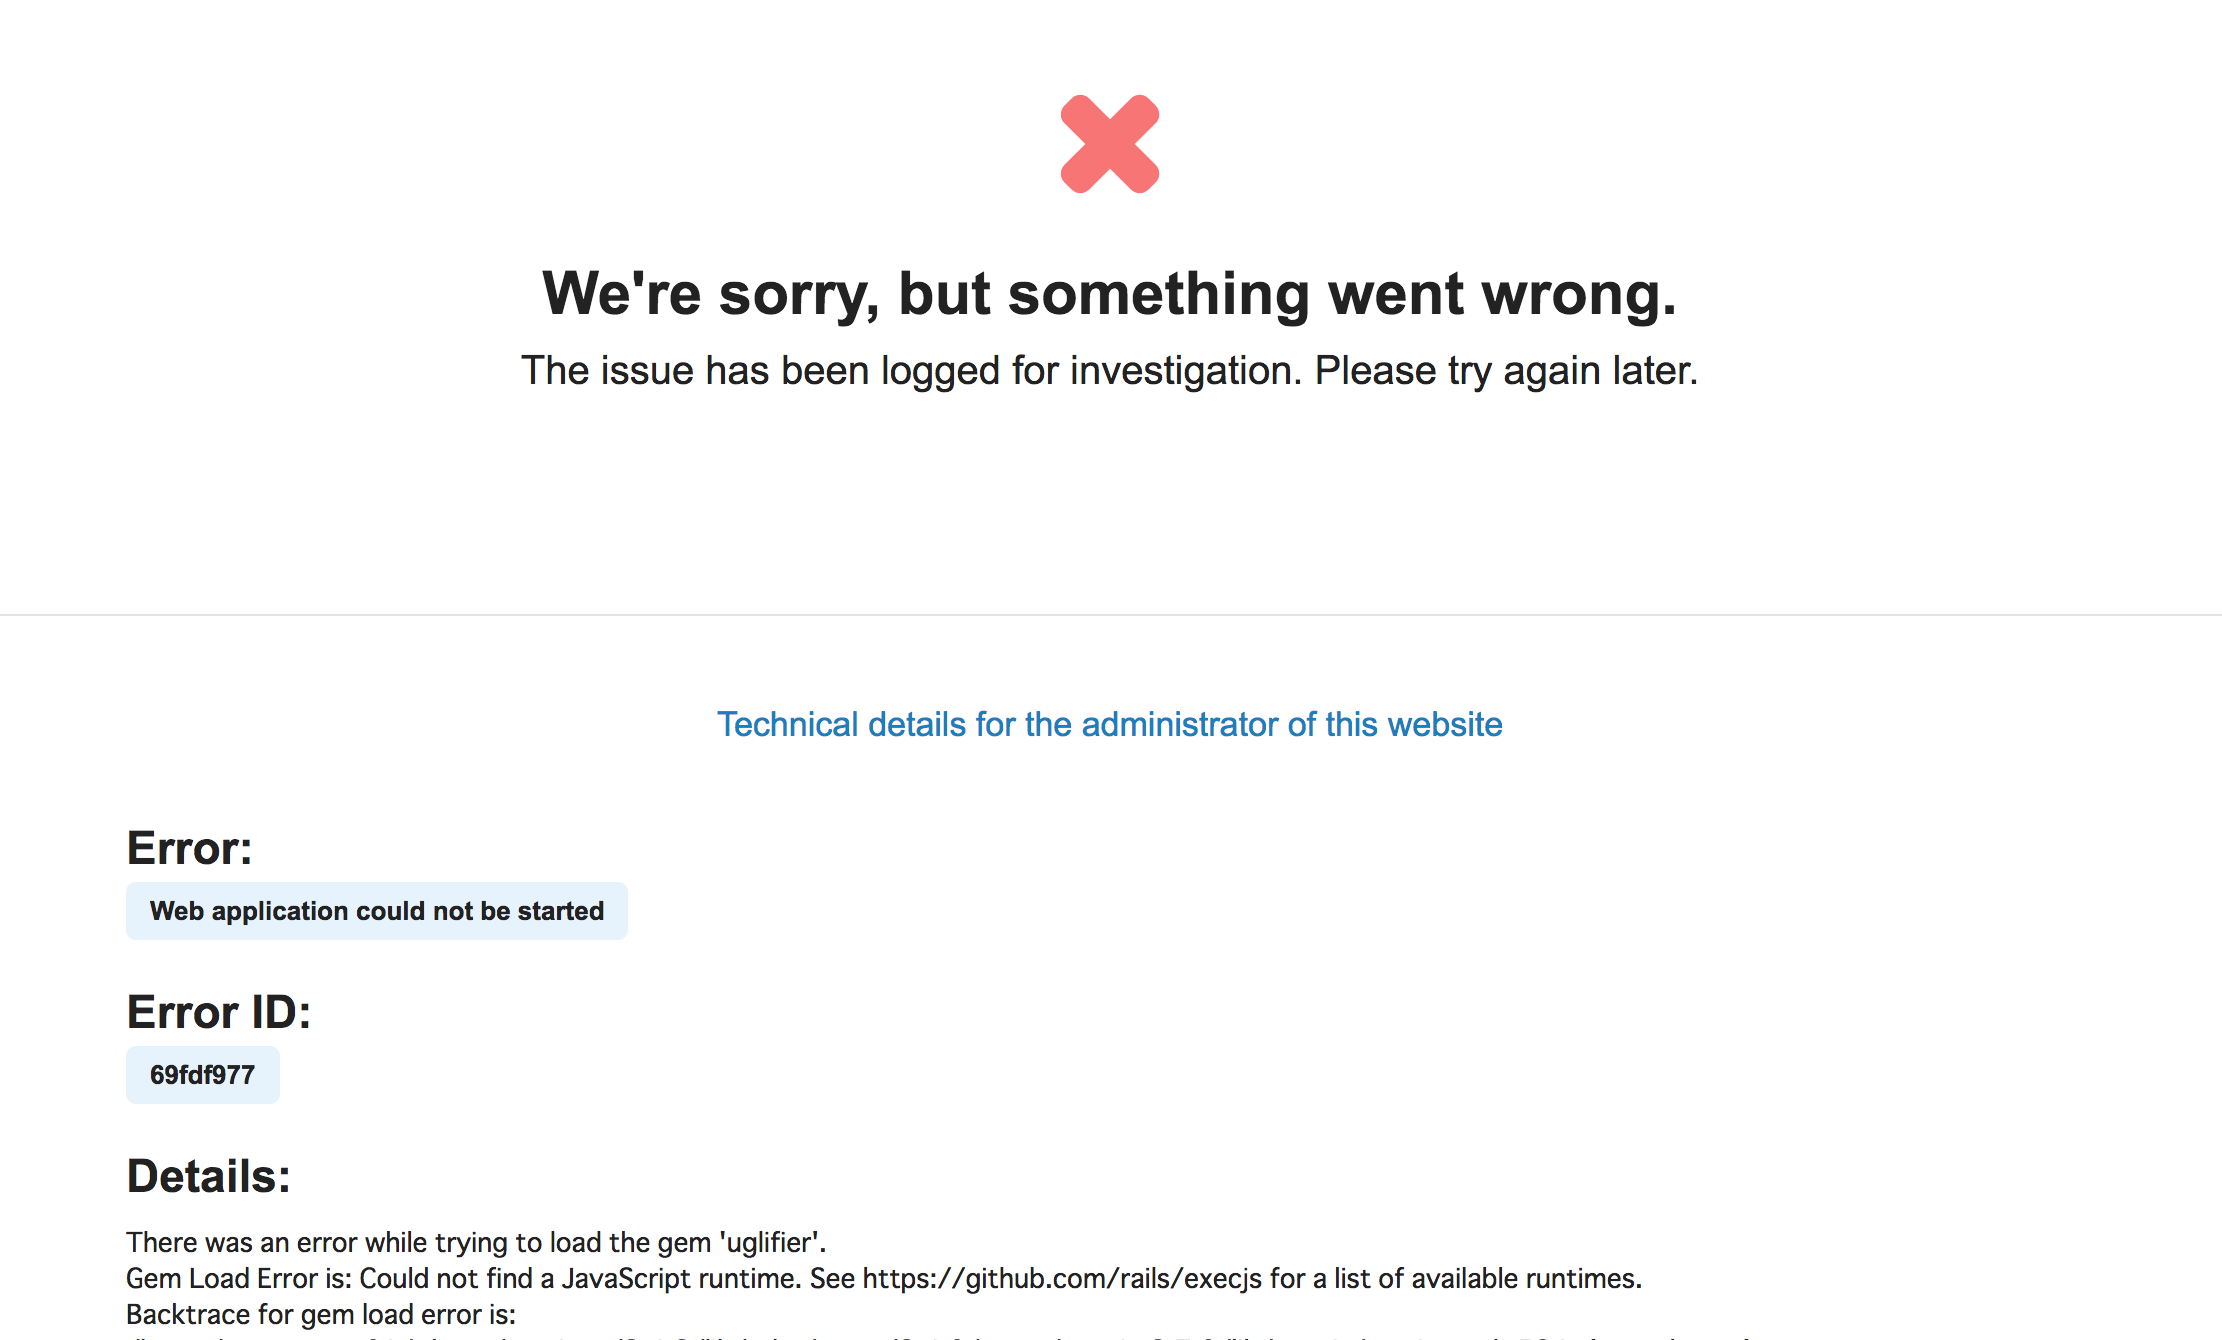
スタックトレース
development設定時のスタックトレースが見慣れた画面と異なるので少し戸惑いますが、Detailsを見れば原因の特定は容易です。
補足:Passenger関連コマンド
Passengerのインストールを検証
$ sudo /usr/bin/passenger-config validate-install

What would you like to validate?
Use <space> to select.
If the menu doesn't display correctly, press '!'
 ‣ ⬢  Passenger itself
   ⬡  Apache

-------------------------------------------------------------------------
 * Checking whether this Passenger install is in PATH... ✓
 * Checking whether there are no other Passenger installations... ✓
Everything looks good. :-)
Passengerのステータスを確認
$ sudo /usr/sbin/passenger-memory-stats
Version: 5.1.8
Date   : 2017-09-16 05:21:08 +0000
------------- Apache processes -------------
*** WARNING: The Apache executable cannot be found.
Please set the APXS2 environment variable to your 'apxs2' executable's filename, or set the HTTPD environment varia
ble to your 'httpd' or 'apache2' executable's filename.
---------- Nginx processes -----------
PID    PPID   VMSize    Private  Name
--------------------------------------
19213  1      110.8 MB  0.3 MB   nginx: master process /usr/sbin/nginx
19214  19213  111.2 MB  0.7 MB   nginx: worker process
### Processes: 2
### Total private dirty RSS: 1.04 MB
----- Passenger processes -----
PID    VMSize    Private  Name
-------------------------------
19186  417.8 MB  1.0 MB   Passenger watchdog
19189  857.5 MB  3.4 MB   Passenger core
19197  425.9 MB  1.0 MB   Passenger ust-router
### Processes: 3