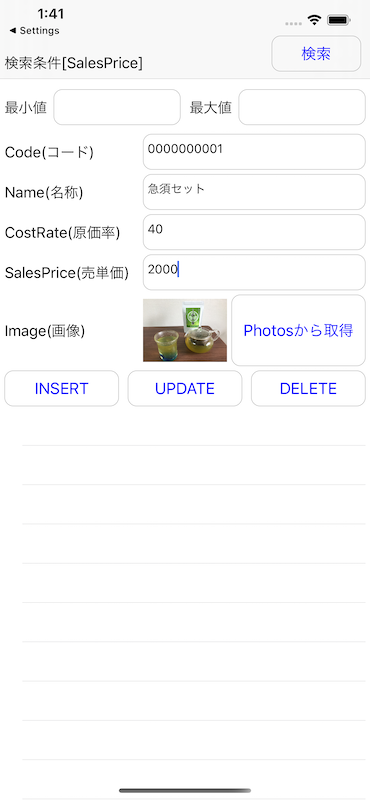
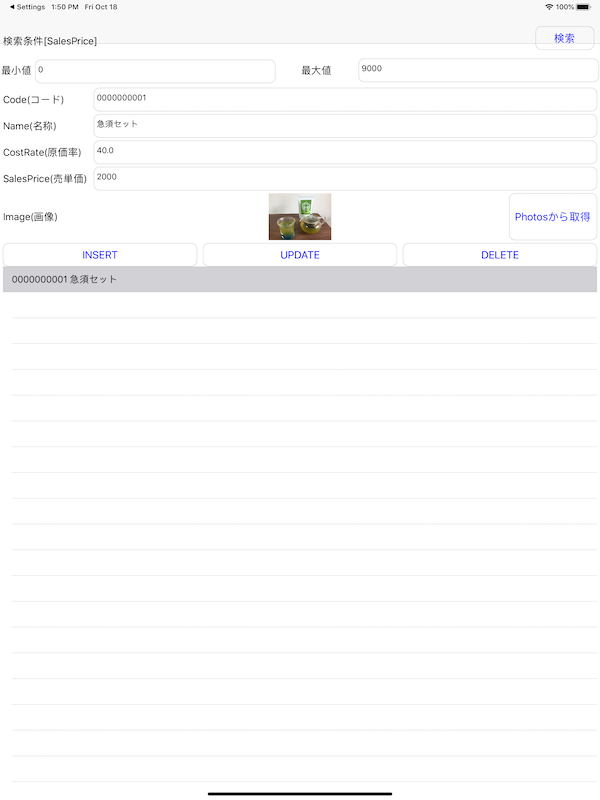
iOS / iPadOS 13からCore DataとCloudKitの連携が自動でできる様になったということで早速試してみました。
環境:swift 5、Xcode 11.0
準備
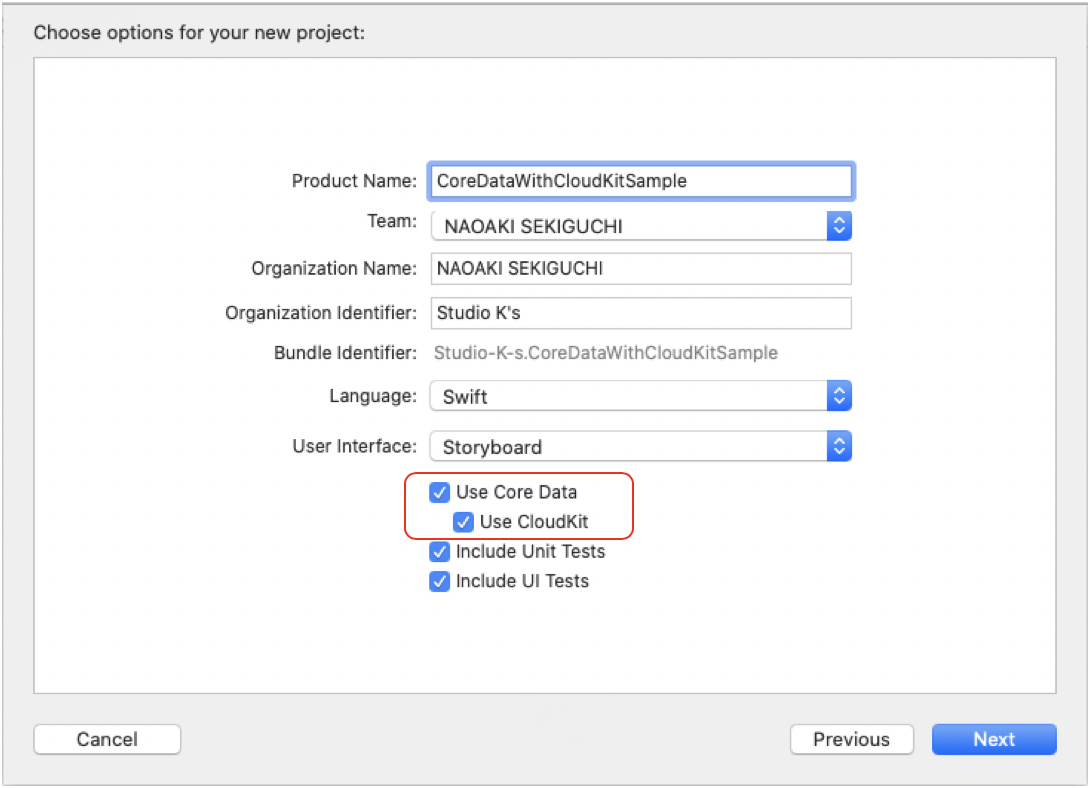
1.まずプロジェクトを作成する時に[Use Core Data]と[Use CloudKit]の両方にチェックを入れます。
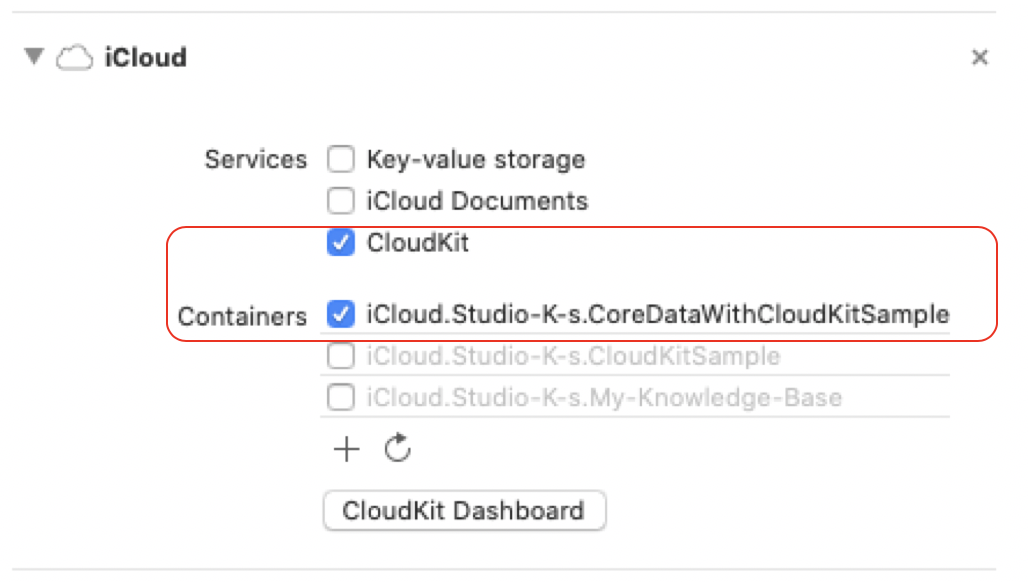
2.プロジェクト作成後、[TARGETS]-[Signing & Capabilities]を選択し[iCloud]を追加します。
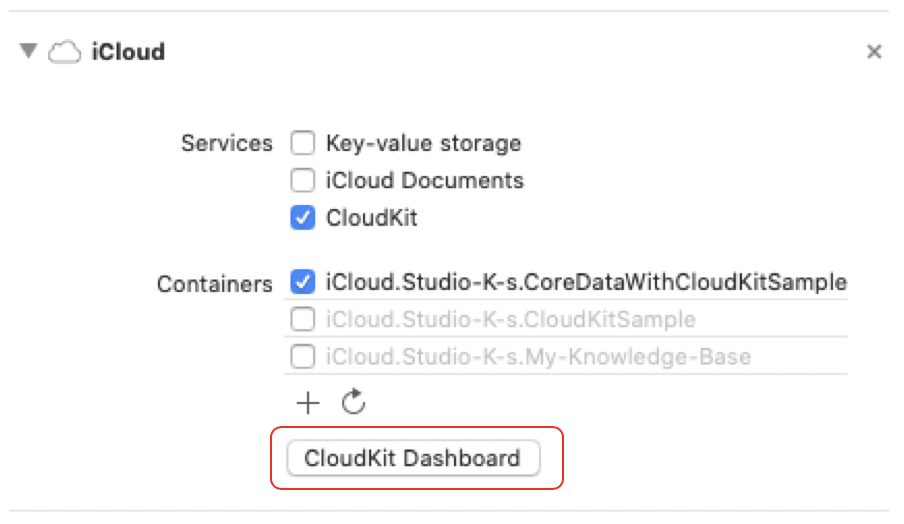
その後、[Cloud Kit]にチェックを入れ、このアプリで使用する[Containers]の名称を入力(あるいは選択)します。
AppDelegateを見てみましょう
ここまで作業ができたらAppDelegate.swiftに自動生成されているコードを見てみましょう。以下の様なCore Dataにアクセスする為のコードが生成されています。
import UIKit
import CoreData

@UIApplicationMain
class AppDelegate: UIResponder, UIApplicationDelegate {

----- (中略)-----

    // MARK: - Core Data stack

    lazy var persistentContainer: NSPersistentCloudKitContainer = {
        /*
         The persistent container for the application. This implementation
         creates and returns a container, having loaded the store for the
         application to it. This property is optional since there are legitimate
         error conditions that could cause the creation of the store to fail.
        */
        let container = NSPersistentCloudKitContainer(name: "CoreDataWithCloudKitSample")
        container.loadPersistentStores(completionHandler: { (storeDescription, error) in
            if let error = error as NSError? {
                // Replace this implementation with code to handle the error appropriately.
                // fatalError() causes the application to generate a crash log and terminate. You should not use this function in a shipping application, although it may be useful during development.

                /*
                 Typical reasons for an error here include:
                 * The parent directory does not exist, cannot be created, or disallows writing.
                 * The persistent store is not accessible, due to permissions or data protection when the device is locked.
                 * The device is out of space.
                 * The store could not be migrated to the current model version.
                 Check the error message to determine what the actual problem was.
                 */
                fatalError("Unresolved error \(error), \(error.userInfo)")
            }
        })
        return container
    }()

    // MARK: - Core Data Saving support

    func saveContext () {
        let context = persistentContainer.viewContext
        if context.hasChanges {
            do {
                try context.save()
            } catch {
                // Replace this implementation with code to handle the error appropriately.
                // fatalError() causes the application to generate a crash log and terminate. You should not use this function in a shipping application, although it may be useful during development.
                let nserror = error as NSError
                fatalError("Unresolved error \(nserror), \(nserror.userInfo)")
            }
        }
    }
これまでCore Data StackにアクセスするクラスはNSPersistentContainerクラスでしたが、[use CloudKit]にチェックを入れた時はNSPersistentCloudKitContainerクラスに変わっています。
このNSPersistentCloudKitContainerクラスを使用することによってCloud Kitとの連携が自動的に行われる様になります。
Core DataのEntityを作成
ではデータを格納する為のCore DataのEntityを作成します。
プロジェクトから.xcdatamodeIdファイルを選択し[Add Entity]を押下してEntityを作成します。
今回は以下の画像の様な構成にしました。

※String型は文字列、Integer型・Double型は数値、Binary Data型はUIImageのデータを保存する為に用意しています。
今回はEntity「GoodsMaster」のCodegenを[Manual/None]にしましたので、Xcodeの[Editor]-[Create NSManagedObject Subclass...]を実行して、「GoodsMaster」のNSManagedObjectクラスを生成します。
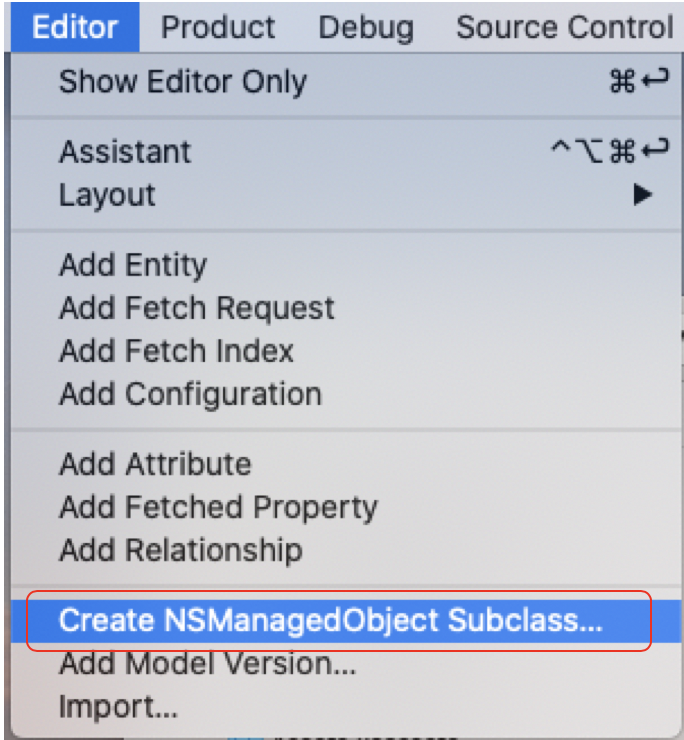
以下の2つのファイルが生成されます。
import Foundation
import CoreData

@objc(GoodsMaster)
public class GoodsMaster: NSManagedObject {

}
import Foundation
import CoreData


extension GoodsMaster {

    @nonobjc public class func fetchRequest() -> NSFetchRequest<GoodsMaster> {
        return NSFetchRequest<GoodsMaster>(entityName: "GoodsMaster")
    }

    @NSManaged public var code: String?
    @NSManaged public var costRate: Double
    @NSManaged public var image: Data?
    @NSManaged public var imageOrientation: Int16
    @NSManaged public var name: String?
    @NSManaged public var salesPrice: Int64

}
また、.xcdatamodeIdファイルのConfigurationsを見てみると[Used with CloudKit]にチェックが入っていることが分かります。

データのINSERT/SELECT/UPDATE/DELETE
ではCore Dataのデータの操作を行なってみます。
データ操作の仕方はこれまでのCore Dataと全く同じです。
NSManagerdContext
Core Dataの操作はNSManagedContextクラスで行います。
AppDelegateを通してNSManagedContextクラスを取得するのが、まず最初に必要な処理になります。
let appDelegate: AppDelegate = UIApplication.shared.delegate as! AppDelegate
let managedContext: NSManagedObjectContext = appDelegate.persistentContainer.viewContext
データのINSERT
ではまずデータをINSERTしてみます。
import UIKit
import CoreData

------ (中略) ------

     /**
     Core DataにデータをINSERTする
     @param INSERTするデータ code:コード name:名称 costRate:原価率 salesPrice:売単価 image:画像
     */
    private func insertData(code:String,name:String,costRate:Double,salesPrice:Int,image:UIImage!){
        let appDelegate: AppDelegate = UIApplication.shared.delegate as! AppDelegate
        let managedContext: NSManagedObjectContext = appDelegate.persistentContainer.viewContext

        //INSERTするデータを設定
        let objectEntity:NSManagedObject = NSEntityDescription.insertNewObject(forEntityName: "GoodsMaster", into: managedContext) as NSManagedObject
        objectEntity.setValue(code, forKey: "code")
        objectEntity.setValue(name, forKey: "name")
        objectEntity.setValue(costRate, forKey: "costRate")
        objectEntity.setValue(salesPrice, forKey: "salesPrice")

        if (image != nil){
            //UIImageをNSDataに変換
            let imageData = image.jpegData(compressionQuality: 1.0)

            //UIImageの方向を確認
            var imageOrientation:Int = 0
            if (image.imageOrientation == UIImage.Orientation.down){
                imageOrientation = 2
            }else{
                imageOrientation = 1
            }

            objectEntity.setValue(imageData, forKey: "image")
            objectEntity.setValue(imageOrientation, forKey: "imageOrientation")
        }

        //データのINSERTを実行
        do {
            try managedContext.save()
        }catch let error {
            //INSERTでエラーになった場合
            NSLog("\(error)")
        }
    }
INSERTするデータはNSManagedObjectに設定します。
データの設定後にNSManagerdContextのsaveメソッドを実行すると設定したデータが保存されます。
データのSELECT
次にINSERTしたデータを検索してみましょう。
import UIKit
import CoreData

------ (中略) ------

    //Core Dataから検索したデータを格納する構造体
    private struct GoodsMaster {
        var code:String
        var name:String
        var costRate:Double
        var salesPrice:Int
        var image:UIImage!
    }

------ (中略) ------

     /**
     Core Dataからデータを検索する
     @param 検索条件 minSalesPrice:検索条件のsalesPriceの最小値 maxSalesPrice:検索条件のsalesPriceの最大値
     */
    private func searchData(minSalesPrice:Int,maxSalesPrice:Int){
        let appDelegate: AppDelegate = UIApplication.shared.delegate as! AppDelegate
        let managedContext: NSManagedObjectContext = appDelegate.persistentContainer.viewContext

        //検索条件指定
        let fetchRequest = NSFetchRequest<NSFetchRequestResult>(entityName: "GoodsMaster")
        fetchRequest.returnsObjectsAsFaults = false
        let predicate = NSPredicate(format: "salesPrice >= %d and salesPrice <= %d", minSalesPrice,maxSalesPrice)
        fetchRequest.predicate = predicate

        //ソート条件指定
        let sortDescriptor1 = NSSortDescriptor(key: "salesPrice", ascending: false) //降順
        let sortDescriptor2 = NSSortDescriptor(key: "costRate", ascending: true) //昇順
        fetchRequest.sortDescriptors = [sortDescriptor1,sortDescriptor2]

        do{
            //検索実行
            let fetchResults: Array = try managedContext.fetch(fetchRequest)

            //検索成功
            self.goodsMasters.removeAll()
            for fetchResult in fetchResults {
                let code = (fetchResult as AnyObject).value(forKey: "code") as! String
                let name = (fetchResult as AnyObject).value(forKey: "name") as! String
                let costRate = (fetchResult as AnyObject).value(forKey: "costRate") as! Double
                let salesPrice = (fetchResult as AnyObject).value(forKey: "salesPrice") as! Int

                let imageData = (fetchResult as AnyObject).value(forKey: "image") as! NSData?
                let imageOrientation = (fetchResult as AnyObject).value(forKey: "imageOrientation") as! Int?

                var image:UIImage! = nil
                if (imageData != nil){
                    image = UIImage(data: imageData! as Data)
                    if (imageOrientation == 2) {
                        image = UIImage(cgImage: image!.cgImage!, scale: image!.scale, orientation: UIImage.Orientation.down)
                    }
                }
                let goodsMaster = GoodsMaster(code: code, name: name, costRate: costRate, salesPrice: salesPrice,image: image)
                self.goodsMasters.append(goodsMaster)
            }
        }catch let error {
            //検索でエラーになった場合
            NSLog("\(error)")
        }
    }
検索に必要な情報はNSFetchRequestクラスに設定します。
検索条件はNSPredicateクラスに、ソート条件はNSSortDescriptorクラスに設定してNSFetchRequestクラスに渡します。
NSFetchRequestクラスを引数にしてNSManagedContextクラスのfetchメソッドを実行すれば検索が実行されます。
あとは配列から検索したデータを取得します。
データのUPDATE
UPDATEはまずデータを検索して、検索した値を変更してSaveすることで行います。
INSERTとSELECTを組み合わせた様なコードになります。
import UIKit
import CoreData

------ (中略) ------

     /**
     指定した条件でCore DataのデータをUPDATEする
     @param whereCode:更新対象のコード updateName:名称の更新値 updateCostRate:原価率の更新値 updateSalesPrice:売単価の更新値 updateImage:画像の更新値
     */
    private func updateData(whereCode:String,updateName:String,updateCostRate:Double,updateSalesPrice:Int,updateImage:UIImage!){
        let appDelegate: AppDelegate = UIApplication.shared.delegate as! AppDelegate
        let managedContext: NSManagedObjectContext = appDelegate.persistentContainer.viewContext

        //1.更新対象のレコードを検索する
        let fetchRequest = NSFetchRequest<NSFetchRequestResult>(entityName: "GoodsMaster")
        fetchRequest.returnsObjectsAsFaults = false
        let predicate = NSPredicate(format: "code == %@", whereCode)
        fetchRequest.predicate = predicate

        do {
            //検索実行
            let fetchResults: Array = try managedContext.fetch(fetchRequest)

            //2.検索したレコードの値をUPDATEする
            for fetchResult in fetchResults {
                let managedObject = fetchResult as! NSManagedObject
                managedObject.setValue(updateName, forKey: "name")
                managedObject.setValue(updateCostRate, forKey: "costRate")
                managedObject.setValue(updateSalesPrice, forKey: "salesPrice")
                if (updateImage != nil){
                    //UIImageをNSDataに変換
                    let imageData = updateImage.jpegData(compressionQuality: 1.0)

                    //UIImageの方向を確認
                    var imageOrientation:Int = 0
                    if (updateImage.imageOrientation == UIImage.Orientation.down){
                        imageOrientation = 2
                    }else{
                        imageOrientation = 1
                    }

                    managedObject.setValue(imageData, forKey: "image")
                    managedObject.setValue(imageOrientation, forKey: "imageOrientation")
                }
                try managedContext.save()
            }
        }catch let error {
            //Updateでエラーになった場合
            NSLog("\(error)")
        }
    }
検索したデータからNSManagedObjectクラスを取得して値を設定し、最後にNSManagedContextクラスのsaveメソッドを実行すると変更した値が保存されます。
データのDELETE
DELETEもまずデータを検索して、そのデータを削除することで行います。
import UIKit
import CoreData

------ (中略) ------

     /**
     指定した条件でCore DataのデータをDELETEする
     @param whereCode:削除対象のCode
     */
    private func deleteData(whereCode:String){
        let appDelegate: AppDelegate = UIApplication.shared.delegate as! AppDelegate
        let managedContext: NSManagedObjectContext = appDelegate.persistentContainer.viewContext

        //1.削除対象のレコードを検索する
        let fetchRequest = NSFetchRequest<NSFetchRequestResult>(entityName: "GoodsMaster")
        fetchRequest.returnsObjectsAsFaults = false
        let predicate = NSPredicate(format: "code == %@", whereCode)
        fetchRequest.predicate = predicate

        do {
            //検索実行
            let fetchResults: Array = try managedContext.fetch(fetchRequest)

            //2.検索したレコードの値を削除する
            for fetchResult in fetchResults {
                let managedObject = fetchResult as! NSManagedObject

                managedContext.delete(managedObject)
            }
            try managedContext.save()
        }catch let error {
            //Deleteでエラーになった場合
            NSLog("\(error)")
        }
    }
検索したデータからNSManagedObjectクラスを取得してdeleteメソッドを実行して削除対象としてマークし、最後にNSManagedContextクラスのsaveメソッドを実行すると削除が実行されます。
Cloud Kitを経由した端末間のデータ連携
では上記のコードを使用してCloud Kitを使用した端末間のデータ連携を試してみます。
事前にiCloudの設定を行ったiPhoneとiPadを用意しておきます。
-
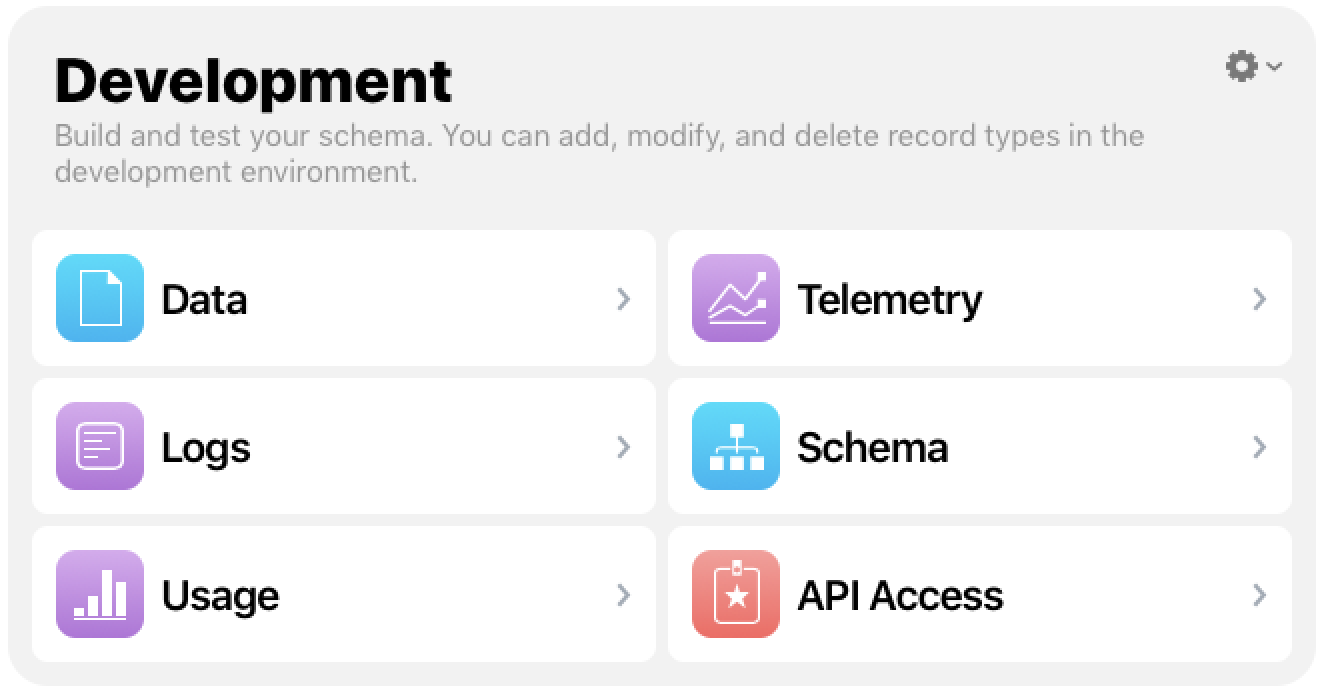
ここでXcodeの[TARGETS] - [Signing & Capabilities] - [iCloud]で[CloudKit Dashboard]を押下して、CloudKit Dashboardを表示します。
-
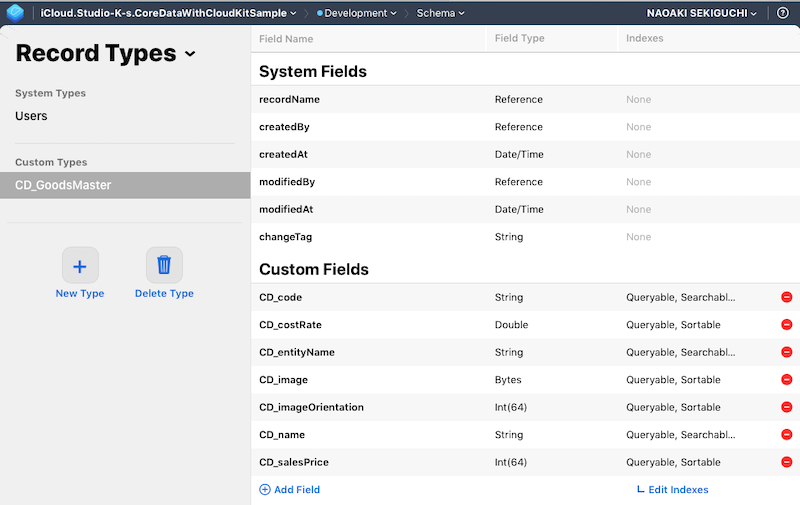
CloudKit Dashboardで[Schema]を選択してみると、Core Dataで作成したEntityがCloudKit上に自動で作成されています。すごい!!! Core Dataで作成したEntity、Fieldの名称に「CD_」が付与された名称で作成されていますね。
-
CloudKit Dashboardで[Data]を選択して見てみると、iPhoneで登録したデータがCloudKit上にも存在していることがわかります。
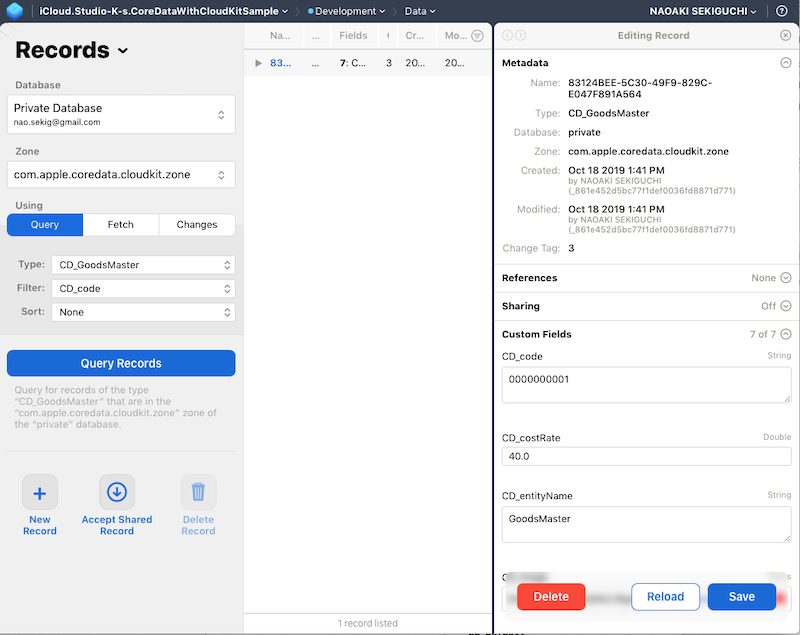
いや、これは本当にすごいです。
これまで苦労してCore DataとCloud Kitを連携させるコードを自分で書いていたのはなんだったのだろうと思います(笑)。
ただ対応しているのはiOS / iPad OS 13以降なので、実際に使うのはもう少し先のことになるかと思います。
サンプルプログラム
今回のサンプルプログラムのソースコードはGitHubに保存しています。
参考文献
Setting Up Core Data with CloudKit - Apple Developer
