今回は、以下の記事の続きとして、以下のステップの(3)-(6)の作業ログを記載していきたいと思います。
- DHCP/Webサーバなどの周辺コンポーネントのセットアップ
- Single Node OpenShift構成導入のためのCoreOSのイメージを準備
a. CoreOSの取得
b. ignitionファイルの作成
c. CoreOSイメージへのembed作業 - 準備したCoreOSイメージを使用してSingle Node OpenShift構成用のVMを起動
- 自動でBootstrapノードの導入が開始。完了後、自動で再起動
- 自動でMaster/Workerノードの導入が開始
- Single Node OpenShift構成が完成!
3. 準備したCoreOSイメージを使用してSNO構成用のVMを起動
それでは、前回ステップ2-cで作成したCoreOSのISOイメージを用いて、OpenShiftをインストールしたいと思います。
今回の私の環境は、KVM上のVMでSNO構成を作成しますので、対象のCoreOS ISOイメージを使用してVMを起動します。その他、VMwareや物理サーバで評価される方は、それぞれのご利用環境に合わせて対象のISOイメージを起動ください。
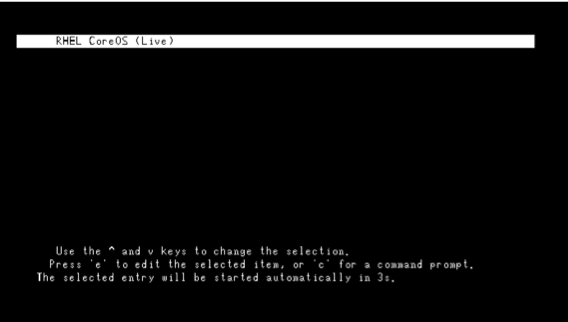
正常にCoreOSが起動すると、以下のような画面を確認できます。この画面が表示されれば、起動時に正常にignitionファイルをWebサーバから取得できています。もし、この画面に行きつかない場合(CoreOSのログイン表示ではなく、コマンドプロンプトが表示される場合など)には、Webサーバ上に設置したignitionファイルの権限情報やISOファイルに指定したWebサーバのURLに誤りがないかご確認ください。
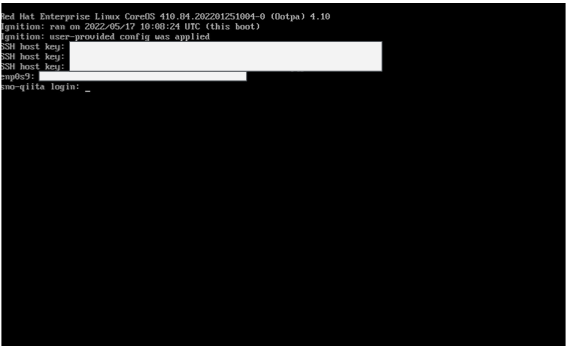
またこの時点で、ignitionファイル作成時に指定したssh-keyを用いて、対象システムへのsshログインが可能となります。
<CoreOSの起動画面>
<正常に起動した場合のログイン画面>
(バックエンドで動いているアプリケーションのメッセージが表示されますが無視してOKです)
この状態になりましたら、VM#2からssh-keyを用いて対象のシステムへアクセスが可能です。
$ pwd
/root/sno/ssh-key
$ ssh -i new_rsa core@192.168.100.100
Red Hat Enterprise Linux CoreOS 410.84.202201251004-0
  Part of OpenShift 4.10, RHCOS is a Kubernetes native operating system
  managed by the Machine Config Operator (`clusteroperator/machine-config`).

WARNING: Direct SSH access to machines is not recommended; instead,
make configuration changes via `machineconfig` objects:
  https://docs.openshift.com/container-platform/4.10/architecture/architecture-rhcos.html

---
This is the bootstrap node; it will be destroyed when the master is fully up.

The primary services are release-image.service followed by bootkube.service. To watch their status, run e.g.

  journalctl -b -f -u release-image.service -u bootkube.service
[core@sno-qiita ~]$
4. 自動でBootstrapノードの導入が開始。完了後、自動で再起動
sshにて対象のSNO構成にログインしましたら、以下のコマンドでbootkube.serviceのプロセスが確認できます。
[core@sno-qiita ~]$ journalctl -b -f -u release-image.service -u bootkube.service
正常に処理が進みますと、install-to-disk.serviceのプロセスとして、install-config.yamlの設定で指定したディスクへのBootstrapノード導入プロセス(進捗状況)を確認できます。
導入が完了すると、自動的に再起動がかかります。
May 17 10:23:00 sno-qiita.test.example.local systemd[1]: Started Install to disk.
May 17 10:23:00 sno-qiita.test.example.local install-to-disk.sh[2258]: Waiting for /opt/openshift/.bootkube.done
May 17 10:29:17 sno-qiita.test.example.local install-to-disk.sh[2258]: Executing coreos-installer with the following options: install -i /opt/openshift/master.ign /dev/vda
May 17 10:29:18 sno-qiita.test.example.local install-to-disk.sh[2258]: Installing Red Hat Enterprise Linux CoreOS 410.84.202201251004-0 (Ootpa) ppc64le (512-byte sectors)
May 17 10:29:20 sno-qiita.test.example.local install-to-disk.sh[2258]: Read disk 15.6 MiB/4.0 GiB (0%)
May 17 10:29:21 sno-qiita.test.example.local install-to-disk.sh[2258]: Read disk 20.3 MiB/4.0 GiB (0%)
May 17 10:29:22 sno-qiita.test.example.local install-to-disk.sh[2258]: Read disk 24.3 MiB/4.0 GiB (0%)
May 17 10:29:23 sno-qiita.test.example.local install-to-disk.sh[2258]: Read disk 28.0 MiB/4.0 GiB (0%)
May 17 10:29:24 sno-qiita.test.example.local install-to-disk.sh[2258]: Read disk 35.3 MiB/4.0 GiB (0%)
May 17 10:29:25 sno-qiita.test.example.local install-to-disk.sh[2258]: Read disk 41.9 MiB/4.0 GiB (1%)
May 17 10:29:26 sno-qiita.test.example.local install-to-disk.sh[2258]: Read disk 50.9 MiB/4.0 GiB (1%)
May 17 10:29:27 sno-qiita.test.example.local install-to-disk.sh[2258]: Read disk 53.7 MiB/4.0 GiB (1%)
May 17 10:29:28 sno-qiita.test.example.local install-to-disk.sh[2258]: Read disk 57.0 MiB/4.0 GiB (1%)
May 17 10:29:29 sno-qiita.test.example.local install-to-disk.sh[2258]: Read disk 59.6 MiB/4.0 GiB (1%)

・・・

May 17 10:39:11 sno-qiita.test.example.local install-to-disk.sh[2258]: Read disk 3.9 GiB/4.0 GiB (99%)
May 17 10:39:12 sno-qiita.test.example.local install-to-disk.sh[2258]: Read disk 3.9 GiB/4.0 GiB (99%)
May 17 10:39:13 sno-qiita.test.example.local install-to-disk.sh[2258]: Read disk 3.9 GiB/4.0 GiB (99%)
May 17 10:39:14 sno-qiita.test.example.local install-to-disk.sh[2258]: Read disk 3.9 GiB/4.0 GiB (99%)
May 17 10:39:15 sno-qiita.test.example.local install-to-disk.sh[2258]: Read disk 4.0 GiB/4.0 GiB (99%)
May 17 10:39:16 sno-qiita.test.example.local install-to-disk.sh[2258]: Read disk 4.0 GiB/4.0 GiB (99%)
May 17 10:39:17 sno-qiita.test.example.local install-to-disk.sh[2258]: Read disk 4.0 GiB/4.0 GiB (99%)
May 17 10:39:17 sno-qiita.test.example.local install-to-disk.sh[2258]: Read disk 4.0 GiB/4.0 GiB (100%)
May 17 10:39:17 sno-qiita.test.example.local install-to-disk.sh[2258]: Read disk 4.0 GiB/4.0 GiB (100%)
May 17 10:39:19 sno-qiita.test.example.local install-to-disk.sh[2258]: Writing Ignition config
May 17 10:39:26 sno-qiita.test.example.local install-to-disk.sh[2258]: Install complete.
May 17 10:39:26 sno-qiita.test.example.local install-to-disk.sh[2258]: Going to reboot

Broadcast message from root@sno-qiita.test.example.local (Tue 2022-05-17 10:39:26 UTC):

Bootstrap completed, server is going to reboot.
5. 自動でMaster/Workerノードの導入が開始
再起動のタイミングで、/dev/vdaから起動してきます。起動すると、また自動でMaster/Workerノードのための環境構築が自動で走ります。
一通りの設定が完了しますと、machine-config-daemonがシステムを再度、再起動させます。
正常にCoreOSが起動しましたら、最後の設定がまた自動で走ります。
ここまで進みましたら、あとはOpenShiftが問題なく起動してくるのを待つだけです。操作端末VM#2(OpenShift Client)から以下のコマンドを実行し、設定が完了するのを待ちましょう。
完了すると、OpenShiftのWebコンソールへの"アクセスURL"とデフォルト管理者ユーザである"kubeaminのパスワード"が表示されます。後ほど、こちらの情報を使用して、OpenShiftクラスタへアクセスしますので、情報を控えておえてください。
$ pwd
/root/sno/ignition
$ ls
create_ignition install-config.yaml
$ openshift-install --dir=create_ignition wait-for install-complete
INFO Waiting up to 40m0s (until 8:49PM) for the cluster at https://api.sno-qiita.test.example.local:6443 to initialize...
INFO Waiting up to 10m0s (until 8:30PM) for the openshift-console route to be created...
INFO Install complete!
INFO To access the cluster as the system:admin user when using 'oc', run 'export KUBECONFIG=/root/sno/ignition/create_ignition/auth/kubeconfig'
INFO Access the OpenShift web-console here: https://console-openshift-console.apps.sno-qiita.test.example.local
INFO Login to the console with user: "kubeadmin", and password: "XXXXXXXXXXXXXX"
INFO Time elapsed: 10m32s
6. Single Node OpenShift構成が完成!
作成したOpenShiftクラスタへアクセスします。
まずはocコマンドを使用して、kubeadminユーザでログインします。正常にログインが完了すると、以下のような出力が確認できます。
$ export KUBECONFIG=/root/sno/ignition/create_ignition/auth/kubeconfig
$ oc login -u kubeadmin -p XXXXXXXXXXXXXX https://api.sno-qiita.test.example.local:6443
Login successful.

You have access to 65 projects, the list has been suppressed. You can list all projects with 'oc projects'

Using project "default".
$ oc get nodes
NAME                           STATUS   ROLES           AGE   VERSION
sno-qiita.test.example.local   Ready    master,worker   52m   v1.23.3+e419edf
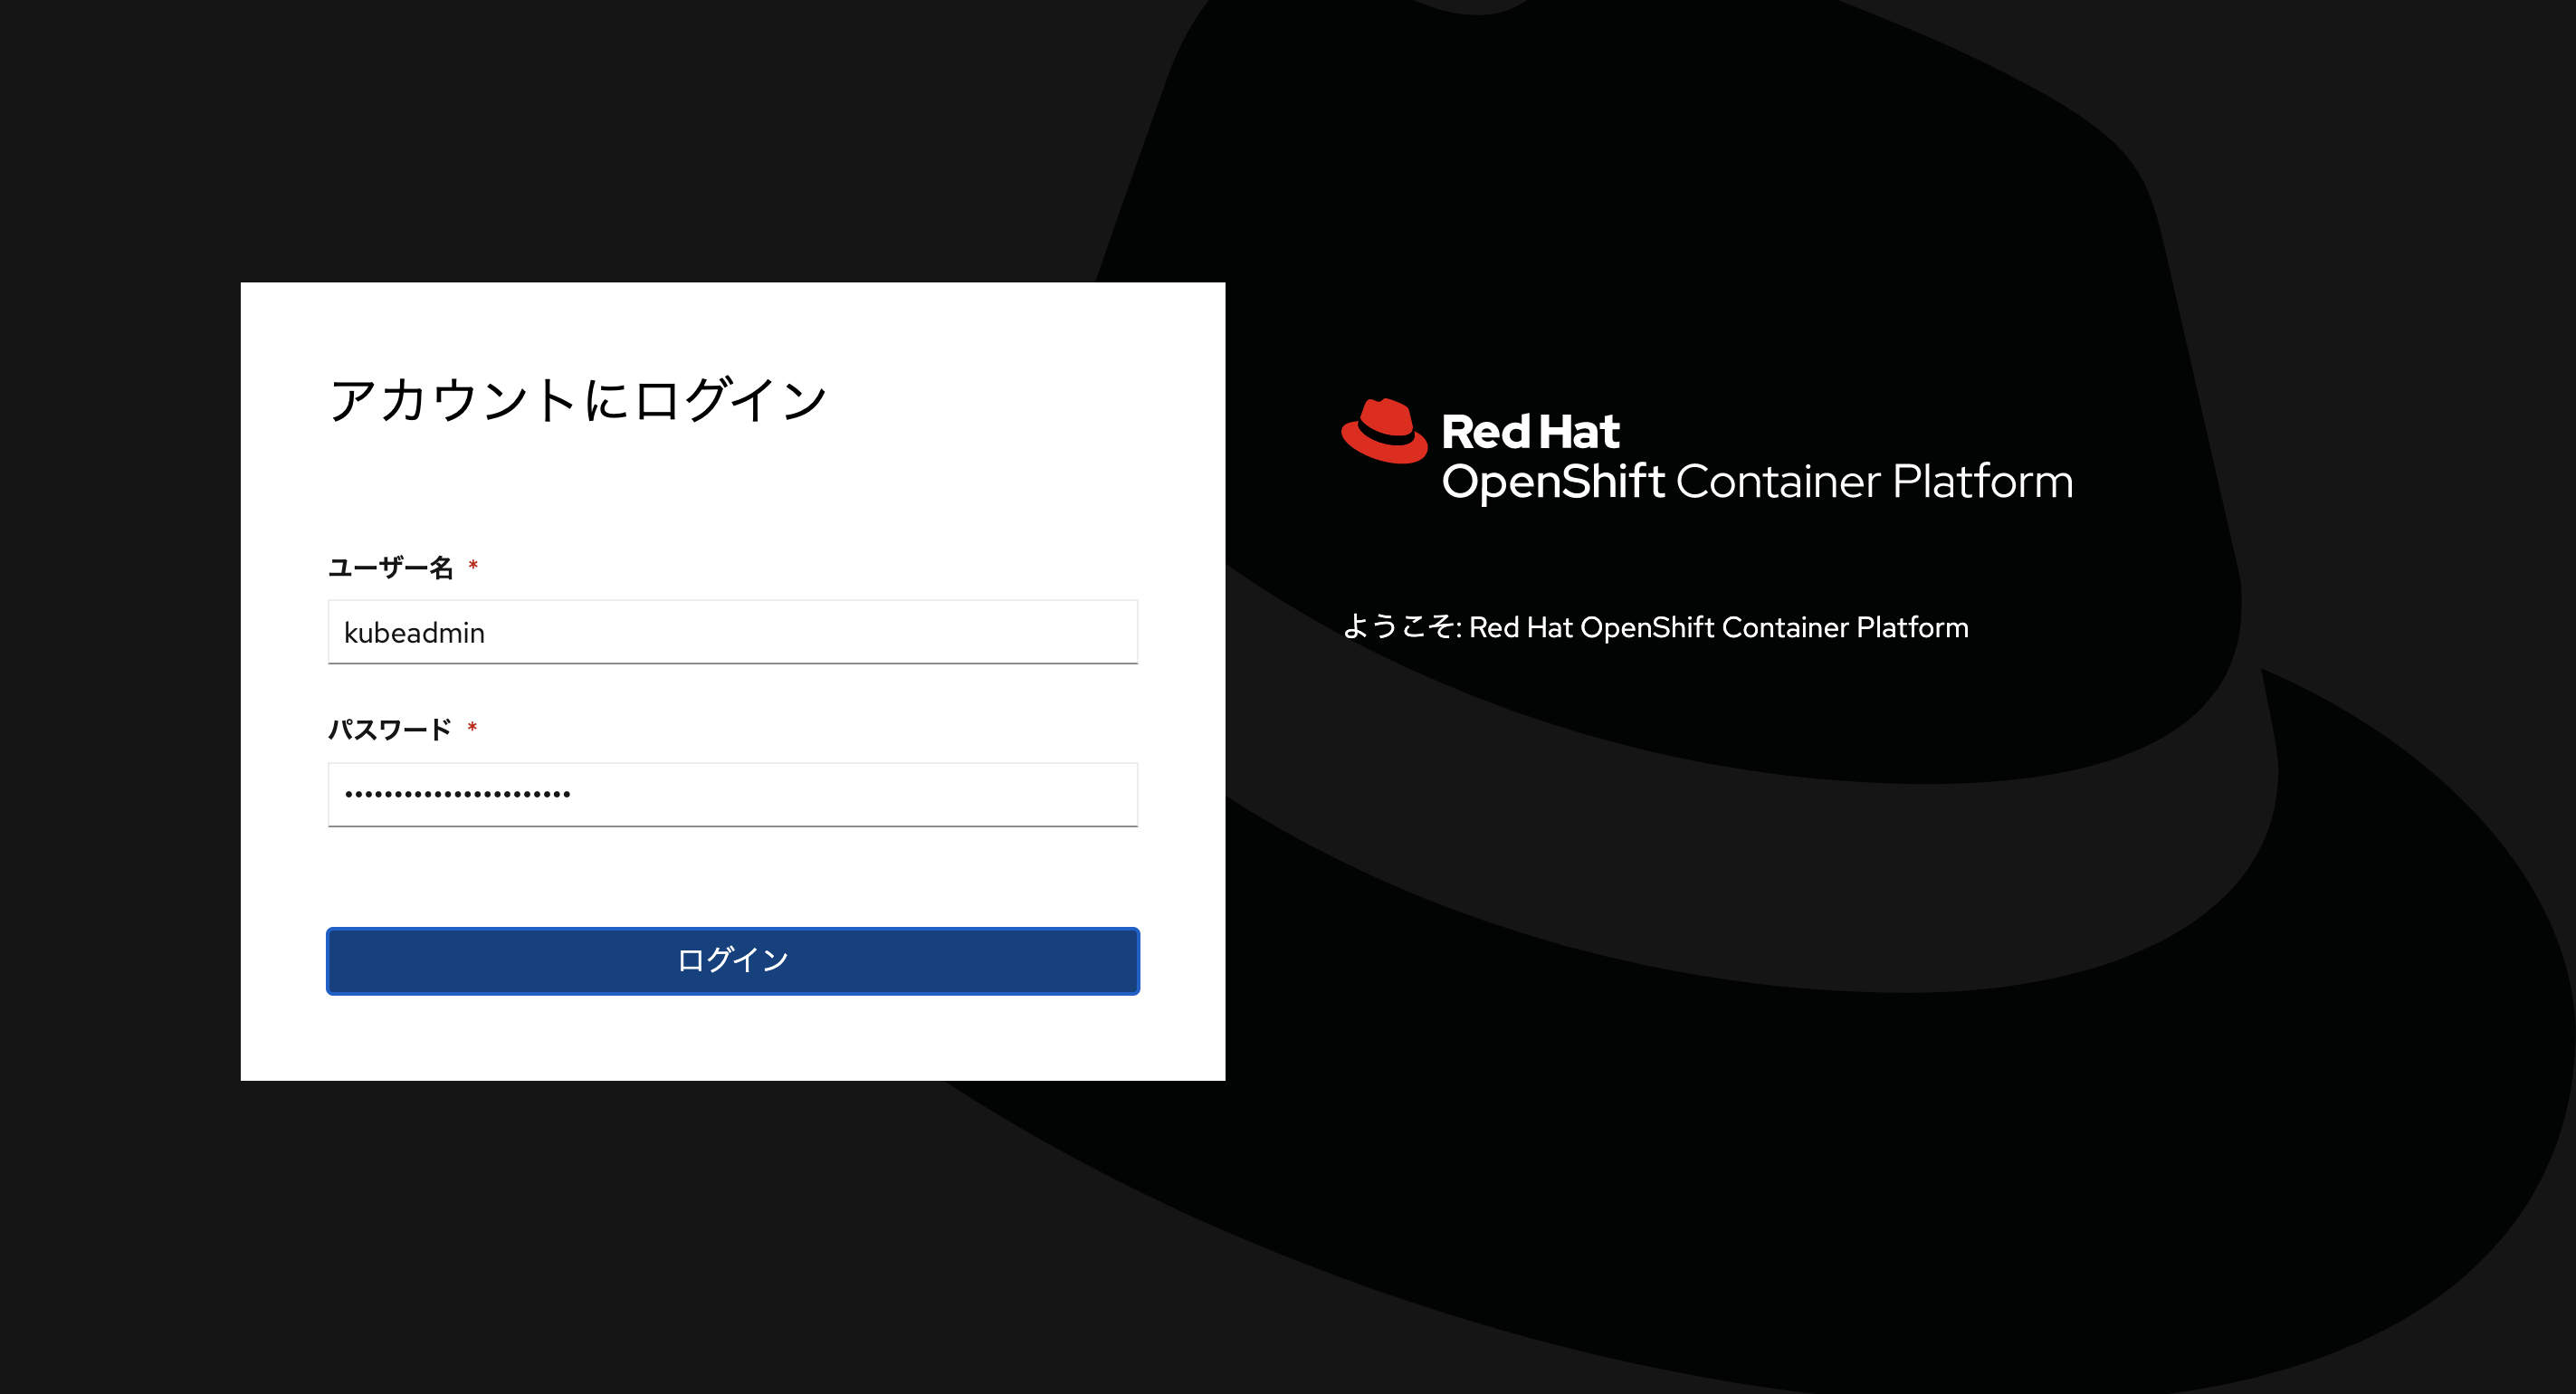
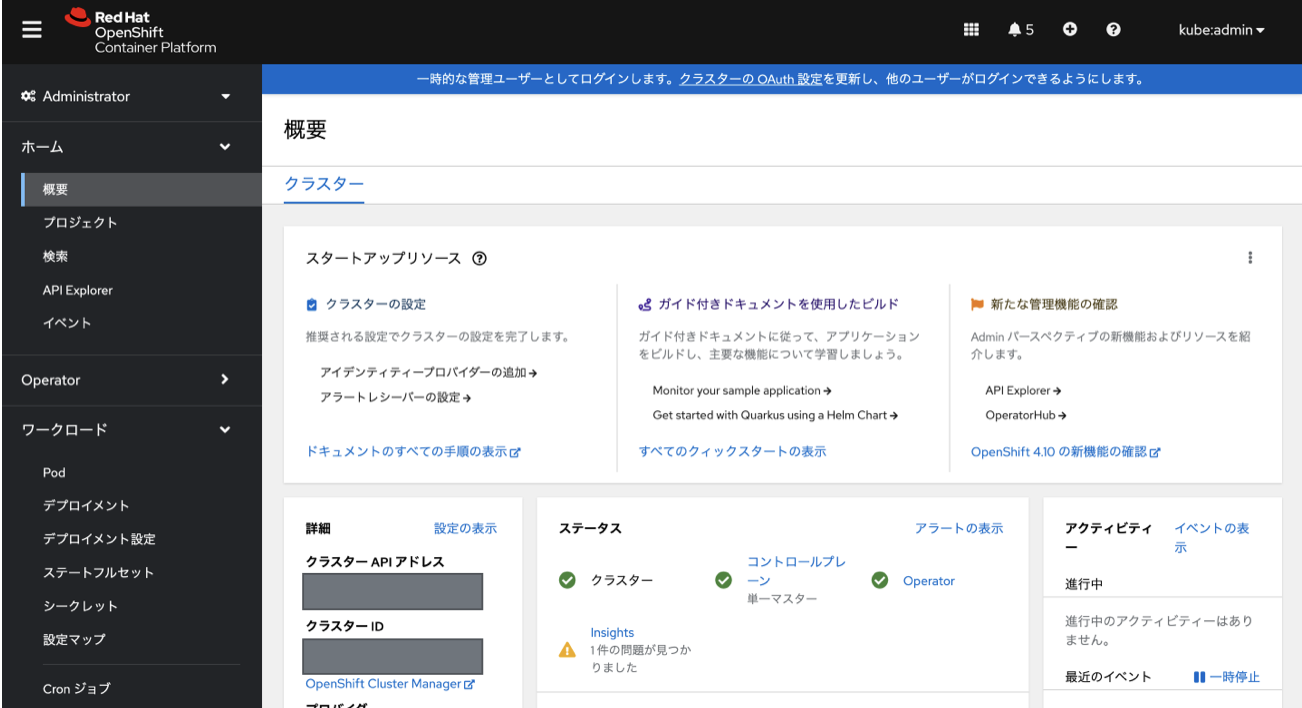
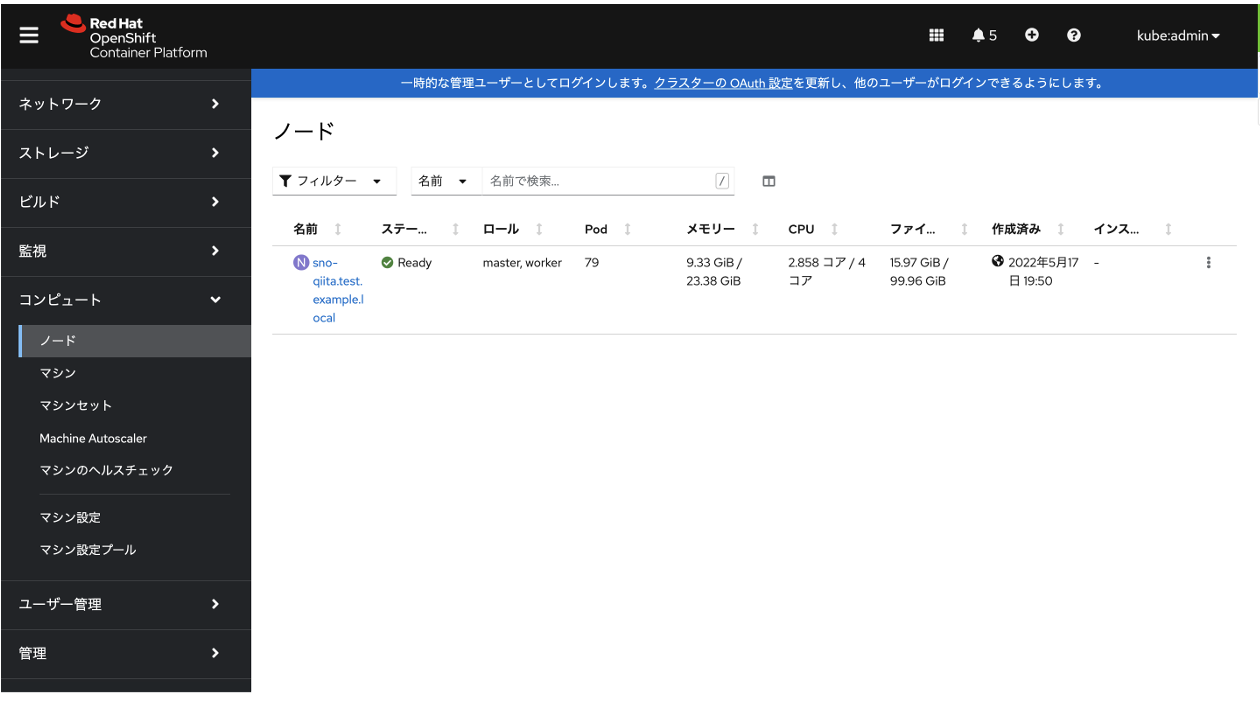
続いて、Webコンソールでもアクセスしてみます。先ほどのWebコンソールUELへアクセスし、kubeadminユーザでログインします。
<ログイン画面>
<ログイン後のダッシュボード画面>
<左の選択欄より : "コンピュート" -> "ノード" を選択>
以上で、2回に渡りご紹介したSingle Node OpenShift構成の作業ログになります!
今後はこちらの環境を使用しながら、OpenShiftの基本的なセットアップなどを作業ログとしてアップできたらと思います。ご興味ある方はまたご覧ください。