はじめに
「CI/CD Advent Calendar 2021」12日目です。本カレンダーの1日目にGCPのCloud BuildでCI/CD環境を構築しSpring Bootアプリをビルド、デプロイするを投稿しましたが、今回は少し違った構成でCI/CD環境を構築してみます。
構築するCI/CD環境構成
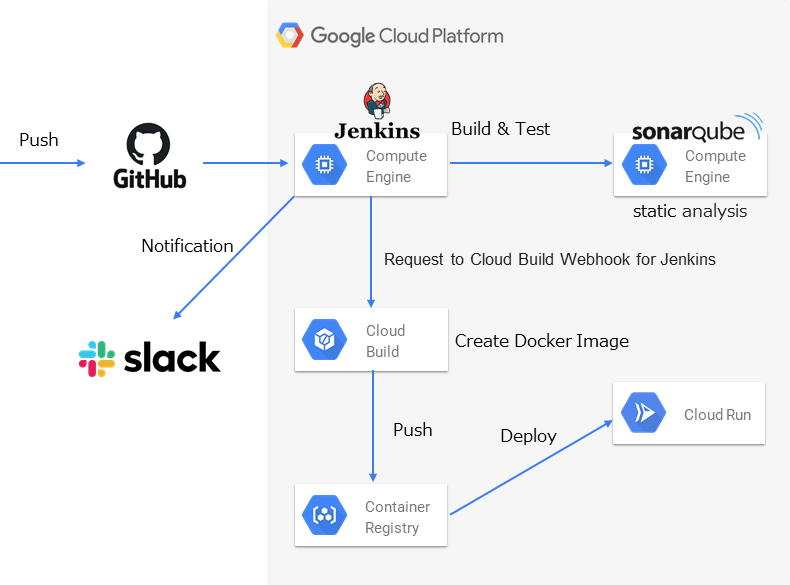
今回構築するCI/CD環境構成は以下の通りです。
■概要
※Jenkinsは全てPipelineを利用します
- GitHubへのPushをトリガーにJenkinsからSonarQubeの静的解析を実行します。
- Jenkinsでビルドとテストを実行します。
- GCPのCloud BuildでCI/CD環境を構築しSpring Bootアプリをビルド、デプロイするで作成した環境を利用してCloud Runへデプロイします(Cloud BuildのWebhookをJenkinsからCurlコマンドで実行させることで実現します)
- 最後にJenkinsの結果をSlackへ通知します。
なお、利用する資材は前回と同じくJava8で書かれたSpring Boot + H2DBのRest APIのサンプルです。
構築してみる
1. ビルドサーバーの構築
ビルドサーバーとなるGCEインスタンスにJenkinsをインストールをします。Jenkinsのインストール方法は公式サイトやWeb上で多くの記事があるのでここでの詳細は割愛しますが、今回はMavenを使ったビルドを行うため、以下のプラグインをインストールしておきます。

2. SonarQubeサーバーの構築
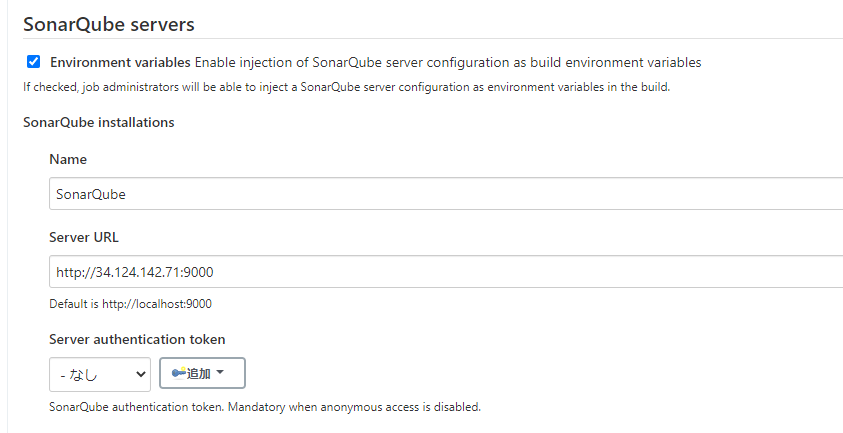
ビルドサーバーとは別にSonarQubeサーバーを構築します。SonarQubeはGCPのマーケットプレイスに登録されているものを利用しました。こちらも数クリックで構築できるため詳細は割愛しますが、Jenkins側の設定としては以下を行います。
2-1 SonarQube Scanner for Jenkinsプラグインのインストール
2-2 Jenkinsのシステムの設定からSonarQubeサーバーの情報の登録
3. JenkinsとSlackの連携設定
JenkinsとSlackを連携させるための設定をします。こちらの記事がとても分かりやすく書かれていたため、こちらを参考に設定しましたが、今回はPipelineからSlack APIを呼び出すため以下も追加で行います。
3-1 Slack Notificationプラグインのインストール
4. Cloud Buildのビルドトリガーの作成
今回はJenkinsからCloud BuildのWebhookを利用するため、ビルドトリガーがWebhookイベントとなるトリガーを作成します。
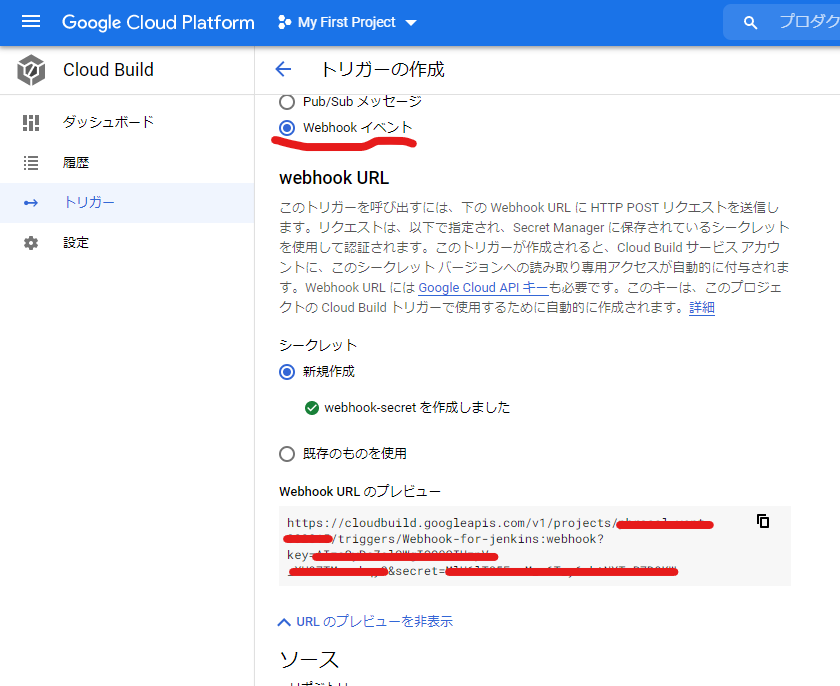
Webhookイベントのトリガーを作成するとURLが発行されるので、そのURLをJenkinsから叩く形になります。
5. Jenkinsfileの作成
pipeline {
  agent any
  stages {
    stage('SonarQube Analysis') {
      steps {
        script {
          def mvn = tool 'My Maven'
          withSonarQubeEnv() {
            sh "${mvn}/bin/mvn sonar:sonar"
          }
        }
      }
    }
    stage('Build & Test') {
      steps {
        sh "mvn test"
      }
    }
    stage('Create Container Image & Deploy') {
      steps {
        sh "curl -X POST -d '{}' 'https://cloudbuild.googleapis.com/v1/projects/PROJECT_NAME/triggers/Webhook-for-jenkins:webhook?key=KEY&secret=SECRET'"
      }
    }
  }
  post {
    // Allureレポートを入れてみたがうまく動かないので後で対応
    always {
      script {
        allure([
          includeProperties: false,
          jdk: '',
          properties: [],
          reportBuildPolicy: 'ALWAYS',
          results: [[path: 'target/allure-results']]
        ])
      }
    }
    success {
      slackSend color: "good", message: "Build Successful $JOB_NAME. See $BUILD_URL"
    }
    failure {
      slackSend color: "danger", message: "Build Failure $JOB_NAME. See $BUILD_URL"
    }
  }
}
6. Dockerfileの作成
# Spring BootアプリをビルドするためMaven/Java8のDockerイメージを利用
FROM maven:3.5-jdk-8-alpine AS builder

# ビルド時のワークディレクトリの設定
WORKDIR /app
COPY pom.xml .
COPY src ./src

# 成果物(jarファイル)を作成(CompileとTestはJenkinsで行うためSkip)
RUN mvn package -Dmaven.test.skip

# Spring Bootアプリの実行環境にopenjdk:8-jre-alpineを利用
FROM openjdk:8-jre-alpine

COPY --from=builder /app/target/Spring-Boot-RESTful-API-Test-Sample-1.0.0-SNAPSHOT.jar /app.jar

# Docker Run時にjavaコマンドでSpring Bootを起動(Embedded Tomcatを起動)
CMD ["java", "-Djava.security.egd=file:/dev/./urandom", "-jar", "/app.jar"]
7. cloudbuild.yamlの作成
steps:
# Dockerイメージの作成
- name: 'gcr.io/cloud-builders/docker'
  args: ['build', '-t', 'gcr.io/$PROJECT_ID/spring-boot-restful-api-test:$COMMIT_SHA', '.']
# DockerイメージをContainer RegistryへPush
- name: 'gcr.io/cloud-builders/docker'
  args: ['push', 'gcr.io/$PROJECT_ID/spring-boot-restful-api-test:$COMMIT_SHA']
# Clourd RunへDockerイメージをデプロイ
- name: 'gcr.io/google.com/cloudsdktool/cloud-sdk'
  entrypoint: gcloud
  args:
  - 'run'
  - 'deploy'
  - 'spring-boot-restful-api-test'
  - '--image'
  - 'gcr.io/$PROJECT_ID/spring-boot-restful-api-test:$COMMIT_SHA'
  - '--region'
  - 'asia-northeast1'
images:
- 'gcr.io/$PROJECT_ID/spring-boot-restful-api-test:$COMMIT_SHA'
動作確認
任意のファイルを適当に修正しGitHubへPushして動作確認をしてみます。
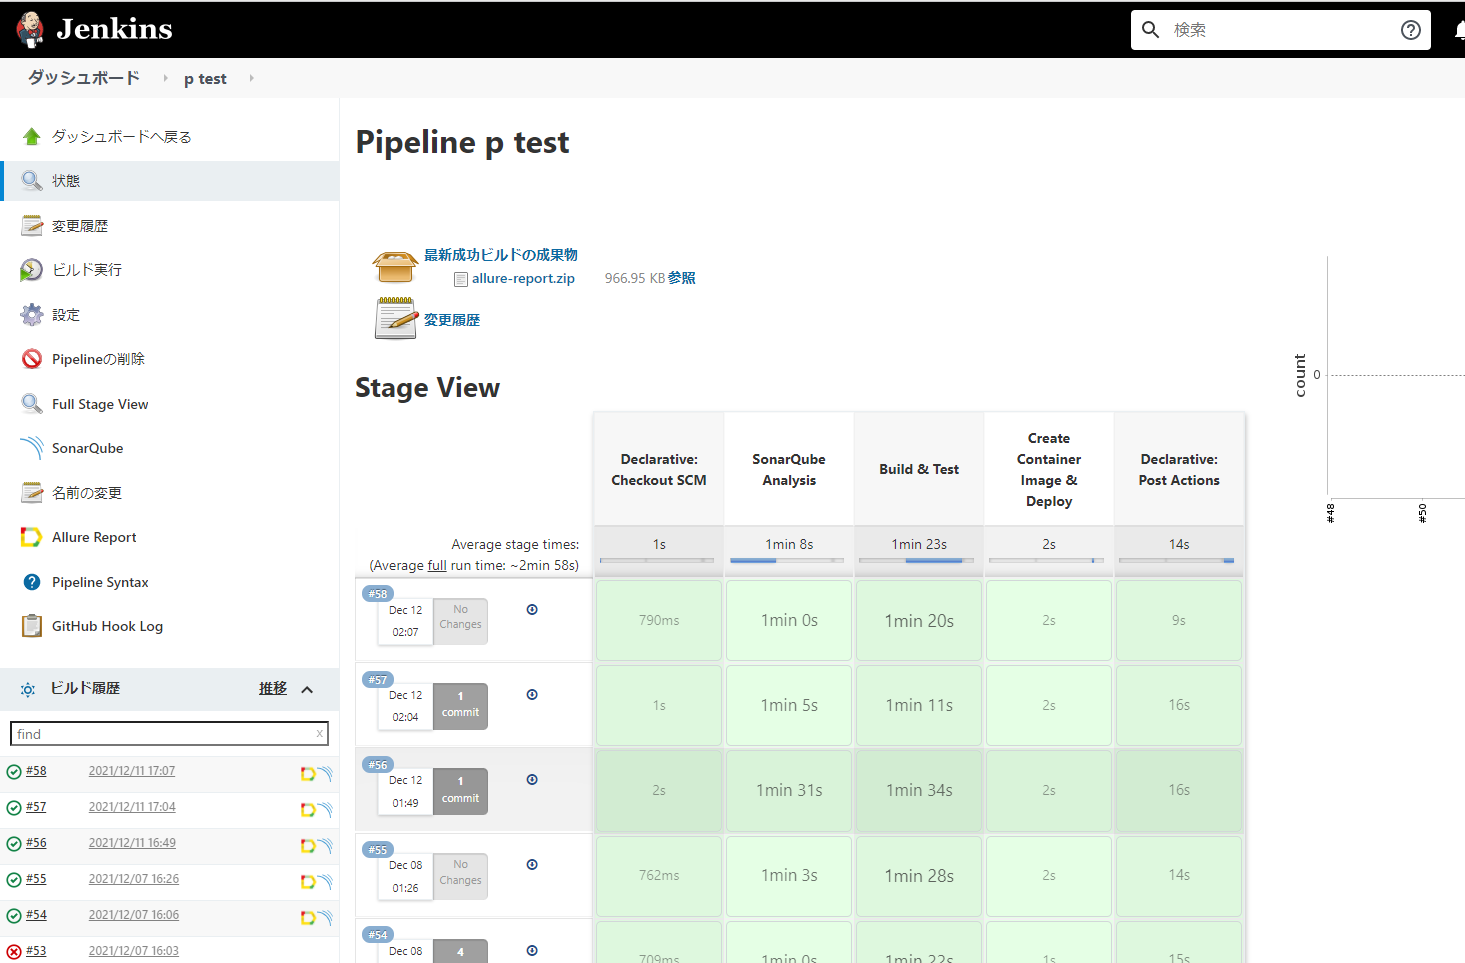
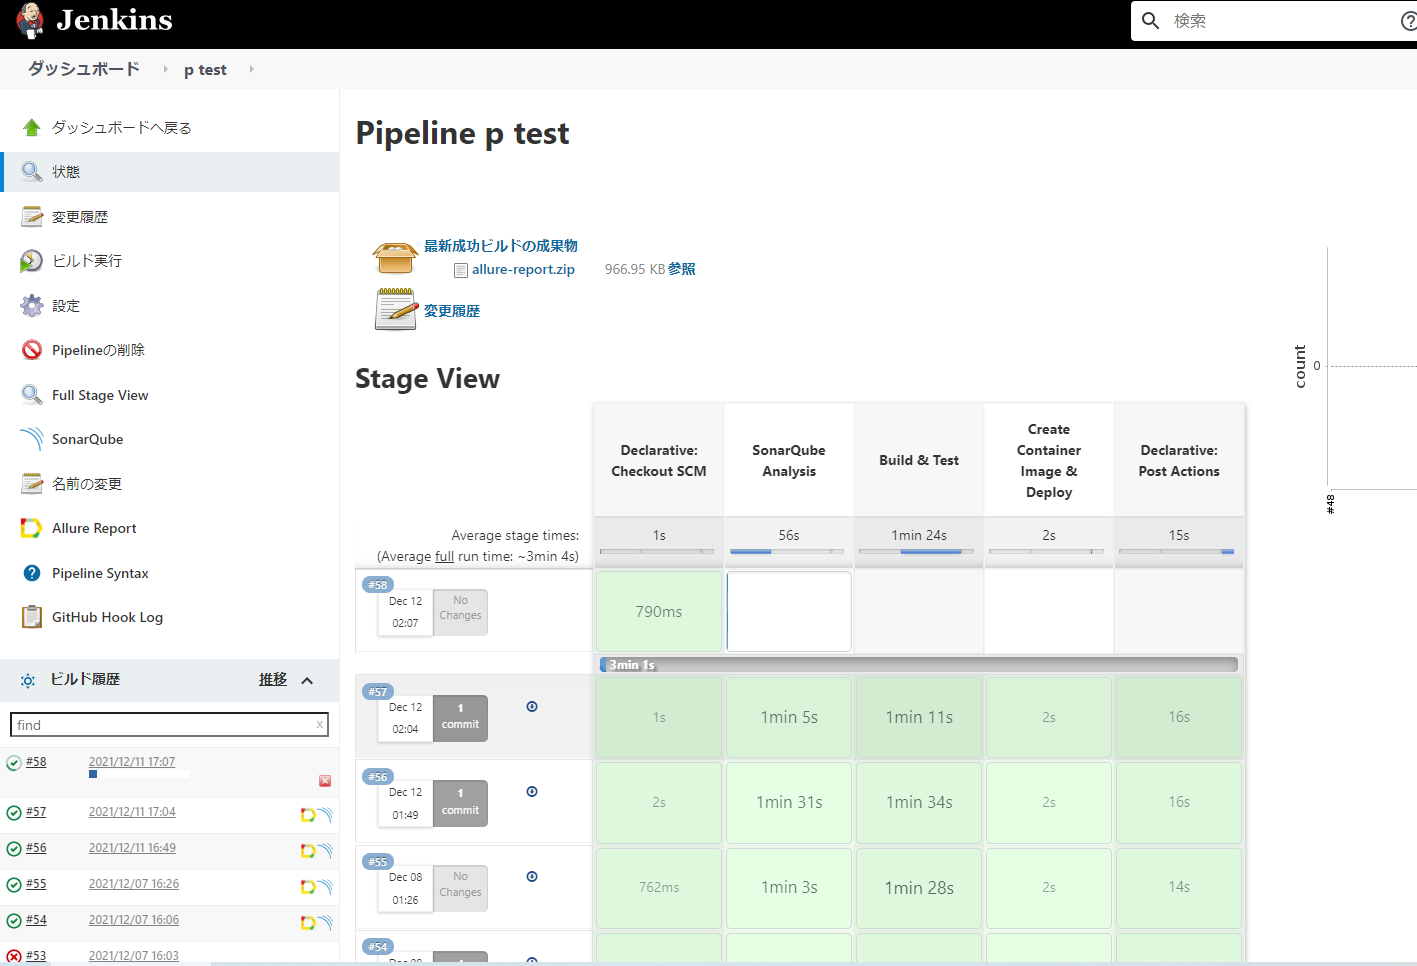
Jenkinsジョブが開始しました(ジョブ名が適当なのはスルーしてください)。
SonarQube側も見てみます。
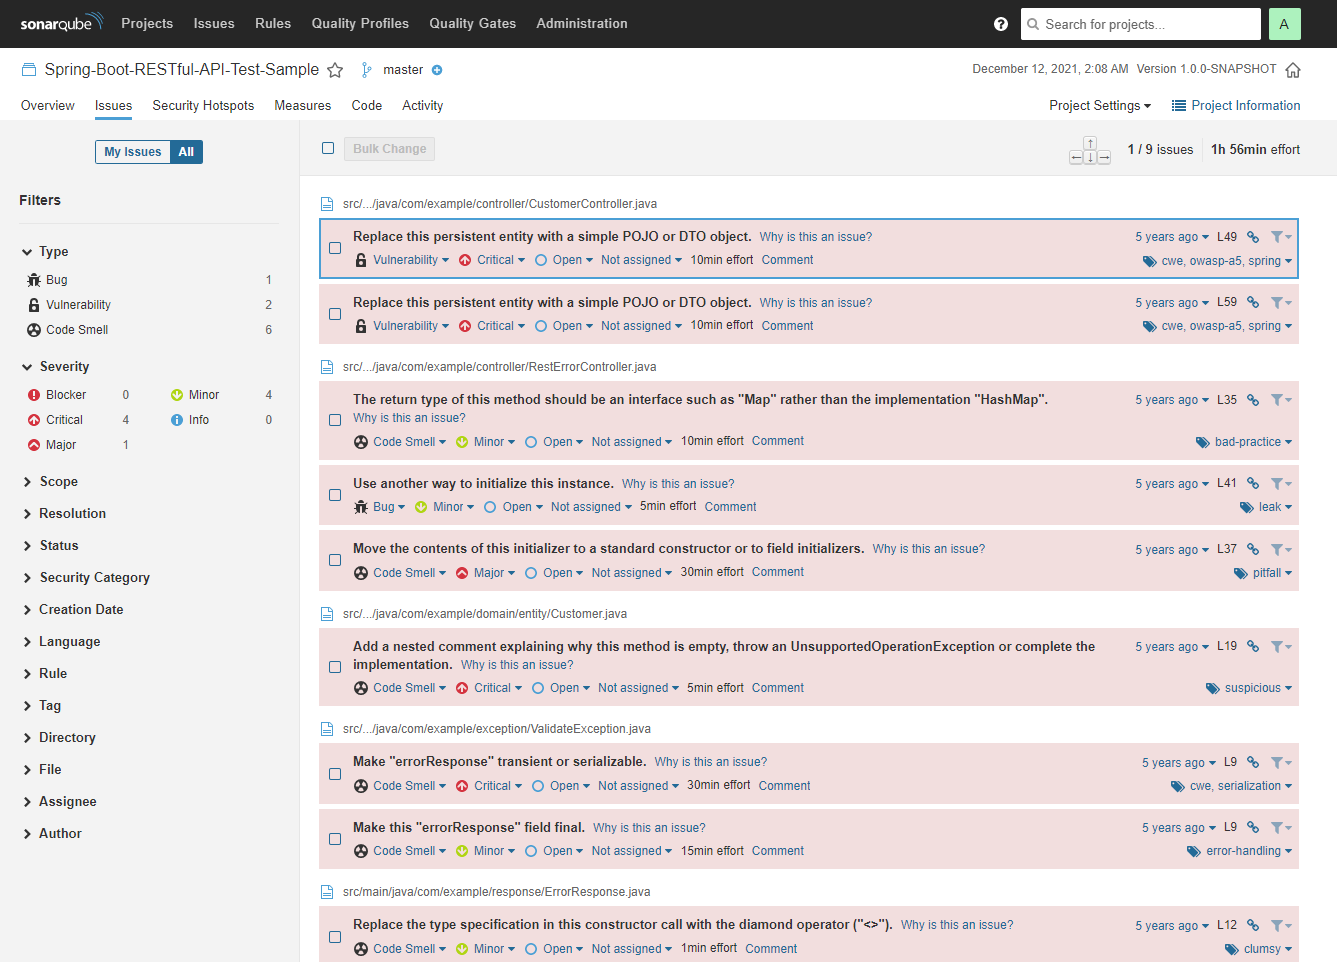
色々と指摘されていますが、Jenkinsから静的解析を実行できました。
Slackも見てみます。
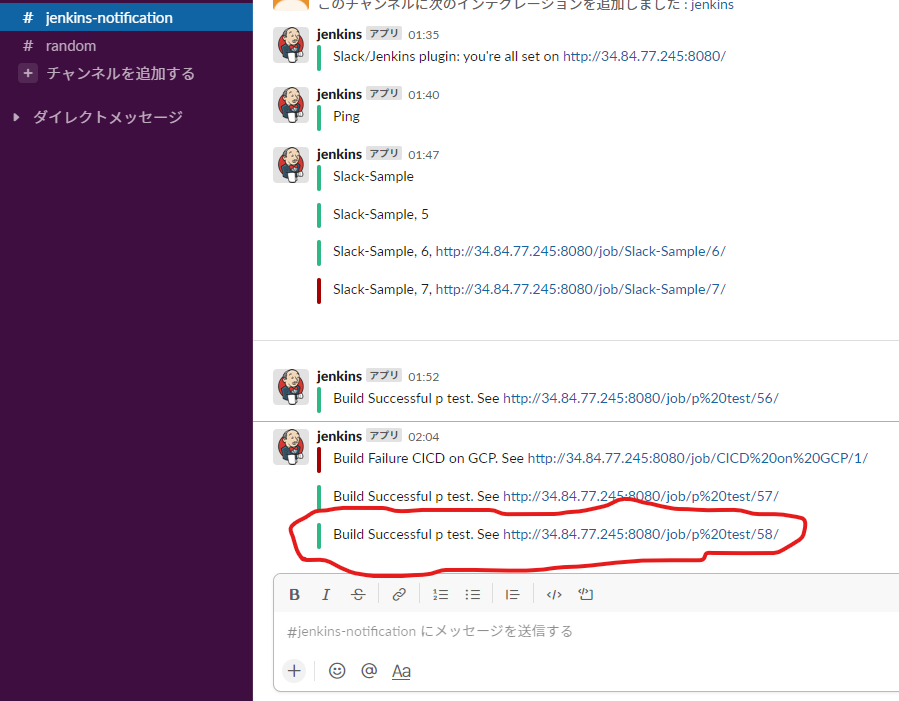
いくつか通知が混ざってますが、一番下のがそれに該当します、問題なく通知もできています。
最後にCloud Buildを確認します。

こちらも無事に完了しCloud Runへデプロイすることができました。
Appendix
- ソースリポジトリ ※5年前くらいにCircle CI、CodeCov、Slack連携するのに作ったお試しリポジトリになります
以上です。
