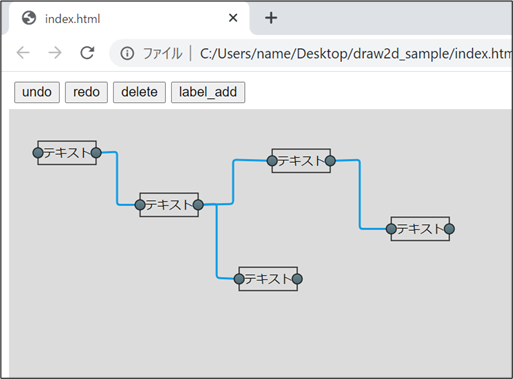
今回は JavaScript、htmlを使用して、フロー図を作成することができる draw2dというライブラリについて書いていきます。
サンプル
<追記 2021/11/15>
githubの機能を使用して、下記に、サンプルのページを作成しました。
https://nagajun1.github.io/sample_draw2d/
ソースコードは、下記のリンクです。
https://github.com/NagaJun1/sample_draw2d
サンプルコード
今回記事を書くにあたって作成したのが下記のコードです。
draw2d、jquery、jquery-uiのライブラリを読み込む必要がありますが、今回はCDNで設定しているため、追加でファイルを用意してもらう必要はありません。
下記の内容をローカルにコピーして、ブラウザーで開いてもらうだけでもそれなりの動きができる様になっているかと思います。
<head>
    <meta http-equiv="Content-Type" content="text/html; charset=utf-8" />
    <!-- cdn読み込み -->
    <script src="https://code.jquery.com/jquery-3.3.1.js"></script>
    <script src="https://code.jquery.com/ui/1.12.1/jquery-ui.js"></script>
    <script src="https://cdn.jsdelivr.net/npm/draw2d@1.0.38/dist/draw2d.js"></script>
    <script type="text/javascript">
        let canvas = null;
        document.addEventListener("DOMContentLoaded", function () {
            canvas = new draw2d.Canvas("canvas_id");

            //ドラッグ&ドロップで connectionを作成できるようにする
            canvas.installEditPolicy(new draw2d.policy.connection.DragConnectionCreatePolicy({
                createConnection: function () {
                    return new draw2d.Connection({
                        //connectionの形状の設定
                        router: new draw2d.layout.connection.InteractiveManhattanConnectionRouter()
                    })
                }
            }));
        });
        function canvas_redo() {
            canvas.getCommandStack().redo();
        }
        function canvas_undo() {
            canvas.getCommandStack().undo();
        }
        function figure_delete() {
            canvas.getCommandStack().execute(
                new draw2d.command.CommandDelete(canvas.getPrimarySelection()));
        }
        function label_add() {
            let label = new draw2d.shape.basic.Label({ text: "テキスト" });
            label.createPort("input");
            label.createPort("output");
            canvas.getCommandStack().execute(new draw2d.command.CommandAdd(canvas, label, 10, 10));
        }
    </script>
</head>

<body id="container">
    <div style="margin: 5px;">
        <input type="button" value="undo" onclick="canvas_undo()">
        <input type="button" value="redo" onclick="canvas_redo()">
        <input type="button" value="delete" onclick="figure_delete()">
        <input type="button" value="label_add" onclick="label_add()">
    </div>
    <div id="canvas_id" style="width:3000px; height:3000px;background-color: rgb(220, 220, 220);"></div>
</body>

</html>
サンプルコードを実行した場合の操作方法と、その処理がどのようにして実現しているかという点を合わせて説明していこうかと思います。
draw2d.Canvasの描写
まず、開いたタイミングで divのid="canvas_id"にdraw2d.Canvasが生成されます。
コードとしては下記の部分です。
    <script type="text/javascript">
        let canvas = null;
        document.addEventListener("DOMContentLoaded", function () {
            canvas = new draw2d.Canvas("canvas_id");
        }
    </script>
    <div id="canvas_id" style="width:3000px; height:3000px;background-color: rgb(220, 220, 220);"></div>
生成された描写領域内にdraw2dで使用するオブジェクトを挿入しています。(描写領域が灰色になっているのは、領域を見やすくするためにしているだけなので、実際は色付ける必要はありません)
ラベルを描写
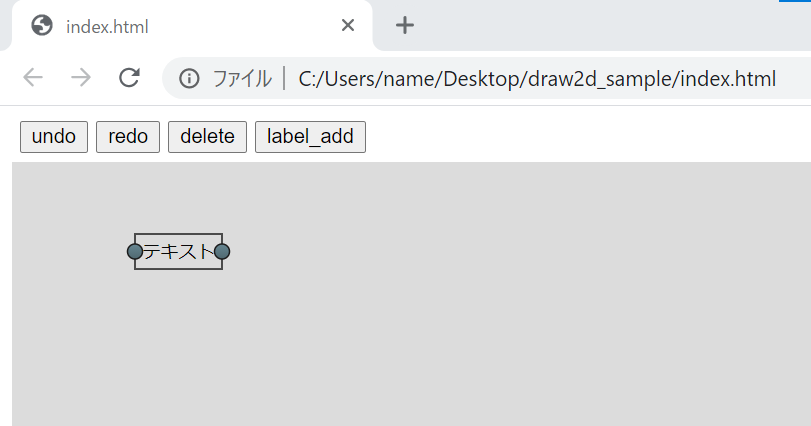
ページを表示すると上部にボタンが4つあるかと思います。そのうちの"label_add"を押下してください。
すると、描写領域内に"テキスト"と書かれたラベルが出現するかと思います。

ソースコードとしては下記の部分です。
        <script>
        function label_add() {
            let label = new draw2d.shape.basic.Label({ text: "テキスト" });
            label.createPort("input");
            label.createPort("output");
            canvas.getCommandStack().execute(new draw2d.command.CommandAdd(canvas, label, 10, 10));
        }
        </script>
        <input type="button" value="label_add" onclick="label_add()">
let label = new draw2d.shape.basic.Label({ text: "テキスト" });でラベルを生成し
canvas.getCommandStack().execute(new draw2d.command.CommandAdd(canvas, label, 10, 10));で canvasに挿入しています。
.createPort(~)でportを作成していますが、portは後のConnectionを作成するのに必要です。
今回はLabelを作成していますが、他にもCircleやRectangleなどの図形もあります。
また、Groupを使用することで入れ子にすることもできます。(Groupに関しては後日記事で補足を書こうかと思います)
因みに、canvasにfigure(draw2d上でのオブジェクトの呼び方)を追加する方法として.add()があるのですが、.add()を使用するとredo・undoに処理が反映されなくなるため、注意が必要です。
Connectionの描写
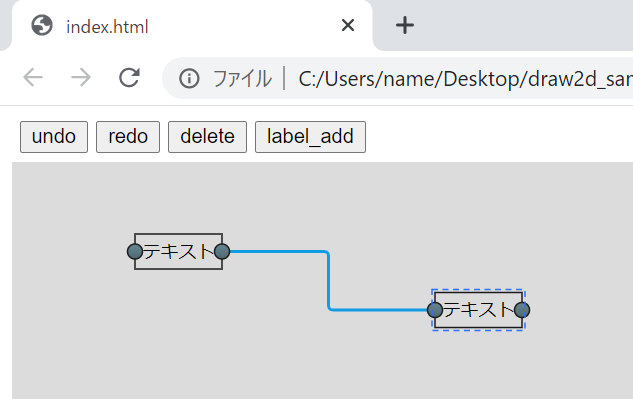
"label_add"でラベルを2つ追加した後、port(ラベルの左右についている灰色の〇)をドラッグして接続できる portにドロップするとConnectionと呼ばれる線を描写することができます。

portは前述の'.createPort(~)'で生成でき、"input"、"output"、"hybrid"の三種類があります。
名称で大体想像つくかと思いますが、inputとoutputはそれぞれ自身と同じ種類のportに接続することができず、今回作成していないhybridはportの種類を区別せずに接続することができます。
connectionの生成に関係しているコードは下記の部分です。
            //ドラッグ&ドロップで connectionを作成できるようにする
            canvas.installEditPolicy(new draw2d.policy.connection.DragConnectionCreatePolicy({
                createConnection: function () {
                    return new draw2d.Connection({
                        //connectionの形状の設定
                        router: new draw2d.layout.connection.InteractiveManhattanConnectionRouter()
                    })
                }
            }));
.installEditPolicy()でcanvasに対して様々な設定を付与することができるのですが、今回はDragConnectionCreatePolicyを設定して、ドラッグ&ドロップでConnectionを生成できるような設定にしてあります。(他にも、クリックでconnectionを描写する設定方法もあります)
また、router: new draw2d.layout.connection.InteractiveManhattanConnectionRouter()の記述に関しては、connectionの形状を設定しています。この設定をしていない場合は、デフォルトで直線のconnectionになります。
オブジェクトの削除
描写領域内のオブジェクト(figure)を選択(クリック)したあと、"delete"ボタンを押下するとオブジェクトを削除することができます。コードとしては下記の部分です。
        <script>
        function figure_delete() {
            canvas.getCommandStack().execute(
                new draw2d.command.CommandDelete(canvas.getPrimarySelection()));
        }
        </script>
        <input type="button" value="delete" onclick="figure_delete()">
処理の内容は、canvas.getPrimarySelection()で選択中のオブジェクトを取得し、.execute(new ~.CommandDelete()でオブジェクトを削除します。
これも'CommandAdd'と同様で、canvasの.remove()を使用するとオブジェクトを削除できるのですが、それをするとredo・undoに反映されなくなります。
redo・undo
redo・undoはそのままの意味で、処理を前に戻したり、進めたりすることができます。コードは下記の部分です。
        <script>
        function canvas_redo() {
            canvas.getCommandStack().redo();
        }
        function canvas_undo() {
            canvas.getCommandStack().undo();
        }
        </script>
        <input type="button" value="undo" onclick="canvas_undo()">
        <input type="button" value="redo" onclick="canvas_redo()">
処理の内容はそのまま意味合いですが、CommandAddやCommandDeleteと同様にcanvas.getCommandStack()でcanvasから取得した同一のCommandStackに対して処理を行うことで実現することができます。
参照
今回の書いた内容に関係する、公式のライブラリは下記のリンクにあります。
(二つ目のリンクの examplesの方にgithubのサンプルがあるので、コードの書き方で困った場合はそれを参考にすると解決しやすいです)
http://www.draw2d.org/draw2d_touch/jsdoc_6/#!/api/draw2d.Canvas
https://freegroup.github.io/draw2d/index.html#/examples
まとめ
今回はdraw2dというライブラリの基本的な使い方について書かせていただきました。
結構いろいろな表現ができるライブラリなのですが、今回書いた内容だけでは表現の内容に限りがあるかと思います。
後日補足で別の記事を書こうかと思います。補足として書こうと考えている内容については下記の通りです。
・draw2dの描写情報をJsonで書き出し、Jsonの読み込み
・draw2d上でのイベント処理設定
・Groupの作成方法について
・フローからの処理順の取り出し(これについてはライブラリではなくロジックの話になります)
どれも、draw2dの公式のgithub コードを参考にすれば実現できるような内容なので、いち早く知りたいという方は公式のサンプルコードを見て、自身で実装してみることをお勧めします。