はじめに
- ESP32-CAMを使う場合、ほぼSoftAPモードで使っているが、出先のWiFi環境でデモする必要があり、WiFiManagerを導入した。
- ただし、WiFiManagerを使うと動的に取得したIPアドレスを知る手段が必要になる。
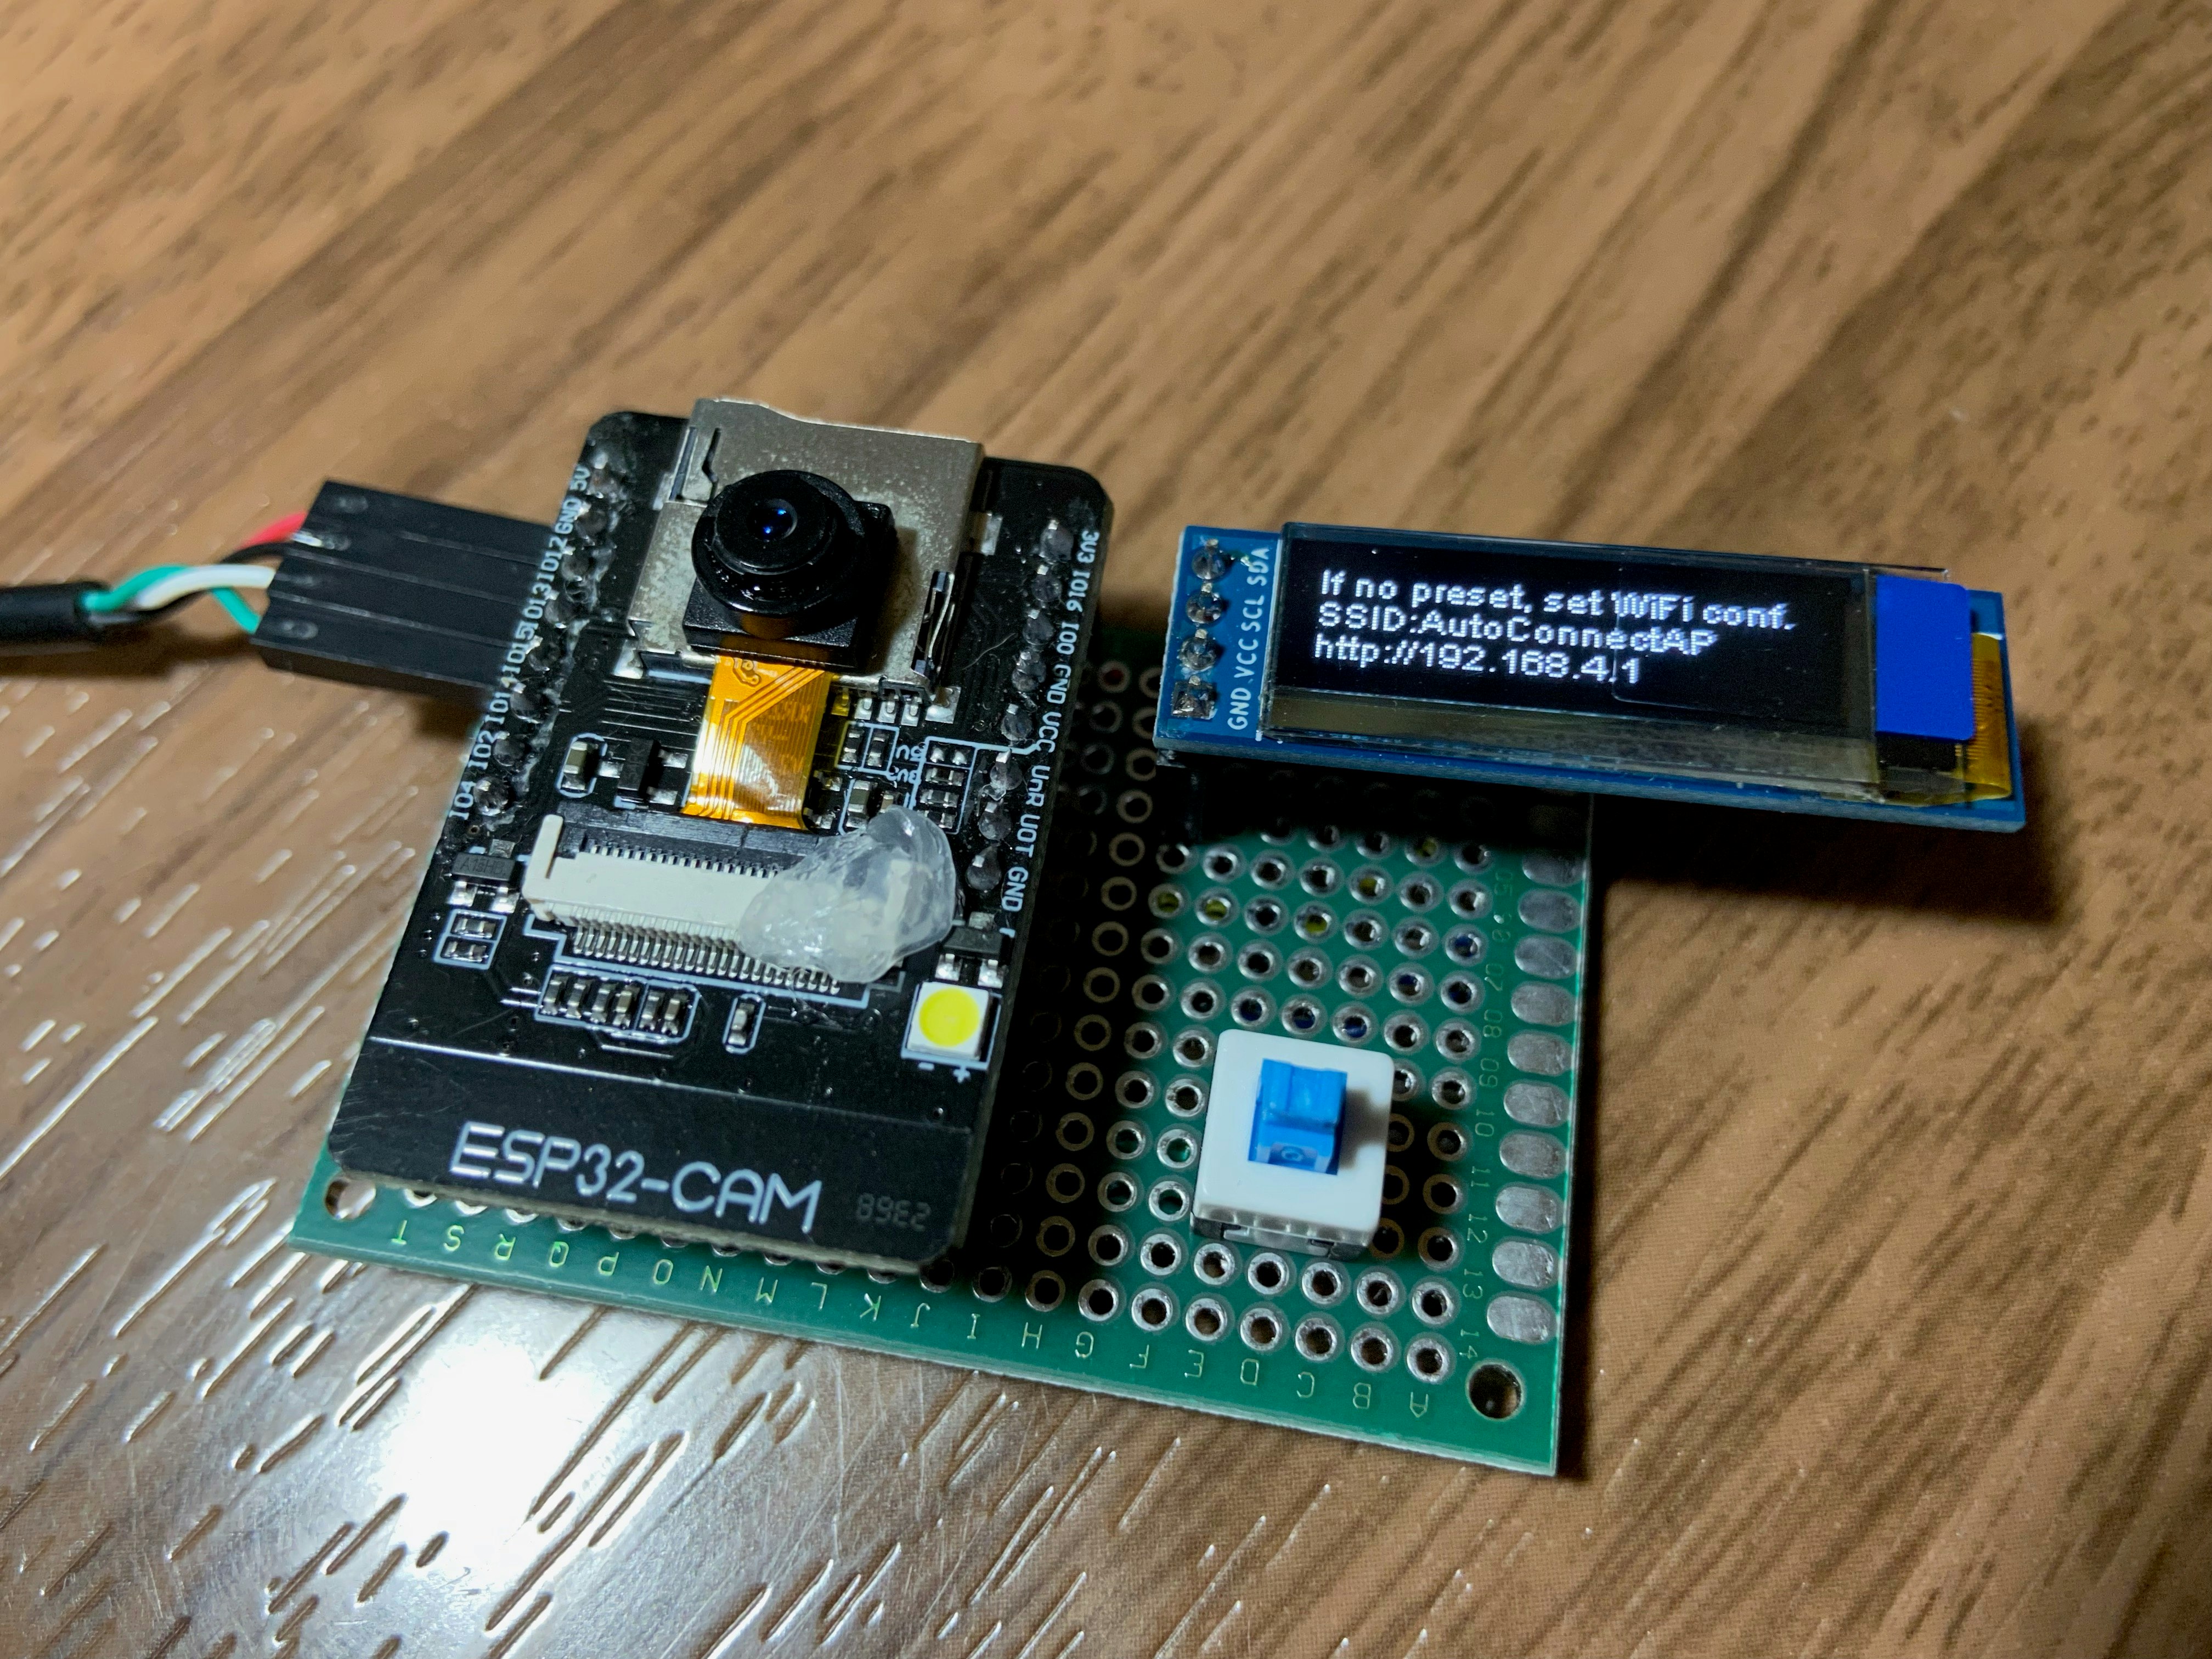
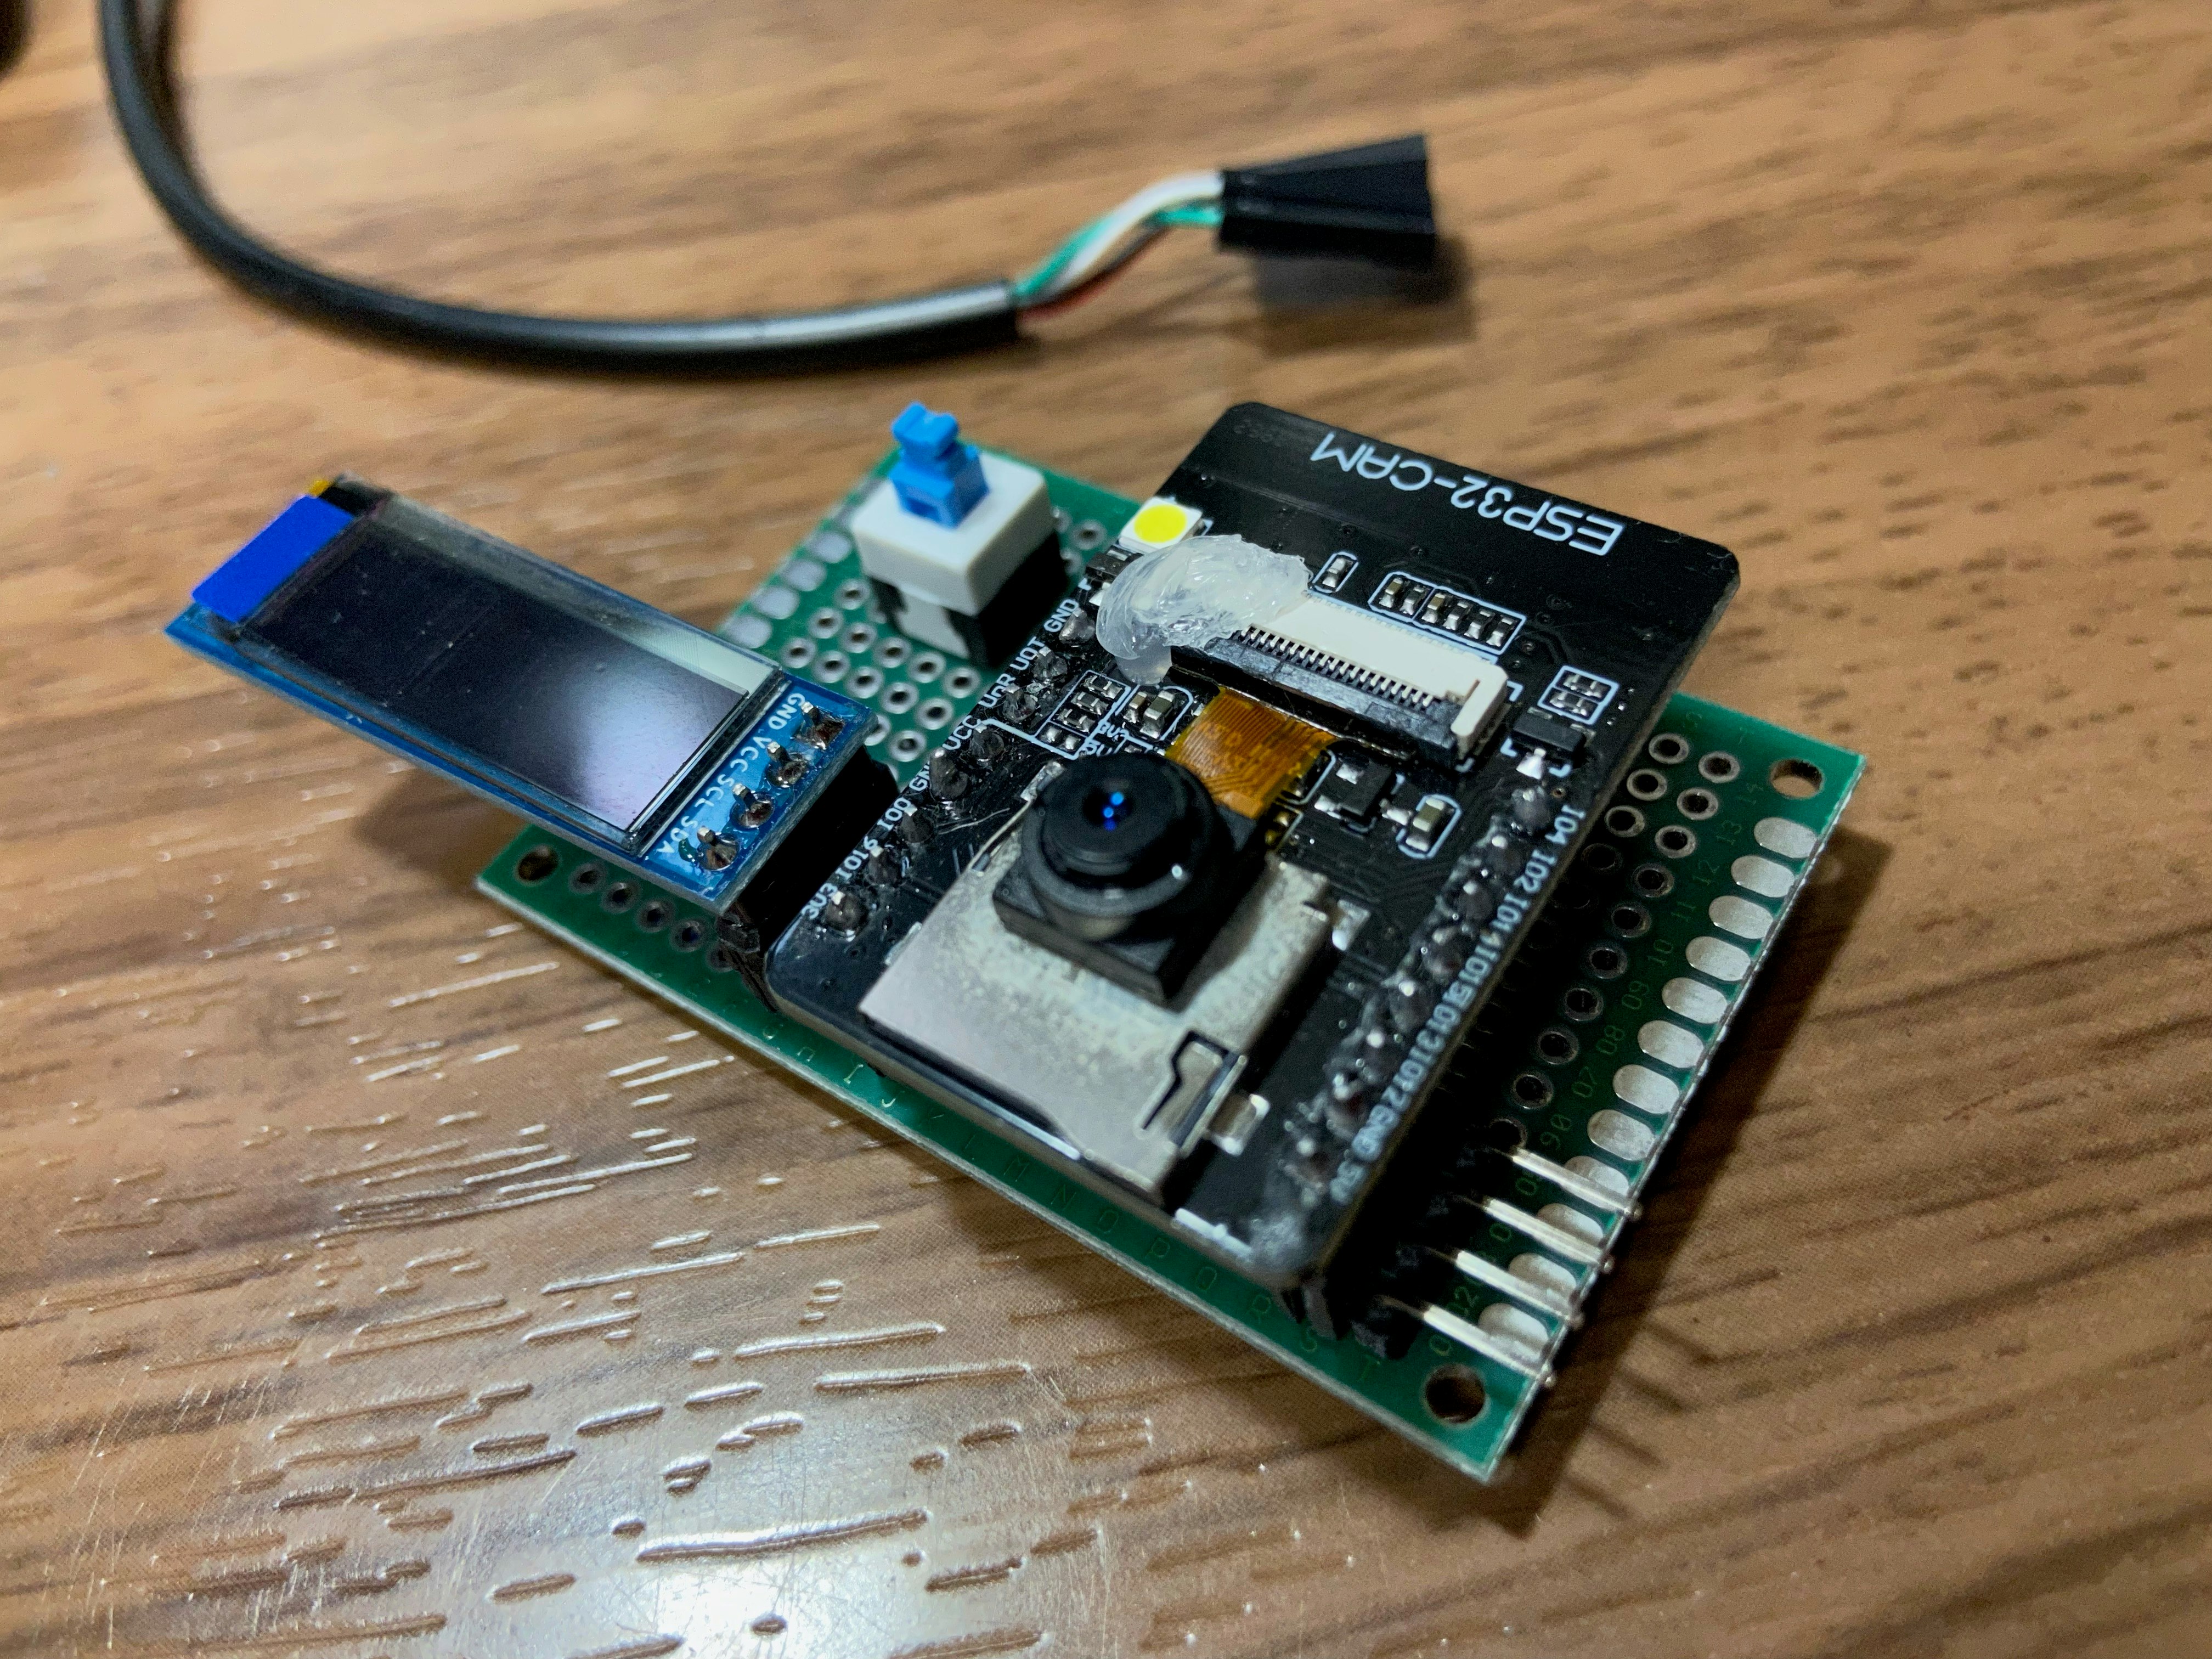
- 今回、OLEDに表示出来るようにするついでに書き込みスイッチ付きの基板を作ってみたら凄く便利だったのでメモしておく。
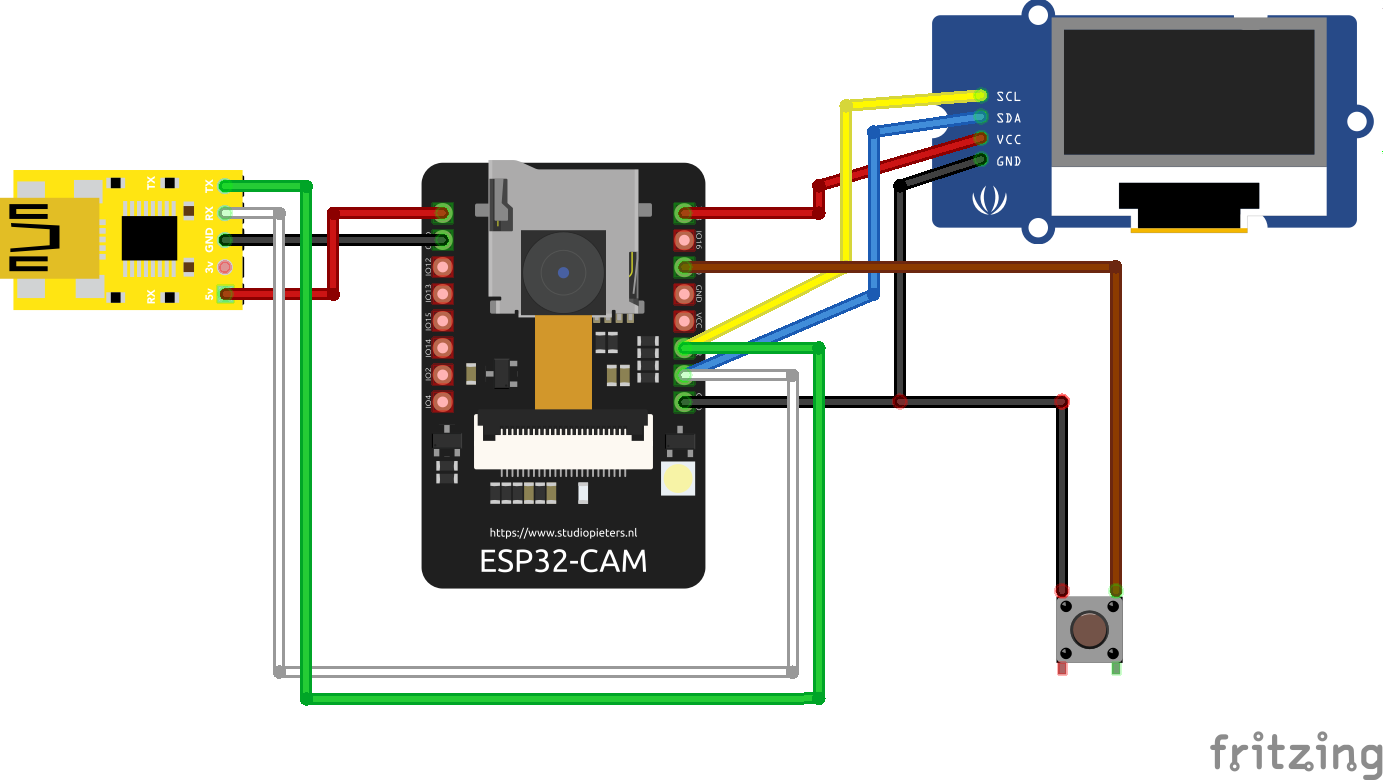
配線図
- 前提知識
- 基本的な内容は「約800円のESP32-CAMで乾電池駆動のWebカメラサーバーを立てる」を参照。
- OLEDはこれを使用。
- 「0.91" OLED I2C 液晶ディスプレイモジュール 128x32, 約350円」
- ESP32-CAMは使えるGPIOが少ないため、起動後は基本的に使わない
UOT,UORにI2Cでディスプレイを接続する。
- ついでに
- 書き込み時にショートさせる
IO0/GND用に押し込み式のスイッチを追加。 - USB/TTLシリアル変換ケーブルから接続するようにオスのジャンパピンを出した。
- 書き込み時にショートさせる
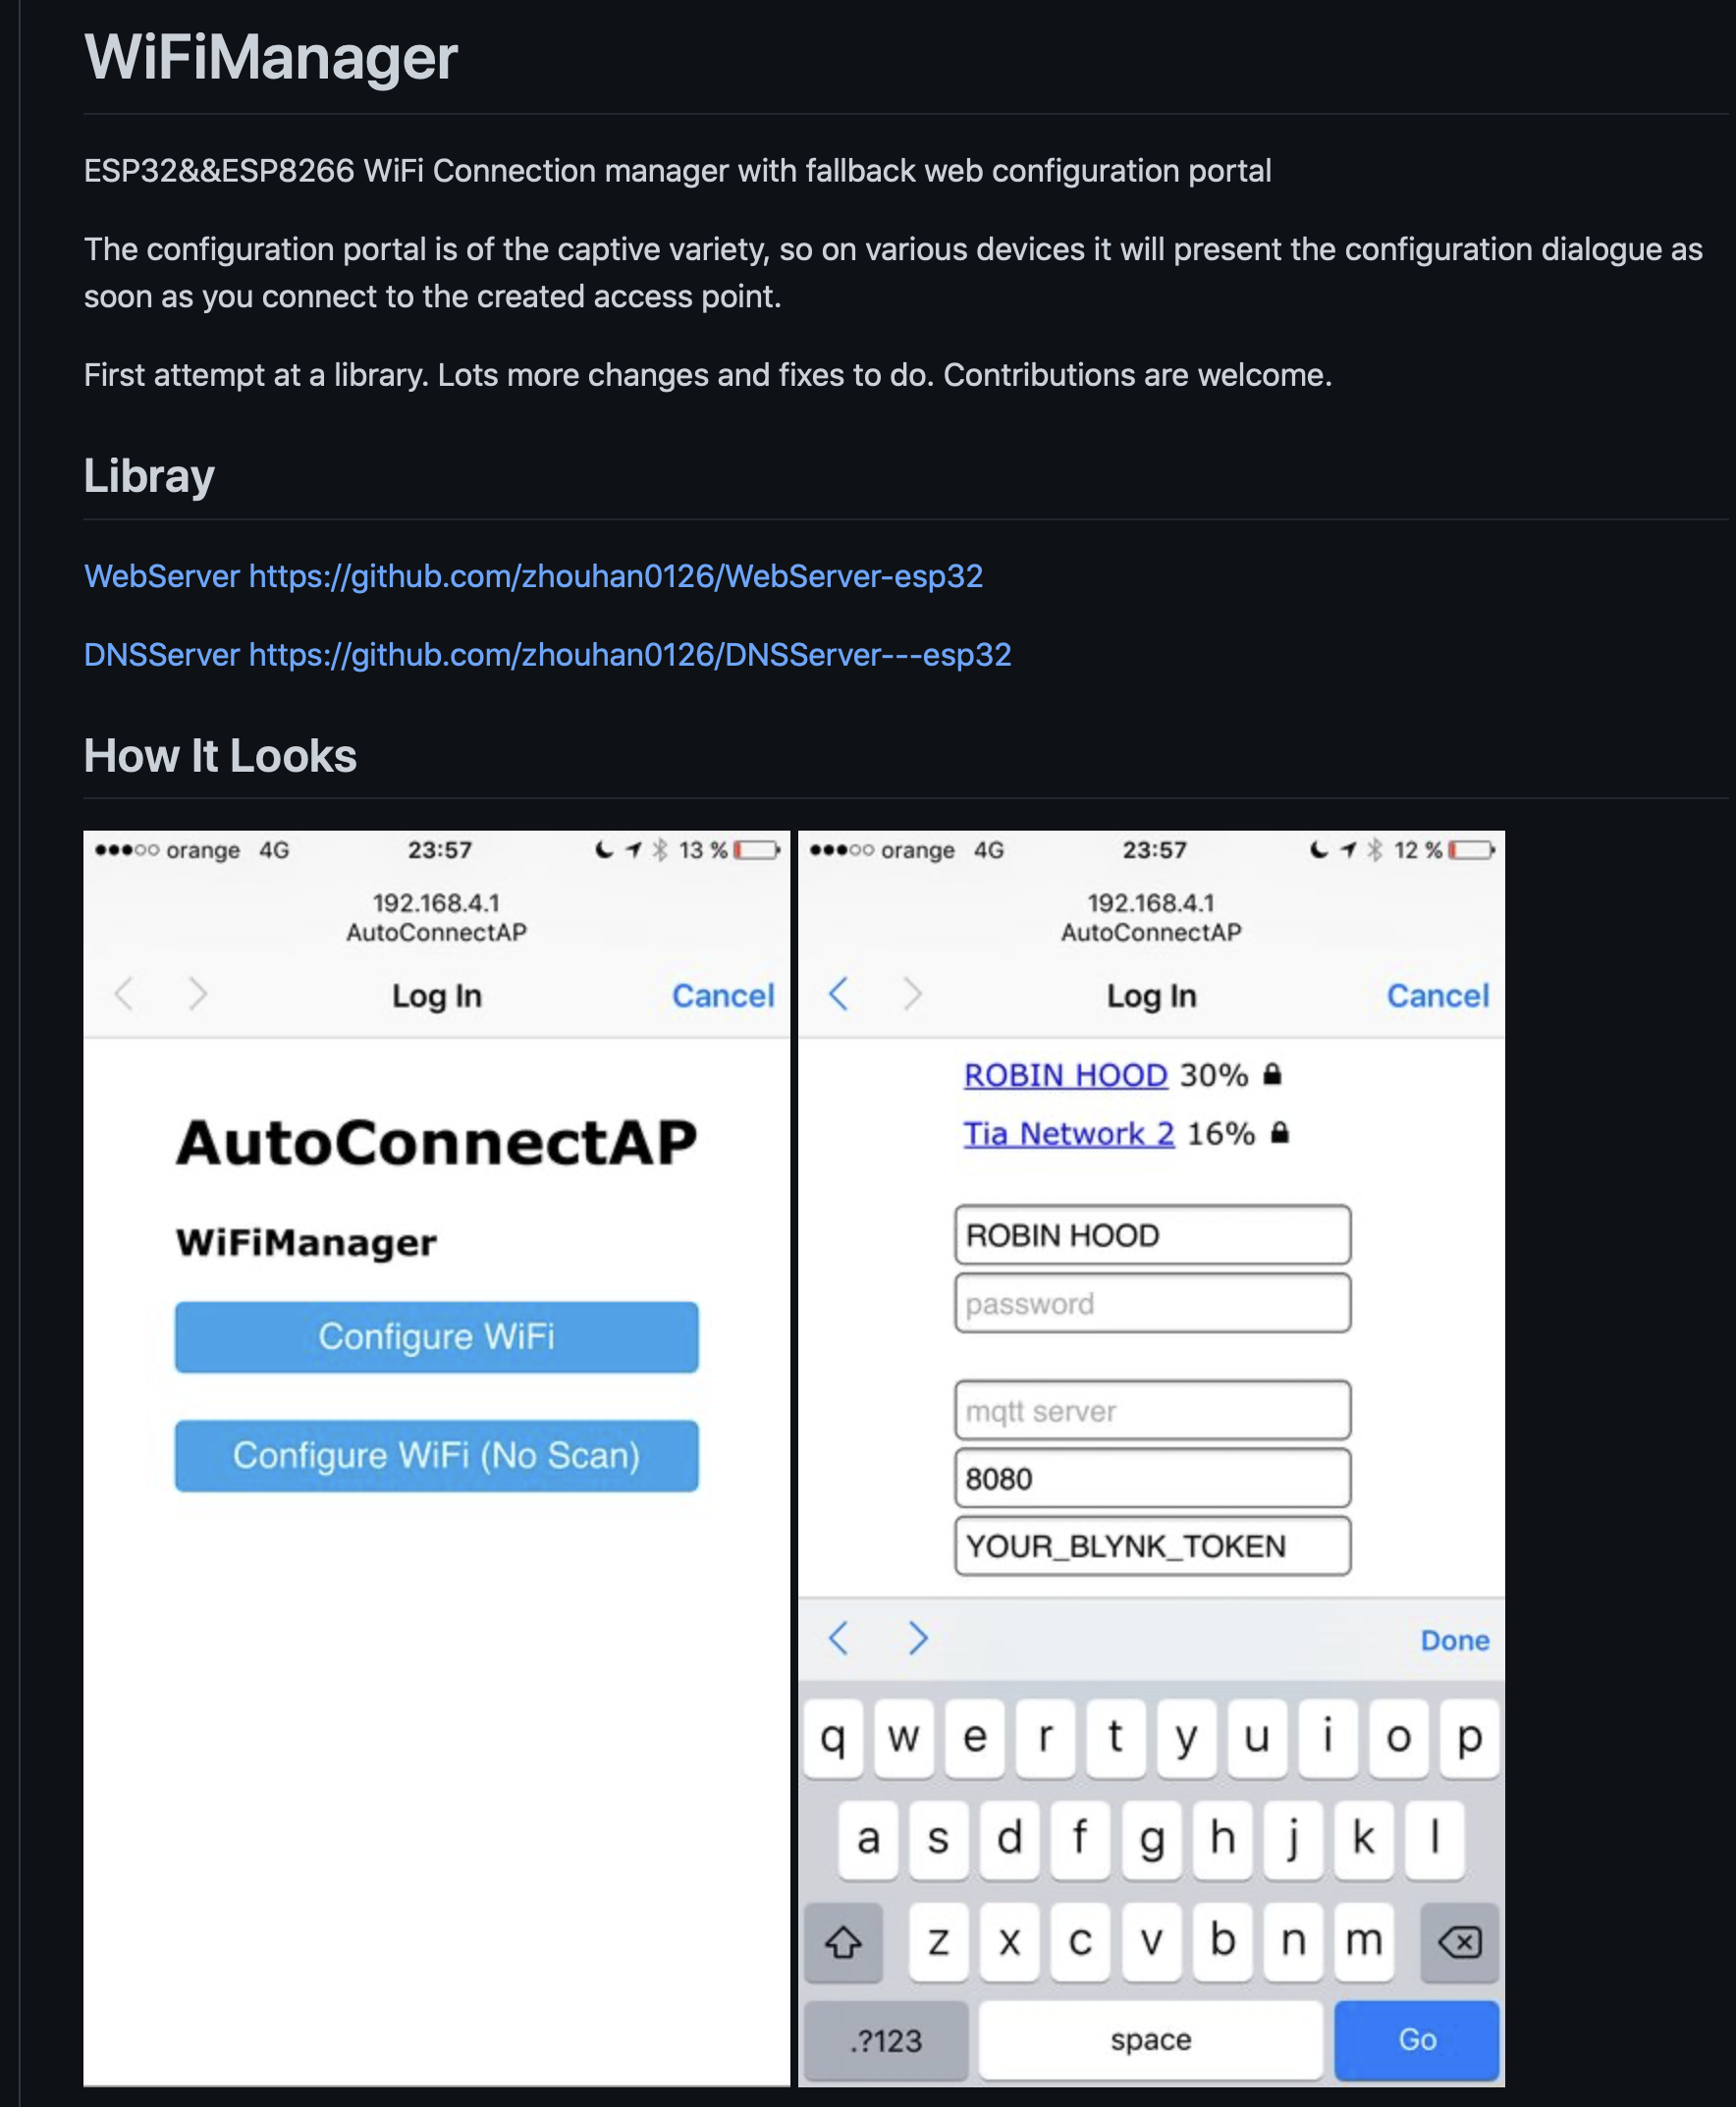
WiFiManager
- こんな感じでスマホからESP32のWiFi設定が可能になる。
- 自宅以外でWiFiアクセスポイントに接続する場合めっちゃ便利。
platformio.ini
- 最近はすっかりVSCode&PlatformIOが定番なので。
[env:esp32cam]
platform = espressif32
board = esp32cam
framework = arduino
monitor_speed = 115200
lib_deps =
	https://github.com/gitnabeshin/WIFIMANAGER-ESP32.git
	thingpulse/ESP8266 and ESP32 OLED driver for SSD1306 displays@^4.2.0
- WifiManagerはgitからcloneした状態だとコンパイルエラーになったので、自分で修正。
- 他は試して無いが、PlatformIO使ったこの環境だとダメなのかしら?
https://github.com/gitnabeshin/WIFIMANAGER-ESP32.git
コード
- あとで使い回せるように最低限のコードで。
- Wifi接続用にWiFiManagerを使用。
- OLEDへの表示はThingPulse OLED SSD1306を使用。
- OLEDに表示すると混線してシリアルモニタが使えなくなるので、使いたい場合は
#ifdef I2C_OLED_ACTIVEで切り替え可能。
main.cpp
/******************************************************************
 * ESP32-CAM WufiManager with SSD1306 OLED
 * WiFiManager
 *       https://github.com/zhouhan0126/WIFIMANAGER-ESP32.git
 * ThingPulse OLED SSD1306 (ESP8266/ESP32/Mbed-OS)
 *       https://github.com/ThingPulse/esp8266-oled-ssd1306.git
 ******************************************************************/

# if defined(ESP8266)
# include <ESP8266WiFi.h>          //https://github.com/esp8266/Arduino
# else
# include <WiFi.h>          //https://github.com/esp8266/Arduino
# endif

//needed for library
# include <DNSServer.h>
# if defined(ESP8266)
# include <ESP8266WebServer.h>
# else
# include <WebServer.h>
# endif
# include <WiFiManager.h>         //https://github.com/tzapu/WiFiManager

// I2C Pins shares with Serial. These can't be use at the same time.
// To debug with Serial monitor, desable this Macro.
# define I2C_OLED_ACTIVE

# ifdef I2C_OLED_ACTIVE
# include <Wire.h>
# define I2C_SDA 1
# define I2C_SCL 3
# include "SSD1306Wire.h"
SSD1306Wire  display(0x3c, I2C_SDA, I2C_SCL, GEOMETRY_128_32);
/*
    --------------------------------------
      USB-TTL     ESP-32-CAM  SSD1306-OLED
    --------------------------------------
        5V  ----  5V
                  3V   ----   3V
        GND ----  GND  ----   GND
        WHITE --  UOT  ----   SDA
        GREEN --  UnR  ----   SCL
*/
# endif

void setup() {

    Serial.begin(115200);
    Serial.println("Initializing...");

# ifdef I2C_OLED_ACTIVE
    // Display setup
    Wire.begin(I2C_SDA, I2C_SCL);

    display.init();
    display.setTextAlignment(TEXT_ALIGN_LEFT);
    display.flipScreenVertically();
    display.setFont(ArialMT_Plain_10);
    display.clear();
    display.drawString(0,0, "WiFi connecting...");
    display.display();
    delay(1000);

    display.clear();
    display.drawString(0,0, "If no preset, set WiFi conf.");
    display.drawString(0,10, "SSID:AutoConnectAP");
    display.drawString(0,20, "http://192.168.4.1");
    display.display();
# endif

    WiFiManager wifiManager;

    if(!wifiManager.autoConnect("AutoConnectAP")) {
        Serial.println("failed to connect and hit timeout");

# ifdef I2C_OLED_ACTIVE
        display.clear();
        display.drawString(0,0, "Error: Timeout...");
        delay(3000);
# endif

        //reset and try again, or maybe put it to deep sleep
        ESP.restart();
        delay(5000);
    }

# ifdef I2C_OLED_ACTIVE
    Serial.println("connected...");
    display.clear();
    display.drawString(0, 0, "  connected!!!");
    delay(1000);
# endif

    // start CameraServer here

# ifdef I2C_OLED_ACTIVE
    display.clear();
    display.drawString(0, 0, "SSID: " + WiFi.SSID());
    display.drawString(0, 18, "IP: " + WiFi.localIP().toString());
    display.display();
    delay(5000);

    display.clear();
    display.drawString(0, 0, "Camera ready!! Use");
    display.drawString(0, 18, "http://" + WiFi.localIP().toString() );
    display.display();
# endif

}

void loop() {
    // put your main code here, to run repeatedly:
}
OLED出力用のI2C設定
- ESP32はI2Cで使うピンをコードで選択可能。
-
UOT,UORピンを使用する場合は、こんな感じで使えば良い。- こうやっとくと、後でロボットとか制御したくなった場合にムダなくGPIOが使える。(
UOT/UORは起動後は使わないので) - もちろん、シリアルモニタでデバッグしつつ、液晶表示もやりたい場合は別の空いてるGPIOを指定すれば良い。
- こうやっとくと、後でロボットとか制御したくなった場合にムダなくGPIOが使える。(
# ifdef I2C_OLED_ACTIVE
# include <Wire.h>
# define I2C_SDA 1
# define I2C_SCL 3
# include "SSD1306Wire.h"
SSD1306Wire  display(0x3c, I2C_SDA, I2C_SCL, GEOMETRY_128_32);
    Wire.begin(I2C_SDA, I2C_SCL);
    display.init();
WiFiManager関連
- ESP32-CAMを起動して内蔵記憶メモリに前回の接続先に接続でき無い場合、Config用のSSIDに接続してWiFi設定をする。
if(!wifiManager.autoConnect("AutoConnectAP")) {
- その場合、WiFiManagerのSSIDにつなぐ必要があるが、IPアドレスを忘れちゃったりするので以下をOLEDに表示する。
- SSID:
AutoConnectAPに接続後、ブラウザからhttp://192.168.4.1を開くとWiFi設定ページが出てくる。 - ここで設定してやると、次回以降そのSSIDにつなぎに行ってくれる。
- SSID:
    display.clear();
    display.drawString(0,0, "If no preset, set WiFi conf.");
    display.drawString(0,10, "SSID:AutoConnectAP");
    display.drawString(0,20, "http://192.168.4.1");
    display.display();
まとめ
- ESP32のWiFi設定にはWiFiManagerが便利。
- これにOLEDを加えたら完璧。
- ESP32-CAMは使えるGPIOが少ないので、
UOT,UORをI2C指定するのが良い。