前回↓
はじめに
今回はControllerを作成していく
Controller作成
ModelとViewを操作するControllerを作成していきます
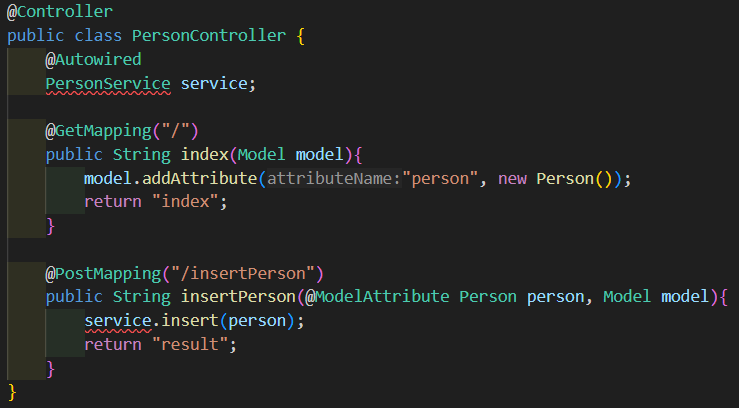
demo直下にcontrollerフォルダを作成してその中にPersonController.javaを作成します
src/main/java/com/example/demo/controller/PersonController.java
package com.example.demo.controller;

import org.springframework.beans.factory.annotation.Autowired;
import org.springframework.stereotype.Controller;
import org.springframework.ui.Model;
import org.springframework.web.bind.annotation.GetMapping;
import org.springframework.web.bind.annotation.ModelAttribute;
import org.springframework.web.bind.annotation.PostMapping;

import com.example.springbootpostgresql.model.Person;

@Controller
public class PersonController {
    @Autowired
    PersonService service;

    @GetMapping("/")
    public String index(Model model){
        model.addAttribute("person", new Person());
        return "index";
    }

    @PostMapping("/insertPerson")
    public String insertPerson(@ModelAttribute Person person, Model model){
        service.insert(person);
        return "result";
    }
}
⚠️注意

このようなエラーが出ている場合はpom.xmlの<dependencies></dependencies>内に以下を追記してください
pom.xml
<dependency>
    <groupId>org.springframework.boot</groupId>
    <artifactId>spring-boot-starter-web</artifactId>
</dependency>
この部分のエラーはとりあえず無視しちゃって大丈夫です
✨解説
アノテーション
◎@Controller
これを付けたクラスをSpringBootはControllerとして認識します
◎@Autowired
詳しく説明してるのはこちら↓
◎@GetMapping
()内で与えられたURL表現式と一致するHTTP GETリクエストを処理します
◎@PostMapping
()内で与えられたURL表現式と一致するHTTP POSTリクエストを処理します
◎@ModelAttribute
このアノテーションが付与されることにより、フォームで入力した値を受け取ることができるようになります
おわりに
今回はControllerを作成しました
次回はRepositoryを作成します