はじめに
Reactで作成したアプリに認証機能を追加しようと思った際、AWSのCognito, Amplifyを使えばサクッと作れるという情報を仕入れたため実際にやってみました。
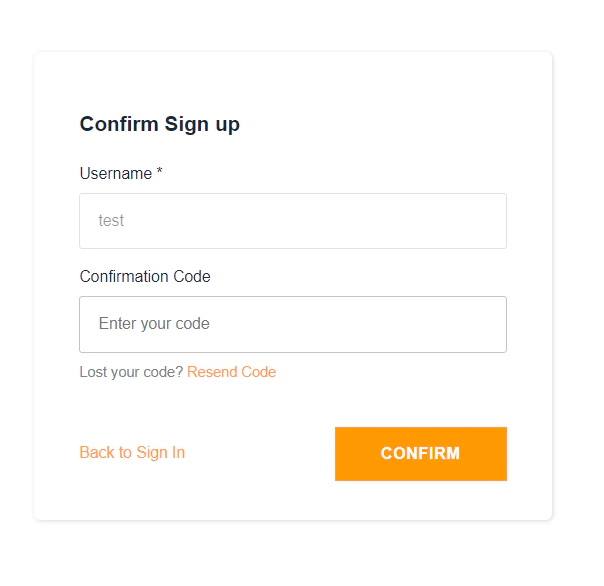
完成イメージ
こんな感じのデフォルトのログイン画面を最初は作ります。
ただ、これだと自由にカスタマイズできないので以下のAmplyfyの関数も同時に紹介します。
・サインアップ
・ログイン
・初期パスワード変更
・TOTP設定
・MFA認証

そもそもこれって何? Cognito? MFA? TOTP? amplyfy?
Cognitoとは
Amazon Cognito は、ウェブアプリケーションやモバイルアプリケーションの認証、許可、ユーザー管理をサポートしています。ユーザーは、ユーザー名とパスワードを使用して直接サインインするか、Facebook、Amazon、Google、Apple などのサードパーティーを通じてサインインできます。
つまり、パスワードを含むユーザーの管理、認証を自動でやってくれるシステムということです。
Cognitoを用いれば認証周りを自分で作成する必要はありません。
また、他のAWSの機能との連携もできるため、(API Gatewai等)AWSを用いて開発を行う場合は非常に重宝する機能になります。
多要素認証(MFA)とは
多要素認証とは、認証の3要素である「知識情報」、「所持情報」、「生体情報」のうち、2つ以上を組み合わせて認証することを指します。
たとえばこういったものが認証に当てはまります。
| 知的情報 | 所持情報 | 生体情報 |
|---|---|---|
| パスワード | 携帯電話 | 指紋 |
| PINコード | ハードウェアトークン | 静脈 |
| 秘密の質問 | ICカード | 声紋 |
アカウントをハッキングから守る手段として第一に強固なパスワードが挙げられます。しかし、用意に推測可能なパスワードを設定しているユーザーは多いのが現状です。
多要素認証とは、認証を行うときに他の情報(携帯電話、指紋など)も認証に用いることでより強固なセキュリティを実現するシステムのことです。
TOTPとは
TOTPとは *time-based one-time password* のことです。 先ほどのMFA認証の要素では、所持情報の携帯電話に当てはまります。 簡単に言えば、あるシークレットと時間で生成されるパスワードをワンタイムパスワードと呼びます。今回では、デバイス(携帯電話)とCognito側のユーザーにシークレットを登録することで、互いのTOTPの一致を確認しMFAが実現します。 細かい説明は逸脱してしまうため[本サイト](https://qiita.com/tnakagawa/items/d999abb685de9424ce17)をご覧ください。amplyfyとは
今回であればamplifyを使ってCognitoのユーザープールの設定・作成、reactアプリに認証画面の作成を行います。他にも色々できるみたいです。
$ npx create-react-app <プロジェクト名>
私の環境
・npm v6.14.6
・yarn v1.22.10
・node v12.18.4
・ubuntu v20.04.1 LTS (Focal Fossa)
2. Amplifyインストール
AmplifyをCLIで操作するために、Amplify CLIをインストールします
$ yarn global add @aws-amplify/cli
プロジェクト内でAmplifyのパッケージを追加します。
$ npm add aws-amplify
$ npm add aws-amplify-react
$ npm add @aws-amplify/ui-react
3. Amplify初期設定
以下コマンドでAmplifyの初期設定を行います。
$ amplify init
私は以下のようになりました。
? Enter a name for the project teatamplify
? Enter a name for the environment dev
? Choose your default editor: IntelliJ IDEA
? Choose the type of app that you're building javascript
Please tell us about your project
? What javascript framework are you using react
? Source Directory Path:  src
? Distribution Directory Path: build
? Build Command:  npm run-script build
? Start Command: npm run-script start
Using default provider  awscloudformation
? Select the authentication method you want to use: AWS profile
? Please choose the profile you want to use (amplify用のIAM)
4. Amplify Cognitoユーザープールの作成
以下コマンドで設定を行います。今回はMFAでTOTPを使うため、そのように設定します。
$ amplify add auth
まず設定方法やユーザープールの名前を決めます。
 Do you want to use the default authentication and security configuration? Manual configuration
 Select the authentication/authorization services that you want to use: User Sign-Up & Sign-In only (Best used with a cl
oud API only)
 Please provide a friendly name for your resource that will be used to label this category in the project: test
 Please provide a name for your user pool: testAmplify
ログインはユーザーネームで行います。
※この設定は後で変更できないので注意
グループは設定するつもりがないためNOを選択。
 Warning: you will not be able to edit these selections.
 How do you want users to be able to sign in? Username
 Do you want to add User Pool Groups? No
API(参考)を使うかどうかの設定です。今回は特に使わないためNOを選択します。そのうち使えるようになりたい。
Do you want to add an admin queries API? No
MFAの設定を行います。
全ての認証にMFAを要求し、TOTPを用いるよう設定します。
 Multifactor authentication (MFA) user login options: ON (Required for all logins, can not be enabled later)
 For user login, select the MFA types: Time-Based One-Time Password (TOTP)
SMSのメッセージの設定や認証コードを送るEメールの設定です。
自由に設定してください。
 Please specify an SMS authentication message: Your authentication code is {####}
 Email based user registration/forgot password: Enabled (Requires per-user email entry at registration)
 Please specify an email verification subject: Your verification code
 Please specify an email verification message: Your verification code is {####}
パスワードポリシーの設定です。8文字以上で数字、特殊文字、大文字、小文字を含むようにしました。
 Do you want to override the default password policy for this User Pool? Yes
 Enter the minimum password length for this User Pool: 8
 Select the password character requirements for your userpool: Requires Lowercase, Requires Uppercase, Requires Numbers, Requires Symbols
サインアップ時に必要な情報です。ちなみに管理者権限で作成した際に、この情報が洩れているとパスワード変更時に要求されます。
What attributes are required for signing up? Email
リフレッシュトークンはひとまずデフォルトの30日にしました。
書き込み権限は与えませんでした。私事ですが、元々サインアップはlambdaで考えていたため。
機能の追加、ソーシャルログイン、Lmabda関数のトリガーは特に使い予定がないため選択無しで行っていきます。
そのうち、下記機能も理解したいです。
・Add Google reCaptcha Challenge
・Email Verification Link with Redirect
・Add User to Group
・Email Domain Filtering (blacklist)
・Email Domain Filtering (whitelist)
・Custom Auth Challenge Flow (basic scaffolding - not for production)
 Specify the app's refresh token expiration period (in days): 30
 Do you want to specify the user attributes this app can read and write? No
 Do you want to enable any of the following capabilities?
 Do you want to use an OAuth flow? No
 Do you want to configure Lambda Triggers for Cognito? No
最後に、設定した項目をpushします。
これでcognitoユーザープールが作成されます。
$ amplify push
5. ログイン画面の作成
プロジェクトにamplifyのデフォルトのログイン画面を追加します。
src/index.js を開き、最後のインポートの下に次のコードを追加します。
import Amplify from 'aws-amplify';
import config from './aws-exports';
Amplify.configure(config);
公式チュートリアルに従い、src/App.jsを次のコードで更新してみましょう。
import React from 'react';
import logo from './logo.svg';
import './App.css';
import { withAuthenticator, AmplifySignOut } from '@aws-amplify/ui-react'

function App() {
  return (
    <div className="App">
      <header>
        <img src={logo} className="App-logo" alt="logo" />
        <h1>We now have Auth!</h1>
      </header>
      <AmplifySignOut />
    </div>
  );
}

export default withAuthenticator(App);
これでプロジェクトを起動してみると無事にログイン画面が表示されました。
おまけにサインイン、コード認証、QRコード表示等、一通りそろえている様子。
素晴らしい!!


Amplify関数の紹介
AUthが使えるように、以下コードをインポートに追加しましょう。参考
import { Auth } from "aws-amplify";
サインアップ
以下関数を用いればサインインすることができます。attributesの中にはユーザーの属性を記入します。
async function signUp() {
  try {
    const { user } = await Auth.signUp({
      username,
      password,
      attributes: {
        email,
        phone_number,
      }
    });
    console.log(user);
  } catch (error) {
    console.log('error signing up:', error);
  }
}
ログイン
Auth.singIn()にusernameとpasswordを渡すことでログインできます。ただし、返ってきたuser.challengeNameによってその後の対応が違います。
初回ログインでは仮パスワードとMFAの設定を求められます。
その後、ログイン毎に二段階認証を求められます。
async function signIn() {
  Auth.signIn(username, password)
    .then((user) => {
      if (user.challengeName === "NEW_PASSWORD_REQUIRED") {
        //初期パスワード変更を参照
      } else if (user.challengeName === "MFA_SETUP") {
        //TOTP設定を参照
      } else if (user.challengeName === "SOFTWARE_TOKEN_MFA") {
        //MFA認証を参照
      }
    })
    .catch((e) => {
      console.log(e);
    });
}
ここからは、Auth.singIn()した際に帰ってきたuserが重要になってくるため、userをStateに保存して作業を行います。
import React, { useState } from "react";

const [user, setUser] = useState();

async function signIn() {
  Auth.signIn(username, password)
    .then((user) => {
      setUser(user);
      //続き
    })
}
初期パスワード変更
user.challengeName === "NEW_PASSWORD_REQUIRED"の時に行います。
stateで保持しているuserと新しいパスワードを以下関数に渡すことで初期パスワードの変更が行えます。ちなみに同時にユーザー情報も変更することができます。
Auth.completeNewPassword(
  user,
  newPassword,
  //attributes
  {
    name: "test",
  }
)
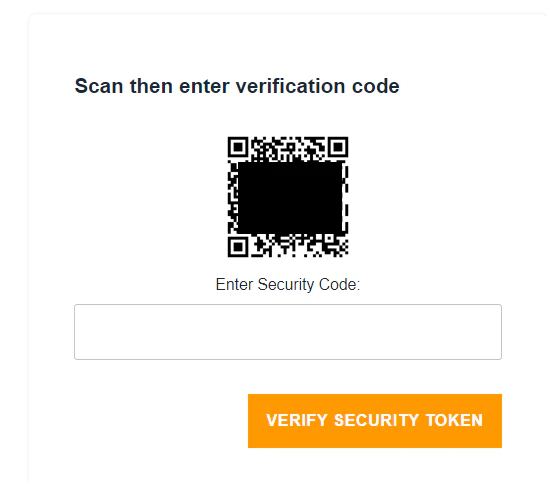
TOTP設定
user.challengeName === "MFA_SETUP"の時に行います。
初期パスワードを正しく変更すればMFA_SETUPに切り替わります。
stateで保持しているuserを使って、まずはQRコードの生成に必要なsecretをいただきましょう。
以下コードでQRコードのURLが作成できます。
Auth.setupTOTP(user).then((code) => {
  const issuer = encodeURI("AWSCognito");
  const str = "otpauth://totp/AWSCognito:" + username + "?secret=" + code + "&issuer=" + issuer;
以下コードでQRコードを表示できます。Authenticator等のアプリを用いて、認証コードを獲得しましょう。
import QRCode from "qrcode.react";
<QRCode value={src} />
以下コードに獲得したコードを入力して、デバイスをCognitoに登録します。
これで、TOTPの設定は完了です。
※setupTOTPと同じuserを使うこと
//challengeAnswerに獲得したコードを入れる
Auth.verifyTotpToken(user, challengeAnswer)
  .then(() => {
     Auth.setPreferredMFA(user, "TOTP");
  })
MFA認証
user.challengeName === "SOFTWARE_TOKEN_MFA"の時に行います。
初期設定が完了していれば"SOFTWARE_TOKEN_MFA"となります。
これまでと同様にstateで保持しているuserを使い、認証コードを以下関数に渡すことでログインができます。ついでにidTokenの式も記入しておきます。
const mfaType = "SOFTWARE_TOKEN_MFA";
const res = await Auth.confirmSignIn(
  user,
  code,
  mfaType
);
const idToken = res.signInUserSession.idToken.jwtToken;
参考
以下サイトを大変参考にさせていただきました。
ありがとうございました。
・【React】ユーザー認証をCognito + Amplifyで構築してみた ~ 構築準備編 ~
終わりに
これにて一通りのamplifyを使ったReactでの認証は終了です。
現状ではaws-export.jsにユーザープールのIDやクライアントIDが記述されています。
これらの情報はフロント側ではなくサーバー側で保持しなければ、公開するのが怖いため、気が向いたらサーバー側で持つような記事を書こうと思います。(書いたらリンクのっけます)
amplifyの関数(ログイン・パスワード変更等)をlambdaで、userをRDSに保管するようなやり方をすればいけるはず。。。
ご精読ありがとうございました。