はじめに
個人用のテンプレートです
LilyGo [H717]T-DisplayをArduinoで使うためのテンプレートです。
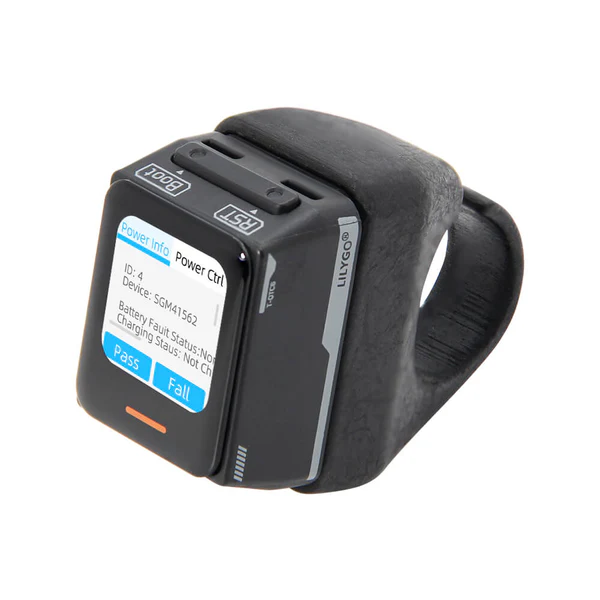
タッチパネルなので、スワイプとかが出来そうです。
Qwiic端子は1つ付いています。
T-QT-C6指リモコン(電池内蔵指グリップ付き)も売ってるので、低電力目的で低電力CPUを使っているのかもしれません。なので、比較対象としているM5AtomS3シリーズとは、そもそも目的が違うかも。(T-QTC6はあくまでバッテリー重視、M5AtomS3は小型だけど能力重視)
※並行輸入した製品には技適マークが無いかもです。
比較
| 項目 | M5AtomS3R | T-QT-C6(H714) | 備考 |
|---|---|---|---|
| CPU | ESP32-S3-PICO-1-N8R8 | ESP32-C6-MINI-1U | |
| 解像度 | 128x128 | 128x128 | |
| Flash | 8MB | 4MB | |
| PS-RAM | 8MB | NA | |
| Wireless protocol | 2.4g Wi-Fi 6, Bluetooth 5 (LE), 802.15.4 | ||
| Onboard function | Battery ADC Detection, Breathing Light | Breathing Lightってなんだ? | |
| LCD Driver Chip | GC9107 | GC9107(SPI) | 本家HPは誤植?GitHubの方からひらった |
| Touch Driver Chip | NA | CST816T | 本家HPは誤植?GitHubの方からひらった |
| Power Management Chip | SGM41562(I2C) | ||
| IMU | BMI270 | (LSM6DSLTR) | 指グリップに内蔵 |
| COMPASS | BMM150 | ||
| IR-LED | 〇 | ||
| Button | 〇 | ||
| 価格 | ¥3,344 | ¥3,300 |
その他の情報
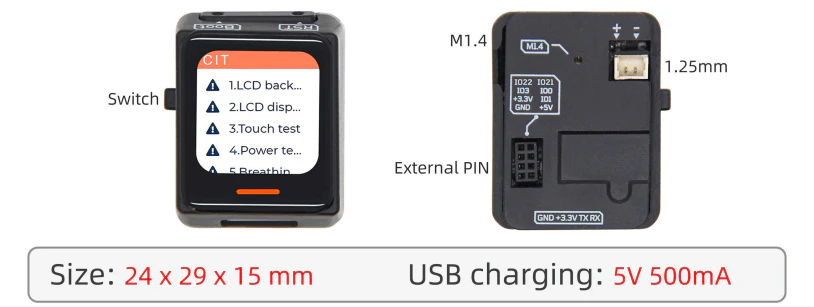
外観
裏面の右下の凹部はマグネットキャッチです。
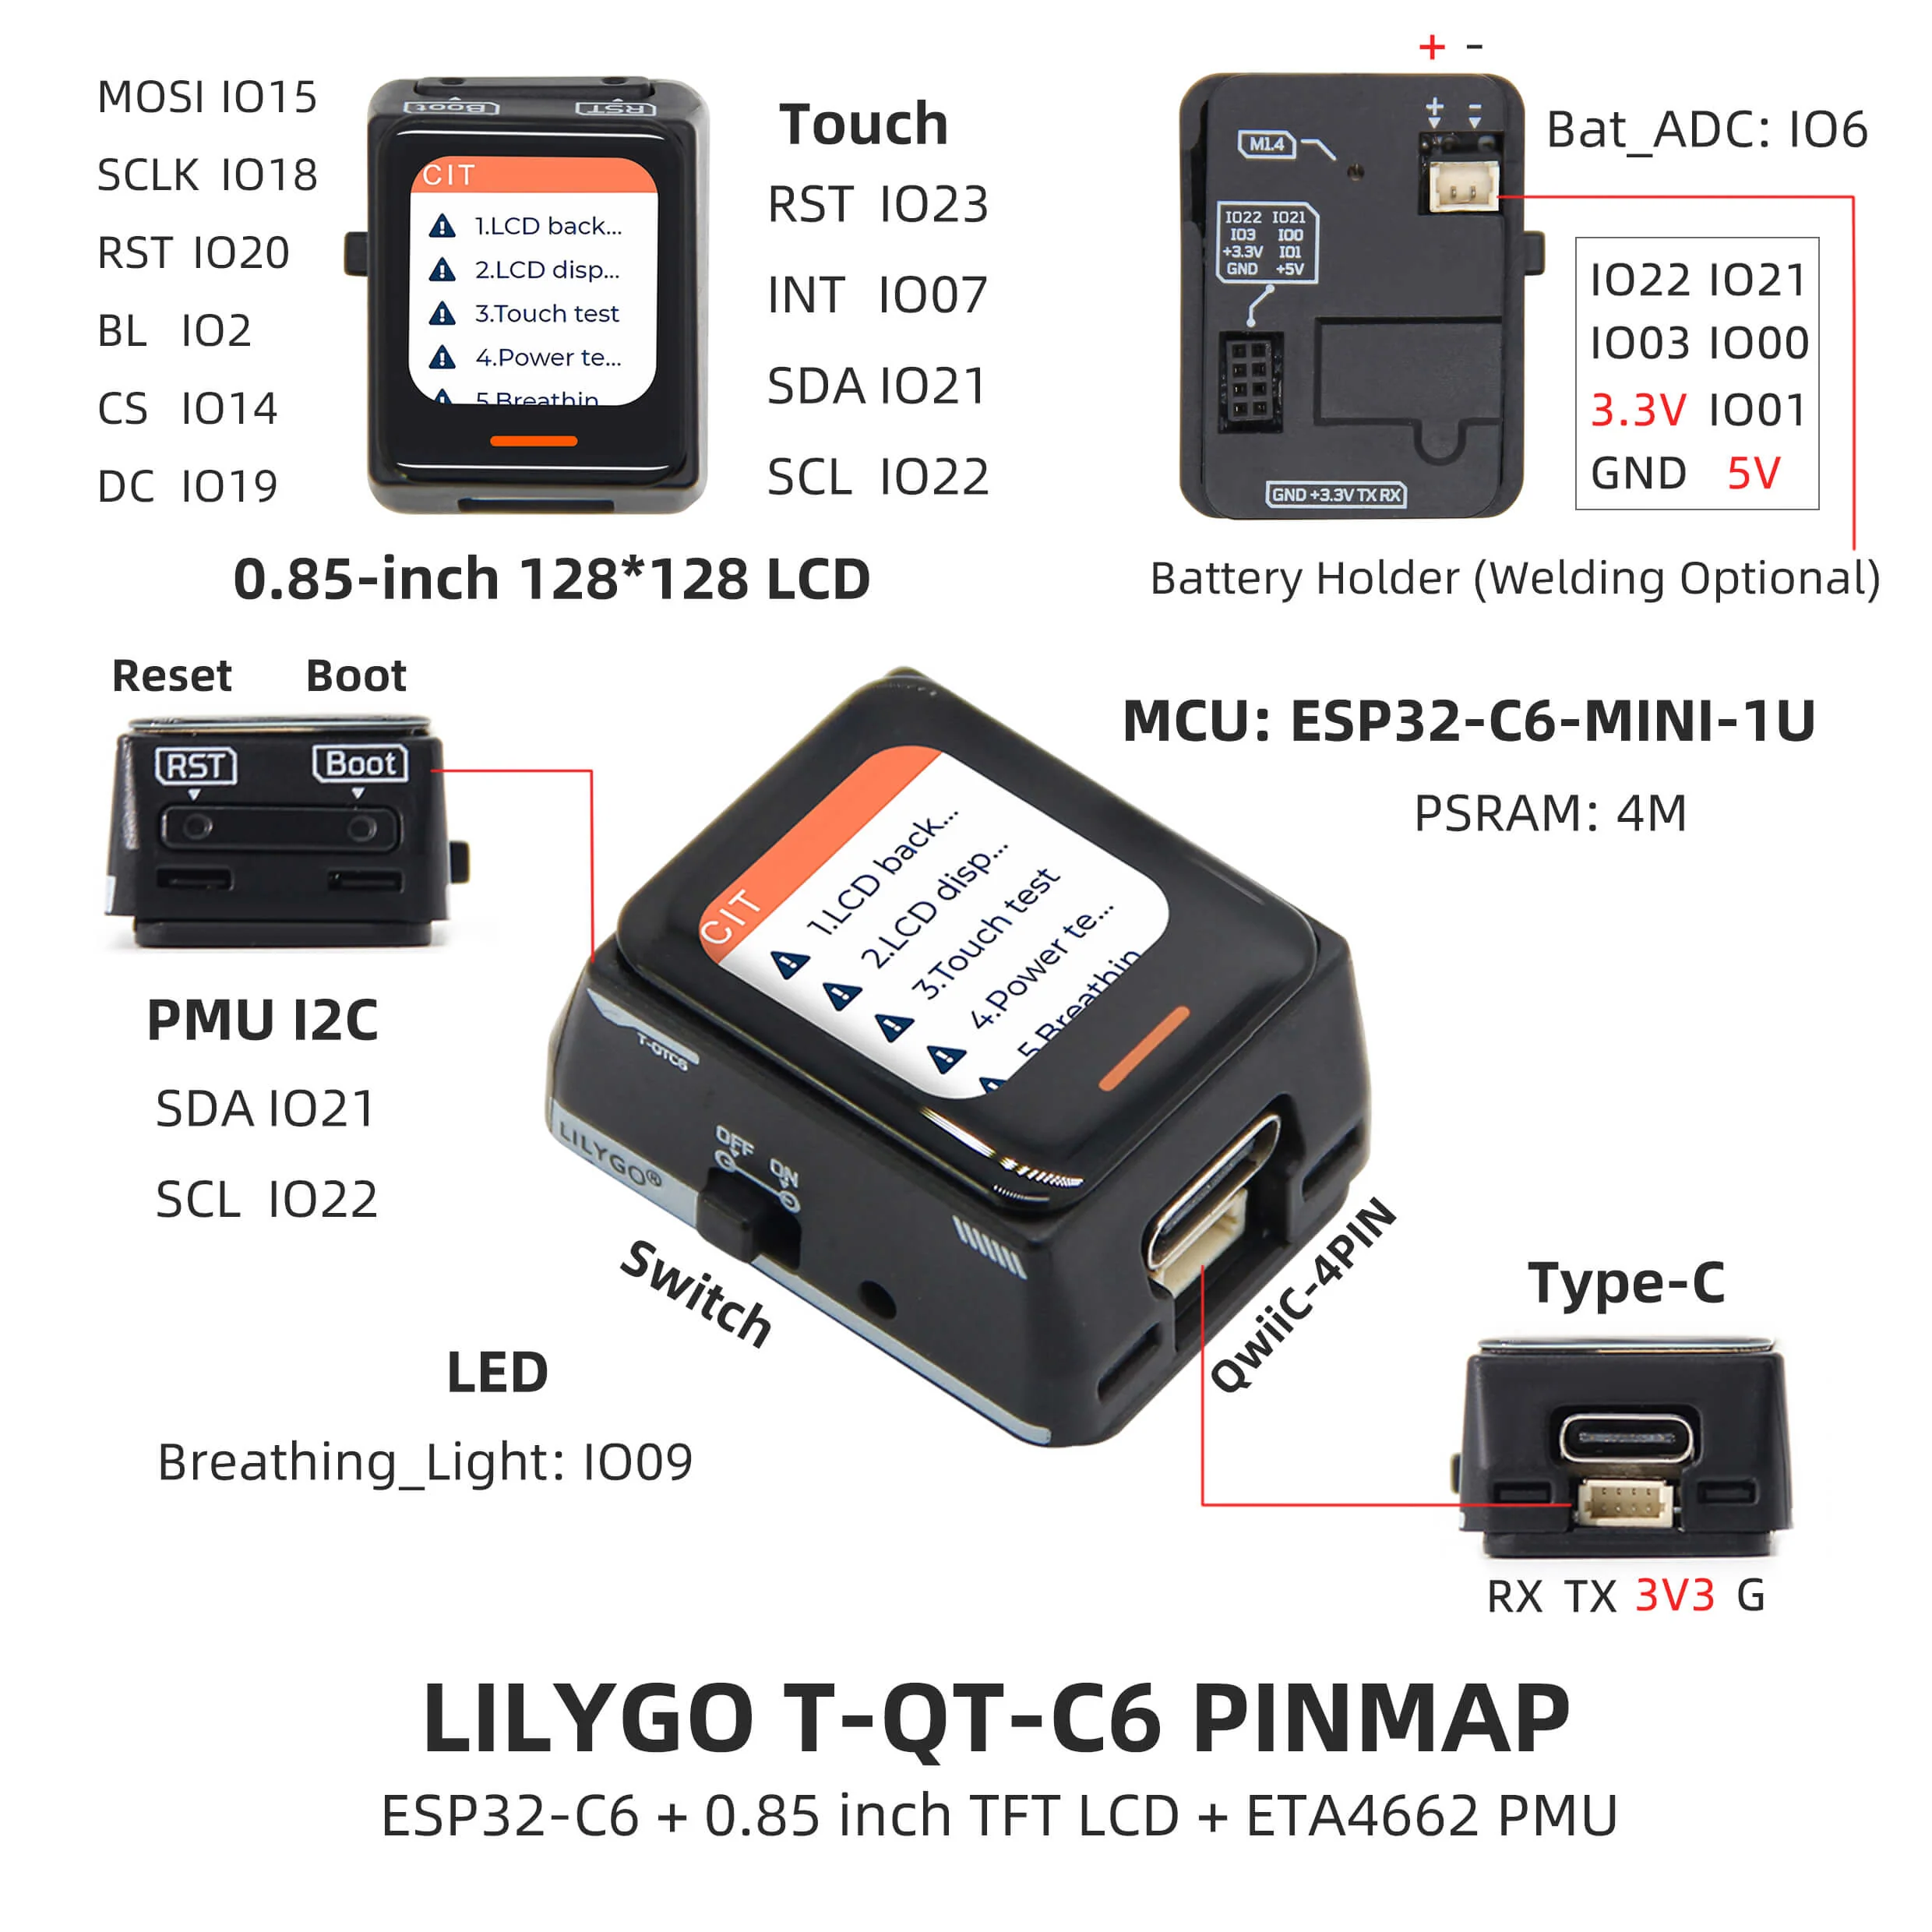
PIN MAP
Breathing_Lightはサンプルを見る限りただのLEDライト(PWM可)。流行りのNeoPixelではなさそう。
Firmwareの更新
https://www.espressif.com/en/support/download/other-tools からFLASH DOWNLOAD toolsをダウンロードします。
GithubからFirmwareをダウンロードします。
あとはGitHubの説明通りです。1枚目のChip-typeはESP32-C6、2枚目の右の0x0は入力でした。

Arduinoの準備
- githubのトップページから"Code"->"Download ZIP"でファイルをダウンロードして展開します。
- Arduinoの"File"-->"Prefarence"でArduinoのホームディレクトリを探します。
- 展開した中のlibrariesのフォルダの中身をArduinoのホームディレクトリのlibrariesフォルダに移します。
("pin_config.h"は、他のモデルと被るので、複数のLilyGo製品を扱うのであればファイル名を変更が望ましそう)
Arduinoのサンプル・実行
Githubからダウンロードして展開したファイルのexamplesフォルダ内の必要なものを開きます。
実行時(コンパイル時)の設定は以下の通りです
| Setting | Value |
|---|---|
| Board | ESP32C6 Dev Module |
| Upload Speed | 921600 |
| CPU Frequency | 160MHz |
| Flash Mode | QIO |
| Flash Size | 4MB (32Mb) |
| Core Debug Level | None |
| Partition Scheme | Huge APP (3MB No OTA/1MB SPIFFS) |
プログラムの例
指キーボード
準備
上記の"Arduinoの準備"を実施してください。
BT Keyboardのライブラリは、 https://github.com/siroitori0413/ESP32-BLE-Keyboard からcode->DownloadZIPでファイルをダウンロードして、
ZIPのまま、Arduinoのsketch-->include Library-->Add .ZIP Libraryで追加します。
雑談
バッテリー監視の回路
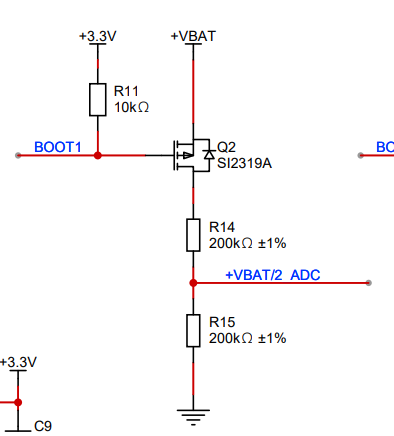
BOOT1(BATTERY_MEASUREMENT_CONTROL:8)で、+VBAT/2_ADC(BATTERY_ADC_DATA:6)はこんな感じです。サンプルでなぜINPUT_PULLDOWNにしているか不明(FETを切った時のノイズカット?)消費電力削減のためにバッテリー電圧の監視も切れるようになっているのだろうか?スケッチはサンプルのままにしています。
スケッチ
#include "Arduino_GFX_Library.h"
#include "Arduino_DriveBus_Library.h"
#include "pin_config.h"
#include <BleKeyboardC6.h>
BleKeyboard bleKeyboard;

Arduino_DataBus *bus = new Arduino_HWSPI(LCD_DC, LCD_CS, LCD_SCLK, LCD_MOSI, -1);

Arduino_GFX *gfx = new Arduino_GC9107(bus, LCD_RST, 0, true, LCD_WIDTH, LCD_HEIGHT, 2, 1, 0, 0);

std::shared_ptr<Arduino_IIC_DriveBus> IIC_Bus =
  std::make_shared<Arduino_HWIIC>(IIC_SDA, IIC_SCL, &Wire);

void Arduino_IIC_Touch_Interrupt(void);

std::unique_ptr<Arduino_IIC> CST816T(new Arduino_CST816x(IIC_Bus, CST816T_DEVICE_ADDRESS,
                                                         TP_RST, TP_INT, Arduino_IIC_Touch_Interrupt));

std::unique_ptr<Arduino_IIC> ETA4662(new Arduino_ETA4662(IIC_Bus, ETA4662_DEVICE_ADDRESS,
                                                         DRIVEBUS_DEFAULT_VALUE, DRIVEBUS_DEFAULT_VALUE));

std::unique_ptr<Arduino_IIC> SGM41562(new Arduino_SGM41562(IIC_Bus, SGM41562_DEVICE_ADDRESS,
                                                           DRIVEBUS_DEFAULT_VALUE, DRIVEBUS_DEFAULT_VALUE));

void Arduino_IIC_Touch_Interrupt(void) {
  CST816T->IIC_Interrupt_Flag = true;
}

void setup() {
  int flag = 0;
  // Serial.begin(115200);
  // Serial.println("**Start**");

  bleKeyboard.begin();

  if (ETA4662->begin() == true) {
    // Serial.println("ETA4662 initialization successfully");
  } else if (SGM41562->begin() == true) {
    // Serial.println("SGM41562 initialization successfully");
  } else {
    // Serial.println("Power chip initialization failed");
    flag = 1;
  }

  // BREATHING_LIGHTの初期化
  pinMode(BREATHING_LIGHT, OUTPUT);
  ledcAttach(BREATHING_LIGHT, 2000, 8);
  ledcWrite(BREATHING_LIGHT, 255);  // 消灯

  // バッテリーの監視
  pinMode(BATTERY_ADC_DATA, INPUT_PULLDOWN);
  pinMode(BATTERY_MEASUREMENT_CONTROL, OUTPUT);
  digitalWrite(BATTERY_MEASUREMENT_CONTROL, HIGH);  // バッテリーを監視しない
  analogReadResolution(12);

  // バックライト
  pinMode(LCD_BL, OUTPUT);
  ledcAttach(LCD_BL, 2000, 8);
  ledcWrite(LCD_BL, 128);  //0が明るい、255がOFF

  while (CST816T->begin() == false) {
    Serial.println("CST816T initialization fail");
    delay(2000);
    flag = 2;
  }
  Serial.println("CST816T initialization successfully");

  gfx->begin();
  if (flag != 0) {
    //Initialize faild
    gfx->fillScreen(RED);
    gfx->setTextColor(WHITE);
    gfx->setCursor(0, 128 / 2);
    gfx->printf("Initialize Error\n");
    delay(1000);
  }
  gfx->fillScreen(WHITE);
  gfx->setCursor(0, 128 / 2);
  gfx->setTextColor(BLACK);
  gfx->setTextSize(3);

  gfx->fillRect(0, 0, 64, 64, ORANGE);
  gfx->setCursor(32 - 10, 32 - 10);
  gfx->printf("A");

  gfx->fillRect(64, 0, 64, 64, MAGENTA);
  gfx->setCursor(96 - 10, 32 - 10);
  gfx->printf("B");

  gfx->fillRect(0, 64, 64, 64, LIGHTGREY);
  gfx->setCursor(32 - 10, 96 - 10);
  gfx->printf("C");

  gfx->fillRect(64, 64, 64, 64, GREENYELLOW);
  gfx->setCursor(96 - 10, 96 - 10);
  gfx->printf("D");
}

void loop() {
  Serial.printf("System running time: %d\n\n", (uint32_t)millis() / 1000);

  if (CST816T->IIC_Interrupt_Flag == true) {
    CST816T->IIC_Interrupt_Flag = false;

    int xx = (uint32_t)CST816T->IIC_Read_Device_Value(CST816T->Arduino_IIC_Touch::Value_Information::TOUCH_COORDINATE_X);
    int yy = (uint32_t)CST816T->IIC_Read_Device_Value(CST816T->Arduino_IIC_Touch::Value_Information::TOUCH_COORDINATE_Y);
    char key;
    if ((xx < 64) && (yy < 64)) key = 'A';
    else if (yy < 64) key = 'B';
    else if (xx < 64) key = 'C';
    else key = 'D';
    //bleKeyboard.print("Hello world");
    bleKeyboard.print(key);
  }
  delay(100);
}
指マウス
試行錯誤しましたが、反応が良くないので使えないです。
準備
https://github.com/NW-Lab/ESP32-BLE-Mouse からダウンロードして、ライブラリに入れます。
ほかはキーボードと一緒
スケッチ
#include "Arduino_GFX_Library.h"
#include "Arduino_DriveBus_Library.h"
#include "pin_config.h"

#include <BleMouseC6.h>
BleMouse bleMouse;

Arduino_DataBus *bus = new Arduino_HWSPI(LCD_DC, LCD_CS, LCD_SCLK, LCD_MOSI, -1);

Arduino_GFX *gfx = new Arduino_GC9107(bus, LCD_RST, 0, true, LCD_WIDTH, LCD_HEIGHT, 2, 1, 0, 0);

std::shared_ptr<Arduino_IIC_DriveBus> IIC_Bus =
  std::make_shared<Arduino_HWIIC>(IIC_SDA, IIC_SCL, &Wire);

void Arduino_IIC_Touch_Interrupt(void);

std::unique_ptr<Arduino_IIC> CST816T(new Arduino_CST816x(IIC_Bus, CST816T_DEVICE_ADDRESS,
                                                         TP_RST, TP_INT, Arduino_IIC_Touch_Interrupt));

std::unique_ptr<Arduino_IIC> ETA4662(new Arduino_ETA4662(IIC_Bus, ETA4662_DEVICE_ADDRESS,
                                                         DRIVEBUS_DEFAULT_VALUE, DRIVEBUS_DEFAULT_VALUE));

std::unique_ptr<Arduino_IIC> SGM41562(new Arduino_SGM41562(IIC_Bus, SGM41562_DEVICE_ADDRESS,
                                                           DRIVEBUS_DEFAULT_VALUE, DRIVEBUS_DEFAULT_VALUE));

void Arduino_IIC_Touch_Interrupt(void) {
  CST816T->IIC_Interrupt_Flag = true;
}

void setup() {
  int flag = 0;
  // Serial.begin(115200);
  // Serial.println("**Start**");

  bleMouse.begin();

  if (ETA4662->begin() == true) {
    // Serial.println("ETA4662 initialization successfully");
  } else if (SGM41562->begin() == true) {
    // Serial.println("SGM41562 initialization successfully");
  } else {
    // Serial.println("Power chip initialization failed");
    flag = 1;
  }

  // BREATHING_LIGHTの初期化
  pinMode(BREATHING_LIGHT, OUTPUT);
  ledcAttach(BREATHING_LIGHT, 2000, 8);
  ledcWrite(BREATHING_LIGHT, 255);  // 消灯

  // バッテリーの監視
  pinMode(BATTERY_ADC_DATA, INPUT_PULLDOWN);
  pinMode(BATTERY_MEASUREMENT_CONTROL, OUTPUT);
  digitalWrite(BATTERY_MEASUREMENT_CONTROL, HIGH);  // バッテリーを監視しない
  analogReadResolution(12);

  // バックライト
  pinMode(LCD_BL, OUTPUT);
  ledcAttach(LCD_BL, 2000, 8);
  ledcWrite(LCD_BL, 128);  //0が明るい、255がOFF

  while (CST816T->begin() == false) {
    // Serial.println("CST816T initialization fail");
    // delay(2000);
    flag = 2;
  }
  // Serial.println("CST816T initialization successfully");

  gfx->begin();
  if (flag != 0) {
    //Initialize faild
    gfx->fillScreen(RED);
    gfx->setTextColor(WHITE);
    gfx->setCursor(0, 128 / 2);
    gfx->printf("Initialize Error\n");
    delay(1000);
  }
  gfx->fillScreen(WHITE);
  // gfx->setTextColor(PINK);
  gfx->setCursor(20, 128 / 2 - 10);
  gfx->setTextColor(BLACK);
  gfx->setTextSize(2);
  gfx->printf("Mouse");
}

void loop() {
  // Serial.printf("System running time: %d\n\n", (uint32_t)millis() / 1000);

  if (CST816T->IIC_Interrupt_Flag == true) {
    CST816T->IIC_Interrupt_Flag = false;
    int xx = (uint32_t)CST816T->IIC_Read_Device_Value(CST816T->Arduino_IIC_Touch::Value_Information::TOUCH_COORDINATE_X);
    int yy = (uint32_t)CST816T->IIC_Read_Device_Value(CST816T->Arduino_IIC_Touch::Value_Information::TOUCH_COORDINATE_Y);
    // if (CST816T->IIC_Read_Device_State(CST816T->Arduino_IIC_Touch::Status_Information::TOUCH_GESTURE_ID) == "Swipe Up")
    // {
    //     // gfx->printf("\nGesture:Swipe Down\n");
    //     int z=(128-yy)/20;
    //     bleMouse.move(0,0,z);
    //     delay(10);
    // }
    // else if (CST816T->IIC_Read_Device_State(CST816T->Arduino_IIC_Touch::Status_Information::TOUCH_GESTURE_ID) == "Swipe Down")
    // {
    //     //gfx->printf("\nGesture:Swipe Up\n");
    //     int z=-yy/20;
    //     bleMouse.move(0,0,z);
    //     delay(10);
    // }
    // else
    // {
    int x, y;

    if (xx > (64 + 5)) x = 10;
    else if (xx < (64 - 5)) x = -10;
    else x = 0;

    if (yy > (64 + 5)) y = 10;
    else if (yy < (64 - 5)) y = -10;
    else y = 0;

    bleMouse.move(x, y);
  }
  delay(10);
}