はじめに
個人用のテンプレートです
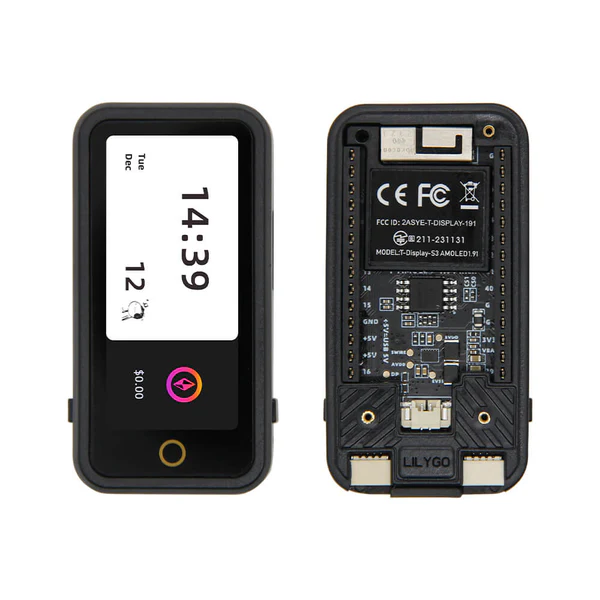
LilyGo [H717]T-DisplayをArduinoで使うためのテンプレートです。
AMO Displayなのできれいです。(視野角が広い)
あとは、タッチパネルがあるだけのシンプルなマイコンです。
Qwiic端子は1つとUART版が1つの計2つです。
リンク等
ハード
| 名称 | Pin | 備考 |
|---|---|---|
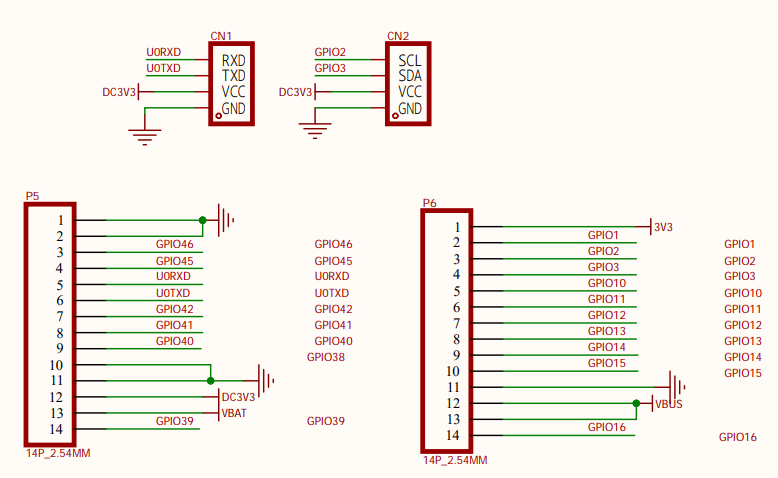
| バッテリー電圧 | IO04 | VBATの半分の電圧が入力 |
| 回路図的にはつながっていない。多分古いボード | ||
| QWIIC(CN1) | GP44? | RXD(QWIICなのにUART?) |
| QWIIC(CN1) | GP43? | TXD(QWIICなのにUART?) |
| QWIIC(CN2) | GP02 | I2C(SCL) |
| QWIIC(CN2) | GP03 | I2C(SDA) |
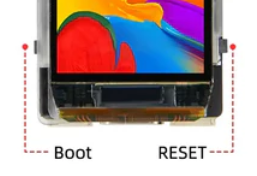
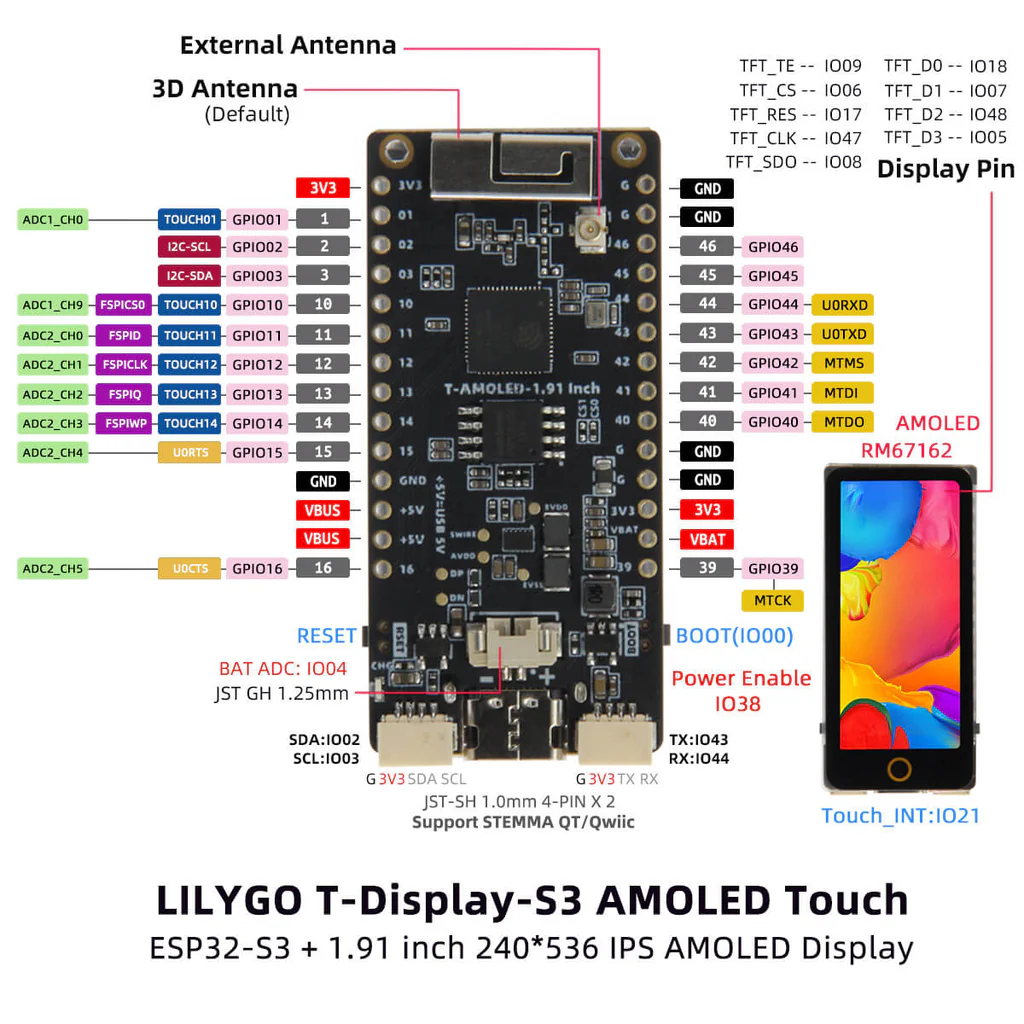
画面を前に左がBoot 右がリセット
I2C アドレス
| 1 | 2 | 3 |
|---|---|---|
| LCD( RM67162) | QSPI | I2Cではない |
| Touch(CST816) | ||
LCD 240x536
準備
- 環境変数のBoard urlsに
https://espressif.github.io/arduino-esp32/package_esp32_index.json - Boardの追加
Install Arduino ESP32 V2.0.5 or later or latest

- Sketch -> Include Library -> Manage Libraries
Library Search -> LilyGO AMOLED Series -> Install -> Install ALL

- (Library Search -> lvgl -> v8.4.0 -> Install) <-- サンプルを動かすため?上記ライブラリで9.2.2が入った。
テンプレート
Arduino_GFX_HelloWorld.inoのコメントを除いたもの
#include <Arduino.h>
#include <Arduino_GFX_Library.h>
#include "TouchDrvCSTXXX.hpp"

#define GFX_DEV_DEVICE LILYGO_T_DISPLAY_S3_AMOLED

Arduino_DataBus *bus = new Arduino_ESP32QSPI(6, 47, 18, 7, 48, 5);
Arduino_GFX *gfx = new Arduino_RM67162(bus, 17, 0);
Arduino_GFX *gfx2;
TouchDrvCSTXXX touch;
bool _touchOnline = false;

void setBrightness(uint8_t value)
{
    bus->beginWrite();
    bus->writeC8D8(0x51, value);
    bus->endWrite();
}


void setup()
{
    Serial.begin(115200);

    delay(3000);//???

    Serial.println("Start!");

    // OLED Enable
    pinMode(38, OUTPUT);
    digitalWrite(38, OUTPUT);

    touch.setPins(-1, 21);
    bool res = touch.begin(Wire, CST816_SLAVE_ADDRESS, 3, 2);
    if (!res) {
        Serial.println("Failed to find CST816T - check your wiring!");
        _touchOnline = false;
    } else {
        _touchOnline = true;
        touch.setCenterButtonCoordinate(600, 120);  //AMOLED 1.91 inch
        Serial.println("CST816T init success!");

        touch.setHomeButtonCallback([](void *ptr) {
            Serial.println("Home key pressed!");
        }, NULL);
    }

    if (!gfx->begin()) {
        Serial.println("gfx->begin() failed!");
    }

    gfx2 = new Arduino_Canvas(240, 536, gfx, 0, 0); // for Sprites
    gfx2->begin(GFX_SKIP_OUTPUT_BEGIN); // Added the GFX_SKIP_OUTPUT_BEGIN so the Canvas class doesn’t try and initialise the display
    gfx2->fillScreen(BLACK);
    gfx2->setCursor(80, 268);
    gfx2->setTextColor(RED);
    gfx2->setTextSize(2 /* x scale */, 2 /* y scale */, 1 /* pixel_margin */);
    gfx2->println("Hello World!");
    gfx2->fillCircle(130, 130, 40, GREEN);
    gfx2->flush();

    //Test brightness
    for (int i = 0; i < 255; i++) {
        setBrightness(i);
        delay(20);
    }

}

void loop()
{
    if (_touchOnline) {
        if (touch.isPressed()) {
            int16_t x_array[1]; int16_t y_array[1];
            if (touch.getPoint(x_array, y_array)) {
                Serial.printf("X:%d Y:%d \n", x_array[0], y_array[0]);
            }
        }
    }
    delay(5);
}