はじめに
Nore-RED MCU EditionのSerialの例です。
元々のソース
元のArduinoはこれを参考(M5Stackのサンプルファイルから)
/*
    Description: The command data of the USB UART  is forwarded to the GPS Unit
   for debugging and functional verification.
*/
#include <M5Stack.h>
#include "M5GFX.h"

HardwareSerial GPSRaw(2);

void setup() {
    M5.begin();
    M5.Power.begin();
    GPSRaw.begin(9600);
}

void loop() {
    // put your main code here, to run repeatedly:
    if (Serial.available()) {
        int ch = Serial.read();
        GPSRaw.write(ch);
    }

    if (GPSRaw.available()) {
        int ch = GPSRaw.read();
        Serial.write(ch);
    }
}
試した環境
version等
Welcome to Node-RED
===================

20 Dec 14:20:39 - [info] Node-RED version: v3.1.0
20 Dec 14:20:39 - [info] Node.js  version: v18.13.0
20 Dec 14:20:39 - [info] Windows_NT 10.0.19045 x64 LE
20 Dec 14:20:41 - [info] Loading palette nodes
20 Dec 14:20:43 - [info] Node-RED MCU Edition Runtime Version: #548dc37
20 Dec 14:20:43 - [info] Node-RED MCU Edition Plugin  Version: v1.3.2
20 Dec 14:20:49 - [info] Moddable SDK Version: v4.2.0-0-gaec7d8b (x86)
試し1
使用機器
M5Stack Fire
M5Stack GPS Unit
必要な情報
M5Stack Fire PORTC UART (TX:GPIO17 RX:GPIO16)
UART の通信規格 9600bps
Flow
Flowは、上段が開始1秒後に行われるシリアルの初期化です。

function2の内容は
trace("Serial Initialize \n");
let serial = new device.io.Serial({
    ...device.Serial.default,
    	baud: 9600,
		transmit:17,
        receive:16,
        port: 2,
		format: "buffer"});
flow.set("serial2",serial);
return msg;
function3の内容は
let serial2=flow.get("serial2");
msg.payload =String.fromCharCode.apply('', new Uint8Array(serial2.read()));
return msg;
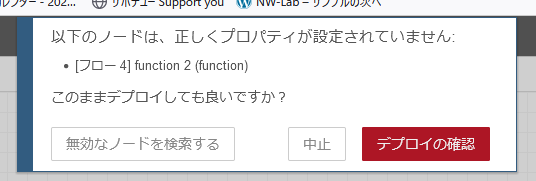
MCUの[Build]をクリックします。1回目は警告が表示されるので[デプロイの確認]をクリックします。この表示だけれ実際にはbuildできません。再度[Build]をクリックするとBuildがはじまります。

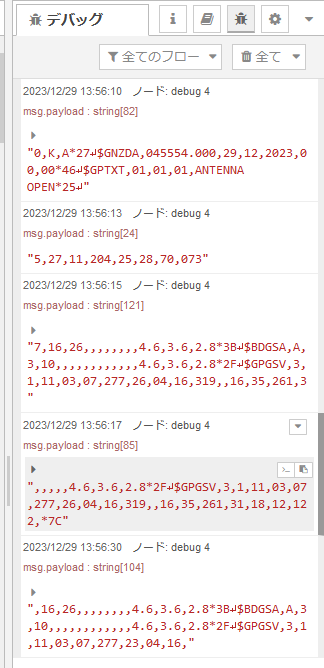
結果
試し2
Core2はHardUartと異なるピンになっています。
ESP32のハードウェアUARTについて
| TX | RX | 備考 | |
|---|---|---|---|
| UART#0 | 1 | 3 | Uart-USB変換機につながっているので使用不可(Debug通信用) |
| UART#1 | 10 | 9 | (Core2AWS) 9,10ともPS-RAMで使用済み |
| UART#2 | 17 | 16 | (Core2AWS) 16,17ともPS-RAMで使用済み |
| M5Stack_Fire | 17 | 16 | |
| M5Stack_Core2AWS Port3 | 14 | 13 |
使用機器
M5Stack Core 2 AWS
M5Stack GPS Unit
必要な情報
M5Stack Core 2 PORTC UART (TX:GPIO14 RX:GPIO13)
UART の通信規格 9600bps
Flow
Function2の内容
trace("Serial Initialize \n");
let serial2 = new device.io.Serial({
    	baud: 9600,
		transmit:14,
        receive:13,
        port: 1});
flow.set("serial2",serial2);
return msg;
Function3の内容
let serial2=flow.get("serial2");
msg.payload =String.fromCharCode.apply('', new Uint8Array(serial2.read()));
return msg;
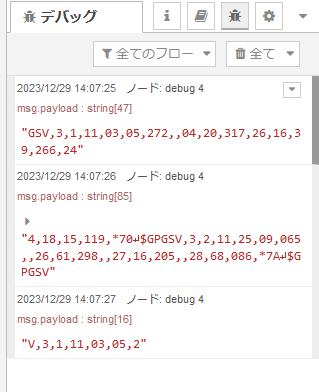
実行結果
考察
ソースを見るとReadBufferはESP32のレジスターを見ているので、ハードウェアUARTのみサポートみたいな気がする。
Port(Uart#),transmit,receiveの3つの指定が必要そう
ESP32だと、Portは0~2 (0は多分xsbugで使用しているはず)
スペルミス(receiveをreciveとした)をすると、Port済みエラーになる。この辺はもう少し親切にして欲しい。

StringからWriteするには(ArrayBufferに書くときは) @mshioji
serial.write(ArrayBuffer.fromString(msg.payload + \"\\n\"));
備考
- Node-RED PluginのWindows+ESP32でうまく動かないのに気付いてPRしました(マージ済み)
- ModdableのESP32+Windows環境でうまく動かないのでISSUEしています。(確認済み そのうち修正が入ります)
https://github.com/Moddable-OpenSource/moddable/issues/1275#issue-2051820245 - ESP-IDF v5.1.2になっていましたが、動きました。

