1. この記事はなに?
Vue.jsでのasyc,awaitの書き方をメモする。
2. 例題の説明
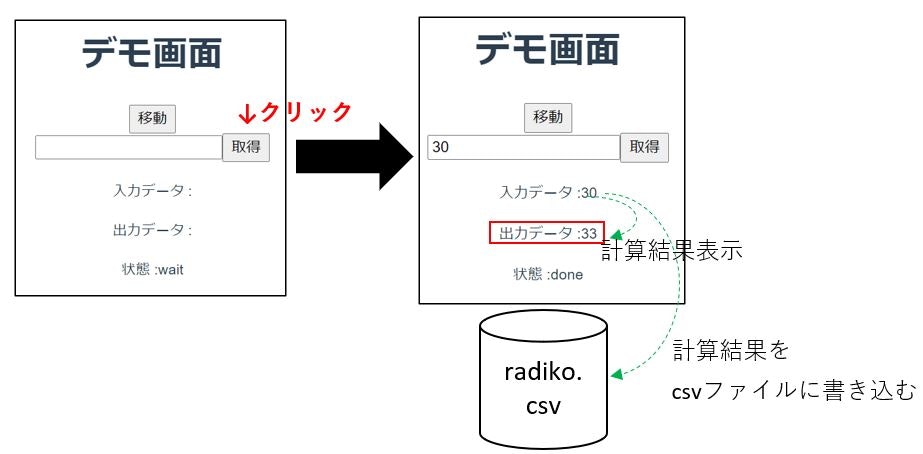
フロントエンド(Webサイト)に整数Nを入力し、バックエンドで計算(N+3)をする。
また、計算結果をフロントエンドに表示すると同時に計算結果をcsvファイルに書き込む
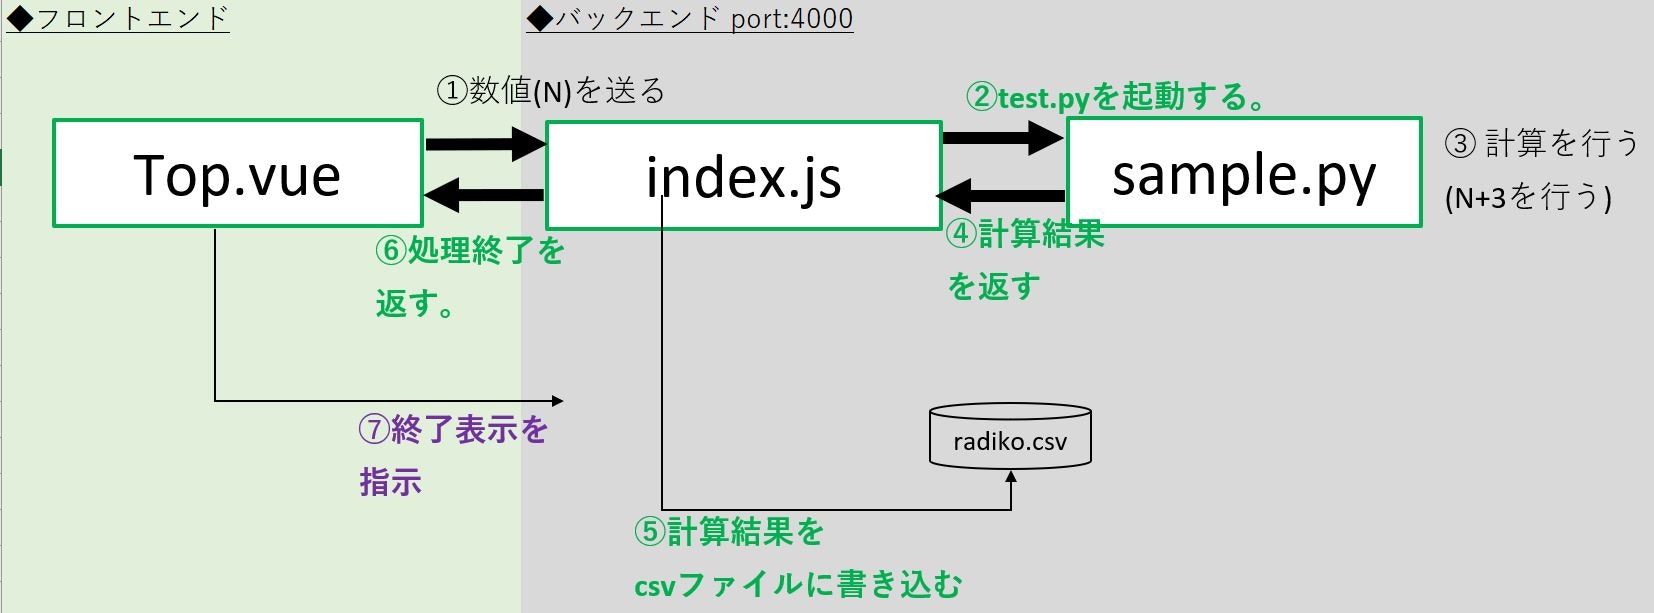
3. アーキテクチャー
アーキテクチャーは、下記図のとおりです。フロントエンドで数値を入力し、「取得」ボタンをクリックし、バックエンドにデータを送ります。フロントエンドから受け取った数値に3を加算する計算をpythonで実施し、その計算結果をcsvファイルに書き込みを行うと同時にフロントエンドに返し表示します。
ただし「➆計算結果をcsvファイルに書き込む」が完了した後に「⑧終了処理を返す」を行います。
4. ソースコードポイント解説
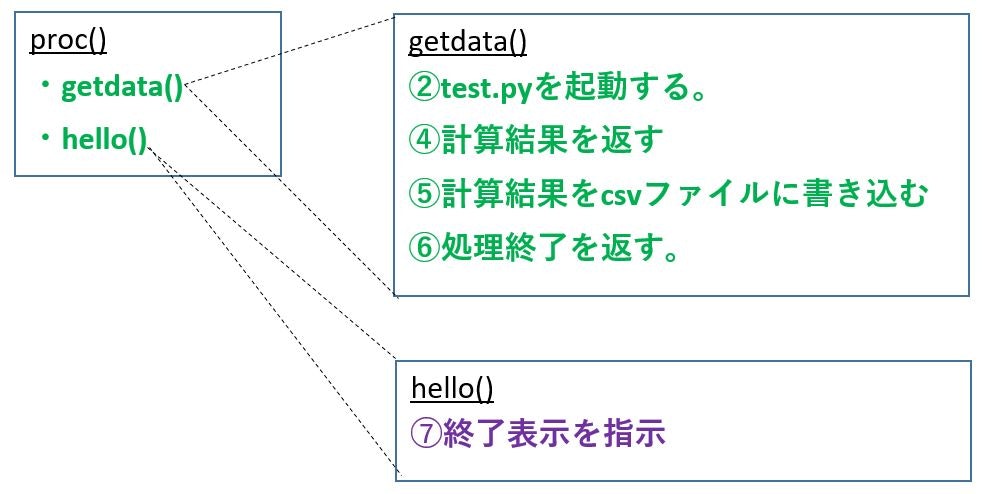
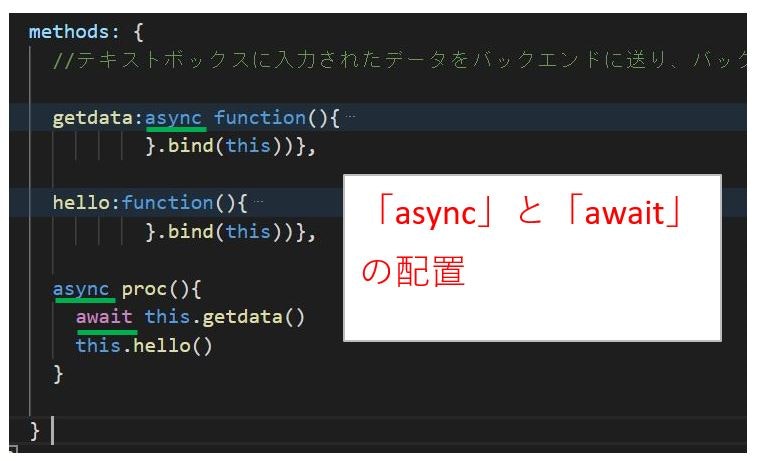
フロントエンドで「取得」ボタンをクリックするとindex.jsに組み込んだproc()を実行します。proc()はgetdata()とhello()から構成されますが、getdata()の実行が完了するまで、hello()の実行を待機しておかなければいけません。ここで「async」「await」を使います。
4. ソースコード
Vue-Cliはすでにインストールされ、使用できる状態であるという前提です。各種ファイル配置やpython-shell,CORS問題への対応は、下記サイトをご覧ください。
https://qiita.com/NT1123/items/505059f23b0d34a50d41
/src/component/main.js
// eslint-disable-next-line
/* eslint-disable */
// The Vue build version to load with the `import` command
// (runtime-only or standalone) has been set in webpack.base.conf with an alias.
import Vue from 'vue'
import App from './App'
import router from './router'
import axios from 'axios'  //axiosを使う場合、main.jsでimportする。

Vue.config.productionTip = false
Vue.prototype.$axios = axios  //axiosを使う場合、main.jsでこの行の追記が必要

/* eslint-disable no-new */
new Vue({
  el: '#app',
  router,
  template: '<App/>',
  components: { App }
})
/src/components/Top.vue
<template>

  <div>
    <h1>デモ画面</h1>
    <input type="button" value="移動" @click="goNewTask()"> <br>
    <input type="number" v-model="message"><input type="button" value="取得" @click="proc()">
    <p> <font size="2"> 入力データ :{{ $data.message }} </font> </p>
    <p> <font size="2"> 出力データ :{{ $data.result }} </font> </p>
    <p> <font size="2"> 状態 :{{ $data.state }} </font> </p>
  </div>

</template>

<script>
// eslint-disable-next-line
/* eslint-disable */
import * as d3 from 'd3'  //有効にする

export default {
  name: 'top',
  data: function(){
    return {
        message:'',  //入力データを格納する変数。
        result :'',  //演算結果を格納する変数。
        state:"wait" //現在の状況を格納する変数。
    }
  },
  methods: {
    //テキストボックスに入力されたデータをバックエンドに送り、バックエンドから演算結果を受け取り、その結果を表示するメソッド

    getdata:async function(){

        this.state="getting data"
        const res=await this.$axios.get('http://192.168.0.4:4000/api',{params:{dat:this.message}})
          .then(function(response){
            console.log(response.data.message)  //バックエンドから返却された演算結果をconsole.logしている。
            this.result= response.data.message
            this.state="done"
            }.bind(this))  //Promise処理を行う場合は.bind(this)が必要
          .catch(function(error){  //バックエンドからエラーが返却された場合に行う処理について
            this.state="ERROR"
            }.bind(this))
          .finally(function(){
            }.bind(this))},

    hello:function(){
        //this.state="getting data"
        this.$axios.get('http://192.168.0.4:4000/hello',{params:{dat:this.message}})
          .then(function(response){

            })  //Promise処理を行う場合は.bind(this)が必要
          .catch(function(error){  //バックエンドからエラーが返却された場合に行う処理について
            this.state="ERROR"
            }.bind(this))
          .finally(function(){
            }.bind(this))},

    async proc(){
      await this.getdata()
      this.hello()
    }

  }
}

</script>
/bkend/index.js
const express = require('express')
const bodyParser = require('body-parser')
const app = express()
app.use(bodyParser.json())
const fs = require('fs')
JSONFILEPATH='test.csv'

//CORSポリシーを無効にしている。
app.use(function(req, res, next) {
  res.header("Access-Control-Allow-Origin", "*");
  res.header("Access-Control-Allow-Headers", "Origin, X-Requested-With, Content-Type, Accept");
  next();
});

app.get('/api', function(req, res) {

  var {PythonShell} = require('python-shell');
  var pyshell = new PythonShell('sample.py');
  console.log("req")
  console.log(req.query.dat) //フロントエンドから受け取ったデータをconsole.logしている。

  pyshell.send(req.query.dat); //本コードからpythonコードに'req.query.dat'を入力データとして提供する

  //pythonコード実施後にpythonから本コードにデータが引き渡される。
  pyshell.on('message',  function (data) {


  var obj={
    age:data
  }
     //(2)JSON.stringfyを使い辞書型配列をJSON形式に変換する。
  var jsondat = JSON.stringify( obj );

   //(3)上記jsondatを書き込むファイルがすでに存在する場合は当該ファイルを一度削除する。
  if (fs.existsSync(JSONFILEPATH)) fs.unlinkSync(JSONFILEPATH)

   //(4)jsondatをJSONFILEPATHに存在するファイルに書き込む
  fs.writeFileSync(JSONFILEPATH,jsondat)
  console.log("csv writing...")


    res.send({
      message: data   //pythonで実施した演算結果をフロントエンドに返している。
    })
  })

})

app.get('/hello', function(req, res) {

  console.log("all process finished")

})

app.get('/', (req, res) => {res.send('Hello World4000!')} )
app.listen(4000)
/bkend/sample.py
import sys
data = sys.stdin.readline()  #標準入力からデータを取得する
num=int(data)

def sum(a):
    return a+3

print(sum(num))  #printの内容をpython-shellに返却する
5. 補足
asyanc,awaitの解説は下記サイトが分かりやすいです。