1. この記事は
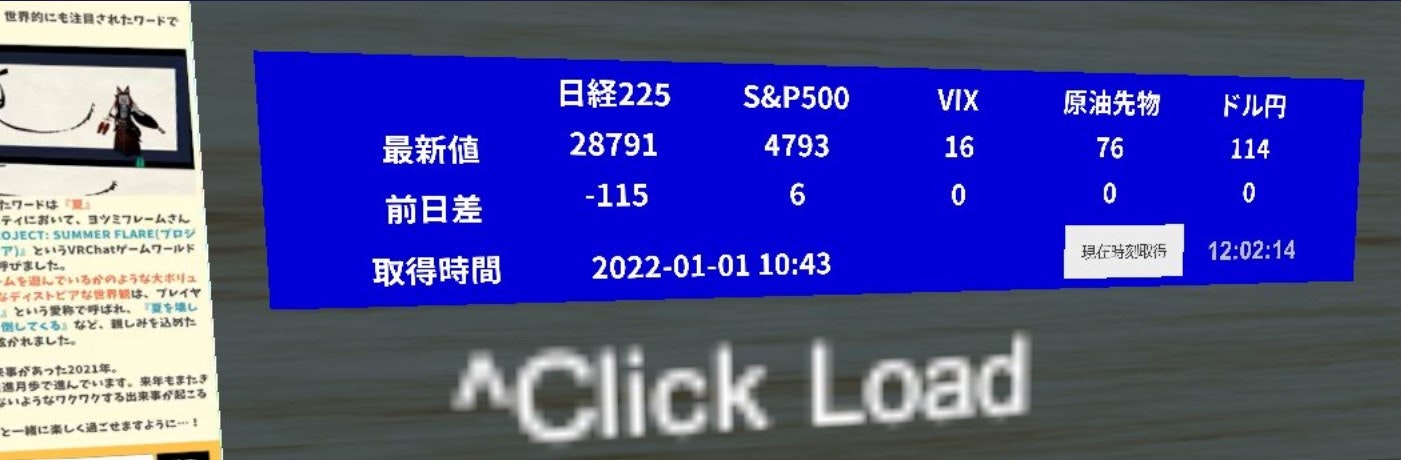
日経平均株価等の情報を外部から取得し、VRchat内のワールドに流し込む方法を解説します。
2. システム構成
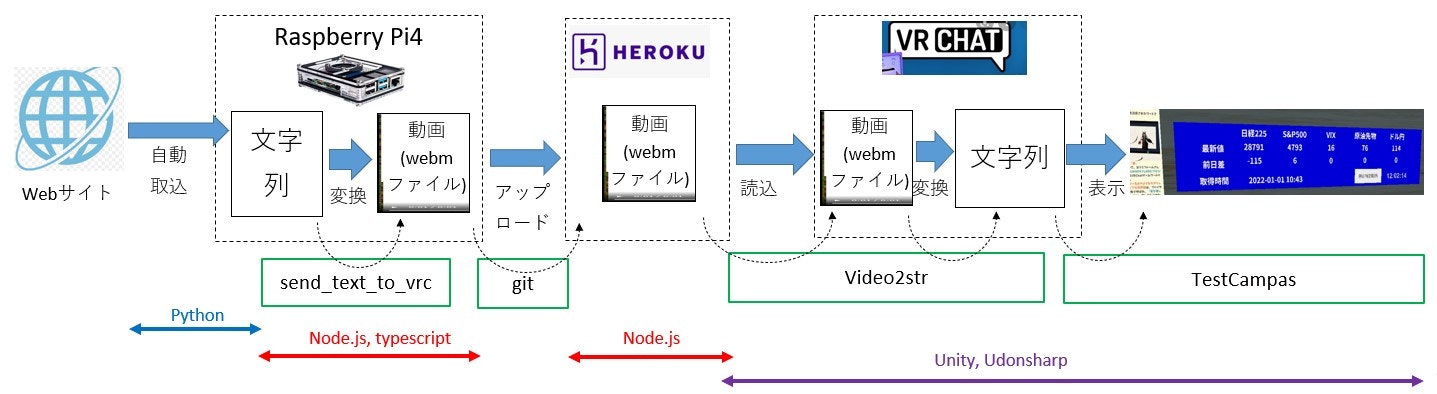

外部からネットワーク経由でVRCに情報を取りこむには、動画をインターフェースにするしか現状手段がないようです。よって、文字列をUnicode(UTF-16BE)に変換、さらに色情報に変換を行い、動画を生成し、その動画をVRCに読み込ませるという方法が現在実現されている方法のようです。ここでは、まずWebサイトより日経平均株価を定期的に取得するアプリをRaspberry pi4に実装します。日経平均株価のテキスト情報を動画に変換し、Web上にアップロードします。動画情報をVRchat上で読み込ませ、動画情報をテキストに戻し、最終的にVRChat上のワールドに表示しております。Publicに公開するWebサーバーを自前で準備することは費用と手間がかかりますが、Herokuサービスを使うと個人目的であれば無料でWebサービスを実装することができます。
3 Raspberry Pi4上での作業
3-1 Raspberry pi4上にDocker & Ubuntuをインストールする。
Raspberry Pi4上にDockerをインストールする。
WindwosにDocker(Docker Desktop for windows)をインストールする場合は下記を見てください。
Docker上でUbuntu環境を立ち上げる。下記のコードを入力する。
(Windowsの場合、Powershellを立ち上げて、下記のコードを入力する。)
docker pull ubuntu
ubuntu環境をdocker上に立ち上げる。
docker run -v /home/pi/dcshare:/home -it --privileged --publish 500:500 ubuntu:latest bash
上記を実施するとコンテナが生成される。
C:/Users/fdfpy/OneDrive/Documents/vrctest
3-2 Ubuntu上に必要なモジュールをインストールする。
先ほど作成したコンテナに入り下記のコマンドを実施し必要なライブラリをインストールする。
apt-get update
cd home
mkdir vrctest
cd vrctest
apt install npm ffmpeg
npm install node

#### npm install node でエラーが出る場合下記を実行すること #######
curl -fsSL https://deb.nodesource.com/setup_16.x
apt-get install -y nodejs
################################################################

npm install -g npm yarn
apt-get install wget
npm install -g n
n lts
apt-get install git
3-3 必要なモジュールのインストール
Ubuntu上にてサーバーにある文字列を動画に変換しVRCに流し込み、VRCの中で動画を文字列に変換するライブラリを先に引き続き、Ubuntu上にインストールします。
・VRChatで文字列を動画から読み出すためのツールです
## (1)ライブラリをダウンロードし、buildを実施します。
git clone https://github.com/m-hayabusa/send_text_to_vrc.git
git clone https://github.com/m-hayabusa/send_text_to_vrc_example.git
git clone https://github.com/m-hayabusa/VRC_get_text_from_video.git
cd send_text_to_vrc_example
yarn
yarn build
3-4 コードの変更
send_text_to_vrc_example/build/main.jsを下記のとおり変更する。
import * as send_text_to_vrc from "send_text_to_vrc";
import fs from 'fs'
const CSVPATH="./dat.json"
const files = [];
const file = new send_text_to_vrc.File("株価", ["ticker", "val"]);

//ファイルの読み込みを行っている。
//fs.readFileSync  第1引数:読み取りたいファイルが配置されているパス、第2引数:文字コード設定
let json_obj=fs.readFileSync(CSVPATH,'utf-8') //ファイルの読み込みを行っている。
let json_dat=JSON.parse(json_obj) //文字列 -> 配列に変換
json_dat=JSON.parse(json_dat)     //配列 -> 配列
let json_dat_today=JSON.stringify(json_dat.today) // 配列 -> JSONに変換 さらに変更
json_dat_today=JSON.parse(json_dat_today) //本日の株価を抽出する。
let json_dat_dif=JSON.stringify(json_dat.dif) // 配列 -> JSONに変換 さらに変更
json_dat_dif=JSON.parse(json_dat_dif) //前日との株価の差を出力する

const NOW=json_dat_today['time']
const NOWDIF=json_dat_dif['time']
const N225=json_dat_today['9999']
const N225DIF=json_dat_dif['9999']
const DJI=json_dat_today['^DJI']
const DJIDIF=json_dat_dif['^DJI']
const GSPC=json_dat_today['^GSPC']
const GSPCDIF=json_dat_dif['^GSPC']
const JPYX=json_dat_today['^JPYX']
const JPYXDIF=json_dat_dif['^JPYX']
const VIX=json_dat_today['^VIX']
const VIXDIF=json_dat_dif['^VIX']
const CLF=json_dat_today['^CLF']
const CLFDIF=json_dat_dif['^CLF']

file.push(["time", NOW]);
file.push(["time", NOWDIF]);
file.push(["N225", N225]);
file.push(["N225DIF", N225DIF]);
file.push(["DJI", DJI]);
file.push(["DJIDIF", DJIDIF]);
file.push(["GSPC", GSPC]);
file.push(["GSPCDIF", GSPCDIF]);
file.push(["JPYX", JPYX]);
file.push(["JPYXDIF", JPYXDIF]);
file.push(["VIX", VIX]);
file.push(["VIXDIF", VIXDIF]);
file.push(["CLF", CLF]);
file.push(["CLFDIF", CLFDIF]);

files.push(file);
send_text_to_vrc.publish(files, "/home/vrctest/node-js-getting-started/public/kaimonolist.webm");
上記のコードで読み取りを行うdat.jsonの記載例を記述します。
"{\"today\":{\"time\":\"2022-01-02 11:52\",\"9999\":\"28791\",\"^CLF\":\"75\",\"^DJI\":\"36338\",\"^GSPC\":\"4766\",\"^JPYX\":\"115\",\"^VIX\":\"17\"},\"dif\":{\"time\":0,\"9999\":\"-115\",\"^CLF\":\"-1\",\"^DJI\":\"-59\",\"^GSPC\":\"-12\",\"^JPYX\":\"0\",\"^VIX\":\"0\"}}"
下記のコマンドを実施し、文字列をwebmファイルに変更します
# 実行後、kaimonolist.webmファイルが生成される。
yarn start
3-5 Herokuをインストール & ログインする
上記で作成したUbuntuのコンテナにてHeroku CLIをインストールします。
apt-get install snapd
npm install -g heroku
## (0)Herokuにログインする
heroku login -i
Email: xxxxxxxxxx
Password: (API key)
PasswordはAPI Keyを入力すること。API KeyはWebブラウザにてアカウントログインした後、Manage Accountで確認することができる。

3-6 Heroku上にWebアプリを生成する。
上記で作成したUbuntuのコンテナの/home/vrctest上にて下記の作業を実施する。
## (1)node.jsを取得する。
git clone https://github.com/heroku/node-js-getting-started.git


## (2)Webサイトを生成する。
cd node-js-getting-started
heroku create
Creating app... done, ⬢ stormy-depths-52109
https://stormy-depths-52109.herokuapp.com/ | https://stormy-depths-52109.herokuapp.git

##  https://stormy-depths-52109.herokuapp.com/ 上にWebアプリが作成される。

## (3)アプリのファイルをHerokuにデプロイ

git push heroku HEAD:master

## (4)ファイルを修正してデプロイしてみる
git add .
git commit -m "testx"
git push heroku HEAD:master
https://stormy-depths-52109.herokuapp.com/ を確認するとWebページが閲覧できる。

次に###2-3で生成したwebm動画をhome/VRCTEST/node-js-getting-started/publicにコピーします
(ここではkaimonolist.webmの名前とします)。
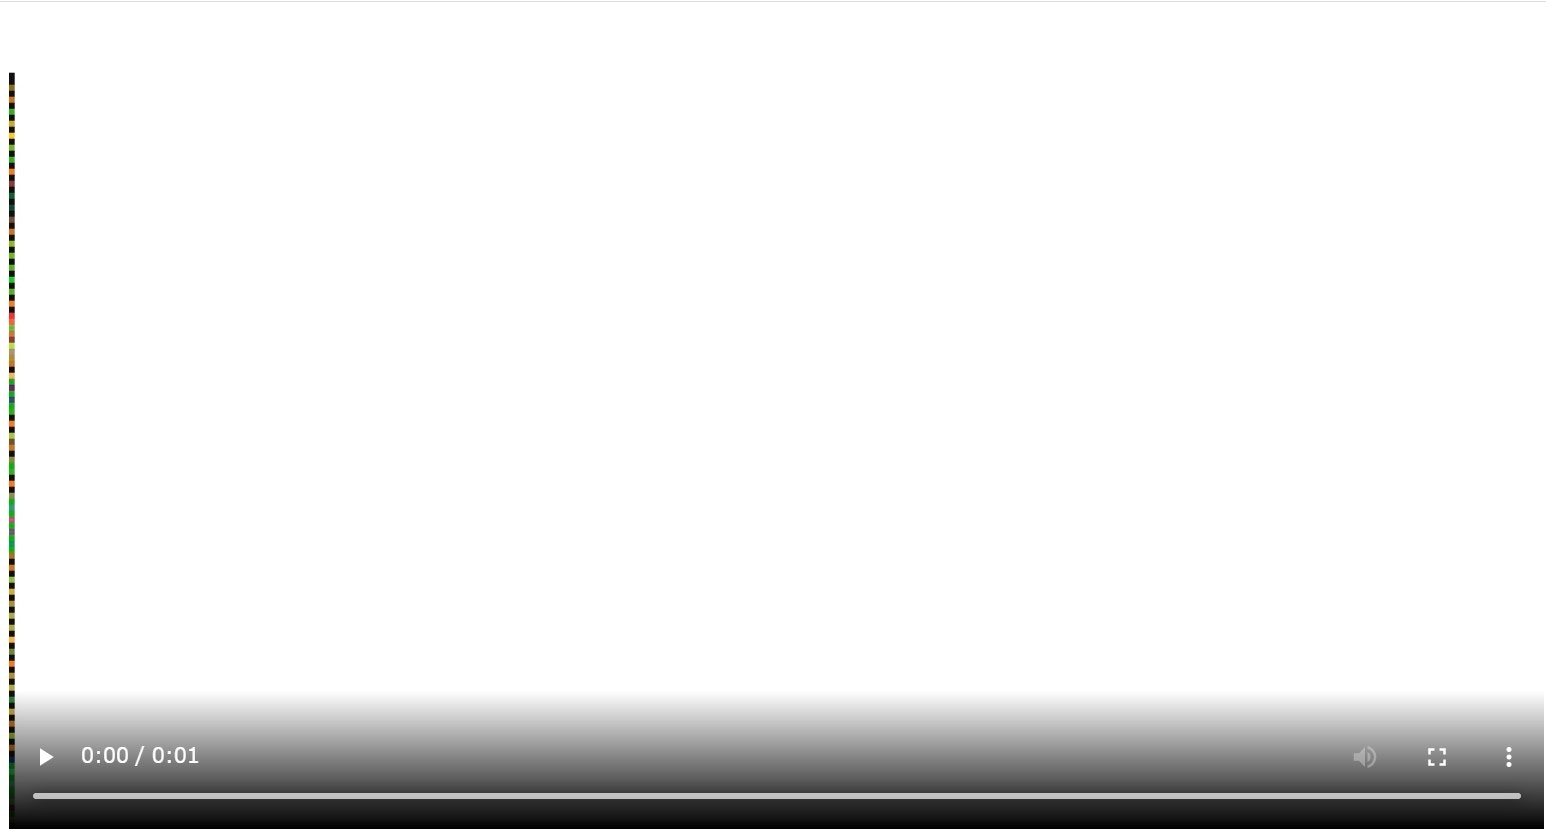
Webサイトhttps://stormy-depths-52109.herokuapp.com/kaimonolist.webm にアクセスすると下記の動画が表示されます。
4 Unity上での作業
4-1 Assetのインポート
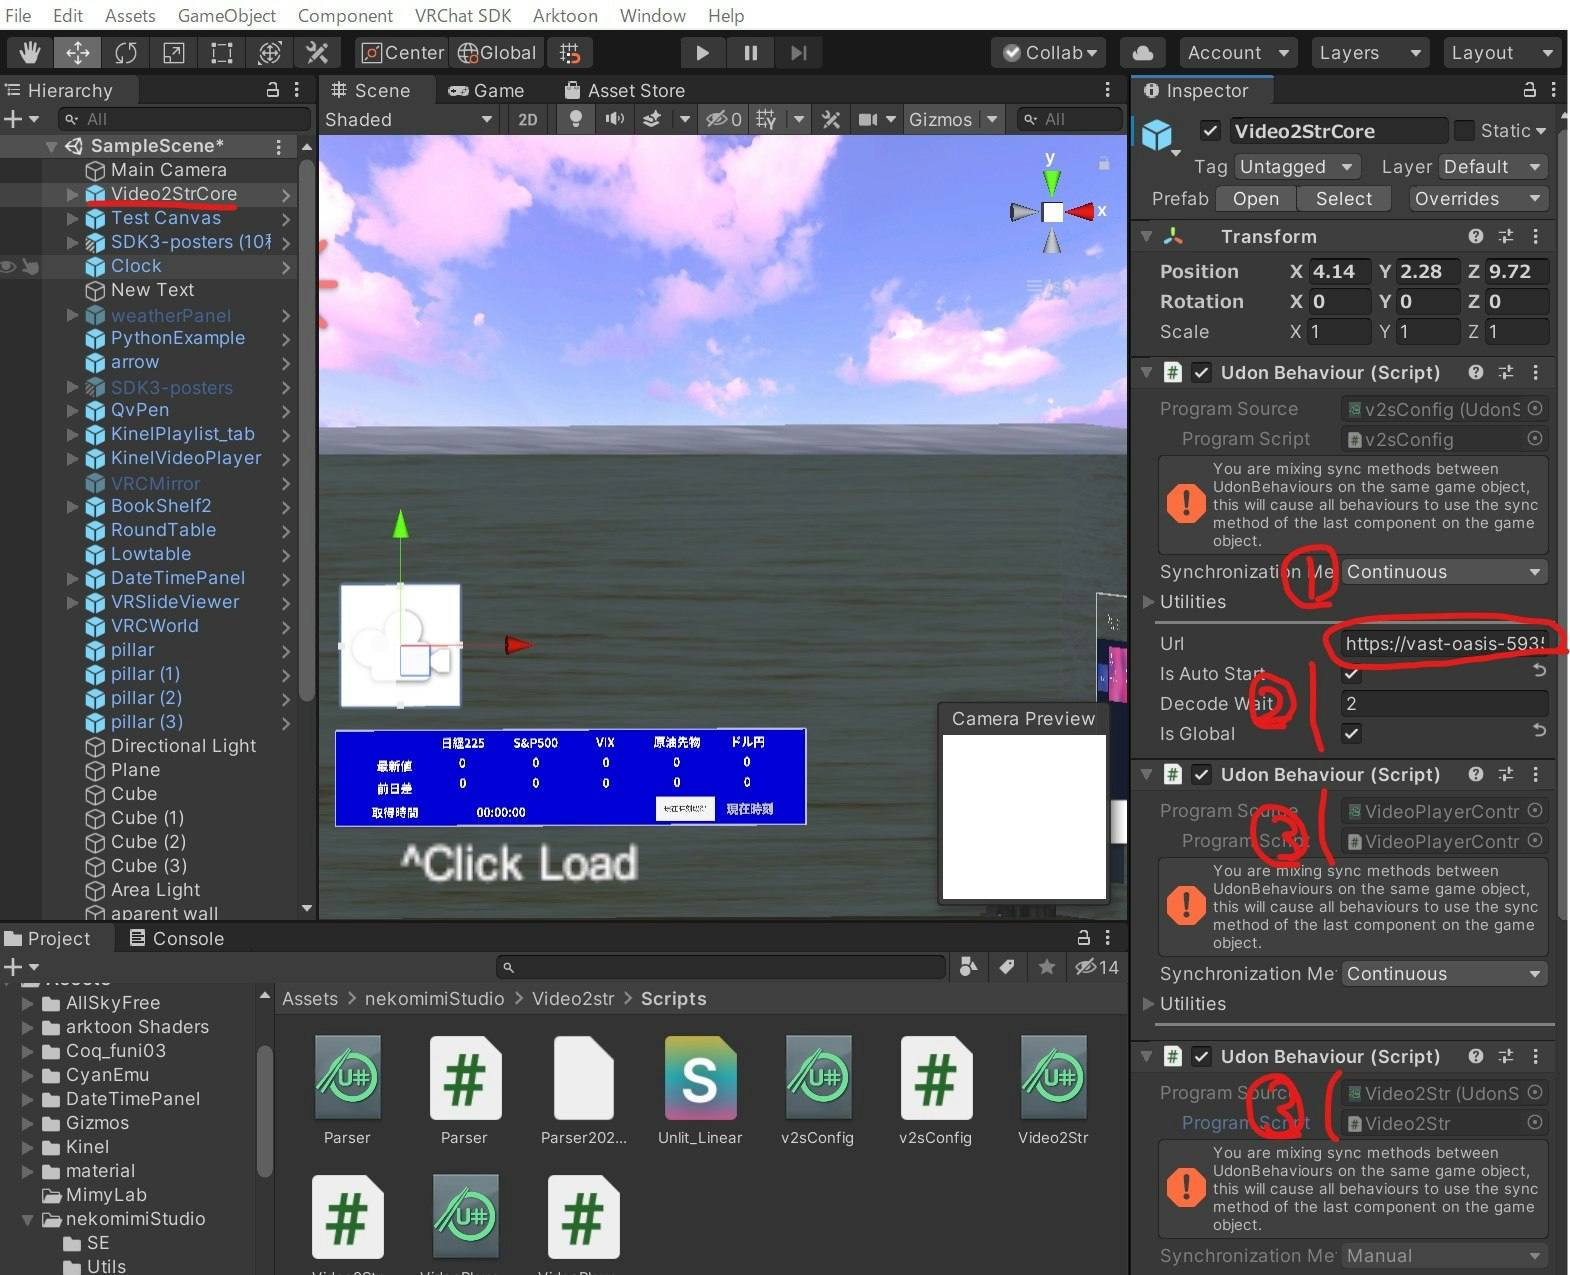
下記「VRC_get_text_from_video」の「Video2StrCore.prefab」をUnity上のAssets-> Import Package よりImportします。
HierarchyのVideo2StrCoreを選択し、InspectorのUrl欄に動画が表示されるWebサイト(ここでの例:https://stormy-depths-52109.herokuapp.com/kaimonolist.webm )を記載します。その他のアタッチメントも下記に画像のように設定を行います。
4-2 Camvasの作成
下記のサイトに従い、文字を表示させるCamvasを作成します。
4-3 データを表示させるコードを作成する。
下記のC#(Udonsharp)コードを作成します。
using UnityEngine;
using UdonSharp;
using nekomimiStudio.video2String;
using VRC.SDKBase;
using UnityEngine.UI;

public class Testlist : UdonSharpBehaviour
{
    public Video2Str video2Str; // Video2StrCore についている Video2Str をここに割りあてる
    [UdonSynced(UdonSyncMode.None)]
    string[] _content = new string[20]; //  [UdonSynced(UdonSyncMode.None)] 後から来た人にも同様な値を見せる
    private bool done = false;
    private Parser parser;
    [SerializeField] Text _time;
    [SerializeField] Text _n225Text;
    [SerializeField] Text _n225difText;
    [SerializeField] Text _sp500Text;
    [SerializeField] Text _sp500difText;
    [SerializeField] Text _vixText;
    [SerializeField] Text _vixdifText;
    [SerializeField] Text _clfText;
    [SerializeField] Text _clfdifText;
    [SerializeField] Text _jpydText;
    [SerializeField] Text _jpyddifText;

    void Start()
    {

        parser = video2Str.getParser();


    }

    //操作対象とするオブジェクトの所有者が別のユーザーだった場合、所有者をオブジェクト操作者に移動させる。
    public void ChangeOwner()
    {
        if (!Networking.IsOwner(Networking.LocalPlayer, this.gameObject)) Networking.SetOwner(Networking.LocalPlayer, this.gameObject);
    }


    // Updateメソッドは毎フレーム呼ばれるため上方向に進み続けるサンプルとなっています。
    void Update()
    {
        if (!done)
        {
            //Debug.Log($"progress: {video2Str.getDecodeProgress()}");

            if (parser.isDone())
            {
                for (int i = 0; i < parser.getLength("株価"); i++)
                {
                    Debug.Log($"{i}: {parser.getString("株価", i, "ticker")}, {parser.getString("株価", i, "val")}");
                    _content[i] = parser.getString("株価", i, "val");
                    //_n225Text.text = _content[0].ToString();
                }

                done = true;

                _time.text = _content[0].ToString();
                _n225Text.text = _content[2].ToString();
                _n225difText.text = _content[3].ToString();
                _sp500Text.text = _content[6].ToString();
                _sp500difText.text = _content[7].ToString();
                _vixText.text = _content[10].ToString();
                _vixdifText.text = _content[11].ToString();
                _clfText.text = _content[12].ToString();
                _clfdifText.text = _content[13].ToString();
                _jpydText.text = _content[8].ToString();
                _jpyddifText.text = _content[9].ToString();
            }
        }
    }


}
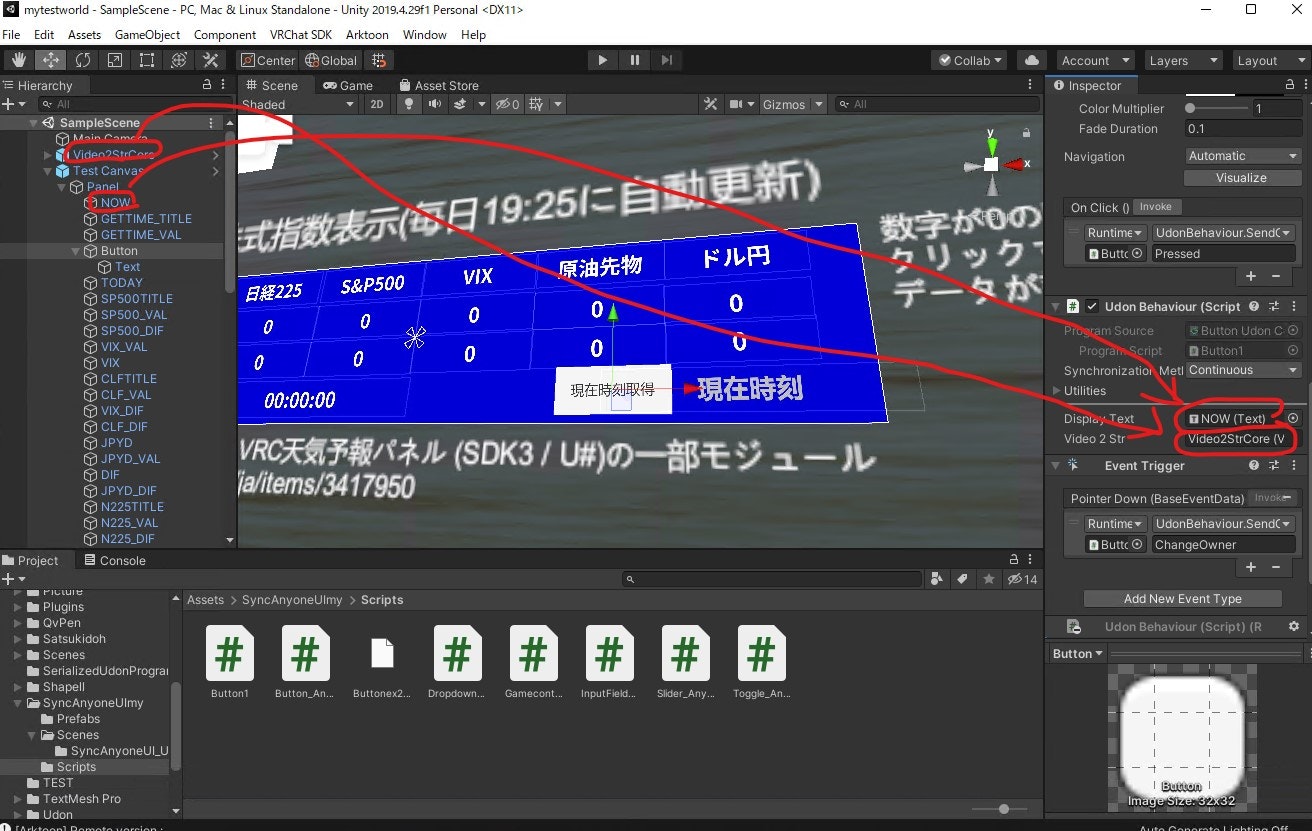
上記のコードであると、あとからワールドに入ってきた人に対してはデータ取得動作を行わないので、「現在時刻取得」というボタンをクリックするとデータの読み込みを実施するようにします。なお、下記のコードは「現在時刻取得」ボタンをクリックした時間を記録し、表示させる機能も備えております。

using UdonSharp;
using UnityEngine;
using UnityEngine.UI;
using VRC.SDKBase;
using nekomimiStudio.video2String;

public class Buttonex : UdonSharpBehaviour
{
    Button _button;   // Buttonクラスの_buttonオブジェクトを定義
    System.DateTime _now;
    [SerializeField] Text _displayText;
    [UdonSynced(UdonSyncMode.None)]
    string _content;  //  [UdonSynced(UdonSyncMode.None)] 後から来た人にも同様な値を見せる
    public Video2Str video2Str; // Video2StrCore についている Video2Str をここに割りあてる


    //Start()はワールド起動時に実行される メソッド
    void Start()
    {
        _now = System.DateTime.Now; //現在の日時(年、月、日、時、分、秒、1/100秒)
        _content = _now.Hour.ToString("00") + ":" + _now.Minute.ToString("00") + ":" + _now.Second.ToString("00");
        _displayText.text = _content.ToString();

    }

    public void Pressed()
    {
        _now = System.DateTime.Now; //現在日時(年、月、日、時、分、秒、1/100秒)
        _content = _now.Hour.ToString("00") + ":" + _now.Minute.ToString("00") + ":" + _now.Second.ToString("00");
        _displayText.text = _content.ToString();

        video2Str.reload(); //株価データの読み込みを行う

    }

    //操作対象とするオブジェクトの所有者が別のユーザーだった場合、所有者をオブジェクト操作者に移動させる。
    public void ChangeOwner()
    {
        if (!Networking.IsOwner(Networking.LocalPlayer, this.gameObject)) Networking.SetOwner(Networking.LocalPlayer, this.gameObject);
    }


    // OnDeserialization 変数の同期が行われると呼び出されるメソッド 全員に同じdataを表示させるために必要なコマンドである。
    public override void OnDeserialization()
    {
        _displayText.text = _content.ToString();
    }
}
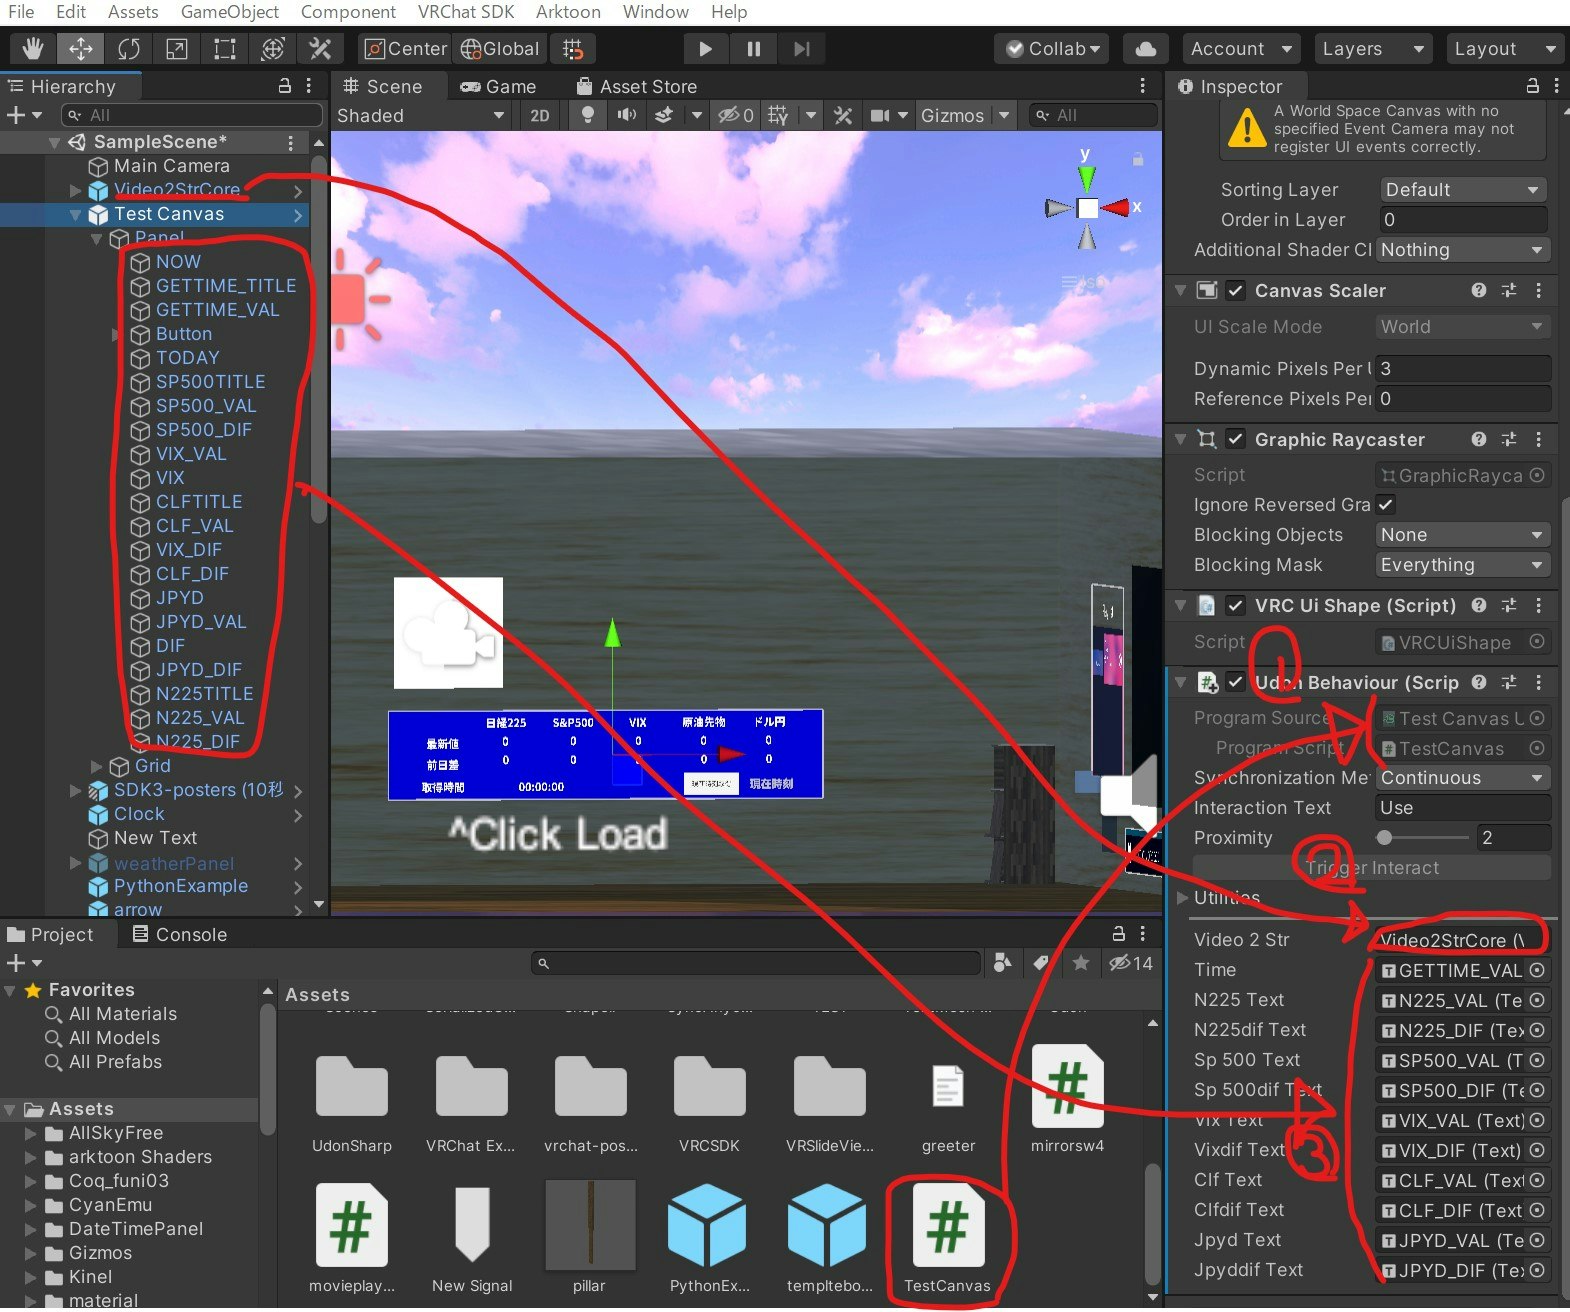
4-4 アタッチメント行う
下記の図を参考にし、Canvasオブジェクト(TestCanvas)のInspectorに「TestCanvas.cs」と「Video2StrCore」とその他表示文字のアタッチメントを行う
下記はHerokuにVuejsをインストールする方法を記載しております。
3-x Vue-cliをインストールする
npm install -g @vue/cli
npm install -g @vue/cli-init
apt-get install lsof
mkdir vue-vrctest
cd vue-vrctest
vue init webpack .
? Generate project in current directory? Yes
? Project name vue-vrctest
? Project description A Vue.js project
? Author
? Vue build standalone
? Install vue-router? Yes
? Use ESLint to lint your code? No
? Set up unit tests No
? Setup e2e tests with Nightwatch? No
? Should we run `npm install` for you after the project has been created? (recommended) (Use arrow keys)
? Yes, use NPM


chmod -R 777 vue-vrctest
npm install -g webpack
npm install express --save  #expressをインストールする。
npm install vue-router #vue-routerをインストールする
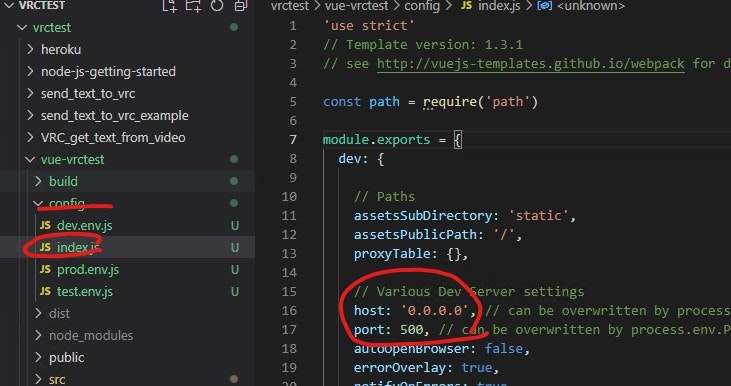
ここで、/vrctest/vue-vrctest/config/index.jsにてアクセスするポートを設定する。
次にserver.jsを下記の通り書き換える。
// server.js
var express = require('express');
var path = require('path');
var serveStatic = require('serve-static');
app = express();
app.use(serveStatic(__dirname + "/dist"));
var port = process.env.PORT || 500;
app.listen(port);
console.log('server started '+ port);
package.jsonのscript部分、 "start": "node server.js"を追加する
  "scripts": {
    "dev": "webpack-dev-server --inline --progress --config build/webpack.dev.conf.js",
    "start": "node server.js",
    "build": "node build/build.js"
  },
3-x Vue.js & Node.jsサーバーをたちあげる
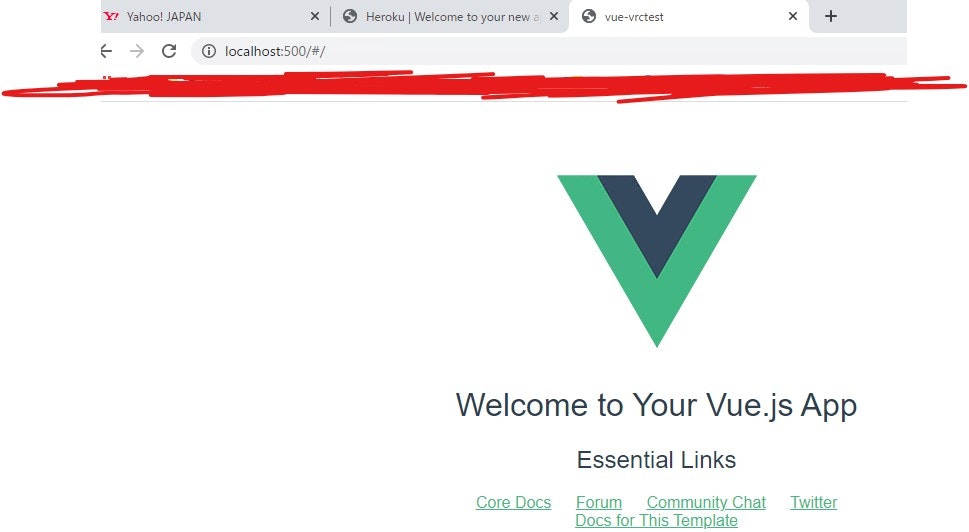
npm run dev & #check http://localhost:500
VueのTempleteメージが表示される
3-x routerを使い、子ページを作成する。
ここでは demoという子ページを作成するものとする。/src/router/index.jsを下記の通り書き換える。
// eslint-disable-next-line
/* eslint-disable */

import Vue from 'vue'
import Router from 'vue-router'
import HelloWorld from '@/components/HelloWorld'
import Demo from '@/components/Demo'
Vue.use(Router)

export default new Router({
  routes: [
    {
      path: '/',
      name: 'HelloWorld',
      component: HelloWorld
    },

    {
      path: '/demo',
      name: 'demo',
      component: Demo
    },
  ]
})
/src/components/Demo.vueを新規に作成する。
任意のvue.jsコードを記載すること
再度npm run devを実施し、vue.js全体を読み込む。
npm run dev
http://localhost:500/#/ と http://localhost:500/#/Demo にアクセスし、所望のページが表示されたらOK。
3-x Herokuアプリし、vue.jsデータをgit上にアップロードする。
heroku create  #https://rocky-reaches-19683.herokuapp.com
heroku config:set NODE_ENV=production --app rocky-reaches-19683
heroku login -i
Email: xxxxxxxxxx
Password: (API key)
git init
# ここで、.gitignoreファイルをオープンし、/dist/を削除する作業を行う(*1)。
heroku git:remote --app rocky-reaches-19683
git add .
git commit -a -m "rocky-reaches-19683"
git push heroku HEAD:master
(*1)
/dist/を削除する
.DS_Store
node_modules/
/dist/  <-----------削除する
npm-debug.log*
yarn-debug.log*
yarn-error.log*
/test/unit/coverage/
/test/e2e/reports/
selenium-debug.log

# Editor directories and files
.idea
.vscode
*.suo
*.ntvs*
*.njsproj
*.sln
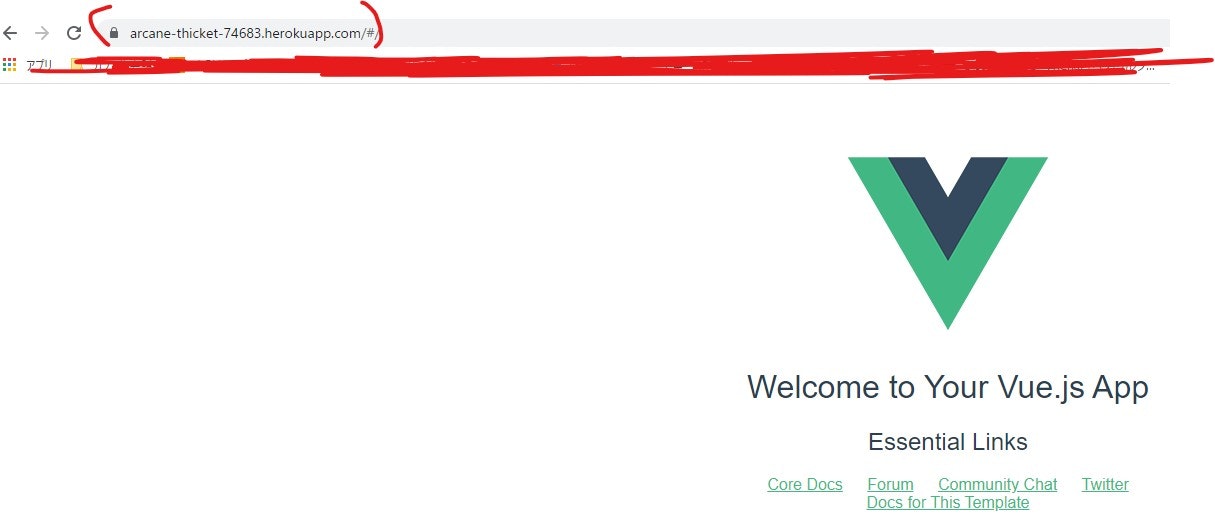
ここで、 https://arcane-thicket-74683.herokuapp.com/#/ にアクセスするとVueのFormat画面が確認できる。
selenium4のインストール
pip install selenium==4.0.0