1 この記事は
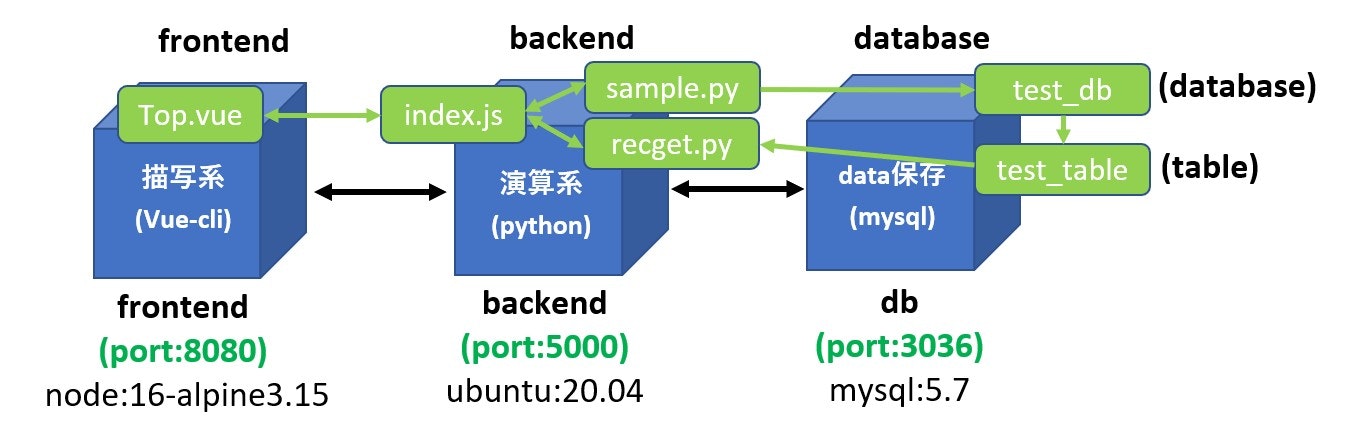
Vue-Cli(描写系)-python(演算系)-mysql(データ保存)で構成されるシステムをdockerコンテナを使って構築する。この記事でアプリ作成方法を説明する。
環境構築編は、下記リンク先をご確認ください。
2 制作アプリの紹介
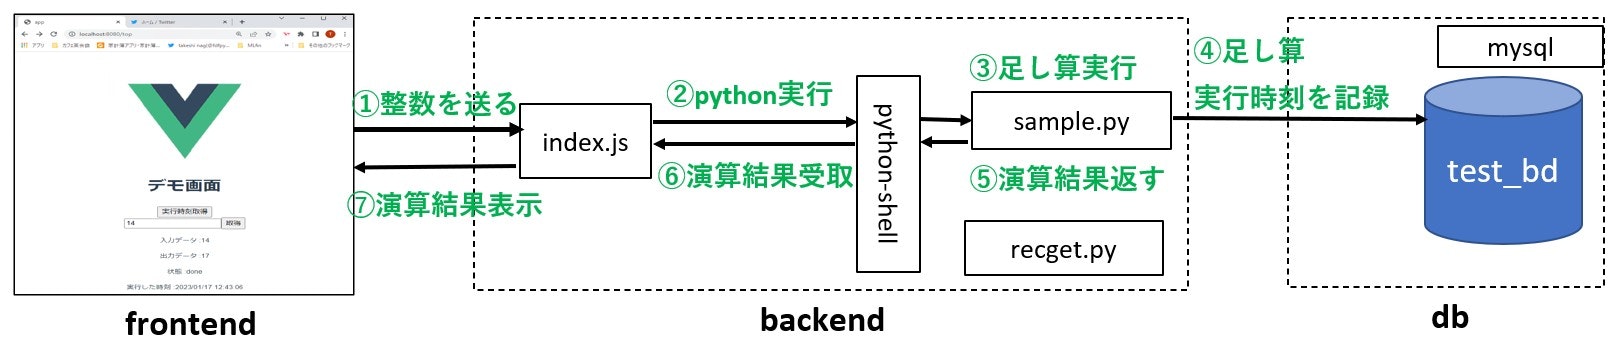
上記のシステムを動かすために、入力した数値に+3を加算し、演算結果を表示するアプリを作成してみました。

入力した数値に+3を加算し表示するとき
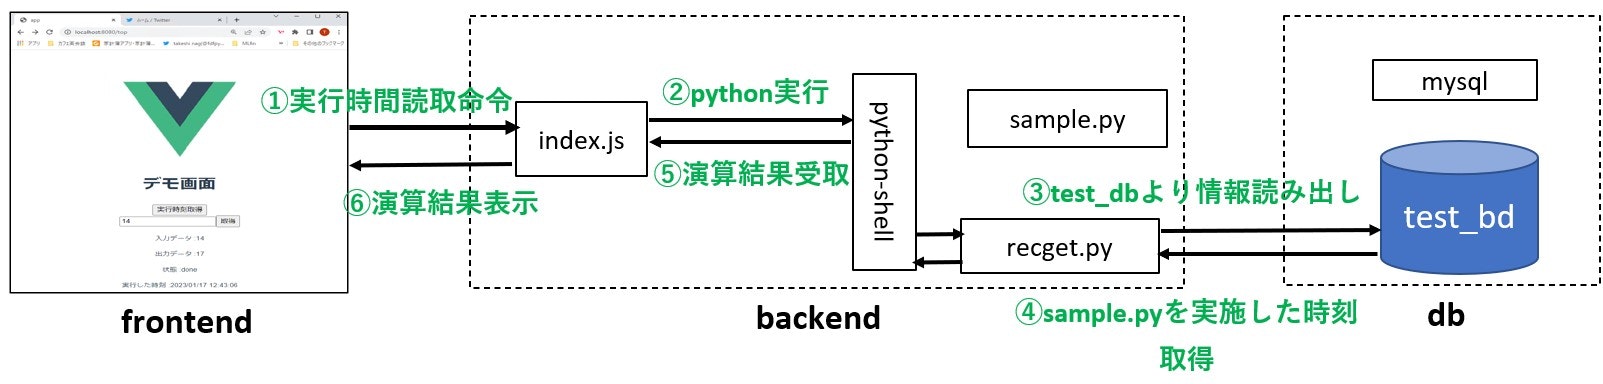
+3を加算する演算を実施した時刻を読みだすとき
3 アプリ構築のために実施すること
3-1 フロントエンド
Top.vueを作成し、下記のコードをコピペする。
MEIGARASEL/fe/app/src/components/Top.vue
<template>

  <div>
    <h1>デモ画面</h1>
    <input type="button" value="実行時刻取得" @click="getrec()"> <br>
    <input type="number" v-model="message"><input type="button" value="取得" @click="getdata()">
    <p> <font size="2"> 入力データ :{{ $data.message }} </font> </p>
    <p> <font size="2"> 出力データ :{{ $data.result }} </font> </p>
    <p> <font size="2"> 状態 :{{ $data.state }} </font> </p>
    <p> <font size="2"> 実行した時刻 :{{ $data.jikan }} </font> </p>

  </div>

</template>

<script>
// eslint-disable-next-line
/* eslint-disable */

export default {
  name: 'top',
  data: function(){
    return {
        message:'',  //入力データを格納する変数。
        result :'',  //演算結果を格納する変数。
        jikan:"", //コマンドを実行した時間
        state:"wait" //現在の状況を格納する変数。
    }
  },
  methods: {
    //テキストボックスに入力されたデータをバックエンドに送り、バックエンドから演算結果を受け取り、その結果を表示するメソッド
    getdata:function(){
        this.state="getting data"
        this.$axios.get('http://localhost:5000/api',{params:{dat:this.message}})
          .then(function(response){
            console.log(response)  //バックエンドから返却された演算結果をconsole.logしている。
            console.log(response.data.message.val)  //バックエンドから返却された演算結果をconsole.logしている。
            this.result= response.data.message.val
            this.state="done"
            }.bind(this))  //Promise処理を行う場合は.bind(this)が必要
          .catch(function(error){  //バックエンドからエラーが返却された場合に行う処理について
            this.state="ERROR"
            }.bind(this))
          .finally(function(){
            }.bind(this))},

    getrec:function(){
        this.state="getting data"
        this.$axios.get('http://localhost:5000/kiroku',{params:{dat:this.message}})
          .then(function(response){
            console.log(response.data.message.jikan)  //バックエンドから返却された演算結果をconsole.logしている。
            this.jikan= response.data.message.jikan
            this.state="done"
            }.bind(this))  //Promise処理を行う場合は.bind(this)が必要
          .catch(function(error){  //バックエンドからエラーが返却された場合に行う処理について
            this.state="ERROR"
            }.bind(this))
          .finally(function(){
            }.bind(this))},


  }
}

</script>
index.jsを作成し、下記のコードをコピペする。
MEIGARASEL/fe/app/src/router/index.js
import Vue from 'vue'
import Router from 'vue-router'
import HelloWorld from '@/components/HelloWorld'
import Home from '@/components/Top'

Vue.use(Router)

export default new Router({
  mode: 'history',
  routes: [
    {
      path: '/',
      name: 'HelloWorld',
      component: HelloWorld
    },
    {
      path: '/top',
      name: 'Top',
      component: Home
    },
  ]
})
main.jsを作成し、下記のコードをコピペする。
MEIGARASEL/fe/app/main.js
// eslint-disable-next-line
/* eslint-disable */
// The Vue build version to load with the `import` command
// (runtime-only or standalone) has been set in webpack.base.conf with an alias.
import Vue from 'vue'
import App from './App'
import router from './router'
import axios from 'axios'  //axiosを使う場合、main.jsでimportする。

Vue.config.productionTip = false
Vue.prototype.$axios = axios  //axiosを使う場合、main.jsでこの行の追記が必要

/* eslint-disable no-new */
new Vue({
  el: '#app',
  router,
  template: '<App/>',
  components: { App }
})
3-2 バックエンド
index.jsを作成し、下記のコードをコピペする。index.jsはフロントエンドとバックエンドの仲介をしている。
MEIGARASEL/be/app/index.js
const express = require('express')
const bodyParser = require('body-parser')
const app = express()
app.use(bodyParser.json())


//CORSポリシーを無効にしている。
app.use(function(req, res, next) {
  res.header("Access-Control-Allow-Origin", "*");
  res.header("Access-Control-Allow-Headers", "Origin, X-Requested-With, Content-Type, Accept");
  next();
});

//フロントエンドから受け取った数値に+3を加算する操作を読み出し、演算結果をフロントエンドに返す。
app.get('/api', function(req, res) {

  var {PythonShell} = require('python-shell');
  var pyshell = new PythonShell('sample.py');
  console.log("req")
  console.log(req.query.dat) //フロントエンドから受け取ったデータをconsole.logしている。

  pyshell.send(req.query.dat); //本コードからpythonコードに'req.query.dat'を入力データとして提供する

  //pythonコード実施後にpythonから本コードにデータが引き渡される。
  pyshell.on('message',  function (data) {
    //console.log(typeof JSON.parse(data))
    //console.log(JSON.parse(data))
    tmpdat=JSON.parse(data) //pythonから受け取ったデータをJSON形式に変換する。

      res.send({
        message:
        {
          "val":tmpdat.val
        }
           //pythonで実施した演算結果をフロントエンドに返している。
      })
  })

})

//mysqlに保存したデータ(演算処理を実施した時刻)を取得しフロントエンドに返す
app.get('/kiroku', function(req, res) {

  var {PythonShell} = require('python-shell');
  var pyshell = new PythonShell('recget.py');
  console.log("req")
  console.log(req.query.dat) //フロントエンドから受け取ったデータをconsole.logしている。

  pyshell.send(req.query.dat); //本コードからpythonコードに'req.query.dat'を入力データとして提供する

  //pythonコード実施後にpythonから本コードにデータが引き渡される。
  pyshell.on('message',  function (data) {

    tmpdat=JSON.parse(data)

      res.send({
        message:
        {
          "jikan":tmpdat.jikan
        }
           //pythonで実施した演算結果をフロントエンドに返している。
      })
  })

})

app.listen(5000)
sample.pyは、index.jsから受け取った数値に+3を加算する処理を行い、演算実施時間をmysql databaseに書き込みを行う作業を担ってる。
MEIGARASEL/be/app/sample.py
import sys
import mysql.connector
import datetime
import json
from datetime import datetime as dt

data = sys.stdin.readline()  #標準入力からデータを取得する
num=int(data)

def sum(a):

    db_record_all_del()


    db_kakikomi([(dt.now().strftime('%Y/%m/%d %H:%M:%S'), a)])
    dbrec=getrecord()

    #tdatetime = dt.now()
    #tstr = tdatetime.strftime('%Y/%m/%d')


    #print(dbrec[0][0])

    mydict={"val":a+3}

    return mydict

def getrecord():

    db=mysql.connector.connect(
      host='db',
      port='3306',
      user='root',
      password='root',
      database='test_db')

    cursor=db.cursor()
    cursor.execute("USE test_db")
    sql = "SELECT * FROM test_db.test_table"
    cursor.execute(sql)
    result=cursor.fetchall()
    db.commit()
    return result

def db_kakikomi(dat):

    # data = [(datetime.datetime.now(), val)]


    db=mysql.connector.connect(
      host='db',
      port='3306',
      user='root',
      password='root',
      database='test_db')

    cursor=db.cursor()
    cursor.execute("USE test_db")

    cursor.execute("""CREATE TABLE IF NOT EXISTS test_table(
                hiduke TEXT,
                value INT);""")
    sql = ('''
    INSERT INTO test_table
        (hiduke, value)
    VALUES
        (%s, %s)
    ''')

    cursor.executemany(sql, dat)
    db.commit()


def db_record_all_del():

    db=mysql.connector.connect(
      host='db',
      port='3306',
      user='root',
      password='root',
      database='test_db')

    cursor=db.cursor()
    cursor.execute("USE test_db")
    sql = "DELETE FROM test_table"
    cursor.execute(sql)
    db.commit()

print(json.dumps(sum(num)))  #printの内容をpython-shellに返却する。json形式でindex.jsに返す。
recget.pyはmysql databaseから情報を読み出し、index.jsに返す役割を担っている。
MEIGARASEL/be/app/recget.py
import sys
import mysql.connector
import datetime
import json
from datetime import datetime as dt

#data = sys.stdin.readline()  #標準入力からデータを取得する
#num=int(data)

def kiroku_get():


    dbrec=getrecord()
    mydict={"jikan":dbrec[0][0]}

    return mydict


def getrecord():

    db=mysql.connector.connect(
      host='db',
      port='3306',
      user='root',
      password='root',
      database='test_db')

    cursor=db.cursor()
    cursor.execute("USE test_db")
    sql = "SELECT * FROM test_db.test_table"
    cursor.execute(sql)
    result=cursor.fetchall()
    db.commit()
    return result


print(json.dumps(kiroku_get()))  #printの内容をpython-shellに返却する
3-3 mysql
コンソールに入り、detabaseとtableをあらかじめ作成していること。


mysql
sh-4.2# mysql -h 127.0.0.1 -u root -p

mysql> CREATE DATABASE test_db;
Query OK, 1 row affected (0.00 sec)

mysql> show databases;
+--------------------+
| Database           |
+--------------------+
| information_schema |
| mysql              |
| performance_schema |
| sys                |
| test_database      |
| test_db            |
+--------------------+
6 rows in set (0.01 sec)

mysql> drop database test_db;

mysql> show databases;
+--------------------+
| Database           |
+--------------------+
| information_schema |
| mysql              |
| performance_schema |
| sys                |
| test_database      |
+--------------------+
5 rows in set (0.01 sec)

//TABLEの中身を表示する
mysql> SELECT * FROM (DB名).(TABLE名);