概要
以下を用いたときの環境設定備忘録です
- RaspberryPi4B+
- raspios_raspios_arm64[bullseye-arm64]-2022-04-04 link↗︎
以下の設定をしていきます
- シェルとプロンプト
- デフォルトシェルの変更(bash→zsh)
- starship(プロンプト設定)
- vsCodeターミナル上でのNerdFonts表示の有効化
- 便利アイテム
- neovim
- exa (lsの代品)
- Git管理とディレクトリ移動
- x-motemen/ghq
- junegunn/fzf
シェルとプロンプト
ZSH
# zshのインストール
sudo apt install zsh -y
touch ~/.zshrc
# shellの確認
cat /etc/shells
# デフォルトシェルの変更
chsh -s /bin/zsh
startship プロンプトの設定(お好みで)
# starshipのインストール
sh -c "$(curl -fsSL https://starship.rs/install.sh)"
echo 'eval "$(starship init zsh)"' >> ~/.zshrc
mkdir -p ~/.config && touch ~/.config/starship.toml
# startship 表示カスタム(お好みで)
sudo vim ~/.config/starship.toml

# Nerdフォント(アイコン表示に使用 DroidSansMono Nerd Font install)
mkdir -p ~/.local/share/fonts
cd ~/.local/share/fonts && curl -fLo "Droid Sans Mono for Powerline Nerd Font Complete.otf" https://github.com/ryanoasis/nerd-fonts/raw/master/patched-fonts/DroidSansMono/complete/Droid%20Sans%20Mono%20Nerd%20Font%20Complete.otf
# Nerdフォント(字体に使用 JetBrains Mono install)
/bin/bash -c "$(curl -fsSL https://raw.githubusercontent.com/JetBrains/JetBrainsMono/master/install_manual.sh)"
# JetBrains Mono 有効化
fc-cache -f -v
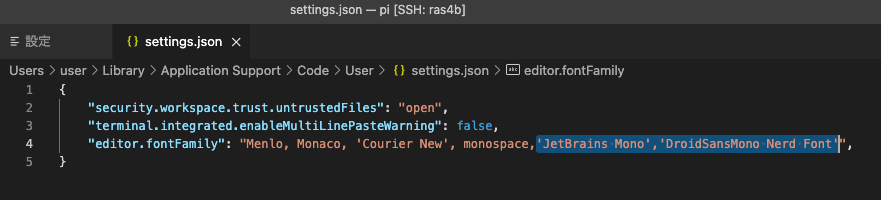
vsCodeターミナル上でのNerdFonts表示の有効化
- フォントファミリは有効にしたいNerdFonts名(色々種類がある)を指定する
- 今回は
DroidSansMono Nerd FontとJetBrains Monoを使用
VScode内のターミナルでzshを使うを表示がおかしくなるのでNerdFonts表示の有効化を実施
VScodeの右上の[ファイル]→[基本設定]→[設定]の検索で[font]で検索
settings.json で編集をクリック

"editor.fontFamily"に'DroidSansMono Nerd Font','JetBrains Mono'を追記し保存するとアイコンが表示されるようになります
便利アイテム
neovim
# プリインストールされている vim-tiny などをまとめて削除
sudo apt --purge remove -y $(dpkg -l | grep vim | awk '{print $2}')

# neovim をインストール
sudo apt update
sudo apt install -y neovim
# neovimコマンドの確認
nvim --version
# エイリアスの登録(vimで起動できるように)
echo "alias vim=nvim" >> ~/.zshrc
# neovim config(お好みで)
sudo mkdir -p ~/.config/nvim
wget https://gist.github.com/hirotaka42/ee4bd66c6e639ea71161e9a81bade0bd/raw/9bd6cb1edf42f0062fc5be132ef913173671b1d8/init.vim -O init.vim
# 恐らくdotfileとしてハードリンクするのが良いと思われ
sudo mv ./init.vim ~/.config/nvim/init.vim
sudo vim ~/.config/nvim/init.vim
exa(lsの代用品)
Debianのapt install exaでは古いバージョンがインストールされてしまい使用できないオプションがある為 RustのCargo installを使用しインストールします
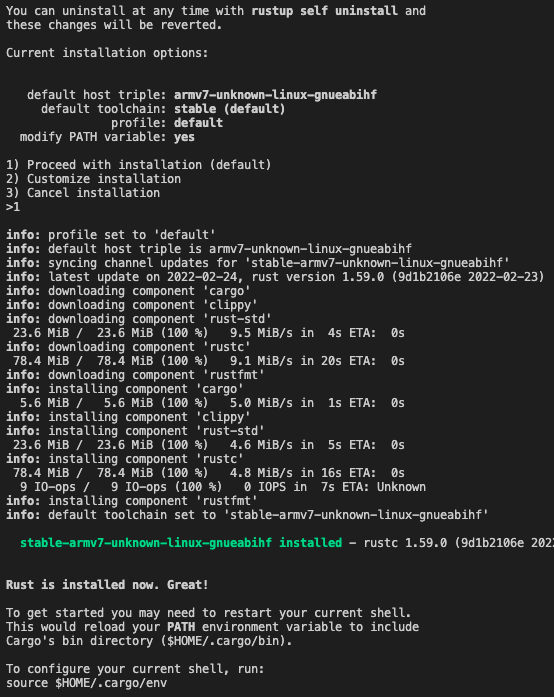
# Rust インストール
curl --proto '=https' --tlsv1.2 -sSf https://sh.rustup.rs | sh
# 1) Proceed with installation (default)
# 2) Customize installation
# 3) Cancel installation
# >1 を選択

# 有効化
source $HOME/.cargo/env
# コマンド確認
rustc --version
cargo --version
# exaのインストール
cargo install exa
# コマンドの確認
exa -l -g --icons
# エイリアス設定
# exaがインストールされている場合のみ有効化
if [[ $(command -v exa) ]]; then
  alias e='exa --icons --git'
  alias l=e
  alias ls=e
  alias ea='exa -a --icons --git'
  alias la=ea
  alias ee='exa -aahl --icons --git'
  alias ll=ee
  alias et='exa -T -L 3 -a -I "node_modules|.git|.cache" --icons'
  alias lt=et
  alias eta='exa -T -a -I "node_modules|.git|.cache" --color=always --icons | less -r'
  alias lta=eta
  alias l='clear && ls'
fi

Git管理とディレクトリ移動
git管理のghqとディレクトリ移動に便利なfzfをインストール
go installを使用する為、 goをインストールする
Go
今回使用したraspberryPi4B+のOSは64bitの為go1.18.linux-arm64.tar.gzになっているものを使用する
32bitOSの場合はlinux-armv6l.tar.gzが提供されているのでそちらを使用。

# パッケージの取得(64bit)
wget https://go.dev/dl/go1.18.linux-arm64.tar.gz
# パッケージの展開(64bit)
sudo tar -C /usr/local -xzf go1.18.linux-arm64.tar.gz

# インストール確認
ls -l /usr/local/go
# バージョン確認
cat /usr/local/go/VERSION
# パスの追加
echo "# Go" >> ~/.zshrc
echo "export GOPATH=$HOME/go" >> ~/.zshrc
echo "export PATH=$GOPATH/bin:$PATH:/usr/local/go/bin" >> ~/.zshrc
# パスの有効化
source ~/.zshrc
# goコマンドの確認
which go
go version
ghq/fzf のインストール
調べ切れていないが,goを使ったfzfのインストールが出来なくなっていたので、git cloneをしたものに変更
# fzf
git clone --depth 1 https://github.com/junegunn/fzf.git ~/.fzf
~/.fzf/install

# ghq
go install github.com/x-motemen/ghq@latest
# ghqで管理するrootディレクトリを設定(この記事では~/srcとする)
git config --global ghq.root '~/src'
ghq/fzf/exa 組み合わせ
cntl(^) + ] でGithubディレクトリを選択し移動
関数とそれをキーバインドさせる設定を~/.zshrcに書き込み完成
source ~/.zshrcで有効化させれば使えます
function ghq-fzf_change_directory() {
    # 選択したリポジトリへ移動 かつ
    # 右にリポジトリのディレクトリ詳細を表示
  local src=$(ghq list | fzf --preview "exa -l -g -a --icons $(ghq root)/{} | tail -n+4 | awk '{print \$6\"/\"\$8\" \"\$9 \" \" \$10}'")
  if [ -n "$src" ]; then
    BUFFER="cd $(ghq root)/$src"
    zle accept-line
  fi
  zle -R -c
}

zle -N ghq-fzf_change_directory
bindkey '^]' ghq-fzf_change_directory
参考にしたサイト
最後に
今回、ラズパイ設定でしたが便利なものはどんどん取り入れていきたいと思います
シェルとしてfishもプロントとしてtmuxも使いたいけど自由に設定できるがあまりに、
マウスを使ったコピペが出来なかったり作り込みをしないと痒いところに手が届かないのでまだ使いこなせません😞
tmuxのプロント設定はとてもかっこいいので使いこなせるようになりたいですね~
ここまでのdotfileを置いておくのでお好きに設定してみてください~
~/.zshrc
# aliases
alias g=git
alias vim=nvim

# exaがインストールされている場合のみ有効化
if [[ $(command -v exa) ]]; then
  alias e='exa --icons --git'
  alias l=e
  alias ls=e
  alias ea='exa -a --icons --git'
  alias la=ea
  alias ee='exa -aahl --icons --git'
  alias ll=ee
  alias et='exa -T -L 3 -a -I "node_modules|.git|.cache" --icons'
  alias lt=et
  alias eta='exa -T -a -I "node_modules|.git|.cache" --color=always --icons | less -r'
  alias lta=eta
  alias l='clear && ls'
fi


# Go
export GOPATH=$HOME/go
export PATH=$GOPATH/bin:$PATH:/usr/local/go/bin

# Startship
eval "$(starship init zsh)"

# 関数

function ghq-fzf_change_directory() {
    # 選択したリポジトリへ移動 かつ
    # 右にリポジトリのディレクトリ詳細を表示
  local src=$(ghq list | fzf --preview "exa -l -g -a --icons $(ghq root)/{} | tail -n+4 | awk '{print \$6\"/\"\$8\" \"\$9 \" \" \$10}'")
  if [ -n "$src" ]; then
    BUFFER="cd $(ghq root)/$src"
    zle accept-line
  fi
  zle -R -c
}

zle -N ghq-fzf_change_directory
bindkey '^]' ghq-fzf_change_directory
~/.config/nvim/init.vim
" Fundamentals "{{{
" ---------------------------------------------------------------------

" init autocmd
autocmd!
" set script encoding
scriptencoding utf-8
" init.vimを保存したら自動反映
autocmd BufWritePost  ~/.config/nvim/init.vim  so ~/.config/nvim/init.vim

set nocompatible
set number
syntax enable
set fileencodings=utf-8,sjis,euc-jp,latin
set encoding=utf-8
set title
set autoindent
set background=dark
set nobackup
set hlsearch
set showcmd
set cmdheight=1
set laststatus=2
set scrolloff=10
set expandtab
"インデント可視化
set list
set listchars=tab:»-,trail:-,eol:↲,extends:»,precedes:«,nbsp:%
"jキーを二度押しでESCキー
inoremap <silent> jj <Esc>
inoremap <silent> っj <ESC>
"help日本語化
set helplang=ja
" 挿入モードでバックスペースで削除できるようにする
set backspace=indent,eol,start
" ヤンクするとクリップボードに保存される
set clipboard+=unnamed

" incremental substitution (neovim)
if has('nvim')
  set inccommand=split
endif

" Suppress appending <PasteStart> and <PasteEnd> when pasting
set t_BE=

set nosc noru nosm
" Don't redraw while executing macros (good performance config)
set lazyredraw
"set showmatch
" How many tenths of a second to blink when matching brackets
"set mat=2
" Ignore case when searching
set ignorecase
" Be smart when using tabs ;)
set smarttab
" indents
filetype plugin indent on
set shiftwidth=2
set tabstop=2
set ai "Auto indent
set si "Smart indent
set nowrap "No Wrap lines
set backspace=start,eol,indent
" Finding files - Search down into subfolders
set path+=**
set wildignore+=*/node_modules/*

" Turn off paste mode when leaving insert
autocmd InsertLeave * set nopaste

" Add asterisks in block comments
set formatoptions+=r

"}}}


" Highlights "{{{
" ---------------------------------------------------------------------
set cursorline
"set cursorcolumn

" Set cursor line color on visual mode
highlight Visual cterm=NONE ctermbg=236 ctermfg=NONE guibg=Grey40

highlight LineNr cterm=none ctermfg=240 guifg=#2b506e guibg=#000000

augroup BgHighlight
  autocmd!
  autocmd WinEnter * set cul
  autocmd WinLeave * set nocul
augroup END

if &term =~ "screen"
  autocmd BufEnter * if bufname("") !~ "^?[A-Za-z0-9?]*://" | silent! exe '!echo -n "\ek[`hostname`:`basename $PWD`/`basename %`]\e\\"' | endif
  autocmd VimLeave * silent!  exe '!echo -n "\ek[`hostname`:`basename $PWD`]\e\\"'
endif

"}}}
~/.config/starship.toml
[memory_usage]
disabled = false
threshold = -1
symbol = " "
style = "bold dimmed green"

[hostname]
ssh_only = false
disabled = false