はじめに
目的
- Oracle Cloud Infrastructure(OCI)に構築したComputeインスタンス(Oracle Linux)に接続する際、一般的には初期で払い出しだされるopcユーザで公開鍵認証がされています。
- このサーバを踏み台としてポートフォワーディングで中のサーバを管理する事が多いかと思いますが、複数人、複数社の人に払い出すとなると、グローバルIPアドレスで制限したり、秘密鍵の管理(使い回し防止のためのローテーション、ユーザの払い出し)、ロギングなど、色々考慮が必要です。
- OpenVPN リモートアクセスVPNを使ってセキュアにComputeに接続することができます。必要な人に必要なユーザの払い出し、多要素認証、クライアント証明書認証、LDAP、接続されたときのログと監視(会社とOCI間をVPN接続することができればもちろんそれにこしたことはないかも?)
OpenVPNとは
- OpenVPNはOpenVPN Technologies, Inc. を中心に開発が行われているオープンソースのVPN(Virtual Private Network)ソフトウェアで、GPLライセンスによって公開されています。
- OCIマーケットプレイスからの利用も費用はCompute金額くらいですが、リモートアクセスユーザは2名までです。それ以上の場合、15ドル/1アカウント/年 必要です。
- OpenVPNは早くてセキュア
- VPN プロトコルの比較: PPTP vs. L2TP vs. OpenVPN vs. SSTP vs. IKEv2
- Windows、Linux、MacOS、iOS、Android色々なOSでリモートアクセスVPNができます。Site-to-Siteも可能ですが、お持ちノードBuffaloルータのファームウェアを専用の物に置き換えたりで、趣味程度ならよいかも?
- 初めてOpenVPN触りましたが、簡単にできることを書き出すと、
- ユーザ認証にLDAPやRADIUSを利用できるので、社内ですでにあるである認証基盤を利用しやすい。
- クライアント証明書での認証も可能
- 多要素認証(Google Authenticator)ができる★今回やった
- VPNクライアント(今回はWindows10)でのVPN接続が早い!今回は関西からカナダのTotrontoリージョンにVPN接続したけど、すぐ繋がる。
- 独自プロトコルですが、ポートは443を使うので、SSL-VPNの様にほぼほぼ使えないところは無い印象。
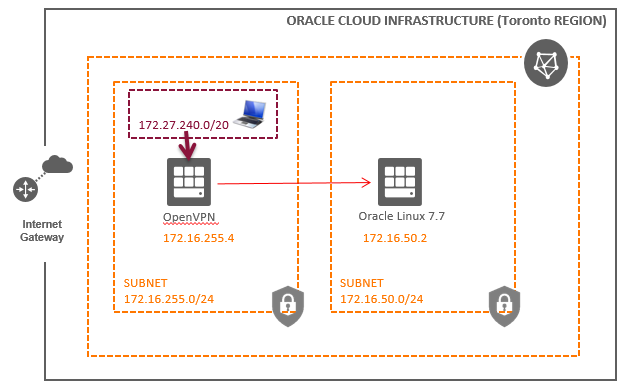
本内容の最終イメージ
- 自宅内のWindows10 PCから、OCIトロントリージョン内に構築したOpenVPNにリモートVPN
- 他のOCIサブネットにあるComputeインスタンスにPingやSSHができることを確認
- 認証はOpenVPN内のローカルユーザ + 多要素認証(Google Authenticator)
- 下図はVPN接続後の論理的なイメージ(※[172.27.240.0/20]はOCI内のサブネットではなく、OpenVPNで定義したもの)
- OpenVPNバージョンは2.7.5
他の利用シーン
- 同じOpenVPNを使って、ルータから接続すればSite-to-Site VPNができる。
全体構成
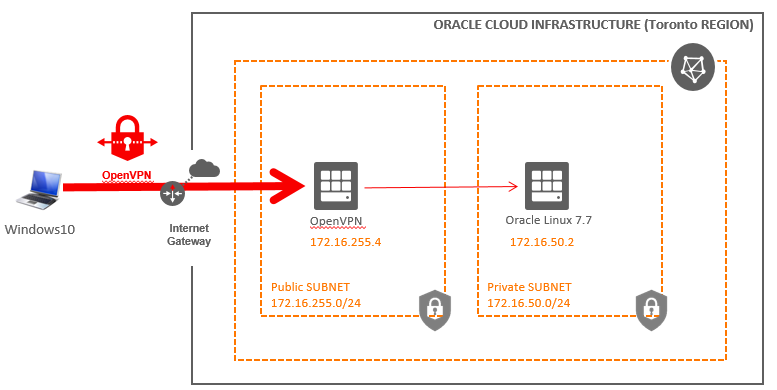
前提
- VCNやサブネットは上図の通り作成済み。
- OpenVPNをデプロイする場所は、Public Subnetで、グローバルIPを付与する
- Private サブネットのComputeは構築済み(Oracle Linux7.7)
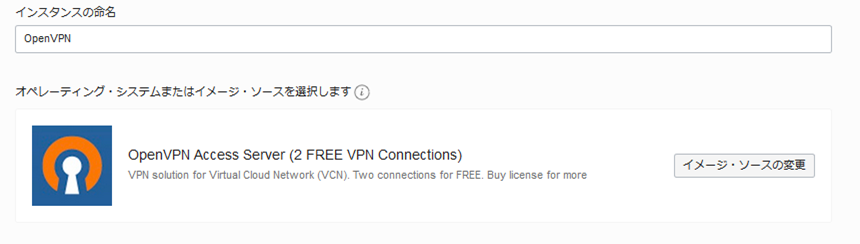
OCIマーケットプレイスからのOpenVPNサーバ構築
Computeを建てる
- OS選択の際に、マーケットプレイスから以下を選択する
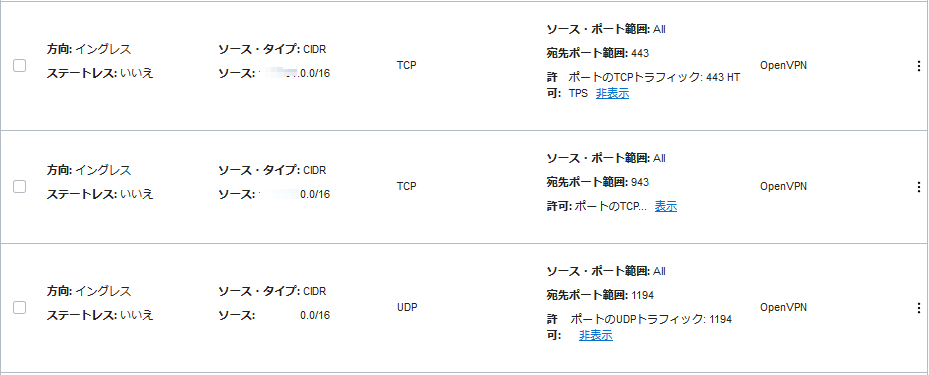
FWの設定(OCIのNetwork Security Group(NSG))
(NSGとは、サブネット単位ではなく、NIC単位に設定できるFW)
- TCP 443、943
- UDP 1194
- を開放する
(ここではソースIPも絞ってるが全て開放するなら[0.0.0.0/0])
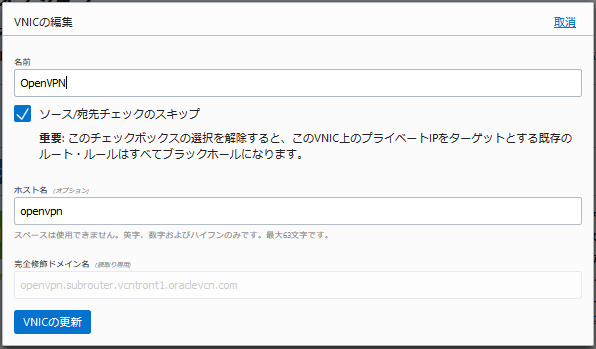
VNICの設定
- Computeデプロイ後、Computeの詳細を開く
- 「アタッチされたVNIC」を開いて「VNICの編集」
- ソース/宛先のチェックを入れる
OpenVPN ComputeにSSH接続して初期設定
- SSHでログインする
- ユーザ名は openvpnas
- Computeデプロイしたときに指定する公開鍵と対になる秘密鍵をセットして接続
- ログイン直後、自動的に初期設定となる
使用許諾
「yes」を入力
Welcome to OpenVPN Access Server Appliance 2.7.5
This system has been minimized by removing packages and content that are
not required on a system that users do not log into.


To restore this content, you can run the 'unminimize' command.
To run a command as administrator (user "root"), use "sudo <command>".
See "man sudo_root" for details.


          OpenVPN Access Server
          Initial Configuration Tool
------------------------------------------------------
OpenVPN Access Server End User License Agreement (OpenVPN-AS EULA)


    1. Copyright Notice: OpenVPN Access Server License;
       Copyright (c) 2009-2019 OpenVPN Inc. All rights reserved.
       "OpenVPN" is a trademark of OpenVPN Inc.
    2. Redistribution of OpenVPN Access Server binary forms and related documents,
       are permitted provided that redistributions of OpenVPN Access Server binary
       forms and related documents reproduce the above copyright notice as well as
       a complete copy of this EULA.
    3. You agree not to reverse engineer, decompile, disassemble, modify,
       translate, make any attempt to discover the source code of this software,
       or create derivative works from this software.
    4. The OpenVPN Access Server is bundled with other open source software
       components, some of which fall under different licenses. By using OpenVPN
       or any of the bundled components, you agree to be bound by the conditions
       of the license for each respective component. For more information, you can
       find our complete EULA (End-User License Agreement) on our website
       (http://openvpn.net), and a copy of the EULA is also distributed with the
       Access Server in the file /usr/local/openvpn_as/license.txt.
    5. This software is provided "as is" and any expressed or implied warranties,
       including, but not limited to, the implied warranties of merchantability
       and fitness for a particular purpose are disclaimed. In no event shall
       OpenVPN Inc. be liable for any direct, indirect, incidental,
       special, exemplary, or consequential damages (including, but not limited
       to, procurement of substitute goods or services; loss of use, data, or
       profits; or business interruption) however caused and on any theory of
       liability, whether in contract, strict liability, or tort (including
       negligence or otherwise) arising in any way out of the use of this
       software, even if advised of the possibility of such damage.
    6. OpenVPN Inc. is the sole distributor of OpenVPN Access Server
       licenses. This agreement and licenses granted by it may not be assigned,
       sublicensed, or otherwise transferred by licensee without prior written
       consent of OpenVPN Inc. Any licenses violating this provision
       will be subject to revocation and deactivation, and will not be eligible
       for refunds.
    7. A purchased license entitles you to use this software for the duration of
       time denoted on your license key on any one (1) particular device, up to
       the concurrent user limit specified by your license. Multiple license keys
       may be activated to achieve a desired concurrency limit on this given
       device. Unless otherwise prearranged with OpenVPN Inc.,
       concurrency counts on license keys are not to be divided for use amongst
       multiple devices. Upon activation of the first purchased license key in
       this software, you agree to forego any free licenses or keys that were
       given to you for demonstration purposes, and as such, the free licenses
       will not appear after the activation of a purchased key. You are
       responsible for the timely activation of these licenses on your desired
       server of choice. Refunds on purchased license keys are only possible
       within 30 days of purchase of license key, and then only if the license key
       has not already been activated on a system. To request a refund, contact us
       through our support ticket system using the account you have used to
       purchase the license key. Exceptions to this policy may be given for
       machines under failover mode, and when the feature is used as directed in
       the OpenVPN Access Server user manual. In these circumstances, a user is
       granted one (1) license key (per original license key) for use solely on
       failover purposes free of charge. Other failover and/or load balancing use
       cases will not be eligible for this exception, and a separate license key
       would have to be acquired to satisfy the licensing requirements. To request
       a license exception, please file a support ticket in the OpenVPN Access
       Server ticketing system. A staff member will be responsible for determining
       exception eligibility, and we reserve the right to decline any requests not
       meeting our eligibility criteria, or requests which we believe may be
       fraudulent in nature.
    8. Activating a license key ties it to the specific hardware/software
       combination that it was activated on, and activated license keys are
       nontransferable. Substantial software and/or hardware changes may
       invalidate an activated license. In case of substantial software and/or
       hardware changes, caused by for example, but not limited to failure and
       subsequent repair or alterations of (virtualized) hardware/software, our
       software product will automatically attempt to contact our online licensing
       systems to renegotiate the licensing state. On any given license key, you
       are limited to three (3) automatic renegotiations within the license key
       lifetime. After these renegotiations are exhausted, the license key is
       considered invalid, and the activation state will be locked to the last
       valid system configuration it was activated on. OpenVPN Inc.reserves the
       right to grant exceptions to this policy for license holders under
       extenuating circumstances, and such exceptions can be requested through a
       ticket via the OpenVPN Access Server ticketing system.
    9. Once an activated license key expires or becomes invalid, the concurrency
       limit on our software product will decrease by the amount of concurrent
       connections previously granted by the license key. If all of your purchased
       license key(s) have expired, the product will revert to demonstration mode,
       which allows a maximum of two (2) concurrent users to be connected to your
       server. Prior to your license expiration date(s), OpenVPN Inc. will attempt
       to remind you to renew your license(s) by sending periodic email messages
       to the licensee email address on record. You are solely responsible for
       the timely renewal of your license key(s) prior to their expiration if
       continued operation is expected after the license expiration date(s).
       OpenVPN Inc. will not be responsible for any misdirected and/or undeliverable
       email messages, nor does it have an obligation to contact you regarding
       your expiring license keys.
   10. Any valid license key holder is entitled to use our ticketing system for
       support questions or issues specifically related to the OpenVPN Access
       Server product. To file a ticket, go to our website at http://openvpn.net/
       and sign in using the account that was registered and used to purchase the
       license key(s). You can then access the support ticket system through our
       website and submit a support ticket. Tickets filed in the ticketing system
       are answered on a best-effort basis. OpenVPN Inc. staff
       reserve the right to limit responses to users of our demo / expired
       licenses, as well as requests that substantively deviate from the OpenVPN
       Access Server product line. Tickets related to the open source version of
       OpenVPN will not be handled here.
   11. Purchasing a license key does not entitle you to any special rights or
       privileges, except the ones explicitly outlined in this user agreement.
       Unless otherwise arranged prior to your purchase with OpenVPN,
       Inc., software maintenance costs and terms are subject to change after your
       initial purchase without notice. In case of price decreases or special
       promotions, OpenVPN Inc. will not retrospectively apply
       credits or price adjustments toward any licenses that have already been
       issued. Furthermore, no discounts will be given for license maintenance
       renewals unless this is specified in your contract with OpenVPN Inc.


Please enter 'yes' to indicate your agreement [no]:yes
Primeサーバ(最初な)なので、「yes」を入力
Once you provide a few initial configuration settings,
OpenVPN Access Server can be configured by accessing
its Admin Web UI using your Web browser.

Will this be the primary Access Server node?
(enter 'no' to configure as a backup or standby node)
> Press ENTER for default [yes]:yes
使うインターフェイスを指定
1でもいいが、2を入力
Please specify the network interface and IP address to be
used by the Admin Web UI:
(1) all interfaces: 0.0.0.0
(2) ens3: 172.16.255.4
Please enter the option number from the list above (1-2).
> Press Enter for default [1]:2
管理コンソールのポート番号を入力
デフォルトで943でいいので、そのままEnter
Please specify the port number for the Admin Web UI.
> Press ENTER for default [943]:
管理コンソールのポート番号を入力
デフォルトで943でいいので、そのままEnter
Please specify the TCP port number for the OpenVPN Daemon
> Press ENTER for default [443]:
そのままEnter
Should client traffic be routed by default through the VPN?
> Press ENTER for default [yes]:
そのままEnter
Should client DNS traffic be routed by default through the VPN?
> Press ENTER for default [yes]
そのままEnter
Use local authentication via internal DB?
> Press ENTER for default [yes]:
そのままEnter
Private subnets detected: ['172.16.255.0/24']

Should private subnets be accessible to clients by default?
> Press ENTER for default [yes]:
ローカルユーザ認証でするので、
そのままEnter
To initially login to the Admin Web UI, you must use a
username and password that successfully authenticates you
with the host UNIX system (you can later modify the settings
so that RADIUS or LDAP is used for authentication instead).

You can login to the Admin Web UI as "openvpn" or specify
a different user account to use for this purpose.

Do you wish to login to the Admin UI as "openvpn"?
> Press ENTER for default [yes]:
ライセンスもってないので、そのままEnter
> Please specify your OpenVPN-AS license key (or leave blank to specify later):
初期化が走る
Initializing OpenVPN...
Removing Cluster Admin user login...
userdel "admin_c"
Adding new user login...
useradd -s /sbin/nologin "openvpn"
Writing as configuration file...
Perform sa init...
Wiping any previous userdb...
Creating default profile...
Modifying default profile...
Adding new user to userdb...
Modifying new user as superuser in userdb...
Getting hostname...
Hostname: openvpnas2
Preparing web certificates...
Getting web user account...
Adding web group account...
Adding web group...
Adjusting license directory ownership...
Initializing confdb...
Generating init scripts...
Generating PAM config...
Generating init scripts auto command...
Starting openvpnas...


NOTE: Your system clock must be correct for OpenVPN Access Server
to perform correctly.  Please ensure that your time and date
are correct on this system.


Initial Configuration Complete!


You can now continue configuring OpenVPN Access Server by
directing your Web browser to this URL:


https://172.16.255.4:943/admin
Login as "openvpn" with the same password used to authenticate
to this UNIX host.


During normal operation, OpenVPN AS can be accessed via these URLs:
Admin  UI: https://172.16.255.4:943/admin
Client UI: https://172.16.255.4:943/


See the Release Notes for this release at:
   https://openvpn.net/vpn-server-resources/release-notes/
最後に表示される
https://172.16.255.4:943/admin
が、管理用アドレス。
IPアドレス部分を付与されているグローバルIPに変更して、管理できる。
https://172.16.255.4:943/
は、VPNクライアントから実際にVPN繋ぐ際のアドレス
IPアドレス部分はグローバルIPアドレスに変更して利用する
ユーザパスワード変更
- SSHログインしているユーザとは別で、OpenVPNのWeb管理画面での管理しるユーザがOS内に作成されている。[
- openvpn ユーザにパスワードを付与しておく
# passwd openvpn
Enter new UNIX password:
Retype new UNIX password:
passwd: password updated successfully
リモートアクセスVPNの実行
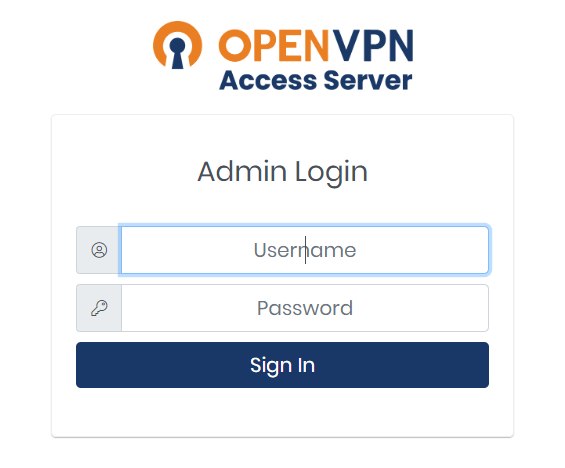
OpenVPN 管理サーバ初期
① 接続 https://<グローバルIP>:943/admin
以下で、Usernameに「openvpn」
パスワードは先程付与したパスワードを入力。
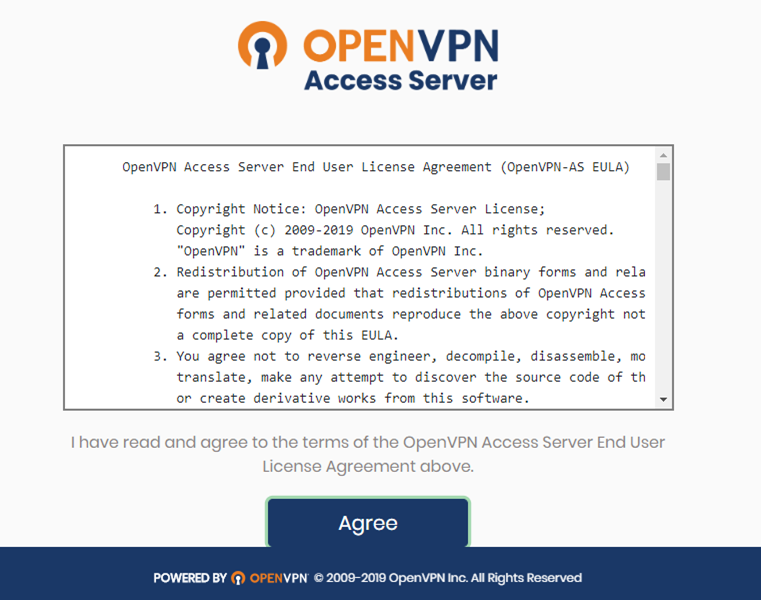
ログイン直後に使用許諾が出てくるので、(よく読んで)、Agree
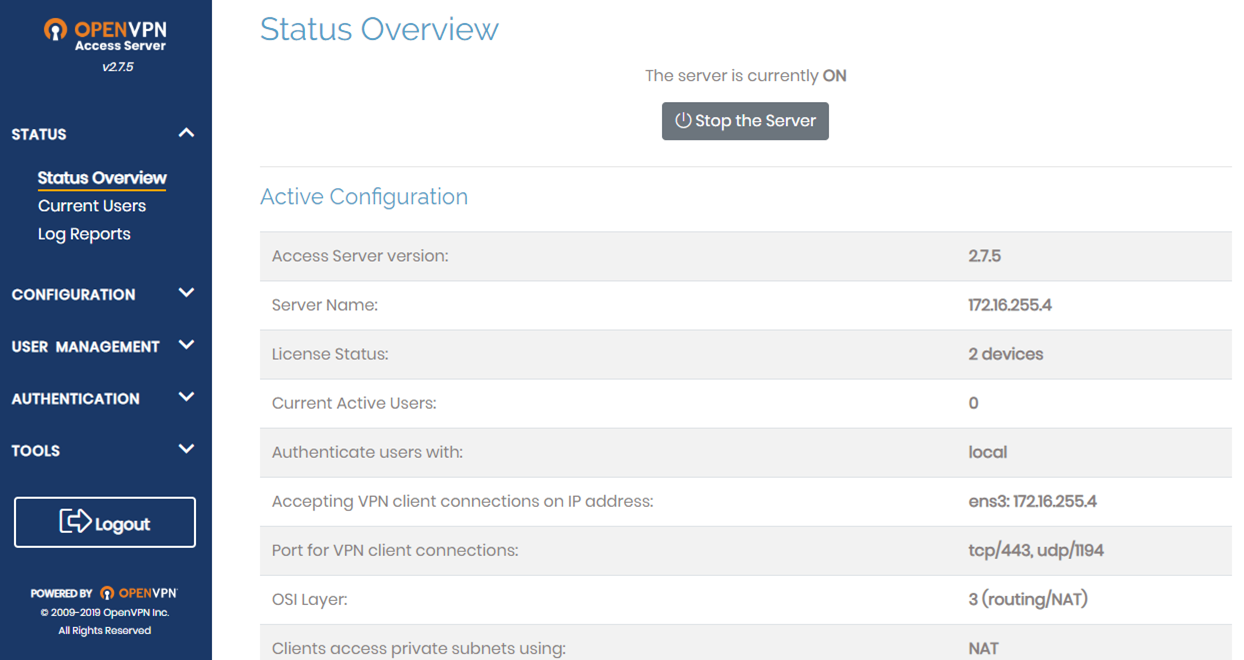
ログイン後の画面
OpenVPN設定:Network Setting
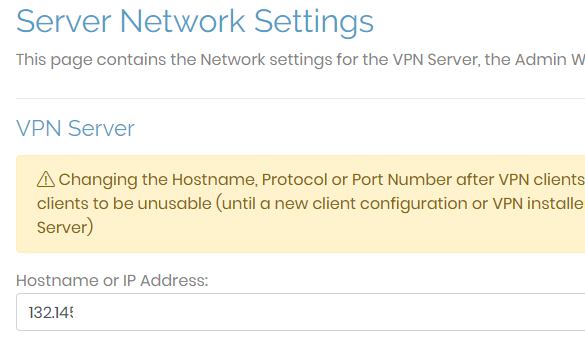
- Netwrok Settingを左のメニューから開いて以下をグローバルIPアドレスに変更する
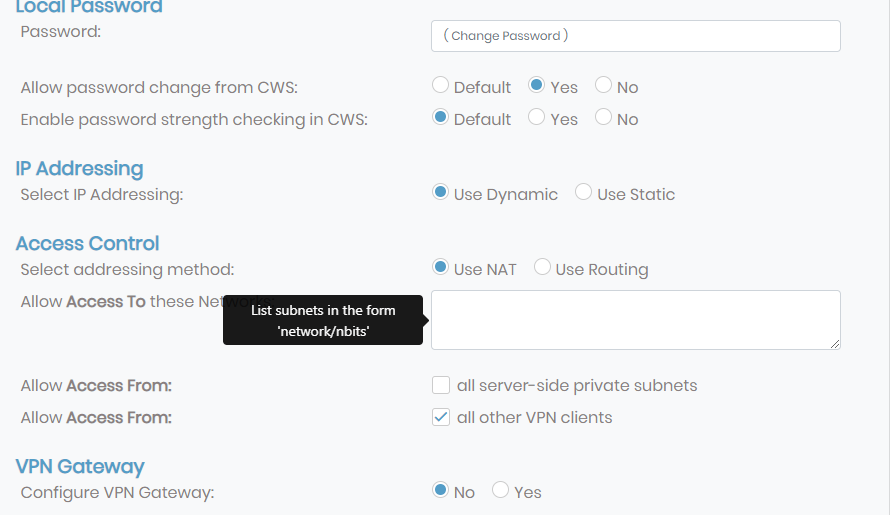
OpenVPN設定:VPN Setting
-
VPN Setting を左のメニューから開く
-
Dynamic IP Address Network が、リモートのWindows10 PCに払い出されるCIDRブロック
変えてもよし。今回はデフォルトのまま。

-
Routing を下記のように追加し、VPN接続後に接続するCIDRをブロックを記載する。
-
1行毎

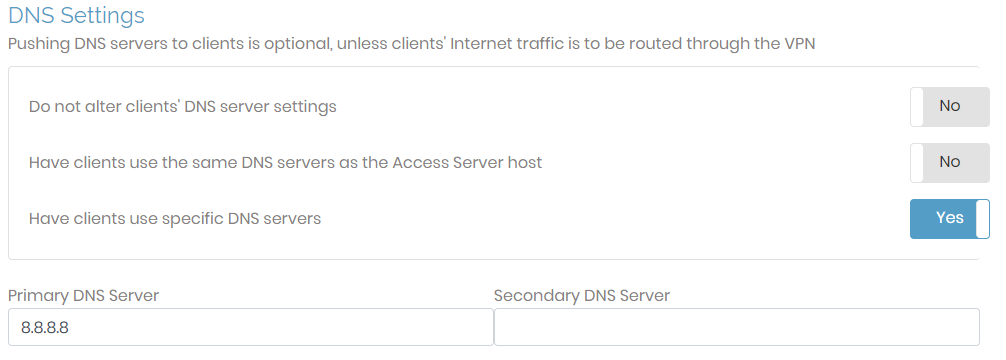
- DNS で、VPN接続後に払い出される リゾルバサーバを指定。今回はGoogle Public DNSを指定。
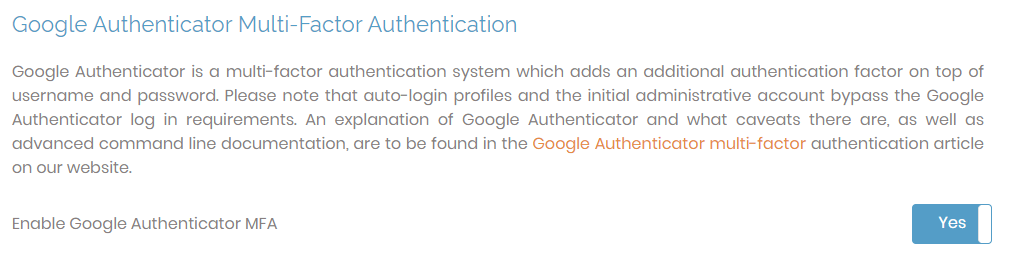
- Authentication の General を左メニューから開く
- 下部の Google Authenticator を Yesに変更
- 設定反映
- 変更するたびに画面上部に以下が出てくるので、「Update Running Server」を押下して初めてOpenVPNの設定が反映される。

- VPNクライアント用ユーザ作成
- User Management のUser permissionを左メニューから開く
- 以下のように user1を作成。
- パスワード設定、ユーザ別にもVPN Setting相当(NATかIP固定化とか)設定が可能。
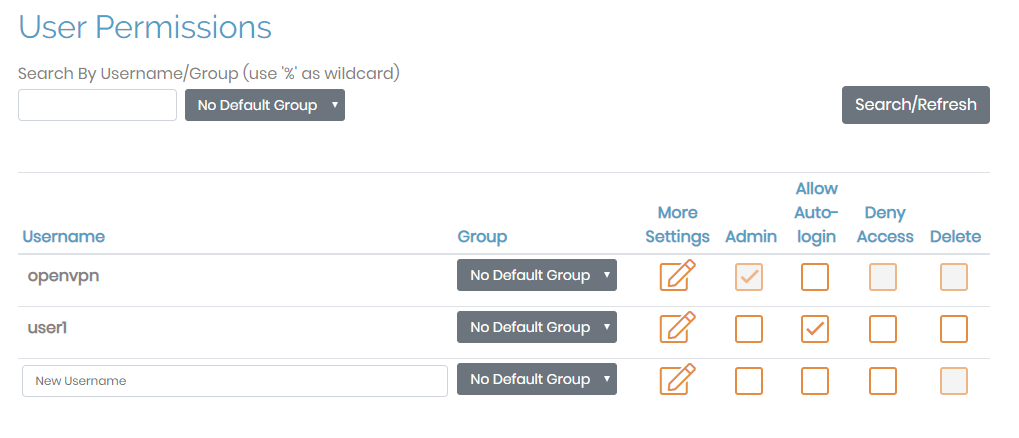
- ★以下はユーザ毎に接続先をCIDRブロックで指定できる
Windows10から接続
- https://<グローバルIP>:943 に接続
- ユーザに払い出した ユーザ名、パスワードでログイン

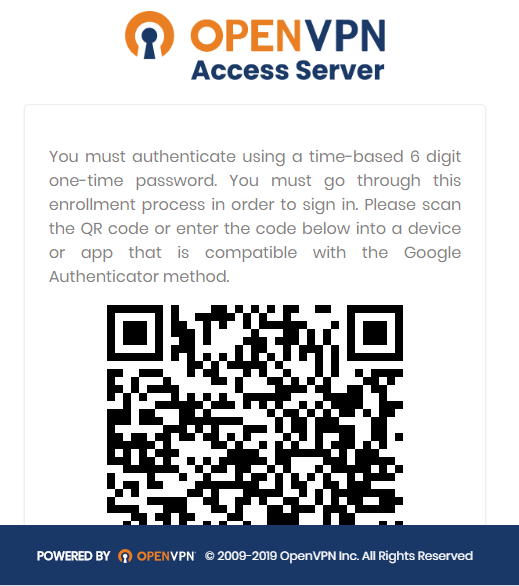
- 以下が出てくるので、スマホアプリで、Google Authenticatorをかざして多要素認証を有効化する
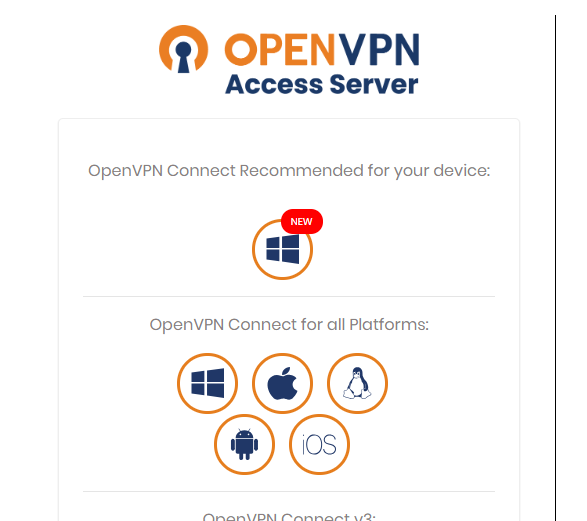
- 以下の画面になるので、VPNクライアントをダウンロード
- ダウンロードしたopenvpn-connect-3.1.0.361_signed.msiをインストール
openvpn-connect-3.1.0.361_signed.msiを実行
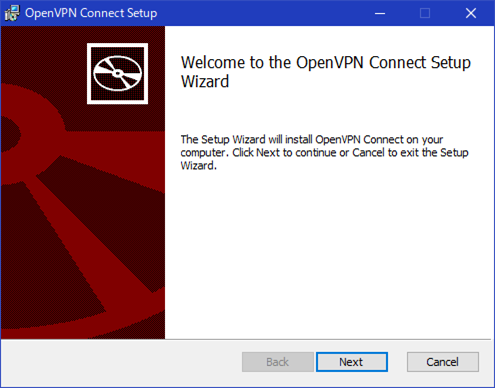
<流すだけ、割愛>
- インストールすると、Windows 10 PCタスクトレイに入る

VPN接続実施
- Windows 10 PC スクトレイをのOpenVPNアイコンを右クリックし、「OpenApp」を選択
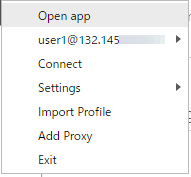
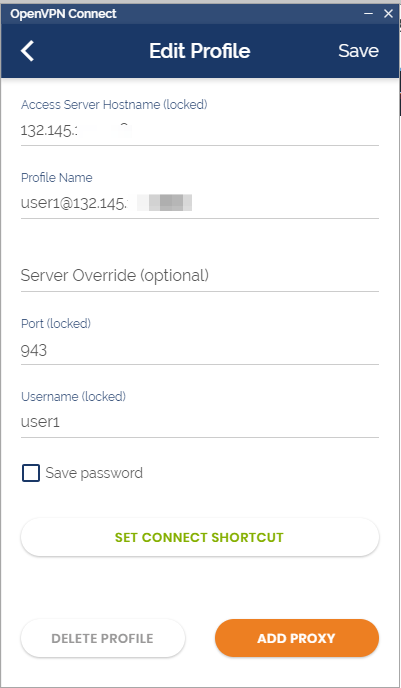
- 以下が出てくるので、以下のようにグローバルIPになってればOK。OKであれば、Saveか、戻るボタン。
- グローバルIPになってなければ「SET CONNECT SHORTCUT」を押下して、プロファイルを再作成する
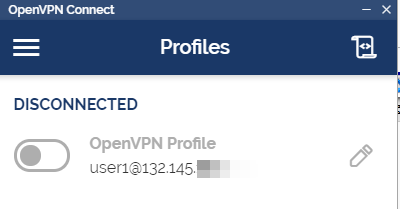
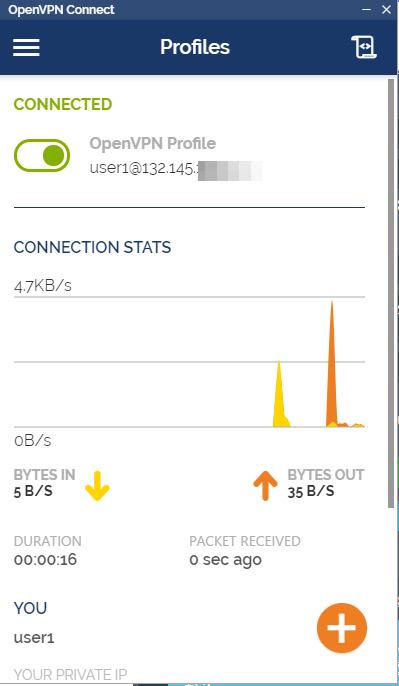
- 以下になるので、ボタンを押下して、Connectする
- ユーザのパスワードが問われるので入力
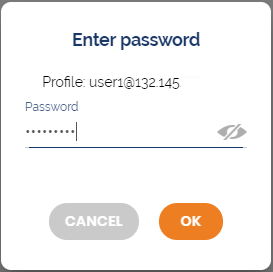
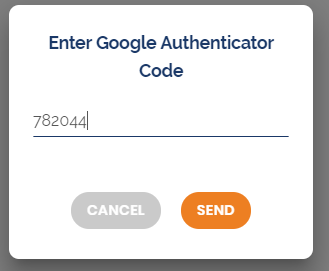
- 多要素認証が問われるので、スマホ開いて、Google Authenticator で数字入力
- 接続成功
VPN接続後の確認
- Windows 10 PCに払い出されたIP
>ipconfig /all


Windows IP 構成


   ホスト名. . . . . . . . . . . . . . .: windows10-PC
   プライマリ DNS サフィックス . . . . .: xxxxx.co.jp
   ノード タイプ . . . . . . . . . . . .: ハイブリッド
   IP ルーティング有効 . . . . . . . . .: いいえ
   WINS プロキシ有効 . . . . . . . . . .: いいえ
   DNS サフィックス検索一覧. . . . . . .: xxxxx.co.jp


イーサネット アダプター イーサネット 4:


   接続固有の DNS サフィックス . . . . .:
   説明. . . . . . . . . . . . . . . . .: TAP-Windows Adapter V9 for OpenVPN Connect
   物理アドレス. . . . . . . . . . . . .: 00-FF-86-C1-25-XX
   DHCP 有効 . . . . . . . . . . . . . .: いいえ
   自動構成有効. . . . . . . . . . . . .: はい
   リンクローカル IPv6 アドレス. . . . .: fe80::c52c:6816:d40:XXXXXX(優先)
   IPv4 アドレス . . . . . . . . . . . .: 172.27.232.3(優先)
   サブネット マスク . . . . . . . . . .: 255.255.252.0
   デフォルト ゲートウェイ . . . . . . .:
   DHCPv6 IAID . . . . . . . . . . . . .: 1476460422
   DHCPv6 クライアント DUID. . . . . . .: 00-01-00-01-21-11-D2-25-FC-45-XX-68-5D-64
   DNS サーバー. . . . . . . . . . . . .: 8.8.8.8
   NetBIOS over TCP/IP . . . . . . . . .: 有効


Wireless LAN adapter Wi-Fi:


   接続固有の DNS サフィックス . . . . .:
   説明. . . . . . . . . . . . . . . . .: Intel(R) Dual Band Wireless-AC 8260
   物理アドレス. . . . . . . . . . . . .: E6-90-5D-87-F7-XX
   DHCP 有効 . . . . . . . . . . . . . .: はい
   自動構成有効. . . . . . . . . . . . .: はい
   リンクローカル IPv6 アドレス. . . . .: fe80::5105:ee62:81e6:dc47%7(優先)
   IPv4 アドレス . . . . . . . . . . . .: 192.168.179.22(優先)
   サブネット マスク . . . . . . . . . .: 255.255.255.0
   リース取得. . . . . . . . . . . . . .: 2020年2月1日 1:00:15
   リースの有効期限. . . . . . . . . . .: 2020年2月4日 9:36:56
   デフォルト ゲートウェイ . . . . . . .: 192.168.179.1
   DHCP サーバー . . . . . . . . . . . .: 192.168.179.1
   DHCPv6 IAID . . . . . . . . . . . . .: 132550749
   DHCPv6 クライアント DUID. . . . . . .: 00-03-00-01-E6-90-5D-87-F7-XX
   DNS サーバー. . . . . . . . . . . . .: 192.168.179.1
   NetBIOS over TCP/IP . . . . . . . . .: 有効
- PCからOpenVPNサーバにPing (関西からカナダなので遠い)
>ping 172.16.255.4

172.16.255.4 に ping を送信しています 32 バイトのデータ:
172.16.255.4 からの応答: バイト数 =32 時間 =186ms TTL=64
172.16.255.4 からの応答: バイト数 =32 時間 =185ms TTL=64
172.16.255.4 からの応答: バイト数 =32 時間 =185ms TTL=64

172.16.255.4 の ping 統計:
    パケット数: 送信 = 3、受信 = 3、損失 = 0 (0% の損失)、
ラウンド トリップの概算時間 (ミリ秒):
    最小 = 185ms、最大 = 186ms、平均 = 185ms
- 別サブネットのComputeにPing
- OCI内のサブネットセキュリティリストと、OpenVPN側でも設定しないと通らない
- このサーバはプライベートIPしか持たないが、ダイレクトにSSHもできる。
>ping 172.16.50.2

172.16.50.2 に ping を送信しています 32 バイトのデータ:
172.16.50.2 からの応答: バイト数 =32 時間 =189ms TTL=63
172.16.50.2 からの応答: バイト数 =32 時間 =189ms TTL=63
172.16.50.2 からの応答: バイト数 =32 時間 =190ms TTL=63
172.16.50.2 からの応答: バイト数 =32 時間 =194ms TTL=63

172.16.50.2 の ping 統計:
    パケット数: 送信 = 4、受信 = 4、損失 = 0 (0% の損失)、
ラウンド トリップの概算時間 (ミリ秒):
    最小 = 189ms、最大 = 194ms、平均 = 190ms
VPN接続後、OpenVPNサーバ側での監視状況
- 接続しているユーザの確認
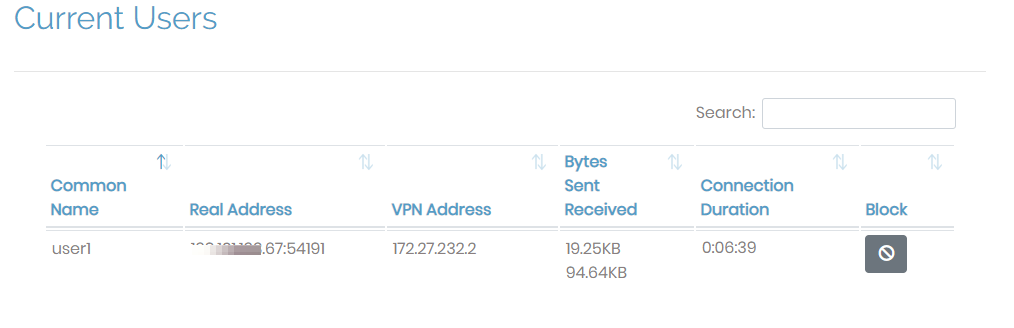
- アクセスログもしっかり残る

以上
Appendix:
参考情報
-
Quick Start guide(OCI用)
-
https://cloudmarketplace.oracle.com/marketplace/listing/67830324
-
Administration Guide