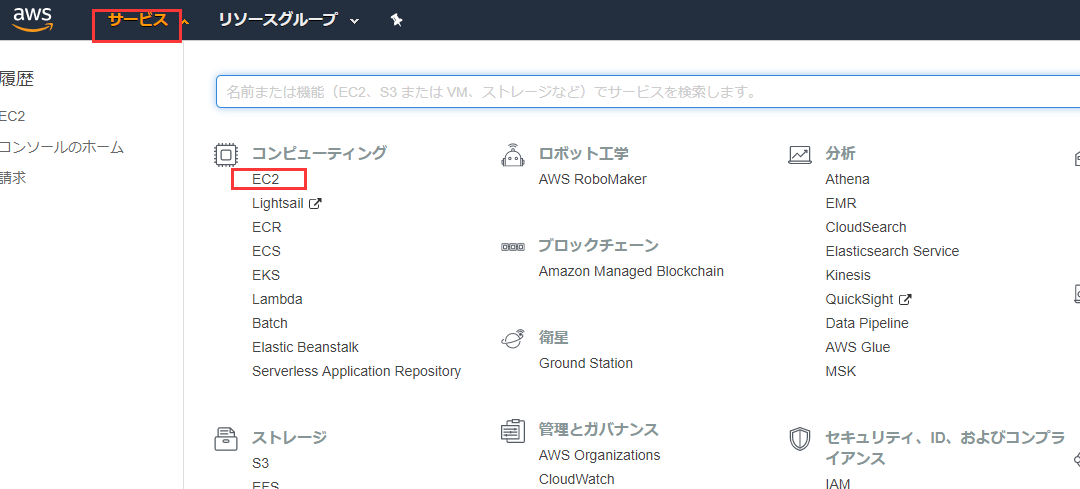
まずはAWSサーバーをゲットする
AWSには一年間の無料体験があるので、安心に登録できます。

インスタンスを作成する

ここではAmazon Linuxを使いました。必要なパッケージが揃っているので使いやすいです。

僕も無料体験中なので、設定はディフォルトで作成しました。

起動バタンを押すとキーの作成画面が出て、キーペア名を入力したら、.pemのファイルをダウンロードします。サーバーにアクセスにはキーが必要なの、これを大事に保存しましょう。
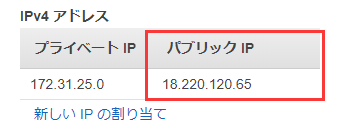
IPをもらいます
右ボタンを押せばこういうパネルが出ます。IPアドレス管理を選択。


こうすることでIPの割り当てが完了しました。
それからセキュリティグループを設定する、テストとしてこのように設定します。

早速テストしましょう!
cmdを開いて、pingでテストします。


アクセス出来ました!
Puttyで接続
まずはPuttyをダウンロード↓
https://www.chiark.greenend.org.uk/~sgtatham/putty/latest.html
続いてPuttyの環境配置を行います。↓
https://docs.aws.amazon.com/ja_jp/AWSEC2/latest/UserGuide/putty.html
↑公式ドキュメンテーションに詳しく記述してあります。
GO環境の構築

では始めます~
公式サイトでlinkを取得します。
https://golang.org/dl/
https://dl.google.com/go/go1.12.5.linux-amd64.tar.gz
↑私が選択したバージョン
Linuxの下で
//ダウンロード
wget https://dl.google.com/go/go1.12.5.linux-amd64.tar.gz

//フォルダーを作ります。
mkdir ~/local

//内容を抽出
sudo tar -C ~/local -xzf go1.12.5.linux-amd64.tar.gz

//PATHを設定
cd ~/
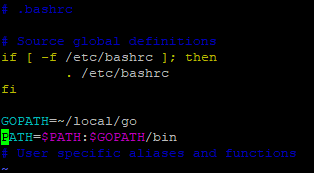
vim .bashrc
//開いたテクストエディターにPATHを入れる
GOROOT=~/local/go
PATH=$PATH:$GOROOT/bin
export GOPATH=$HOME/XXXXX/go   //プロジェクトのディレクトリ
export GOBIN=$GOPATH/XXXXXX/bin  //プロジェクトのbinディレクトリ

//shift+zz(二回押し)保存

//PATHを更新
sourse ~/.bashrc

//テスト
go version
Helloworld
//goファイルを作る
vi HelloWorld.go
//以下のコードを中にコピーする
package main

 import (
    "fmt"
    "log"
    "net/http"
)

 func main() {
    http.HandleFunc("/", func(w http.ResponseWriter, r *http.Request) {
        fmt.Fprintf(w, "Hello world\n")
    })

    err := http.ListenAndServe(":9090", nil)
    if err != nil {
        log.Fatal("ListenAndServe: ", err)
    }
}
//保存
shift+zz
//実行
go run HelloWorld.go
テスト
go run の後、puttyをそのまま放置
ブラウザに [自分のIP]:9090を入力 例:http://18.220.120.65:9090/
自分のIPはさっき取得した:

もう一歩-------SupervisorでHelloWorldを管理する
//まずはSupervisorをインストール
sudo easy_install supervisor

//バージョン確認
supervisord -v
Supervisorの設定ファイルを作る↓
sudo mkdir /etc/supervisor

//権限を取得する
sudo chmod -R 777 /etc/supervisor

//ディフォルト配置ファイルを作る
 echo_supervisord_conf > /etc/supervisor/supervisord.conf
このように編集する
//後ろにこれを挿入
[include]
files = /etc/supervisor/config/*.conf
//ほかのpackageを導入、プロセスが多くなってもコントロールしやすい。

mkdir /etc/supervisor/config/
//HelloWorld.confをこう編集する
vim /etc/supervisor/config/HelloWorld.conf
[program:HelloWorld]
command=go run /home/ec2-user/GoCode/hello/HelloWorld.go ;実行するコマンド
autostart=true   ;Supervisorと共に起動
autorestart=true  ;自動再起動
startsecs=10
stdout_logfile=/var/log/HelloWorld.log  ;ログファイルのディレクトリを設定
stdout_logfile_maxbytes=1MB
stdout_logfile_backups=10
stdout_capture_maxbytes=1MB
stderr_logfile=/var/log/HelloWorld.log ;うえと同じくディレクトリを設定
stderr_logfile_maxbytes=1MB
stderr_logfile_backups=10
stderr_capture_maxbytes=1MB
mkdir /var/log/
//ディレクトリの権限を取得する
sudo chmod -R 777  /var/log/
//起動
supervisord -c /etc/supervisor/supervisord.conf
//作動状態をチェック
supervisorctl
よく使うsupervisord/supervisorctl コマンド
supervisord -c supervisor.conf                       配置ファイルでsupervisorを起動
supervisorctl -c supervisor.conf status              状態チェック
supervisorctl -c supervisor.conf reload              配置ファイルの再読み込み
supervisorctl -c supervisor.conf start [all]|[x]     すべて/指定のプロセスを起動
supervisorctl -c supervisor.conf stop [all]|[x]      すべて/指定のプロセスを中止


