Web Componentsがフルに導入されたプロジェクトに入った結果とサンプル実装
導入
この記事は、CAM Advent Calendar 2日目の記事です![]()
前回は id:ishikawa_pro の 社内で見かけるNode.jsデザインパターン を紹介しましたが
今回は業務で使用しているフロントエンド技術の一部を紹介したいと思います![]()
僕は新卒でサイバーエージェントに入社し、Androidを2年半、現在はフロントエンドをしています。(1年半程)
最近、Web Componentsがフルに導入されたプロジェクトに移動して来たので、この一ヶ月のWeb Componentsを通じて学んだ事を共有していきたいと思います![]()
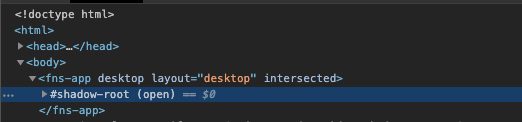
実際に業務でWeb Componentsがフルに使用されているプロダクトはこちらのFensiというサービスです

Chromeのdev toolで見るとbody直下の fensi-appからshadowDOMになっているのがわかります。
結論このベースから使う事の課題点も判明しましたが。。
Web Componentsの始まりです。
ちなみに、今回僕が作成したサンプルのGithubはこちらになります![]()
Web Componentsとは?
なにができる?
・ カスタムタグ作れるe.g. <my-foo></my-foo>
・ カスタムタグ内を完全にカプセル化できる。CSSが外部に影響を与えないし、外部が内部に影響もしない
フレームワークでも似たような事ができますが、React, Vue, etc…
・カスタムタグ作ったり
・カプセル化ぽいことできたり
・CSS in JSでclass名を被らないようにしたり
フレームワーク使わなくてもWeb標準で出来る時代に
モダンブラウザがPolyfillなしでもWeb Componentsに対応 Can i use
仕様は4つの構成からなる
・ CustomElements
・ Shadow DOM
・ HTML Template
・ ES Module
(現行の仕様はv1)
Custom Elements
カスタムタグ作れるe.g. <my-foo></my-foo>
(新しいHTMLタグを定義し、使用できる)
Shadow DOM
カプセル化されスコープが形成されるので
CSSなども外部に影響しないし、外部が内部にも影響しない
HTML Templates
<template></template> タグを用いて雛形となる仮想のタグを作る。
テンプレートタグはアクティベートされるまでは、スクリプト, 画像, オーディオなどもロードされない。
<template><div>描画されない</div></template>
テンプレートタグの例: Code Pen
ES Module
JSファイルの読み込み方法の一つ
type=”module" を指定することで
deferのようにDOM解析後にscriptが実行される
deferとの違いはざっくりいうと、外部のスクリプトを読み込むか、内部のスクリプトを読み込むかの違いらしい。
ES Moduleの例
<script type="module" src="index.js"></script>
import { sayMessage } from "./alert.js";
showMessage("Hello!");
export function showMessage(message) {
  alert(message);
}
それではWeb Componentsをスクラッチで書きながらサンプルを作っていきましょう
※ 実際の業務ではWeb Componentsのラッパーライブラリが使用される事と思います
現状では、 lit-element, stencil.js, skatejs といったところでしょう
ディレクトリ構成
 web-components-todo
   ├── README.md
   ├── package-lock.json
   ├── package.json
   └── src
       ├── index.html
       ├── todoItem.js
       └── todoList.js
環境の設定
事前にnode.js が入っている事を前提にしています
web-components-todo/package.json
{
  "name": "web-components-todo",
  "version": "0.0.1",
  "description": "",
  "main": "./src/todoList.js",
  "scripts": {
    "start": "serve ./src"
  },
  "author": "",
  "license": "MIT",
  "dependencies": {
    "serve": "^11.2.0"
  }
}
index.html
-
ここではスクリプトの読み込みに
type="module"を使用します
DOM解析後にスクリプトが実行されます
こうすることでbodyの一番下にスクリプトを書くなどの作業がいらないので、headタグに書く事ができるようになります
ここでESModuleを使用する事ができました -
カスタムエレメントの命名には必ず、ハイフンを含めなくてはいけません(ハイフンがないとエラーになります)
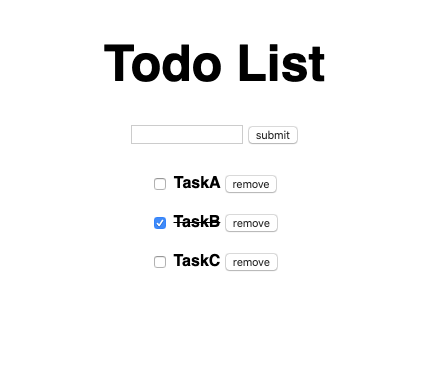
<todo-list></todo-list>
ここでCustom Elementsを使用する事ができました
web-components-todo/src/index.html
<!DOCTYPE html>
<html>
  <head>
    <meta charset="utf-8">
  <!-- 1. type="module"を使用 -->
    <script type="module" src="todoList.js"></script>
  </head>
  <body>
    <!-- 2. ハイフンを含める -->
    <todo-list></todo-list>
  </body>
</html>
todoList.js
全体図
web-components-todo/src/todoList.js
// アイテムとなるjsをimport
import './todoItem.js';

// テンプレートタグの生成
const template = document.createElement('template');
// テンプレートの中に、innerHTMLでhtmlとcssを構築
template.innerHTML = `
  <style>
    /* host要素はこのエレメント全体に当たるCSS  */
    :host {
      /* カスタムエレメントはデフォルトでインライン要素なので、display: block;に変更 */
      display: block;
      font-family: Helvetica;
      font-weight: bold;
      color: black;
    }
    h1 {
      text-align: center;
      font-size: 50px;
    }
    form {
      text-align: center;
      margin-bottom: 20px;
    }
    .container {
      text-align: center;
    }
  </style>
  <h1>Todo List</h1>
  <form>
    <input type="text"></input>
    <button class="submit" type="button">submit</button>
  </form>
  <div class="container"></div>
`;

// HTMLElementを継承する。HTMLElementの上位クラスはElement
class TodoList extends HTMLElement {
  // コンストラクタで初期化処理を行い、必ず先頭で親コンストラクタをsuper();で呼び出す
  constructor() {
    super();
   // ShadowRootの形成
    this._shadowRoot = this.attachShadow({mode: 'open'});
   // テンプレートタグのアクティベート
    this._shadowRoot.appendChild(template.content.cloneNode(true));
    // TODO リストの初期化
    this._todoList = [];
    this._containerElm = this._shadowRoot.querySelector('.container');
    this._submitElm = this._shadowRoot.querySelector('.submit');
    this._clickListener =  this._add.bind(this);
    this._inputElm = this._shadowRoot.querySelector('input');
  }

  // このエレメントがアタッチされた時に呼ばれる関数
  connectedCallback() {
    this._submitElm.addEventListener('click', this._clickListener);
  // アタッチされた後に自前のレンダー関数を呼ぶ
    this._render();
  }

  // このエレメントがデアタッチされた時に呼ばれる関数
  // イベントリスナーの削除や、メモリの解放等をこのライフサイクルで行う
  disconnectedCallback() {
    this._submitElm.removeEventListener('click', this._clickListener)
    for (let item of this._containerElm.children) {
      item.clearListner();
    }
  }

  // 追加されたアイテム分をコンテナ内に追加し、描画していく
  _render() {
    this._containerElm.innerHTML = '';
    this._todoList.forEach((item, index) => {
      const todoElm = document.createElement('todo-item');
      todoElm.label = item.label;
      todoElm.checked = item.checked;
      todoElm.index = index;
      const onToggleListener = this._toggle.bind(this);
      const onRemoveListener = this._remove.bind(this);
      todoElm.addEventListener('onToggle', onToggleListener);
      todoElm.addEventListener('onRemove', onRemoveListener);
      todoElm.clearListner = () => {
        todoElm.removeEventListener('onToggle', onToggleListener);
        todoElm.removeEventListener('onRemove', onRemoveListener);
      };
      this._containerElm.appendChild(todoElm);
    });
  }

 // todoの追加
  _add() {
    if (!this._inputElm.value) {
      return;
    }
    const todo = { label: this._inputElm.value, checked: false};
    this._todoList.unshift(todo);
    this._inputElm.value = '';
    this._render();
  }

  // todoの完了・未完了
  _toggle(e) {
    const todo = this._todoList.find((item, index) => {
      return index === e.detail.index;
    });
    todo.checked = !todo.checked;
    this._render();
  }

  // todoの削除
  _remove(e) {
    const index = e.detail.index;
    this._todoList.splice(index, 1);
    this._render();
  }
}

// エレメントの定義
window.customElements.define('todo-list', TodoList);
テンプレートタグ生成を生成し、innerHTMLで構造を記述していく
ここでHTML Templatesを使う準備ができました
// テンプレートタグの生成
const template = document.createElement('template');
// テンプレートの中に、innerHTMLでhtmlとcssを構築
template.innerHTML = `
   省力...
`;
Classの作成とコンポーネントを定義する
コンスタントラクタでShadowrootを定義する
ここでShadow DOMを使う準備ができました
class TodoList extends HTMLElement {
 constructor() {
   super();
  // ShadowRootの形成
   this._shadowRoot = this.attachShadow({mode: 'open'});
  // テンプレートタグのアクティベート
   this._shadowRoot.appendChild(template.content.cloneNode(true));
  }
  省力...
}

window.customElements.define('todo-list', TodoList);
レンダー関数を定義し、todoListの配列を回して、todoを追加する
省略...
  // 追加されたアイテム分をコンテナ内に追加し、描画していく
  _render() {
    this._containerElm.innerHTML = '';
    this._todoList.forEach((item, index) => {
      const todoElm = document.createElement('todo-item');
      todoElm.label = item.label;
      todoElm.checked = item.checked;
      todoElm.index = index;
      const onToggleListener = this._toggle.bind(this);
      const onRemoveListener = this._remove.bind(this);
      todoElm.addEventListener('onToggle', onToggleListener);
      todoElm.addEventListener('onRemove', onRemoveListener);
      todoElm.clearListner = () => {
        todoElm.removeEventListener('onToggle', onToggleListener);
        todoElm.removeEventListener('onRemove', onRemoveListener);
      };
      this._containerElm.appendChild(todoElm);
    });
  }
省略...
そしてtodoの追加・削除・チェックなどの関数を追加
省略...
 // todoの追加
  _add() {
    if (!this._inputElm.value) {
      return;
    }
    const todo = { label: this._inputElm.value, checked: false};
    this._todoList.unshift(todo);
    this._inputElm.value = '';
    this._render();
  }

  // todoの完了・未完了
  _toggle(e) {
    const todo = this._todoList.find((item, index) => {
      return index === e.detail.index;
    });
    todo.checked = !todo.checked;
    this._render();
  }

  // todoの削除
  _remove(e) {
    const index = e.detail.index;
    this._todoList.splice(index, 1);
    this._render();
  }
省略...
最後にライフサイクルを追加し、レンダーを呼び出すように定義
省略...
  // このエレメントがアタッチされた時に呼ばれる関数
  connectedCallback() {
    this._submitElm.addEventListener('click', this._clickListener);
  // アタッチされた後に自前のレンダー関数を呼ぶ
    this._render();
  }

  // このエレメントがデアタッチされた時に呼ばれる関数
  // イベントリスナーの削除や、メモリの解放等をこのライフサイクルで行う
  disconnectedCallback() {
    this._submitElm.removeEventListener('click', this._clickListener)
    for (let item of this._containerElm.children) {
      item.clearListner();
    }
  }
省略...
todoItem.js
web-components-todo/src/todoItem.js
const template = document.createElement('template');
template.innerHTML = `
  <style>
    :host {
      display: block;
      font-family: Helvetica;
      font-weight: bold;
      padding: 10px;
    }
  </style>
  <input class="checkbox" type="checkbox">
  <label class="label"></label>
  <button class="remove" type="button">remove</button>
`;

class Todo extends HTMLElement {
  // アトリビュートの変更を受け取るためのホワイトリストを配列で作成
  static get observedAttributes() {
    return ['label', 'checked', 'index'];
  }

  // ホワイトリストに登録したアトリビュートに変更があった場合に呼ばれる関数
  attributeChangedCallback(name, oldValue, newValue) {
    switch(name){
      case 'label':
        this._label = newValue;
        break;
      case 'checked':
        this._checked = this.hasAttribute('checked');
        break;
      case 'index':
        this._index = Number(newValue);
        break;
    }
    this._render();
  }

  constructor() {
    super();
    this._shadowRoot = this.attachShadow({ 'mode': 'open' });
    this._shadowRoot.appendChild(template.content.cloneNode(true));
    this._label =  '';
    this._index = 0;
    this._checked =  false;
    this._checkBoxElm = this._shadowRoot.querySelector('.checkbox');
    this._toggleListener = this._dispatchToggle.bind(this);
    this._removeElm = this._shadowRoot.querySelector('.remove');
    this._removeListener = this._dispatchRemove.bind(this);
    this._labelElm = this._shadowRoot.querySelector('.label');
  }

  connectedCallback() {
    this._checkBoxElm.addEventListener('click', this._toggleListener);
    this._removeElm.addEventListener('click', this._removeListener);
    this._render();
  }

  disconnectedCallback() {
    this._checkBoxElm.removeEventListener('click', this._toggleListener)
    this._removeElm.removeEventListener('click', this._removeListener);
  }

  _render() {
    this._labelElm.textContent = this._label;
    this._checkBoxElm.checked = this._checked;
    this._labelElm.style.textDecoration = this._checked ? 'line-through'  : 'none';
  }

  // 親コンポーネントにトグルボタンが押された事を通知する関数
  _dispatchToggle() {
    // カスタムイベントを作成し、親コンポーネントに通知する
    // ここではバブリングさせ、孫要素だった場合も考慮する
    this.dispatchEvent(new CustomEvent('onToggle',
      {
        detail: { index: this._index },
        bubbles: true,
        composed: true
      }
    ));
  }

  // 親コンポーネントに削除ボタンが押された事を通知する関数
  _dispatchRemove() {
    this.dispatchEvent(new CustomEvent('onRemove',
      {
        detail: { index: this._index },
        bubbles: true,
        composed: true
      }
    ));
  }

  // 親からプロパティを通して、自身のアトリビュートを更新するためのアクセッサー郡
 // この方法はgoogleのweb componentsベストプラクティスを参考に
  get label() {
    return this.getAttribute('label');
  }

  set label(val) {
    if (val) {
      this.setAttribute('label', val);
    } else {
      this.removeAttribute('label');
    }
  }

  get checked() {
    return this.getAttribute('checked');
  }

  set checked(val) {
    if (val) {
      this.setAttribute('checked', '');
    } else {
      this.removeAttribute('checked');
    }
  }

  get index() {
    return this.getAttribute('index');
  }

  set index(val) {
    if (val) {
      this.setAttribute('index', val);
    } else {
      this.removeAttribute('index');
    }
  }
}

window.customElements.define('todo-item', Todo);
親コンポーネントと同様に各種設定をしていき、
アイテムがクリックされた時のイベントを設定する
省略...
  // 親コンポーネントにトグルボタンが押された事を通知する関数
  _dispatchToggle() {
    // カスタムイベントを作成し、親コンポーネントに通知する
    // ここではバブリングさせ、孫要素だった場合も考慮する
    this.dispatchEvent(new CustomEvent('onToggle',
      {
        detail: { index: this._index },
        bubbles: true,
        composed: true
      }
    ));
  }

  // 親コンポーネントに削除ボタンが押された事を通知する関数
  _dispatchRemove() {
    this.dispatchEvent(new CustomEvent('onRemove',
      {
        detail: { index: this._index },
        bubbles: true,
        composed: true
      }
    ));
  }
省略...
最後にプロパティを更新するためのアクセッサー郡も定義する
省略...
  get label() {
    return this.getAttribute('label');
  }

  set label(val) {
    if (val) {
      this.setAttribute('label', val);
    } else {
      this.removeAttribute('label');
    }
  }
省略...
ビルド
Install
$ npm install .
Run
$ npm run start
Server running at http://localhost:5000
長所と短所
長所:
スコープが形成されるので、衝突を気にしなくて良い。
ライフサイクルも最低限用意されているので、そこにフックする事で大抵の事はできる。
短所:
例えば、協業しているパートナーからスクリプトの埋め込み依頼があったとしよう、
そのスクリプトはDOMを操作するものだったとしたら、ShadowDOMの中には入れない。
例えば、ログイン画面のinputタグにブラウザの自動保管を入れたいとしよう、inputタグはネストされたShadowDOMの中に埋もれているので、当然ブロックされる
例えば、GoogleBotはShadowDOMを解釈できるようになったが、他のボットはどうだろうか。
結論
現状プロダクトレベルで使用できているが、新しい技術なので、課題はたくさんある。
しかし、これが新たなWeb標準である事はたしかであり、ベースの部分から入れなくても、
ボタンなどのリーフノードから、徐々に入れてみることはできるので、できる所からWebComponentsの恩恵を受けていこう
参考文献
https://vaadin.com/tutorials/using-web-components
https://developers.google.com/web/fundamentals/web-components/best-practices
https://developers.google.com/web/fundamentals/web-components/examples/howto-tabs
https://dev.to/thepassle/web-components-from-zero-to-hero-4n4m