初めに
AWS AmplifyをVue.jsで使う機会があったので、Vue.jsで認証までの流れをまとめたいと思います。
EC2で実行するのではなく、ローカル環境から実行しますので、前提としてアクセスキー及びシークレットキーが設定しておいてください。
AWS Amplifyとは
AWS Amplify は、モバイルおよびフロントエンドのウェブデベロッパーが AWS を利用したセキュアでスケーラブルなフルスタックアプリケーションを構築およびデプロイできるようにする製品およびツールのセットです。
環境
os: Linux(centos8)
aws-amplify/cli: 7.6.19
vue/cli: 4.5.15
nodejs: v16.14.0
Amplify CLI のインストール
$ npm install -g @aws-amplify/cli
基礎となるVueプロジェクトの作成
$ vue -V
@vue/cli 4.5.15

# ここのプロジェクト名は自由にしてください
$ vue create xxxxxx

# 今回はVur3を選択
? Please pick a preset:
  Default ([Vue 2] babel, eslint)
❯ Default (Vue 3) ([Vue 3] babel, eslint)
  Manually select features


.
.
.

🎉  Successfully created project xxxxxx.

$ cd xxxxx
上記のようにVueプロジェクトを作成しましたら、Vueフォルダに移動してください。
Amplify の初期化
Vueのフォルダ内でAmplifyの初期化を行います。
このコマンドを実行すると、AWSコンソールのAmplifyにアプリが追加されます。
$ amplify init

# アプリのプロジェクト名を入力できます。
# 今回はVueのプロジェクト名と同じ初期状態でエンターを押します。
? Enter a name for the project (xxxxxx)

Project information
| Name: amplifyauth
| Environment: dev
| Default editor: Visual Studio Code
| App type: javascript
| Javascript framework: vue
| Source Directory Path: src
| Distribution Directory Path: dist
| Build Command: npm run-script build
| Start Command: npm run-script serve

# 今回の認証に関しては上記設定で大丈夫なので、Yes
? Initialize the project with the above configuration? Yes

# 設定してあるアクセスキーがあるProfileを設定してください
Using default provider  awscloudformation
? Select the authentication method you want to use: xxxxx

For more information on AWS Profiles, see:
https://docs.aws.amazon.com/cli/latest/userguide/cli-configure-profiles.html

? Please choose the profile you want to use xxxxx

.
.
.

Initialized your environment successfully.

Your project has been successfully initialized and connected to the cloud!

Some next steps:
"amplify status" will show you what you've added already and if it's locally configured or deployed
"amplify add <category>" will allow you to add features like user login or a backend API
"amplify push" will build all your local backend resources and provision it in the cloud
"amplify console" to open the Amplify Console and view your project status
"amplify publish" will build all your local backend and frontend resources (if you have hosting category added) and provision it in the cloud

Pro tip:
Try "amplify add api" to create a backend API and then "amplify push" to deploy everything
最後まで行くと、AWSコンソールのAmplifyにアプリが一つ追加されています。
またS3にはデプロイ用のバケットが一つ追加されています。
ここまでで、Amplifyの初期設定は完了です。
Amplify auth 設定
次に認証で使うAWSサービスのCognitoをAmplify CLIより追加します。
$ amplify add auth

Do you want to use the default authentication and security configuration? Default configuration

# 今回はUsernameでログインするようにします。
# emailでログインしたり、電話番号でログインしたりすることが出来ます。
How do you want users to be able to sign in? Username

# その他、Cognitoのグループを作成したりすることが出来ますが、今回は特に設定しません。
Do you want to configure advanced settings? No, I am done.
設定を確認します。
$ amplify status

    Current Environment: dev

┌──────────┬─────────────────────┬───────────┬───────────────────┐
│ Category │ Resource name       │ Operation │ Provider plugin   │
├──────────┼─────────────────────┼───────────┼───────────────────┤
│ Auth     │  │ Create    │ awscloudformation │
└──────────┴─────────────────────┴───────────┴───────────────────┘
上記のようにAuthの機能が追加されます。
次にこれをAWSに適応する必要があります。
$ amplify push

✔ Successfully pulled backend environment dev from the cloud.

    Current Environment: dev

┌──────────┬─────────────────────┬───────────┬───────────────────┐
│ Category │ Resource name       │ Operation │ Provider plugin   │
├──────────┼─────────────────────┼───────────┼───────────────────┤
│ Auth     │ xxxxxxxxxxxxxxxxxxx │ Create    │ awscloudformation │
└──────────┴─────────────────────┴───────────┴───────────────────┘

# yesを指定する
# $ amplify push -y としていすることでここを自動でyesにすることが出来ます。
? Are you sure you want to continue? Yes

.
.
.

✔ All resources are updated in the cloud
完了すると、AWSコンソールの Cognito に新規にユーザープールが作成されています。
最後にaws-amplifyをインストールします。
$ npm install --save aws-amplify
$ npm install --save @aws-amplify/ui-vue
$ npm install --save @aws-amplify/ui-components
Vueでログイン画面の作成
Amplifyの設定で認証を行うためのバックエンドが完成しましたので、次にフロント側を作成します。
Amplifyには簡単にログイン画面を実装してくれる機能がありますので、それを使います。
今回は簡単にログイン画面と、ログインに成功したらVueの初期画面(Hello World)を出すようなものを作成します。
最初にAmplifyの設定を適応します。
vueのsrcフォルダに自動的に
aws-exports.js
というファイルが作成されていると思います。
これにはAWSのサービスのリソースの場所や名前が記述されていますので、これをvueに設定します。
import { createApp } from 'vue';
import App from './App.vue';
import Amplify from 'aws-amplify';
import aws_exports from './aws-exports';
import AmplifyVue from '@aws-amplify/ui-vue';

import {
    applyPolyfills,
    defineCustomElements
} from '@aws-amplify/ui-components/loader';

Amplify.configure(aws_exports);

applyPolyfills().then(() => {
    defineCustomElements(window);
});

const app = createApp(App);
app.use(AmplifyVue);
app.mount('#app');
vueプロジェクトの src フォルダにApp.vueがありますので、これを変更します。
<template>
  <amplify-authenticator>
    <img alt="Vue logo" src="./assets/logo.png">
    <HelloWorld msg="Welcome to Your Vue.js App"/>
    <amplify-sign-out></amplify-sign-out>
  </amplify-authenticator>
</template>

# templateのみ変更
上記を記述して、Vueを起動してみてください。
$ npm run serve
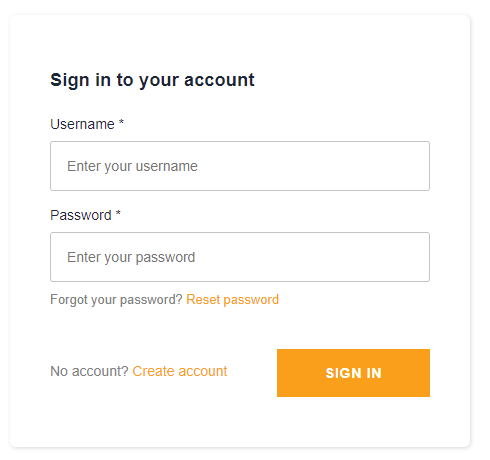
上記画像のようにサインイン画面が表示されます。
しかしサインイン画面が出来ただけで、サインインするユーザーを作成していません。
これは今回は簡単にAWSコンソールのCognitoから作成します。
コンソール画面
より
ユーザープールの管理 -> 該当するユーザープール -> 全般設定 -> ユーザーとグループ -> ユーザーの作成
ユーザーを作成したら、先ほどのサインイン画面にユーザー名と、仮パスワードを入力し、サインインを行うと、ログインすることができ、Vueの初期画面が表示されます。
また下にサインアウト画面が作成されていますので、こちらをクリックすると再度サインイン画面に戻ることが出来ます。
最後に
Amplifyを使って簡単に認証画面を作成することが出来ました。
認証ユーザーを取得することも簡単に出来ますので、ログインしたユーザーで特定のユーザーのみが実行できる機能なども簡単に作成することが出来ます。
Amplifyにはこの他にLambdaを作成したり、GraphQLのエンドポイントを作成したりなど、様々な機能を後から追加することができますので自分のやりたいようにWEBアプリを作成することが出来ます。


