GitHub Actions、便利ですよね。
いろいろ作っていく中で、いろんなRepositoryに同じようなアクションやワークフローを使いたいことがあると思います。
それらをどう共通化して、再利用していくかということについて、いくつかの方法をご紹介したいと思います!
Custom Action
これはDockerやJavaScriptを使用してWorkflowの中で行いたい処理を共通化できます。
GitHub Actionsを利用している人でこの機能を利用していない人はまずいないでしょう。
よく使われるCustomActionは checkout でしょうか。
基本的には公開されているものを使用すると思いますが、自分で作ることも可能です。
ちなみに現時点ではPrivateRepositoryで作成したCustomActionは、公開されてるCustomActionのように利用することは出来ません。
しかしやりようはあります。
まず同じRepositoryの .github/actions ディレクトリにCustomActionのディレクトリを配置すると
そのRepositoryのWorkflowで参照することが出来ます。
# https://docs.github.com/ja/actions/learn-github-actions/workflow-syntax-for-github-actions#
# Example: Using an action in the same repository as the workflow
jobs:
  my_first_job:
    steps:
      - name: Check out repository
        uses: actions/checkout@v2
      - name: Use local my-action
        uses: ./.github/actions/my-action
この仕組を利用し、.github/actions 配下にPrivateRepositoryにあるCustomActionsをチェックアウトしてくれば
CustomActionをさまざまなRepositoryで参照することが可能です。
jobs:
  my_first_job:
    steps:
      - name: Check out repository
        uses: actions/checkout@v2
      - name: Check out private github action repository
        uses: actions/checkout@v2
        with:
          repository: organization/my-action
          path: ./github/actions
      - name: Use local my-action
        uses: ./.github/actions/my-action
Composite Action
これはCustomActionの一種で、いくつかのWorkflowのStepを1つのアクションにする機能です。
以下のように、コンテナイメージを作るための複数のStepを1つのアクションにまとめられ、非常に便利です。
name: "Publish to Docker"
description: "Pushes built artifacts to Docker"
inputs:
  registry_username:
    description: “Username for image registry”
    required: true
  registry_password:
    description: “Password for image registry”
    required: true
runs:
  using: "composite"
  steps:
    - uses: docker/setup-buildx-action@v1

    - uses: docker/login-action@v1
      with:
        username: ${{inputs.registry_username}}
        password: ${{inputs.registry_password}}

    - uses: docker/build-push-action@v2
      with:
        context: .
        push: true
        tags: user/app:latest
ちなみに if が使えなかったりするので、Stepの結果によって次のStepをどうこうするとかいう処理は難しいです。
Reuse Workflow
こちらの機能はこの記事を書いてる段階ではまだBetaです。
この機能は、他のRepositoryで定義したWorkflowを自身のRepository上で実行する機能です。
例えば、以下のようなWorkflowがあったとします。
- mainブランチにマージしたらRepositoryに定義されてるDockerfileを参照してコンテナイメージをビルド
- ビルドしたコンテナイメージをContainerRepositoryにPush
- 上記処理が正常に終了したら、コンテナイメージが無事作成出来たことをSlackに通知する
このWorkflowは、DockerfileがあるRepositoryならどこでも使えると思います。
こういうときに便利なのがこの Reuse Workflowという機能です。
このようなWorkflowを1つのRepositoryに配置しておけば、他のRepositoryでこのWorkflowを実行できます。
サンプルをご紹介します。
まず以下のWorkflowを organization/sample-repository Repositoryの .github/workflows に配置します。
name: Reusable workflow example

on:
  workflow_call:
    inputs:
      username:
        required: true
        type: string
    secrets:
      token:
        required: true

jobs:
  example_job:
    name: Pass input and secrets to my-action
    runs-on: ubuntu-latest
    steps:
      - uses: actions/checkout@v2
      - uses: ./.github/actions/my-action@v1
        with:
          username: ${{ inputs.username }}
          token: ${{ secrets.token }}
workflow_call トリガーを使用することで他のRepositoryからこのWorkflowを実行することが可能になります。
呼び出し方は以下のようにします。
name: workflow call
on:
  pull_request:
jobs:
  call-workflow:
    uses: organization/sample-repository/.github/workflows/sample.yaml@main
    with:
      username: mona
    secrets:
      token: ${{ secrets.TOKEN }}
こうすることで、外部で定義されているWorkflowを自身のRepository上で実行することが可能です。
外部で定義されているWorkflowを自身のRepository上で実行することが可能
ちょっとわかりにくいかもなのでもう少し説明します。
上記サンプルの呼び出したWorkflowでは uses: actions/checkout@v2 を実行しています。
このWorkflowを他のRepositoryで実行した場合、チェックアウトするRepositoryは呼び出し元のRepository(上記サンプルでいうとmy-repository)になります。
なのでWorkflowを定義する場合は、呼び出し元のRepositoryのことを考慮しなくてもよいのです。
これはめちゃくちゃ便利です・・・!
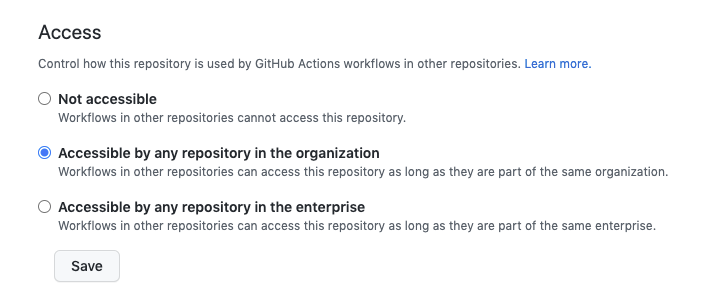
ちなみにこの機能を利用するためにはWorkflowを定義するRepositoryで以下の設定が必要です。(Settings -> Actions)
