今年に入ってdockerのVersion1.13がリリースされたことを小耳に挟んだので、
普段はトラディショナルなオンプレ環境しか触ってないOpsが、勉強がてら試してみたメモです。
目的
以下のかっこいい技術を触ってみる(普段オンプレCentOS5触ってますが何か)
- GCP
- terraform
- docker
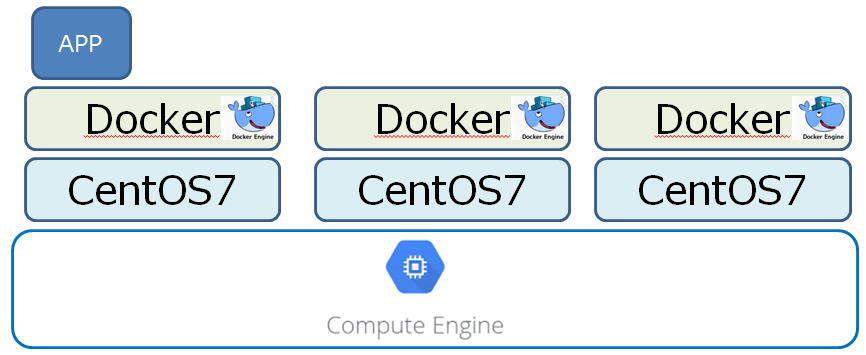
構成としてはこんな感じを目指します
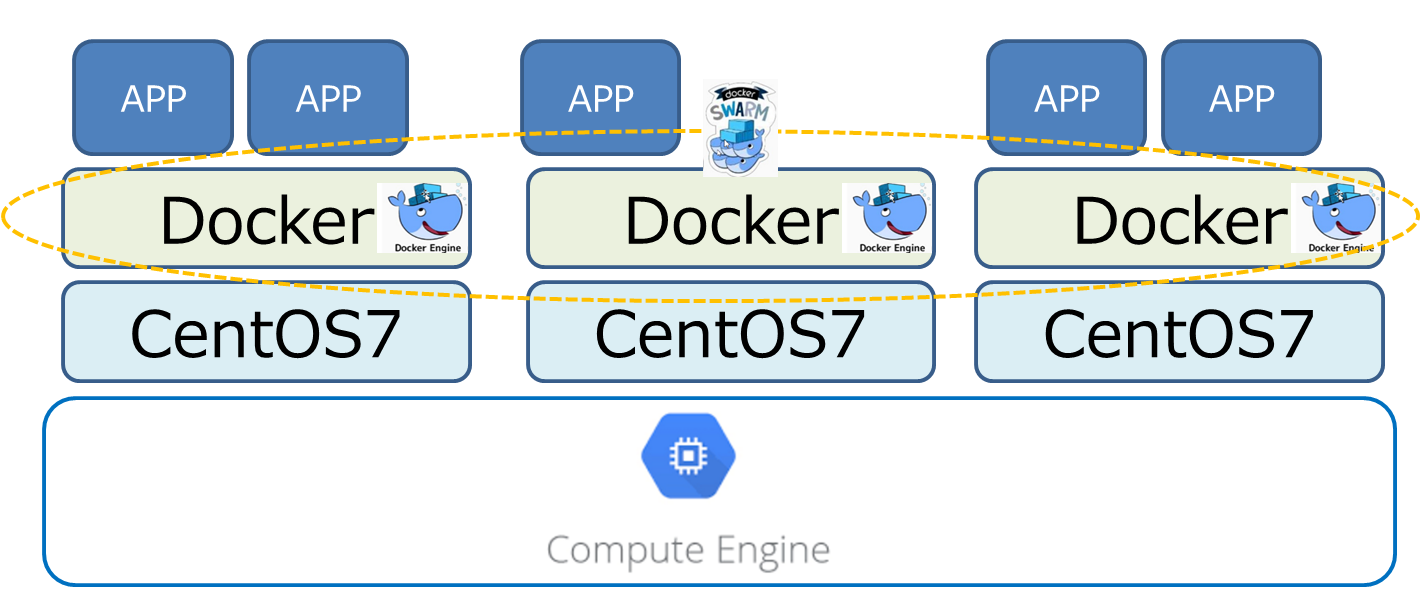
構成のポイントとしては
- GKE(Google Container Engine)じゃなくて敢えてGCE(Google Compute Engine)でCentOS7サーバを構築する(オンプレをイメージ)
- dockerはもちろんswarmモードでクラスタを構成する
- CentOS7サーバの構築など、GCPの操作はterraformで"Infrastructure as code"っぽく構築する
手順
前提条件
- GCPのアカウント登録は完了していること
- terraformのインストールが完了していること
手順概要
- terraformファイルを準備する
- terraformでCentOS7サーバ1台をGCEに構築
- dockerをインストール
- terraformで2台目、3台目のCentOS7サーバをでGCEに構築(dockerインストールもterraformで指示)
- dockerでswarm modeを構築(ここまではv1.12の機能)
- dockerで"stack deploy"を試す(v.1.13新機能)
- terraformでGCPのFireWallを設定する
- "stack deploy"でデプロイしたデモ用アプリの動作確認
- terraformで一括お片付け
手順詳細
1.terraformファイルを準備する
任意のディレクトリにterraform公式ドキュメントの"Google Provider"を参考に以下の3ファイルを準備します。
- 認証用のJSONファイル(GCPから取得)
- クレデンシャル、プロジェクト名、リージョンを記載する "google_cloud_provider.tf"
- 構築するサーバ構成を記載する "google_cloud_instanc1.tf"
※terraformは実行したパスの"*.tf"ファイルをすべて読み込んで処理をしてくれるため、ファイル名は任意で、かつ分割する必要はありませんが、わかりやすいので↑にしています
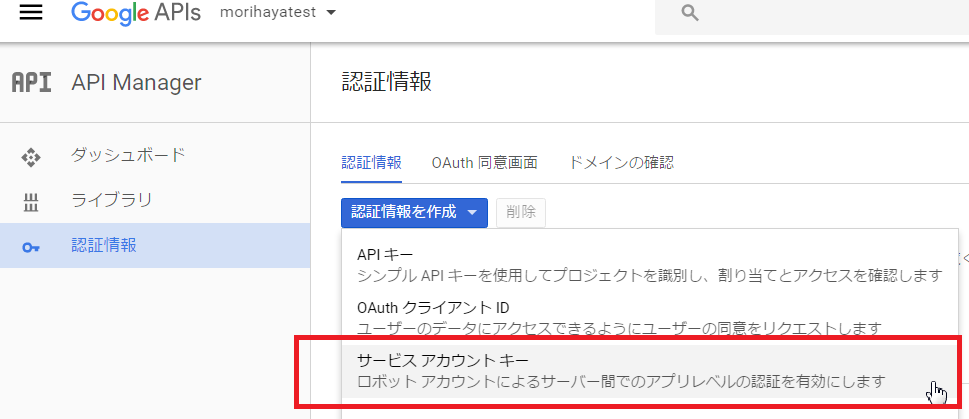
1.1 認証用のJSONファイルの取得
認証用のJSONファイルはGoogle Developers Consoleから簡単に取得できます。
以下のように「認証情報」→「サービスアカウントキー」をクリックします。
次の画面ではデフォルトのサービスアカウントをリストから選び、出力形式がJSONとなっていることを確認して「作成」をクリックします。
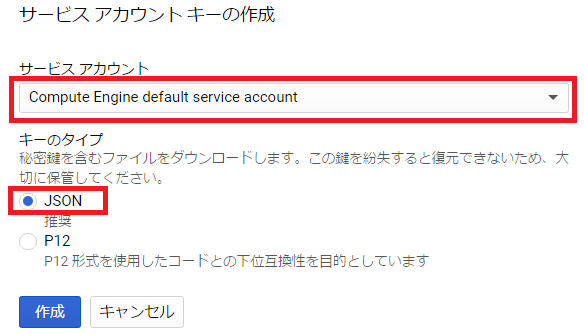
これで認証用のJSONファイルが取得できました。
1.2 クレデンシャル、プロジェクト名、リージョンを記載する "google_cloud_provider.tf" の作成
terraformのサンプルをそのまま流用して以下のように記載します。
// Configure the Google Cloud provider
provider "google" {
  credentials = "${file("morihayatest-hogehoge.json")}"
  project     = "morihayatest"
  region      = "us-central1"
}
※"jsonのファイル名"、"プロジェクト名"は環境ごとに変更してください。
1.3 構築するサーバ構成を記載する ***"google_cloud_instanc1.tf"***の作成
ここでもterraformのサンプルを流用して以下のように記載します。
resource "google_compute_instance" "centos7-01" {
  name         = "centos7-01"
  machine_type = "n1-standard-1"
  zone         = "us-central1-a"

  tags = ["terraform","test"]

  disk {
    image = "centos-cloud/centos-7"
  }

  // Local SSD disk
  disk {
    type    = "local-ssd"
    scratch = true
  }

  network_interface {
    network = "default"
    access_config {
      // Ephemeral IP
    }
  }

  metadata {
    foo = "bar"
  }

  metadata_startup_script = "echo hi > /test.txt"

  service_account {
    scopes = ["userinfo-email", "compute-ro", "storage-ro"]
  }
}
terraform docのサンプルから変更したのは以下の点
- resourceの2個めの引数を"default"から"centos7-01"へ(他のインスタンスと重複するとエラーになる)
- nameを"test"から"centos7-01"へ(これがホスト名になる)
- imageを”debian-8"から"centos-7"へ(普段CentOS使ってるから...)
※不必要な記述がいくつかありますが、とりあえず動かすのが目的のためスルー
2. terraformでCentOS7サーバ1台をGCEに構築
2.1 terrform planで定義のチェック
1で作成した3ファイルのあるディレクトリへターミナルで移動し、以下を実行します
terraform plan
エラーがなければ以下のような出力になります。最後の"Plan: 1 to add, 0 to change, 0 to destroy."を確認できればOKです。
$ terraform plan
Refreshing Terraform state in-memory prior to plan...
The refreshed state will be used to calculate this plan, but
will not be persisted to local or remote state storage.


The Terraform execution plan has been generated and is shown below.
Resources are shown in alphabetical order for quick scanning. Green resources
will be created (or destroyed and then created if an existing resource
exists), yellow resources are being changed in-place, and red resources
will be destroyed. Cyan entries are data sources to be read.

Note: You didn't specify an "-out" parameter to save this plan, so when
"apply" is called, Terraform can't guarantee this is what will execute.

+ google_compute_instance.default
    can_ip_forward:                                      "false"
    disk.#:                                              "2"
    disk.0.auto_delete:                                  "true"
    disk.0.image:                                        "centos-cloud/centos-7"
    disk.1.auto_delete:                                  "true"
    disk.1.scratch:                                      "true"
    disk.1.type:                                         "local-ssd"
    machine_type:                                        "n1-standard-1"
    metadata.%:                                          "1"
    metadata.foo:                                        "bar"
    metadata_fingerprint:                                "<computed>"
    name:                                                "centos7-01"
    network_interface.#:                                 "1"
    network_interface.0.access_config.#:                 "1"
    network_interface.0.access_config.0.assigned_nat_ip: "<computed>"
    network_interface.0.address:                         "<computed>"
    network_interface.0.name:                            "<computed>"
    network_interface.0.network:                         "default"
    self_link:                                           "<computed>"
    service_account.#:                                   "1"
    service_account.0.email:                             "<computed>"
    service_account.0.scopes.#:                          "3"
    service_account.0.scopes.1632638332:                 "https://www.googleapis.com/auth/devstorage.read_only"
    service_account.0.scopes.2428168921:                 "https://www.googleapis.com/auth/userinfo.email"
    service_account.0.scopes.2862113455:                 "https://www.googleapis.com/auth/compute.readonly"
    tags.#:                                              "2"
    tags.3632233996:                                     "test"
    tags.969816526:                                      "terraform"
    tags_fingerprint:                                    "<computed>"
    zone:                                                "us-central1-a"


Plan: 1 to add, 0 to change, 0 to destroy.
2.2 terrform applyでサーバデプロイ
実際にGCE上にサーバを構築します。
terraform apply
terraform plan実行時とほとんど同じようなログが出力されます。
$ terraform apply
google_compute_instance.default: Creating...
  can_ip_forward:                                      "" => "false"
  disk.#:                                              "" => "2"
  disk.0.auto_delete:                                  "" => "true"
  disk.0.image:                                        "" => "centos-cloud/centos-7"

~~~~省略~~~

google_compute_instance.default: Still creating... (10s elapsed)
google_compute_instance.default: Still creating... (20s elapsed)
google_compute_instance.default: Creation complete

Apply complete! Resources: 1 added, 0 changed, 0 destroyed.

The state of your infrastructure has been saved to the path
below. This state is required to modify and destroy your
infrastructure, so keep it safe. To inspect the complete state
use the `terraform show` command.

State path: terraform.tfstate
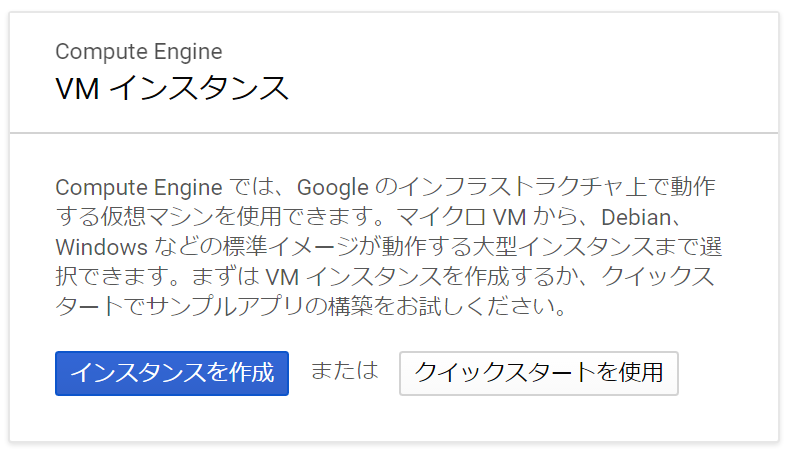
GCPのコンソールにログインし、左上のハンバーガメニュー('三'みたいなボタン)から「Compute Engine」を選択します。
問題がなければサーバーが1台起動していることを確認できます。

3. dockerをインストール
起動したサーバへdockerをインストールします。
3.1 サーバへログイン
GCPコンソールの"SSH"ボタンをクリックすることで、サーバへログインすることができます。
(このログインの簡単さに感動しました)
3.2 レポジトリ登録
ここからはdocker公式ドキュメントに従ってインストールをしてきます。
各ディストリビューション用に、丁寧に手順が記載されていますが、ここでは最低限必要なコマンドだけ抜粋します。
# レポジトリ登録のための"yum-utils"をインストール
sudo yum install -y yum-utils

# レポジトリ登録
sudo yum-config-manager \
    --add-repo \
    https://docs.docker.com/engine/installation/linux/repo_files/centos/docker.repo
3.3 dockerインストール
yumであっさりインストールできます。
sudo yum -y install docker-engine
3.4 docker起動
インストール後は停止しているため、起動します。
sudo systemctl start docker
3.5 docker起動確認
基本のバージョン確認と、"hello world"を実行します。
# バージョン確認
sudo docker --version
→"Docker version 1.13.1, build 092cba3"

# hello world
sudo docker run hello-world
→"Unable to find image 'hello-world:latest' locally"と出て、docker HUBからイメージを取得します。
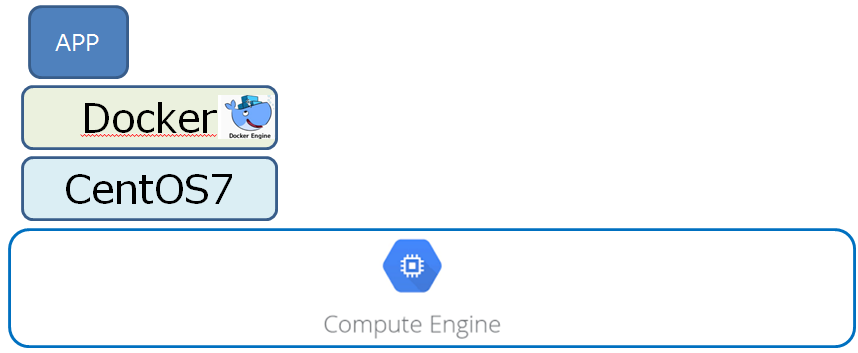
ここまでで以下の構成になりました。(hello-worldがappなのかというツッコミは無しで...)
4. terraformで2台目、3台目のCentOS7サーバをでGCEに構築(dockerインストールもterraformで指示)
4.1 terraformファイルの準備
引き続き2台目、3台目のサーバを構築していきますが、dockerのインストールを都度やるのは面倒です。
そこで一工夫として"metadata_startup_script"を活用します。
"metadata_startup_script"に指定されたコマンドはサーバ起動時に実行されるため、dockerインストールのための一連のコマンドを記載しておくことで、構築の自動化を図ります。
また、2台目、3台目の固有値であるホスト名などの部分を変更します。
resource "google_compute_instance" "centos7-02" {
  name         = "centos7-02"

~~~省略~~~

  metadata_startup_script = "yum install -y yum-utils ; yum-config-manager --add-repo https://docs.docker.com/engine/installation/linux/repo_files/centos/docker.repo ; yum -y install docker-engine ; systemctl start docker"

~~~省略~~~
※おそらく、metadata_startup_scriptは使い方次第で無限の可能性がありそうです。GCSからスクリプト取ってきて構築自動化とかしたらステキ
上記の変更をしたterraformファイルを既存のディレクトリへ配置します。
- google_cloud_provider.tf
- google_cloud_instanc1.tf
- google_cloud_instanc2.tf ←★NEW
- google_cloud_instanc3.tf ←★NEW
4.2 terraformでデプロイ
1台目を作成した時と同じ手順でサーバを構築していきます。
terraform plan
→"Plan: 2 to add, 0 to change, 0 to destroy."を確認

terraform apply
→"Apply complete! Resources: 2 added, 0 changed, 0 destroyed."を確認
4.3 dockerインストールを確認
2台目、3台目のサーバにsshログインし、dockerがインストールされているかを確認します。
sudo docker --version
→問題なくバージョンが表示されることを確認
ここまでで以下の状態になりました。
5. dockerでswarm modeを構築(ここまではv1.12の機能)
いよいよdocker swarm modeでクラスタを構築していきます。
ここでもdocker公式のチュートリアルに従いますが、さすがワールドワイドなプロダクトはドキュメントがしっかりしていると感心します。
5.1 swarm managerサーバでswam mode開始
swarm modeを開始するために、1台のサーバをマネージャとして初期化します。
マネージャ作成時にその他のワーカーサーバと通信するためのIPを指定します。
# ip確認
ip a
→他サーバと通信可能なIPを確認 "10.128.xxx.xxx/32"

# swam managerの開始
sudo docker swarm init --advertise-addr 10.128.xxx.xxx
コマンドが成功すると、他のワーカーサーバで実行するためのコマンドが出力されます。
$ sudo docker swarm init --advertise-addr 10.128.0.2
Swarm initialized: current node (hogehoge) is now a manager.

To add a worker to this swarm, run the following command:

    docker swarm join \
    --token hogehoge-fugafuga \
    10.128.xxx.xxx:2377

To add a manager to this swarm, run 'docker swarm join-token manager' and follow the instructions.
5.2 swarm wokerサーバをswarmへ参加
swarmにワーカーサーバを参加させますが、折角なのでマネージャサーバでモニタします。
sudo watch -n 1 docker node ls
ID                           HOSTNAME    STATUS  AVAILABILITY  MANAGER STATUS
hogehogehogehogehogehogeh *  centos7-01  Ready   Active        Leader
→"swarm init"直後はマネージャの1台のみ
swarm init時に出力されたコマンドを、他のサーバで実行します。
※sudoを付けるのをお忘れなく
sudo docker swarm join \
--token hogehoge-fugafuga \
10.128.xxx.xxx:2377
→"This node joined a swarm as a worker."
joinコマンドを実行するびにサーバが増えて行きます
ID                           HOSTNAME    STATUS  AVAILABILITY  MANAGER STATUS
hogehogehogehogehogehogeh *  centos7-01  Ready   Active        Leader
fugafugafugafugafugafugaf    centos7-02  Ready   Active
mogemogemogemogemogemogem    centos7-03  Ready   Active
5.3 swarmへサービスをデプロイ
いよいよswarmへサービスをデプロイします。
swarmによるサービスの拡縮をモニタするために、マネージャサーバで以下を実行します。
sudo watch -n 1 docker service ps helloworld
→デプロイ前のため"Error: No such service: helloworld"と出ます
いよいよデプロイです
sudo docker service create --replicas 1 --name helloworld alpine ping docker.com
以下のように出力されます
ID            NAME          IMAGE          NODE        DESIRED STATE  CURRENT STATE          ERROR  PORTS
hogehogehoge  helloworld.1  alpine:latest  centos7-01  Running        Running 9 seconds ago
スケールアップしてみましょう
sudo docker service scale helloworld=5
1秒もしないでスケールアップします。
ID            NAME          IMAGE          NODE        DESIRED STATE  CURRENT STATE          ERROR  PORTS
hogehogehoge  helloworld.1  alpine:latest  centos7-01  Running        Running 5 minutes ago
fugafugafuga  helloworld.2  alpine:latest  centos7-02  Running        Running 7 seconds ago
mogemogemoge  helloworld.3  alpine:latest  centos7-01  Running        Running 8 seconds ago
nuganuganuga  helloworld.4  alpine:latest  centos7-03  Running        Running 7 seconds ago
moemoemoemoe  helloworld.5  alpine:latest  centos7-02  Running        Running 8 seconds ago
続いてスケールダウンしてみましょう
sudo docker service scale helloworld=2
あっさりスケールダウンします
ID            NAME          IMAGE          NODE        DESIRED STATE  CURRENT STATE          ERROR  PORTS
fugafugafuga  helloworld.2  alpine:latest  centos7-02  Running        Running 5 minutes ago
mogemogemoge  helloworld.3  alpine:latest  centos7-01  Running        Running 5 minutes ago
5.3 swarmからサービスを削除
公式チュートリアルではホストメンテナンスや、ローリングアップデートの手順もありますが、一旦は満足したのでサービスを停止します。
sudo docker service rm helloworld
ここまでで、ついに目指した構成が出来上がりました。
6. dockerで"stack deploy"を試す(v.1.13新機能)
いよいよdocker v1.13の新機能"stack deploy"を試します。
v1.13の新機能は"stack deploy"だけではないですが、目玉であることは間違い無いでしょう。
"stack deploy"コマンドでは、compose fileを使用してswarm modeへサービスをデプロイすることができます。
6.1 デモ用アプリのダウンロード
dockerの定番(?)のデモ用アプリがGitHubで公開されているため、ダウンロードします。
# gitをインストール
sudo yum install -y git

# デモ用アプリのダウンロード
git clone https://github.com/docker/example-voting-app.git
このアプリは以下の構成となっているそうです。
- TCP5000番で投票画面(voting-app)
- TCP5001番で結果画面(result-app)

折角なのでcompose fileを確認します。
# デプロイ用のファイルを確認
cd example-voting-app/
cat docker-stack.yml
example-voting-appリポジトリには従来のcompse fileも格納されているため、stack用のcompose fileと見比べることができます。
どうやらstack用のcompose fileには以下のパラメタが追加されているようです。
- replicas
- parallelism
6.2 デモ用アプリのデプロイ
デプロイの動きを確認するために、マネージャサーバで以下を実行しておきます。
sudo watch -n 1 docker service ls
sudo watch -n 1 docker stack ps vote
v1.13新機能、***「stack deploy」***コマンドで、マネージャサーバからデプロイを実行します。
sudo docker stack deploy --compose-file docker-stack.yml vote
もりもりとサービスが起動していくことを確認します。
# docker service lsの結果
ID            NAME             MODE        REPLICAS  IMAGE
hogehogehoge  vote_redis       replicated  2/2       redis:alpine
fugafugafuga  vote_vote        replicated  2/2       dockersamples/examplevotingapp_vote:before
nuganuganuga  vote_worker      replicated  1/1       dockersamples/examplevotingapp_worker:latest
mogemogemoge  vote_db          replicated  1/1       postgres:9.4
moemoemoemoe  vote_visualizer  replicated  1/1       dockersamples/visualizer:stable
hobihobihobi  vote_result      replicated  1/1       dockersamples/examplevotingapp_result:before

# docker stack ps voteの結果
ID            NAME               IMAGE                                         NODE        DESIRED STATE  CURRENT STATE          ERROR  PORTS
hoehoehoehoe  vote_worker.1      dockersamples/examplevotingapp_worker:latest  centos7-01  Running        Running about a minute ago
fuefuefuefue  vote_result.1      dockersamples/examplevotingapp_result:before  centos7-01  Running        Running about a minute ago
muomuomuomuo  vote_vote.1        dockersamples/examplevotingapp_vote:before    centos7-03  Running        Running 2 minutes ago
jojojojojojo  vote_db.1          postgres:9.4                                  centos7-01  Running        Running about a minute ago
gogogogogogo  vote_redis.1       redis:alpine                                  centos7-03  Running        Running 2 minutes
7. terraformでGCPのFireWallを設定する
アプリが立ち上がったところで、早速接続確認をしたくなりますが、このままでは接続できません。
GCPのインスタンスは、基本的に外部からのアクセスを許可していないため、FireWall(以後FW)の設定が必要です。
7.1 FW用terraformファイルの準備
ここでもterraformを使ってFWの設定を行います。(GUIを使ったらInfrastructure as codeじゃないからです)
サンプルに従ってgoogle_compute_firewall.tfを作成します。
resource "google_compute_firewall" "default" {
  name    = "example-voting-app"
  network = "default"

  allow {
    protocol = "icmp"
  }

  allow {
    protocol = "tcp"
    ports    = ["5000-5001"]
  }

  source_ranges = ["0.0.0.0/0"]
  target_tags = ["terraform"]
}
サンプルからの変更ポイントとしては以下の通りです。
- nameをわかりやすく
- networkは"default"に
- portsはアプリが使う5000と50001
- source_rangesでany(0.0,0.0/0)を指定
7.2 FWの設定をデプロイ
適用手順はサーバ構築時と同じです。
terraform plan
→"Plan: 1 to add, 0 to change, 0 to destroy."を確認

terraform apply
→"Apply complete! Resources: 1 added, 0 changed, 0 destroyed."を確認
7.3 FWの設定をGCPコンソールで確認
ハンバーガメニューから「ネットワーキング」→「ファイアウォールルール」を選択し、"example-voting-app"ルールが作成されていることを確認します。

8. "stack deploy"でデプロイしたデモ用アプリの動作確認
いよいよアプリに接続します。
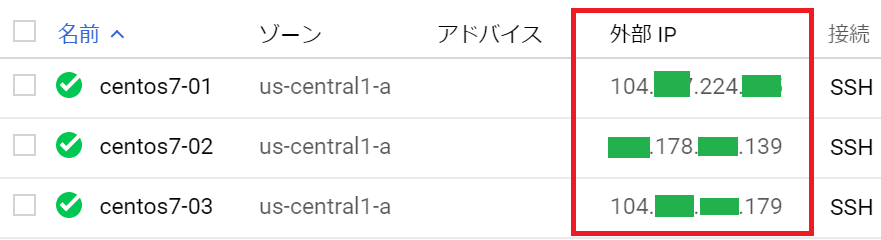
8.1 GIPの確認
ハンバーガメニューから「Compute Engine」から、各サーバのGIPを確認します。
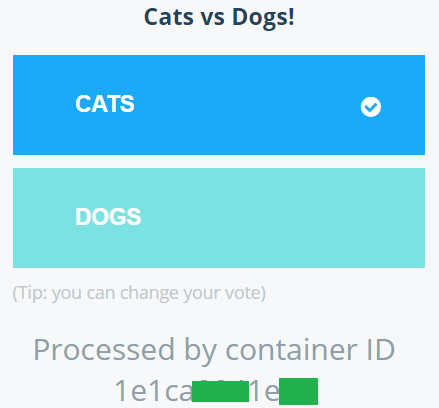
8.2 接続!そして投票!
お手持ちのブラウザで"GIP:5000"へ接続します。
以下を確認しましょう。
- サーバ3台のどのGIPからでも接続できる ←これ重要
- リロードでコンテナのIDが変わる ←これも重要
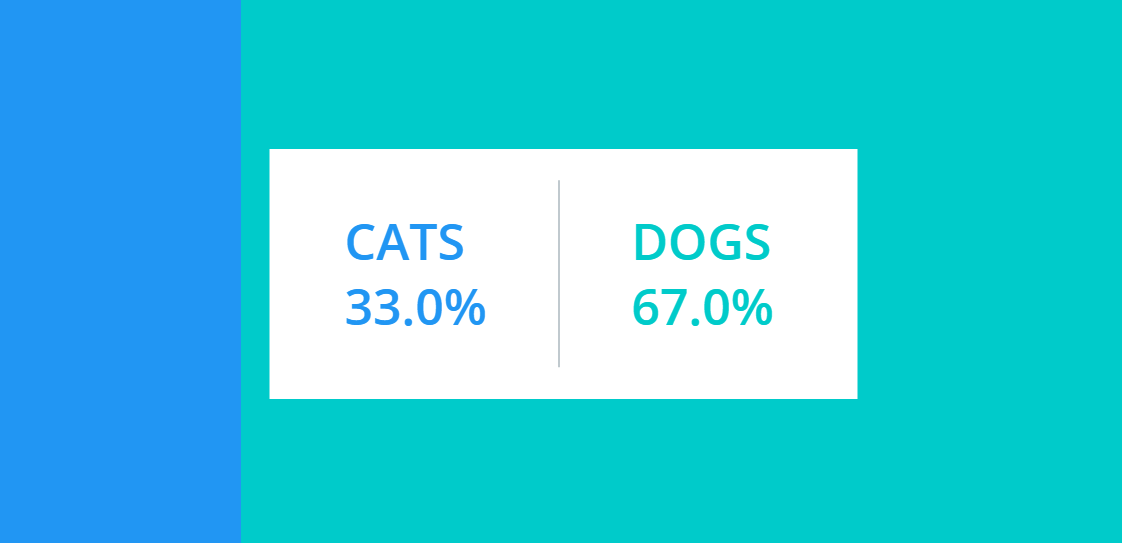
8.3 結果確認
つづいて5001番へ接続して投票結果を確認します。
(ブラウザのキャッシュクリアをして複数回投票しないと、結果としては面白くないかもしれません)
8.4 docker swarm modeのIngress overlay networkを体感する
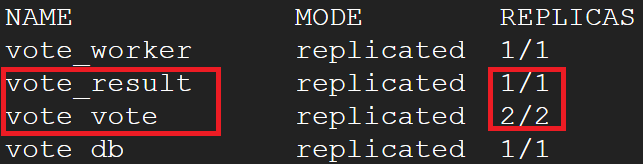
3台全てのGIPへの接続で、投票画面も結果画面を確認した後は、"docker service ls"の表示を落ち着いて見ます。
「voteは2つ、resultは1つしかない」→「しかし、全てのGIPからアクセスが可能だった」
Docker 1.12: swarm モードと Ingress Load Balancing 概要から以下の図を引用します。
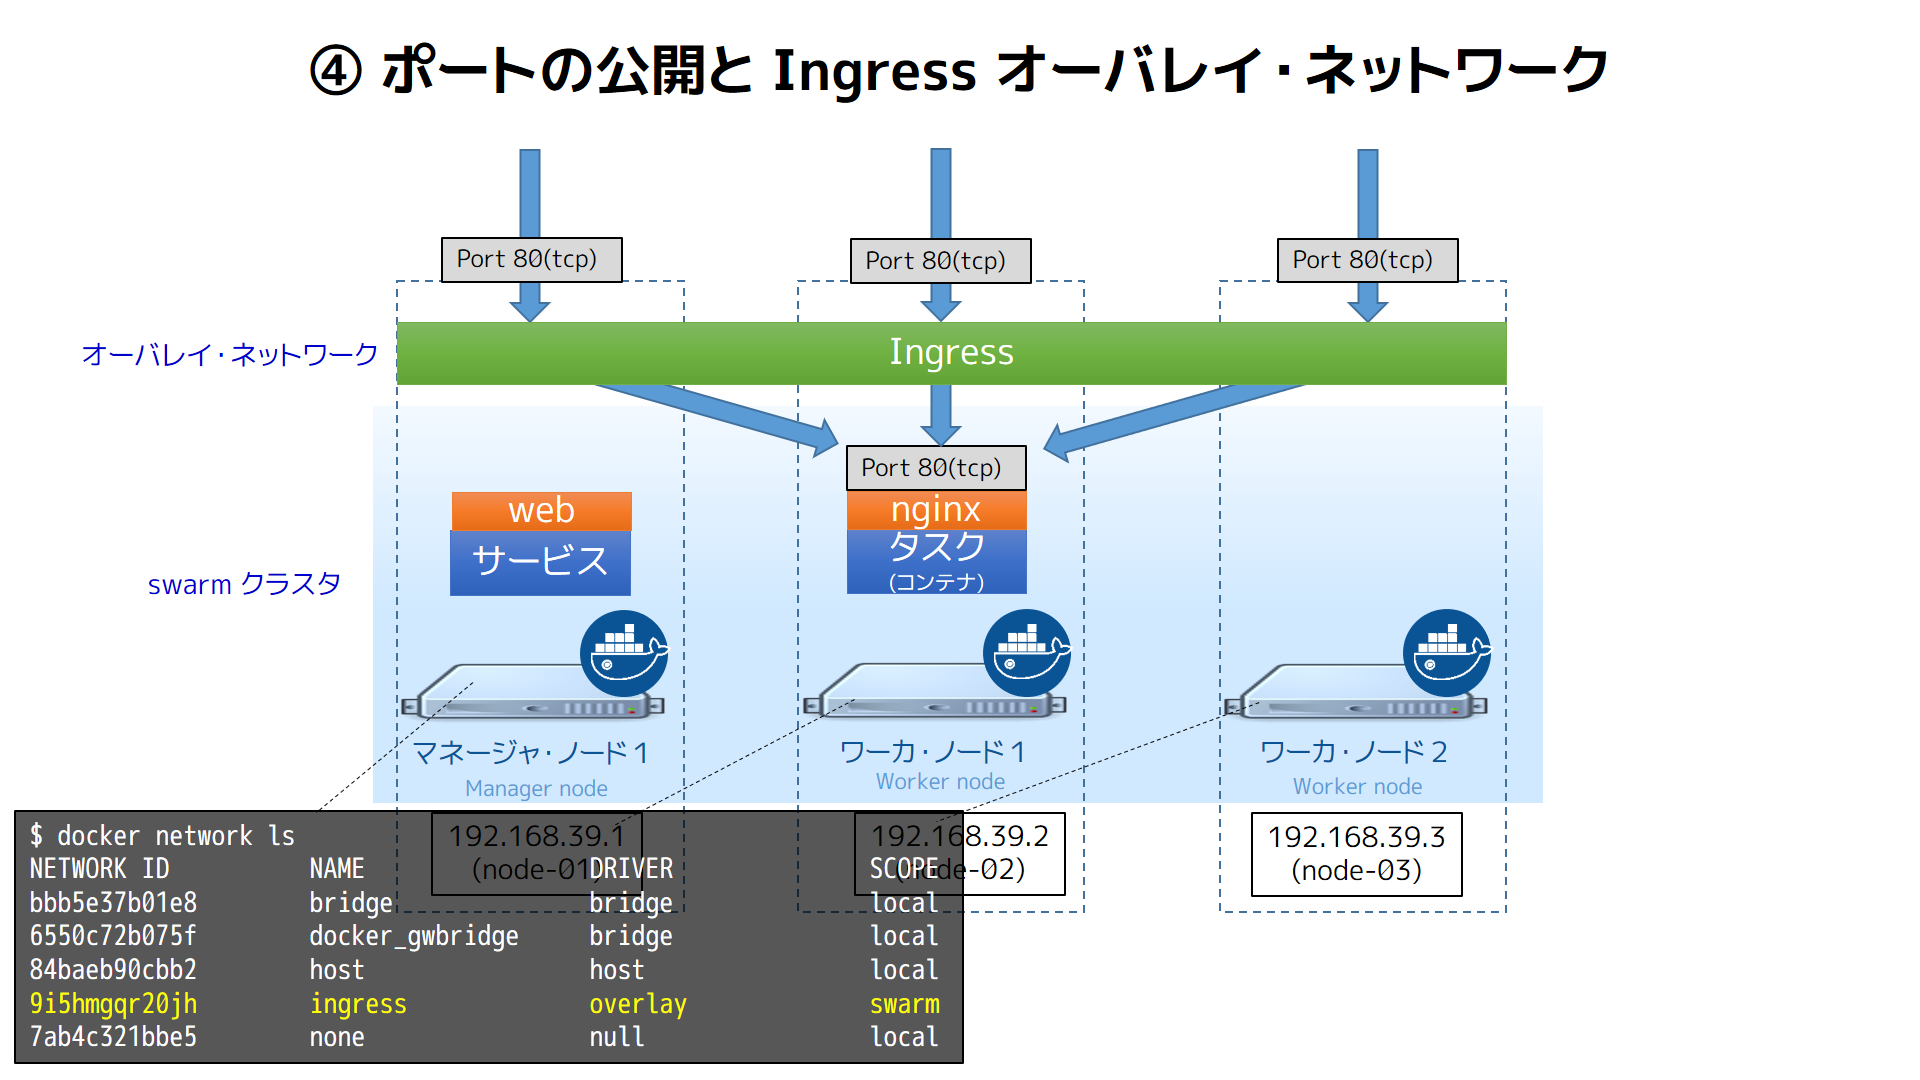
どうやらdockerが上手いことをやってくれているようです。(小並感)
詳細は引用元のPocketstudio Technology Logの記事を御覧ください。
他にも素晴らしい技術記事が掲載されています。
9. terraformで一括お片付け
一通りの検証が終わったので、立ち上げたサーバ群を停止します。
sudo docker stack rm voteを実行してdockerのサービスを停止し、GCPコンソールからポチポチサーバを削除する、なんて面倒なことはしません。
terraformから以下のコマンドを投入するだけで、お片付けが完了します。
terraform destroy
確認のためのプロンプトが表示されるため、"yes"と入力します。
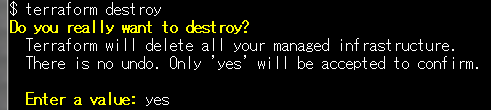
Destroy complete! Resources: 4 destroyed.と表示されたことを確認してください。
万が一消し忘れがあってはお財布的に危険ですので、GCPのコンソールからも削除されていないサーバが無いことを確認します。
ハンバーガメニューから「Compute Engine」を選択し、初期画面であることを確認すれば、作業は完了となります。
参考
- 前佛さんのプレゼン(Dockerの面白さを教えてくれた)
- https://www.slideshare.net/zembutsu/ のdocker系スライド(前佛さん資料の作り込みは本当にすごい)
- https://pocketstudio.net/2016/06/23/docker-1-12-swarm-mode-and-ingress-load-balancing/ (ここも前佛さん...)
- https://www.terraform.io/docs/providers/google/index.html
- https://www.terraform.io/docs/providers/google/r/compute_instance.html
- https://www.terraform.io/docs/providers/google/r/compute_firewall.html
- https://docs.docker.com/engine/installation/linux/centos/
- https://docs.docker.com/engine/swarm/swarm-tutorial/
- https://blog.docker.com/2017/01/whats-new-in-docker-1-13/
- https://github.com/docker/example-voting-app.git
- https://cloudplatform-jp.googleblog.com/